101-Mile Kitchen logo- green bar
Jars of garlic confit next to autumn vegetables.

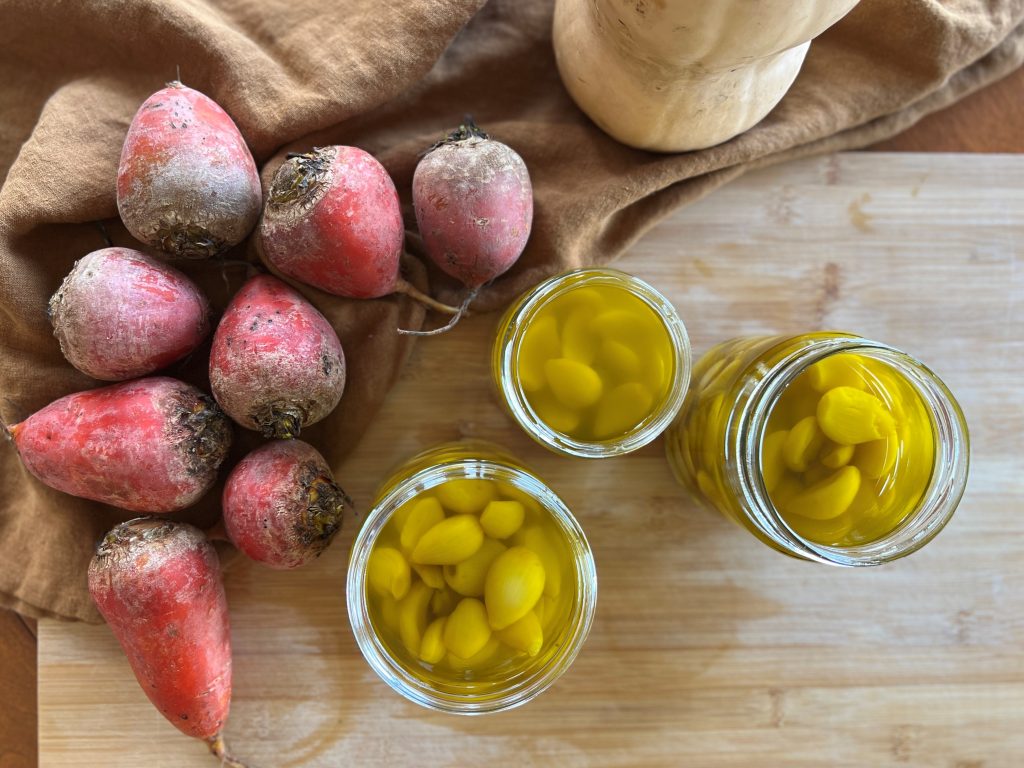
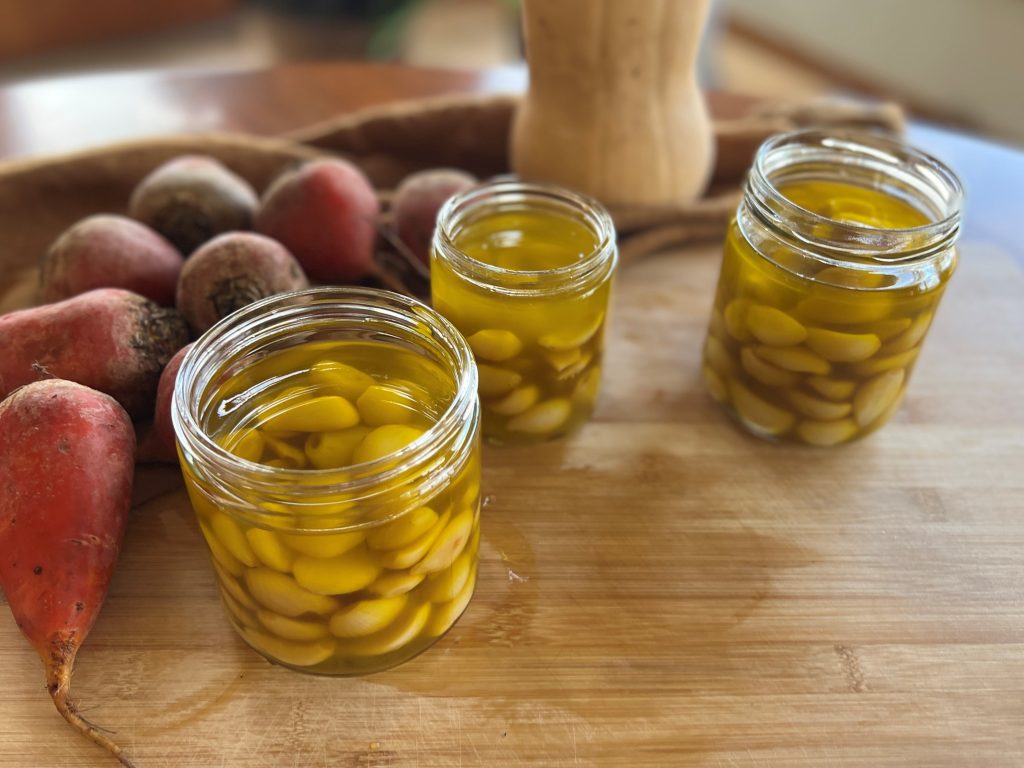
I encourage you to make garlic confit, the wonderful kitchen workhorse that amplifies so many other fall and winter ingredients. It is so easy to do. The soft cloves and/or flavored oil can go into anything that you would otherwise use garlic in. The slow cooked cloves are much more tame than raw garlic, making them enjoyable for people who want the flavor of garlic without the bite. 

Use garlic confit as a pasta sauce or pizza base layer by smashing the softened cloves into some of the oil. The same treatment makes great garlic bread or toast. I sauté or roast vegetables, chicken, fish, or shrimp in garlic confit. Use a spoonful to top a pan-seared steak or chicken. The oil alone is great in a homemade vinaigrette like this. The cloves alone are perfect on a cheese or charcuterie platter, or alongside a sandwich. 

Jars of galric confit next to autumn beets.

What is Confit?

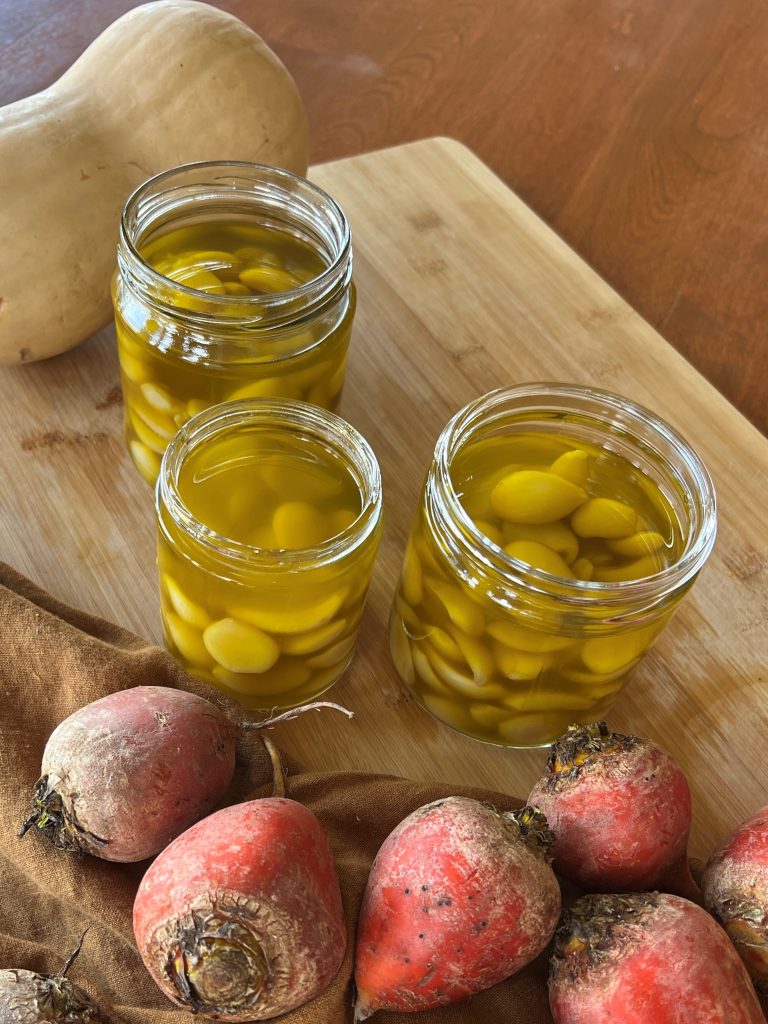
Confit is a French word meaning to preserve. Vegetables or meats that are preserved in fats or oils, or fruits preserved in sugar syrups are considered confit.

While I won’t take a shortcut in buying broth and stock, I do use pre peeled garlic. I buy the three-pound bags of organic pre-peeled garlic at Costco, and use about half of it to make many jars of garlic confit. I use the rest in my day to-day cooking.

Three jars of garlic confit.

How Should I Use My Garlic Confit?

Here's a brief list of delicious ways to use garlic confit:

  • Smash some of the garlic cloves into some of the oil and spread it on bread for quick and easy garlic toast.
  • Smash some together and use is at a simple pizza sauce base. Add your other toppings and bake!
  • Spoon confit garlic cloves into a small dish and put on your next charcuterie and cheese board.
  • Saute any vegetable in a spoonful or two of the oil and cloves. Carrots, peas, broccoli and broccoli rabe, greens like kale, chard, and collards are especially great this way.
  • Add extra flavor to roasted vegetables. Add spoonsful of garlic confit to a sheet pan of chopped winter vegetables-- cabbage chunks, cauliflower, peppers, onions, parsnips, turnips, carrots-- and roast at 425° until done.
  • Use garlic confit instead of butter in mashed potatoes and/or mashed celeriac.
  • Add a layer of flavor to your stews from the beginning by searing meats and vegetables in garlic confit first.
  • Use the oil and some chopped garlic cloves from your confit jar to your next vinaigrette.
  • Pan sear steaks or chicken pieces in garlic confit.
  • Add some of the oil and chopped cloves to cooked rice and other grains and beans.
Jars of freshly made garlic confit.

Garlic Confit

Course: Condiments
Cuisine: French
Season: All Season
Cook Time: 2 minutes
Total Time: 2 minutes
Author: Pam Spettel
Garlic confit is a springboard to better cool-weather cooking. Use the tender cooked garlic cloves and flavored oil as a condiment or seasoning to breads, meats, and vegetables, and use the garlic-flavored oil as a start to phenomenal sautees, sauces, and vinaigrettes.
Print Recipe

Equipment

  • Paring knife
  • Stainless steel saucepan

Ingredients

  • Peeled fresh garlic cloves
  • Good quality extra virgin olive oil

Instructions

  • Use a paring knife to rim away the stem end or any blemishes from the peeled garlic cloves. Then place the peeled blemish-free cloves in a saucepan (as many as you want), cover with olive oil, and put a lid on it. Make sure the cloves are covered by at least 1/4 inch of oil.
  • From here you have two choices: set the saucepan into a 250° oven for two hours, or set it on low heat on your cooktop for about the same amount of time. Gently stir the garlic in the oil every 30 minutes to keep them from browning. Moderate your heat as needed to gently cook the garlic. The aim is to soften the garlic cloves, not to toast or roast them. You will know they are ready when the oil has grown deeply golden and the garlic cloves are fork-tender and somewhat translucent.
  • Garlic confit is best stored in tightly sealed jars in your refrigerator. The refrigerated oil will thicken and become cloudy. It will return to its beautiful liquid-gold self when set out for about 30 minutes, or you can scoop some out and place it in a dish in a warm spot to hurry it along.
  • After scooping some out to use, make sure that any garlic cloves that are exposed get covered in oil. If there isn’t enough in the jar for that, simply drizzle in a little more from your day-to-day bottle. The oil creates a seal over the garlic cloves that preserves your jar of gold.
Cowboy sloppy joes on a platter with beans.

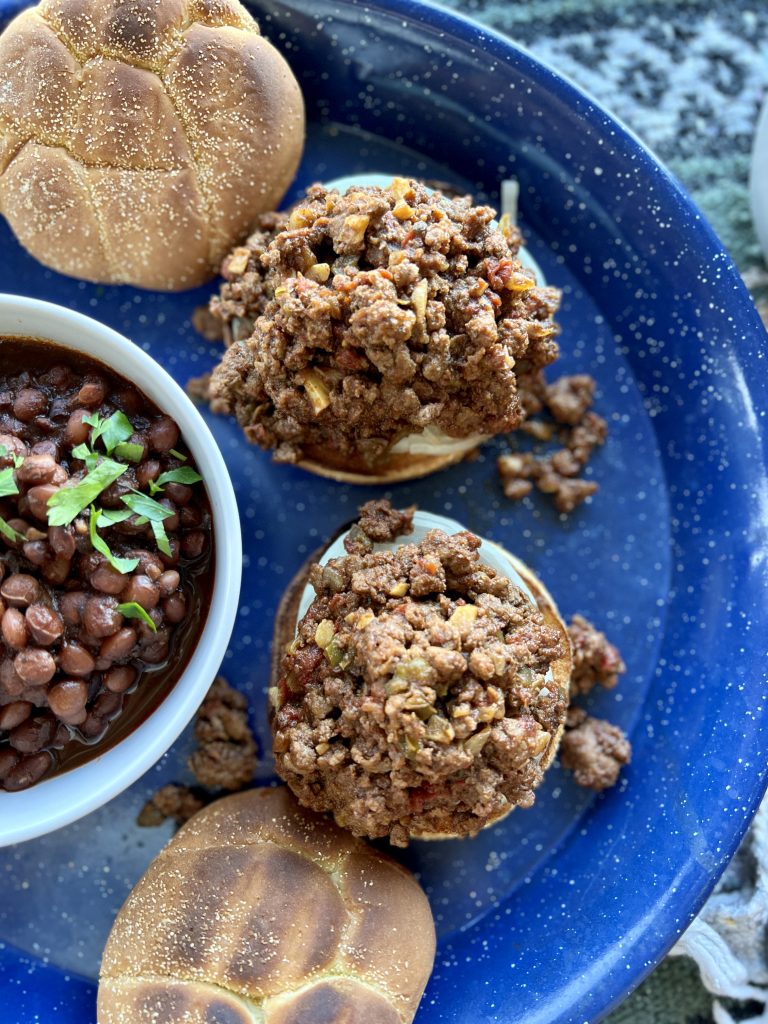
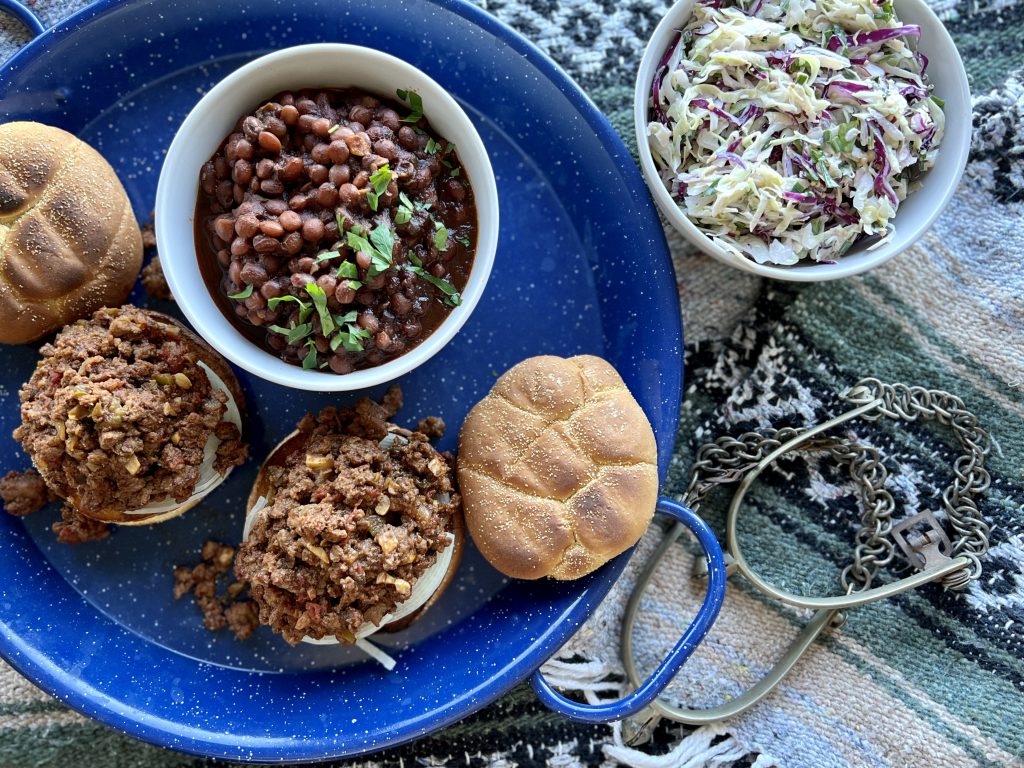
Howdy, cowboys and cowgirls! Chuckwagon Cookie here to share some pretty decent grub for summer fun. Cowboy Sloppy Joes, made with ground beef, smoky seasonings, and a little beer (non-alcoholic is my choice) are a great way to make some summer fun.

Make Cowboy Sloppy Joes when you gather around a crackly campfire, searching for Cassiopeia or the Summer Triangle. Try imagining what it might have been like to have worked the herd that day, or pretend to be making your way west on the Oregon Trail. Or simply take a pot of Cowboy Sloppy Joes with you to campouts, or make them for backyard gatherings. Ravenous kids will love these after jumping out of the pool or lake, when they get home from day camps, or when they come in off of the slip-and-slide.

Cowboy sloppy joes on a platter with beans, next to spurs.

Make no mistake in thinking these are just for kids, however. My dear friends Holly and Chris celebrate the end of the week by having themed Friday night mini-parties. They prove to me all the time that it's not that hard to have some simple grown-up fun.

Take a page from Holly and Chris's playbook and plan a fun summer evening! For a menu of Cowboy Sloppy Joes, Cowboy Beans (click for the video recipe), and coleslaw, your attire might include a red bandana and a cowboy hat. Play a little Hank Williams or John Prine. Follow dinner up with an episode or two of 1883. You are not too old to create this kid of fun for yourself!

cowboy sloppy joes, cowboy beans on a platter.

Making Cowboy Sloppy Joes

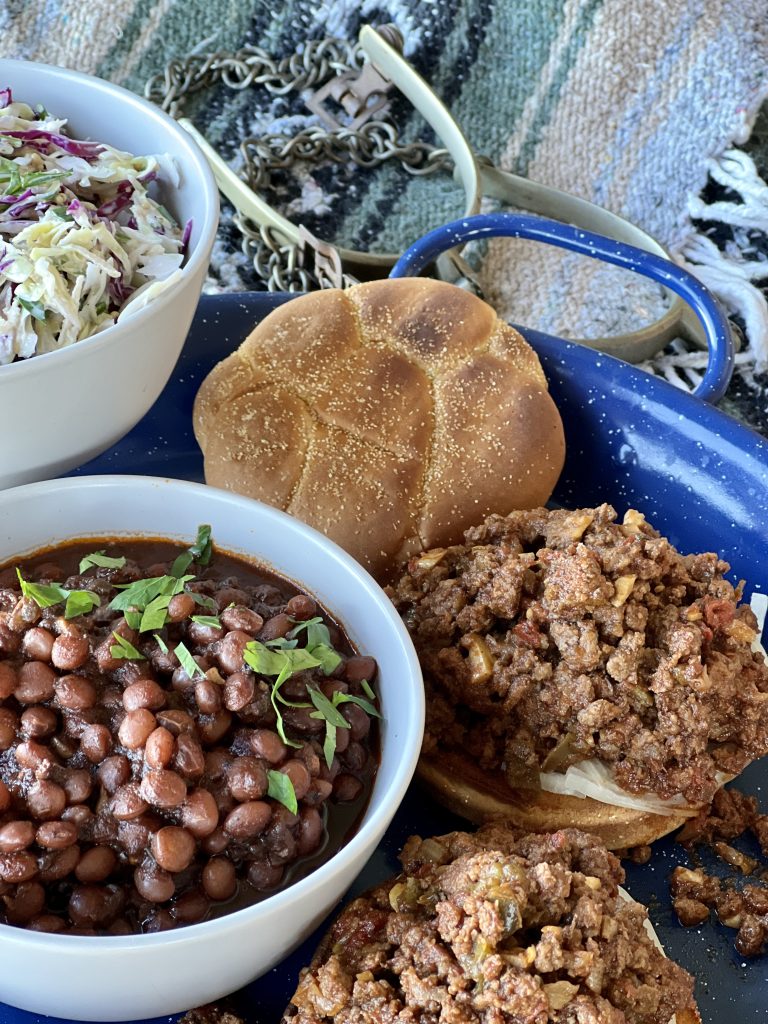
You'll notice that this recipe is scaled to feed six. This diverts from my new focus of developing recipes for smaller households, and here is why. I've packaged these up for the freezer in two-serving containers, which is handy in the summer when you've been out playing or just don't want to turn on the range. The sloppy joe mixture warms easily in the microwave or in a small saucepan. Besides, when the grandkids are coming over or you have that backyard cowboy party, you are all set for a slightly larger crowd.

Another Hearty, Quick Ground Beef Recipe

Cheap, Quick + Easy 20-minute Beefy Spinach Burritos

If you enjoy this recipe, please give it a green star rating on the recipe card below. That will help others find it too. If you make the recipe, please show us and tag 101-Mile Kitchen on Facebook and Instagram! (It's a total thrill when I hear you've made my recipes!) And as always, your questions and feedback in the comments is welcome and appreciated.

Cowboy Sloppy Joes on a platter with cowboy beans

Cowboy Sloppy Joes

Course: Main Dish, Quick + Easy
Cuisine: American
Season: All Season
Dietary: Dairy-Free, Gluten-Free
Preparation: Fast + Easy, One Pot/One Pan
Total Time: 25 minutes
Servings: 6
Author: Pam Spettel
Tell stories around the campfire while enjoying chuckwagon-style Cowboy Sloppy Joes. This is how summer memories are made.
Print Recipe

Ingredients

  • lbs. ground beef
  • 1 small onion, finely diced
  • 1 small red or green bell pepper, finely diced
  • 5 cloves garlic, finely chopped
  • 2 tespoons ground cumin
  • 1 tablespoon smoked paprika
  • 2 tablespoons brown sugar
  • 2 tablespoons chipotle pepper in adobo sauce, canned
  • 1 12 oz. can beer, any kind, regular or non-alcoholic or 12 oz. water plus 1 additional tablespoon apple cider vinegar
  • 1 14.5 oz. can diced tomatoes
  • 1 tablespoon apple cider vinegar

Instructions

  • In a heavy skillet over medium-high heat, brown the ground beef until the pink is gone. Add the onion, bell pepper, and garlic and continue to cook until the onion is translucent and soft. Stir, scraping the bottom of the pan, regularly.
  • Add the cumin, smoked paprika, and brown sugar and stir in. Cook about 1 minute to activate the spices. Add the chipotle in adobo, beer, diced tomatoes and their juices, and apple cider to the mix, scraping the spices from the bottom of the pan. Bring to a boil, and then drop the heat to a gently simmer to reduce and thicken the sauce and allow the flavors to bloom together, about 10 minutes.
  • Serve the sloppy Joe mixture on toasted buns with any condiments you prefer. (We like ours with some thinly sliced onion nothing else.)

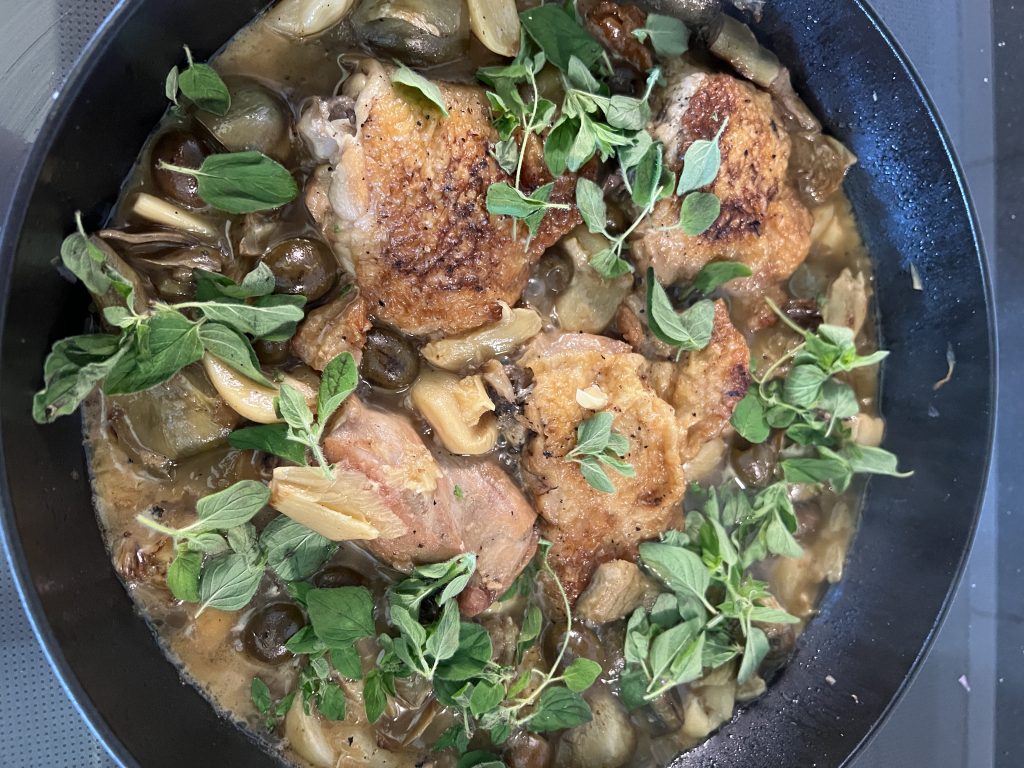
Mediterranean Artichoke Chicken is one of those recipes you'll go to again and again. Make it once and you'll love it for its silky sauce, fork-tender chicken, and utter simplicity. Everything comes together in one skillet, yet it is light and so so delicious.

Mediterranean Artichoke Chicken skillet.

Making the Mediterranean Chicken + Artichokes

First, this may look or sound like a challenging recipe, but it is not. The steps are easy to work through:

  • Brown the chicken in a pan.
  • In the same pan, brown the artichoke halves or pieces, garlic, and shallot or onion.
  • Add the wine or vermouth and chicken stock.
  • Add back the browned chicken and braise at a simmer for 15 minutes.
  • Add the olives and part of the oregano and simmer another 5 minutes.
  • Serve over rice, pasta, mashed potatoes, farro, or polenta.
  • Viola!

Next, let's address the elephant in the room. Yes, you are reading this right-- 40 to 60 cloves of garlic. When garlic gets a nice warm braise, it turns soft and savory-sweet. The tender garlic breaks down and adds to the sauce for this dish, so please don't be afraid of it. When I made it this time I counted 64 cloves from my fun-sized bag of pre-peeled Costco garlic, and it was perfectly divine.

Decades ago I took a cooking class in New Orleans, and I'll never forget this encouragement from the instructor. "Treat garlic like a vegetable-- it's just another vegetable. Use it generously." That has forever changed my cooking. Give it a try.

Preparing Artichokes for Mediterranean Chicken

artichokes on a cutting board.

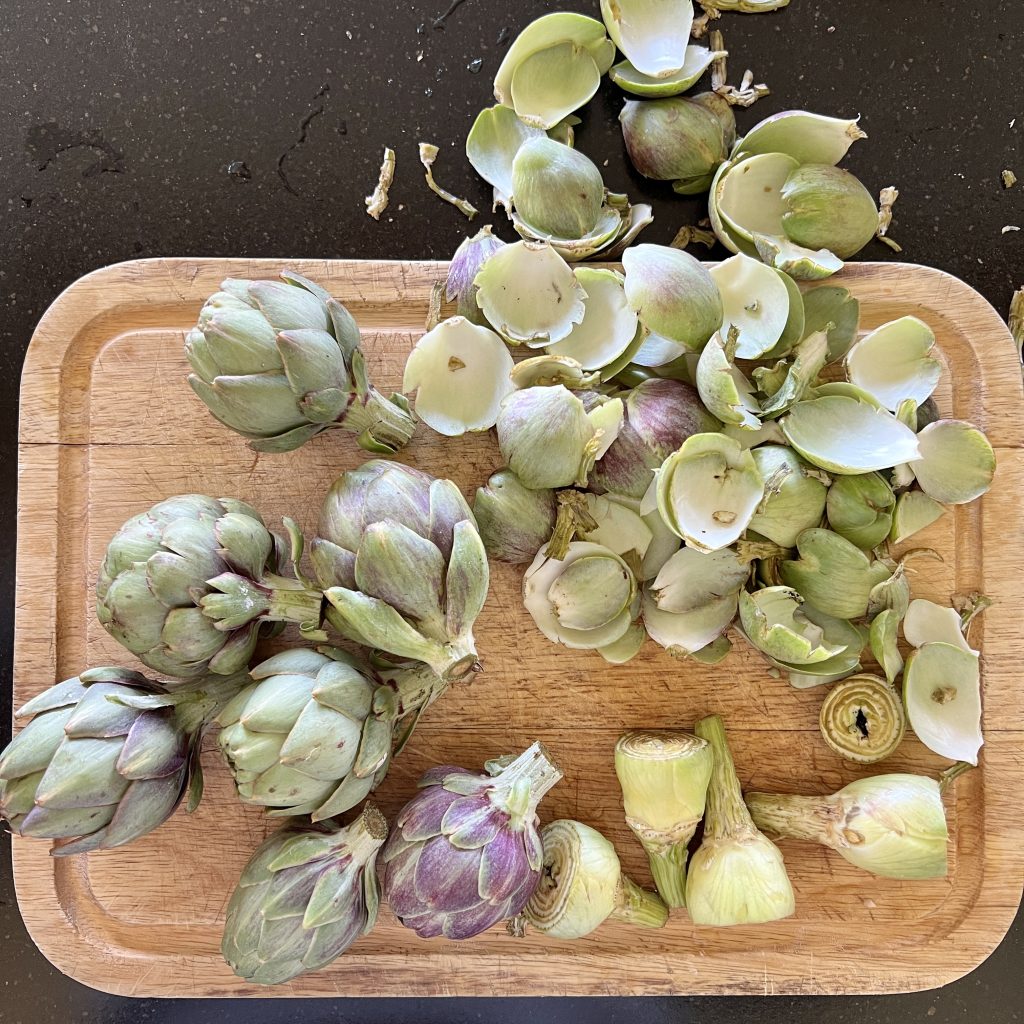
Frozen or well-drained jarred artichokes work just fine in this recipe, but during spring fresh artichokes are a great way to go. This time I had some palm-sized baby artichokes from the farmers market. Preparation for them is the same as for large artichokes. First, gently peel the darker, thicker leaves away until you reach the pale and tender leaves towards the center. Next, trim about 1/3 of the crown away from the tip, slicing horizontally. Use a vegetable peeler or pairing knife to peel the stem, then slice them in half vertically, top to bottom.

If you are working with large artichokes, you'll likely need to scoop out the prickly part of the inner choke with the tip of a spoon, but the babies don't need this. Finally, you'll plop the trimmed artichoke hearts into a bowl you've filled with cool water and healthy splash of white vinegar. The acidified water will keep the artichokes from darkening while you work through them. When you're ready to use them, remove them from the water and pat them dry.

Yes, this takes some time. I use this time as an exercise in presence, noticing all the different colors an textures of my artistic medium, the amazing artichoke! Notice the rosette that emerges when you cut off the top? And the topographical map that appears when you slice down the center? I settle in to the task, allowing my mind to calm as my hands work. This special time is one of the things I love most about cooking, and working with produce especially.

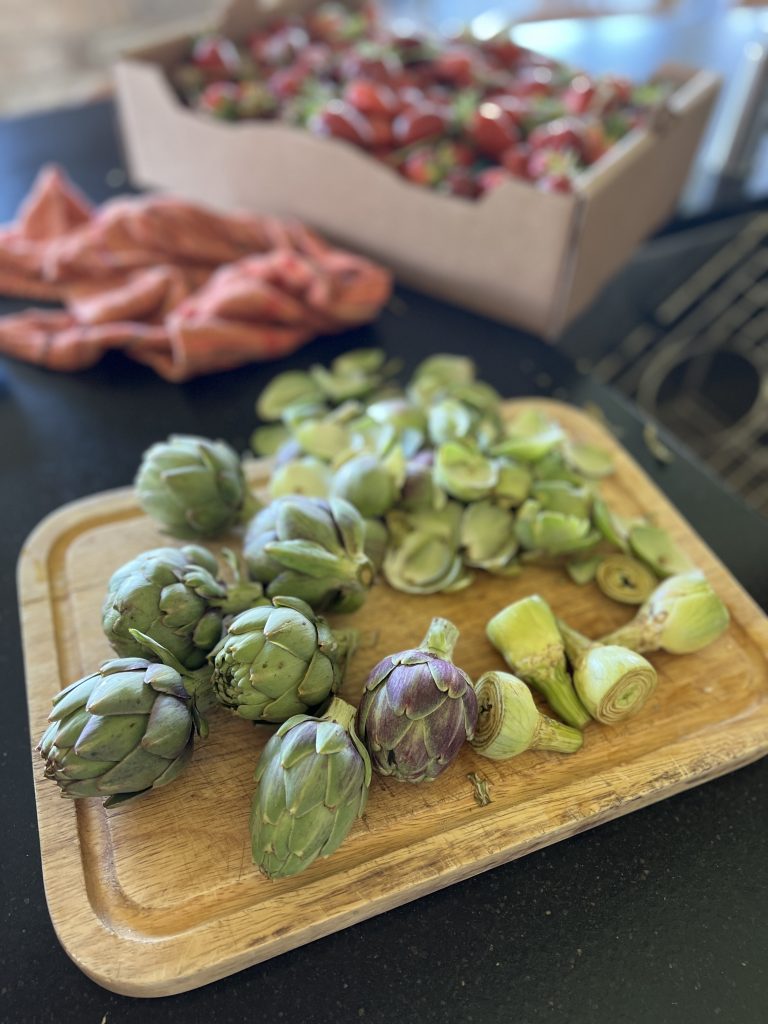
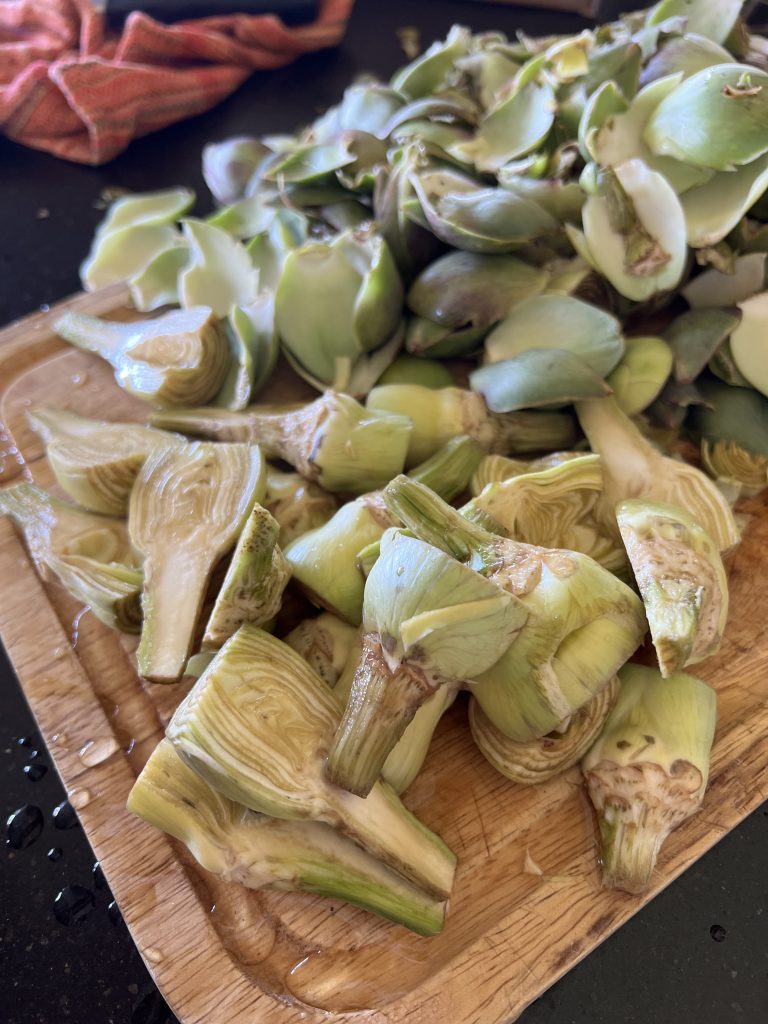
You will have a rather enormous pile of artichoke leaves when you're done. That's just part of artichokes, just like the pile that's left behind when you husk and de-silk fresh corn. Add this to your compost pile just like you do other vegetable trimmings. When we talk about edible flowers, remember that the artichoke is the flower of this amazing plant.

All that to say, if you opt to go the frozen or jarred artichoke route, no one will blame you, and you'll still have an utterly delicious Mediterranean Artichoke Chicken braise.

Other One-Skillet Meals You'll Love

Weeknight Gingery Broccoli Beef Stir-Fry

Green Goddess Mac + Cheese

Turkey Meatball + Roasted Lemon Zucchini Pasta

If you enjoy this recipe, please give it a green star rating on the recipe card below. That will help others find it too! If you make the recipe, please show us and tag 101-Mile Kitchen on Facebook and Instagram! (It's a total thrill when I hear you've made my recipes!) And as always, your questions and feedback in the comments is welcome and appreciated.

top ten recipes of 2022- Mediterranean Artichoke Chicken

Mediterranean Artichoke Chicken

Course: Main Dish
Cuisine: Mediterranean
Season: All Season
Dietary: Dairy-Free, Gluten-Free
Preparation: One Pot/One Pan
Prep Time: 15 minutes
Cook Time: 25 minutes
Total Time: 40 minutes
Servings: 2 to 3
Author: Pam Spettel
A quick braise of artichokes, chicken thighs, lots of garlic, and olives makes a lovely weeknight or guest-worthy dinner.
Print Recipe

Ingredients

  • 4 chicken thighs, bone-in, skin on
  • 1 tablespoon extra virgin olive oil
  • 10 baby artichokes, OR 12 oz. frozen thawed artichoke hearts, or 1 14 oz. can halved artichoke hearts, drained
  • 40-60 cloves fresh garlic, peeled (Yes, that many! They turn soft and sweet in the braise.)
  • 1 large shallot, minced or 1/2 onion, minced
  • cup dry white wine or dry vermouth
  • 1 cup chicken stock
  • ½ cup pitted green olives, canned or from the olive bar
  • 1 large handful fresh oregano leaves
  • salt and pepper to taste

Instructions

  • Heat olive oil in a large skillet over medium high heat. Pat the chicken thighs dry and sprinkle them with salt and pepper. Place the chicken in the skillet skin side down and allow to brown, without moving or turning, for about 4 minutes. When the chicken is well-browned and will lift easily from the skillet, flip and repeat on the other side. Remove chicken from pan and set aside.
  • Prepare the artichokes: follow the directions in the above post for trimming the fresh baby artichokes, or if using frozen or canned, gently pat them dry with a paper towel. Place the artichokes in the pan, cut side down, and allow them to take on a bit of color without moving or flipping. When they begin to brown, Add the garlic and shallot, and stir. Allow the garlic to brown in spots and begin to soften, stirring every two minutes for about 6 minutes.
  • Add the vermouth to the pan and scrape up any browned bits clinging to the pan. Add the chicken stock and stir. Bring to a simmer, and tuck the browned chicken thighs into the sauce. Sprinkle with a little salt and pepper.
  • Put a lid on the pan and allow it to simmer for about 15 minutes to finish cooking the chicken and marry the flavors together. Remove the lid and add the green olives and about half of the oregano and stir. Allow it to cook another 5 minutes. Check to ensure that the chicken is cooked through, giving it a few more minutes if necessary. When done, the chicken will be fork-tender.
  • This chicken dish is wonderful served on a bed of pasta, rice, farro, or polenta. Garnish with the remaining oregano and serve.
Coffee-infused rice krispie treats

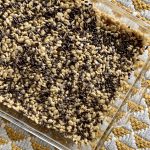
A few weeks ago I came upon this clever new idea for Coffee Rice Krispie Treats, an old family favorite. When I visit my dear mom, she still makes her famous peanut-butter rice crispie treats for me, my favorite comfort food, all these years later. The whole pan disappears before you can say snap, crackle, pop.

This recipe comes from the website Emotional Baking, with permission to share it with you. Each Emotional Baking recipe explores a specific emotion or mood and creates a recipe cure. As a result, it is a keen way to process feelings and address everyday mental health.

Why Make Coffee Rice Krispie Treats Now?

Ever since the horrific yet predictable incident that happened in Uvalde, Texas, comfort is definitely needed. Since gun violence is an adult issue requiring an adult response, this very adult rice krispie treat version is just right.

The Coffee-Infused Rice Krispie Treats recipe was designed to clear feelings of fogginess. Since this repeated mass tragedy in our children's schools creates a hazy, gas-lit feeling, yes. Foggy is indeed what I'm feeling.

In Canada, home base to Emotional Baking, package sizes for Rice Krispies and marshmallows are different than in the U.S. For those of us in the U. S. I made some revisions to utilize our product sizes. Also, I tinkered with their ratios by reducing the butter, and increased the amount of coffee powder for more pronounced flavor.

Making Coffee Rice Krispie Treats

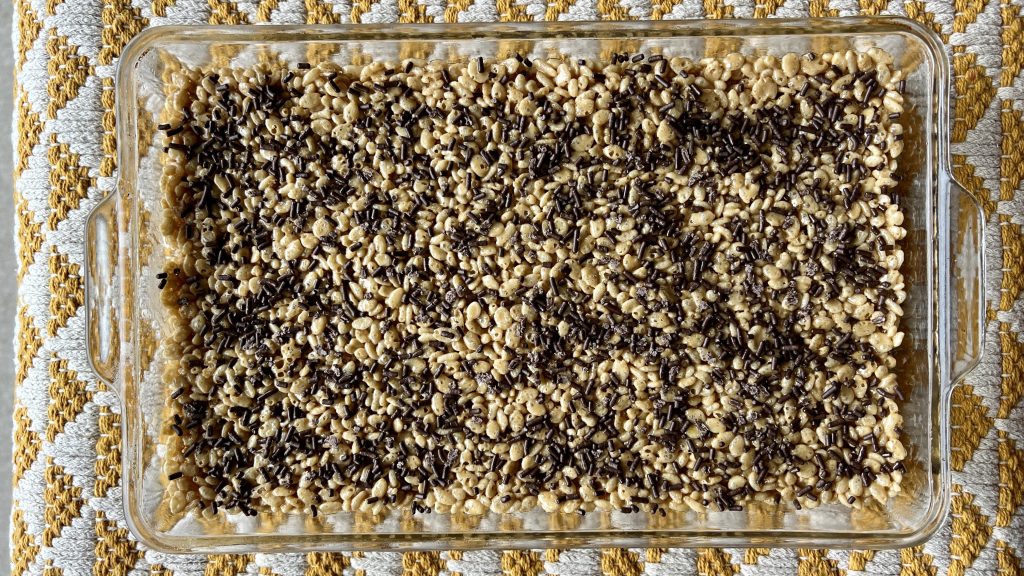
This no-bake treat couldn't be easier. Equally important, the addition of coffee flavor is purely genius. Why not make them today? Visit Emotional Baking for other delicious recipes that will match your mood. Whether it be happy, lonely, optimistic, or even foggy, you'll find the just-right kitchen therapy.

Other Comfort Foods for Now

Vanilla-Lemon Rice Pudding

World's Best Tomato Soup

Green Goddess Mac and Cheese

If you enjoy this recipe, please give it a green star rating on the recipe card below. That will help others find it too, and helps me pay the bills! If you make the recipe, please let me celebrate with you by tagging 101-Mile Kitchen on Facebook and Instagram. (It's a total thrill when I hear you've made my recipes!) And as always, your questions and feedback in the comments are welcome and appreciated.

Top ten recipes 2022- Coffee-infused Rice Krispie Treats

Coffee-Infused Rice Krispie Treats

Course: Dessert
Preparation: Fast + Easy
Prep Time: 15 minutes
Servings: 12
As addictive as the coffee that flavors this very adult Rice Krispie Treat version, you won't want to put them down. Chocolate sprinkles make them even better!
Print Recipe

Ingredients

  • 1 10 ounce bag miniature marshmallows
  • 3 tablespoons butter
  • 1 tablespoon milk or plant milk
  • 1 tablespoon instant expresso or coffee powder
  • 6 cups Kellogg's Rice Krispies
  • 2 tablespoons chocolate sprinkles (optional)

Instructions

  • Spray the inside of a 9" x 13" or 7" x 11" baking dish with non-stick spray. Mix together the milk and coffee powder in a small bowl and set aside.
  • Melt together the miniature marshmallows and butter over medium heat, stirring constantly, being careful to keep the bottom from scorching. Lower heat if necessary. When the marshmallows are completely melted, stir in the milk/coffee mixture. Remove from heat, and stir in the Rice Krispies until they are thoroughly coated. (the marshmallow mixture may start to become stiffer-- that's OK, just keep stirring.
  • Scrape the Rice Krispie/marshmallow mixture into the prepared pan, and flatten, making sure that the mixture is evenly distributed to the edges and corners. With a piece of parchment between your hand and the mixture, or your hand inside a sandwich bag, press down to firmly compact the mixture.
  • Sprinkle the top with the chocolate sprinkles (optional) and set aside until thoroughly cool. Cut into bars. Cover tightly and store at room temperature.
plate of broccoli beef

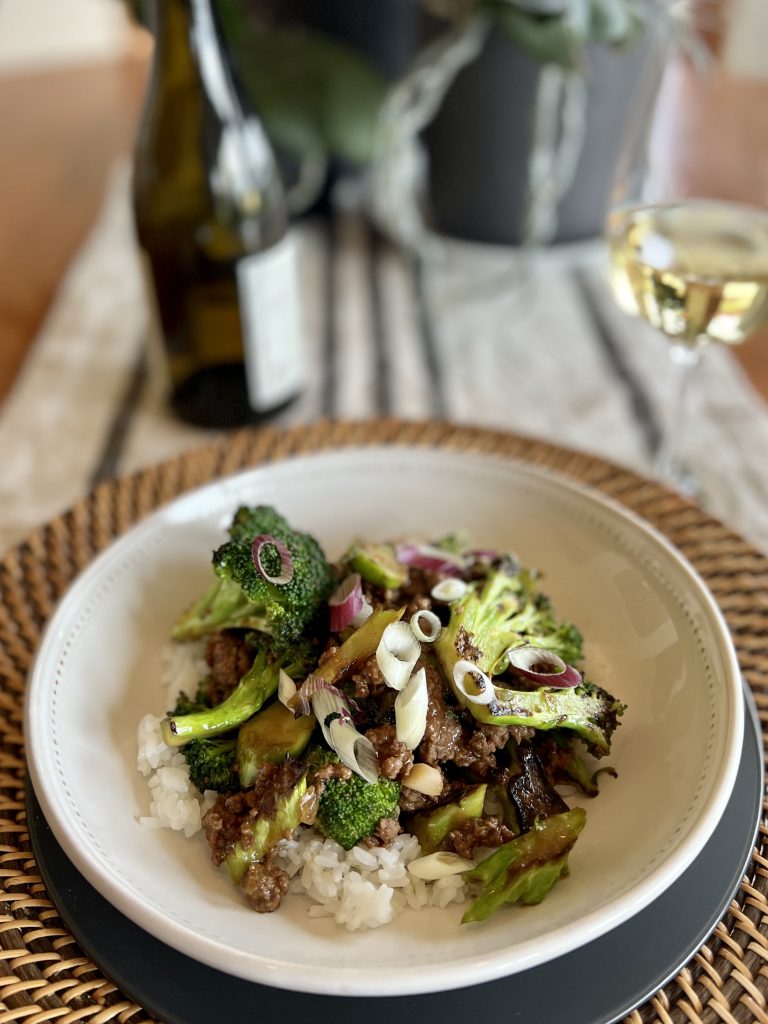
This weeknight-friendly Gingery Broccoli Beef stir-fry recipe came to me at the just-right time. Since last November we’ve been abuzz with houseguests. I took a four-month business course, and I started to teach cooking classes. And we’ve made the most of being able to travel again to see family. I can’t get enough of this gingery broccoli beef for four reasons, and think you might, too:

  • It uses pantry and freezer staples I love and almost always have around, like broccoli, fresh ginger, ground beef and soy sauce or coconut aminos.
  • It’s a 30-minute complete meal made in one pan, rice notwithstanding, perfect for busy days, lazy days, or any time fast, delicious nutrition is the aim.
  • It’s a season less dish, as appropriate in May as it is in November.
  • Our little household loves it. That’s all the reason I need to include this in our regular rotation.
plate of gingery broccoli beef stir-fry

How Recipes Evolve

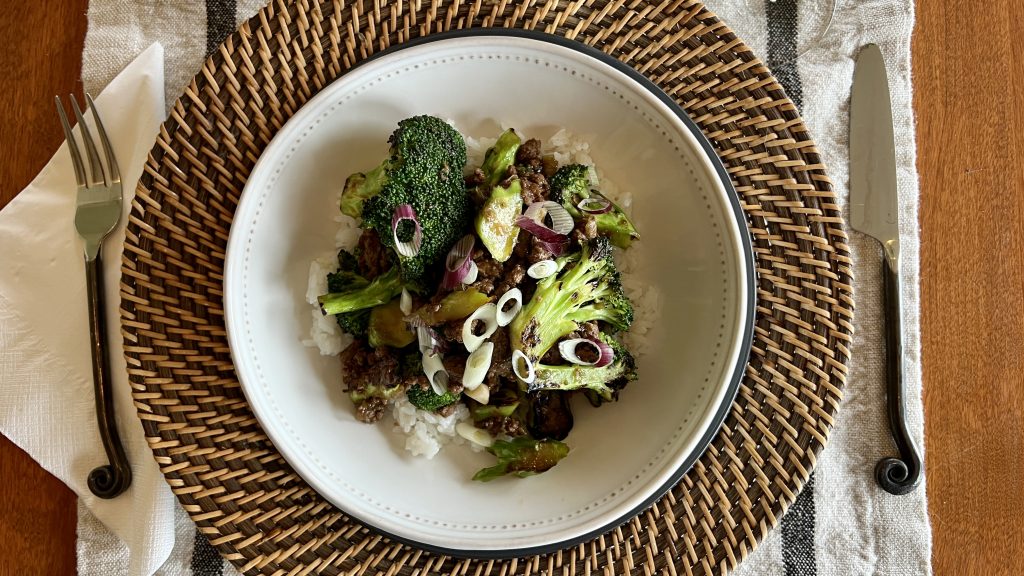
It's not often one sees the straight line in how recipes evolve, but this one is a perfect example. I learned this gingery broccoli and beef recipe from my friend Mandy. Mandy added oven-roasted broccoli to Michelle at Unbound Wellness's Mongolian Ground Beef. In a step toward speed and energy efficiency I stir-fry the broccoli in the same pan as the beef. I cut the broccoli stems into thin coins, and slice the florets to have have flat edges that allow a similar caramelization as roasting. Triple score: this way it takes less time, uses less electricity, and has one less pan to wash. Taking a page from traditional stir-fries, I add the sauce directly to the pan with the browned beef and broccoli. The stir-fry method seems a little more like the Chinese beef and broccoli dishes I have always loved, just using the weeknight classic ground beef.

Mandy and I have each made our adaptations from Michelle's original yet the spirit remains the same.

half plate of broccoli beef stir-fry

Making Gingery Broccoli Beef Stir-Fry

Grass-fed beef is the way to go. Grass fed beef is lower in overall fat than grain fed beef. Not only that, grass-fed beef contains two to six times more Omega-3 fatty acids than feed-lot beef. and is packed with B vitamins, vitamins A, E, and other antioxidants compared to grain fed beef. Thinly-sliced sirloin would easily work.

Don't count this recipe out for vegans. I suspect that plant-based meat crumbles or crumbled and browned tofu would be a swell swap for the ground beef in this recipe. If you give either option a try, please let the rest of us know how it goes.

If low-carb is your jam, swap the rice for cauliflower rice like Mandy does. It serves four, so my sweetheart and I each have dinner and a grab-and-go lunch with very little effort.

Don't be shy with the ginger! I uses pieces that are longer than my thumb and about twice as wide. The three-step recipe is really straightforward: Start your pot of rice first, and in about 20 minutes you'll have tasty, simple weeknight meal.

half plate of broccoli beef stir-fry

Weeknight Gingery Broccoli Beef Stir-Fry

Course: Main Dish, Quick + Easy
Cuisine: Fusion
Season: All Season
Dietary: Dairy-Free, Gluten-Free
Preparation: Fast + Easy, One Pot/One Pan
0 minutes
Total Time: 28 minutes
Servings: 4
Author: Pam Spettel
Using ground beef in a classic broccoli beef stir-fry makes a fast, easy weeknight meal with amped up ginger for extra deliciousness.
Print Recipe

Ingredients

  • 1 lb. broccoli
  • 2 tsp. olive or avocado oil
  • 1 lb. lb. lean ground beef, grass fed preferred
  • 1 generous thumb fresh gingerroot, peeled
  • 4 cloves garlic, peeled
  • 4 large green onions, cut into 1" pieces
  • cup soy sauce
  • ¼ cup beef or vegetable broth, or water
  • 2 tsp. corn starch or arrowroot powder
  • 1 tsp. brown sugar
  • salt + pepper to taste

Instructions

  • In a small bowl, stir together the soy sauce, broth, sugar, and cornstarch until the sugar is completely dissolved. Set this sauce mixture aside.
  • Slice thick broccoli stems into thin coins. Cut thinner stems and florets into 1" - 2" pieces. Heat the oil in a large skillet over medium high heat. When it begins to shimmer add the stems and cook for 3 to 4 minutes until they have browned brown in places but are still bright green. Add the remaining broccoli pieces and stir-fry until they are bright green and have softened but remain slightly crisp. A little brown on the crowns is delicious! Remove to a plate.
  • Crumble the ground beef into the skillet and break into pieces with a wooden spoon. Cook over medium high heat until no pink remains. Use a microplane or other grater and grate the ginger and garlic into the meat. Add ¾ of the slices green onions and stir. Cook, stirring often, until the beef is well browned, about 10 minutes total for this step.
  • Reduce the heat to medium and add the cooked broccoli back into the skillet. Add the reserved soy mixture to the meat and broccoli, stirring until the sauce slightly thickens, about 2-3 minutes.
  • Serve the broccoli beef mixture over rice, and garnish with the remaining green onion slices.
A bowlful of vanilla lemon rice pudding.

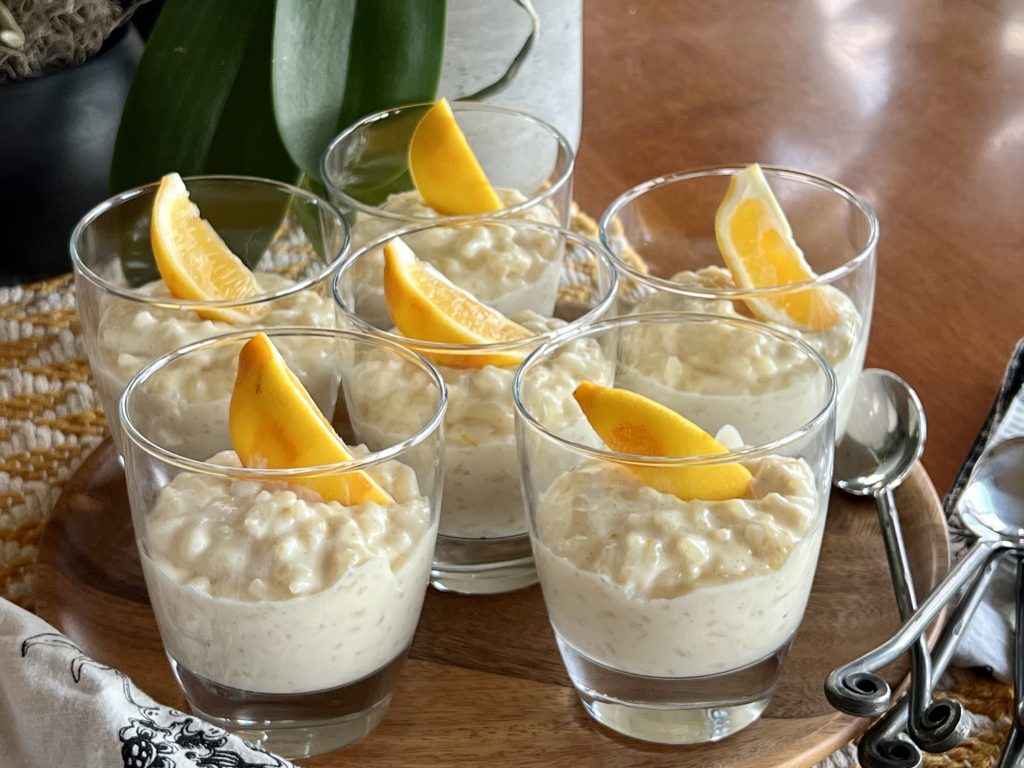
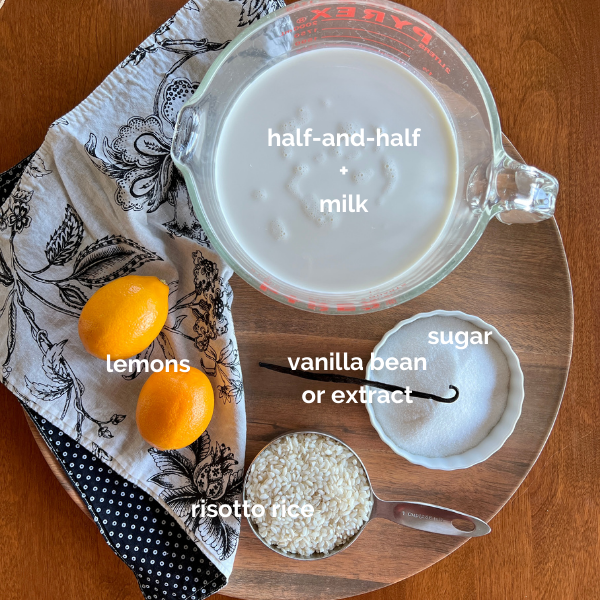
I wish I had a nickel for every time the words "comfort food" have been used in the United States since March 2020. With the money, I'd launch a campaign to deliver a cup of Vanilla Lemon Rice Pudding to the doorstep of every American, thereby redefining comfort food in our culture.

This recipe is gently sweet, creamy but not cloying. It is alive with lemon zest, and ethereal with a whole vanilla been (or vanilla extract.) Vanilla Lemon Rice Pudding is far more exciting than any other rice pudding I've ever had. Yet as comforting as your favorite cashmere sweater.

A platterful of cups of creamy vanilla lemon rice pudding.

The Paris Connection

I learned of this bit of deliciousness from Katherine Burns of Rue Dauphine Paris. Katherine's Rue Dauphine Paris Instagram feed is full of glorious photos of her visits to historic gardens, churches, shops, and arrondissements in Paris, some lovely French recipes, and a glimpse of how she brings the Parisian lifestyle into her own Seattle home. Another bit of fun-- she and May of Noisettes 1420 (also a fabulous peek into Paris) host a Francophile book club, which I promise myself to participate in some soon day.

Needless to say, discovering Rue Dauphine Paris has brought me a bit of joy in these travel-less days, and has me wishing Katherine would be my guide to Paris one day.

A platter of 5 cups of vanilla lemon rice pudding.

Making Vanilla Lemon Rice Pudding

Katherine graciously allowed me to share her vanilla rice pudding recipe with you. I've renamed it to bring justice to the magic the lemon brings. I've made a slight change to the dairy component, swapping her 4 cups of whole milk + 1 1/4 cups heavy cream for 1 quart of half-and-half and 1 1/4 cups milk), otherwise this is completely hers. This change retains the silky creaminess of her version, but leaves me with no wasted partial carton of whipping cream. She is right in that the sweet aroma of lemon and vanilla this offers when bubbling on the stovetop is most pleasant.

You should definitely use Meyer Lemons when they are in season for this. The floral mandarin/lemon flavor is fantastic. I think orange zest would also be wonderful, like a creamsicle. However, standard Eureka or Lisbon (everyday grocery store0 lemons will still take you over the moon.

Katherine serves hers in flowery china cups, a touch of French charm, with a drizzle of caramel sauce. I like serving the rice pudding with a wedge of the zested lemon. A squeeze over the top brings a little acidic component as a balance to its sweet creaminess.

When I started dreaming of Vanilla Lemon Rice Pudding in the middle of the night, I knew I had to share it with you. It has become my new favorite sweet treat. Maybe it will become yours, too, as you dream of far away places.

Five everyday ingredients, so much deliciousness.

Another Delicious and Easy Dessert

Nutty Chocolate Port Ice Cream Sundae: Get the recipe here.

Tope ten recipes of 2022-A cup of vanilla lemon rice pudding with a spoon

Vanilla Lemon Rice Pudding

Course: Breakfast + Brunch, Dessert
Cuisine: French
Season: All Season
Dietary: Gluten-Free
Preparation: One Pot/One Pan
Prep Time: 10 minutes
Cook Time: 1 hour
Total Time: 1 hour 10 minutes
Servings: 6 - 8
It's hard to believe five ingredients can make a treat as delicious and comforting as this vanilla lemon rice pudding.
Print Recipe

Ingredients

  • 4 cups half-and-half*
  • cups milk
  • ¾ cup sugar
  • 1 vanilla bean, seeds scraped
  • 2 lemons zested, lemons reserved for garnish
  • 1 cup Arborio rice

Instructions

  • Combine milk, heavy cream, sugar, vanilla seeds and bean pod, and lemon zest in a large saucepan. Bring to a simmer over medium low heat.
  • Stir in rice, bring back to a strong simmer, cover with a lid. Reduce heat to the lowest possible setting and simmer 60 minutes, stirring every 5 minutes or so, until rice is tender and a puddinglike texture. Spoon into serving dishes, garnish with a wedge of zested lemon to squeeze over the top, and serve warm. Cover with plastic wrap and refrigerate to store up to three days.

Notes

*Katherine Burns' original recipe calls for 4 cups of whole milk and 1¼ cups whipping cream. I changed this in order to use up an entire quart of half-and-half, and I typically have milk on hand. This provides less waste (3/4 cup of cream) in my kitchen since I use cream infrequently. Choose what's best for you, as the results are nearly indistinguishable. 
A top-down photo of a bowl of red tomato soup in a white bowl.

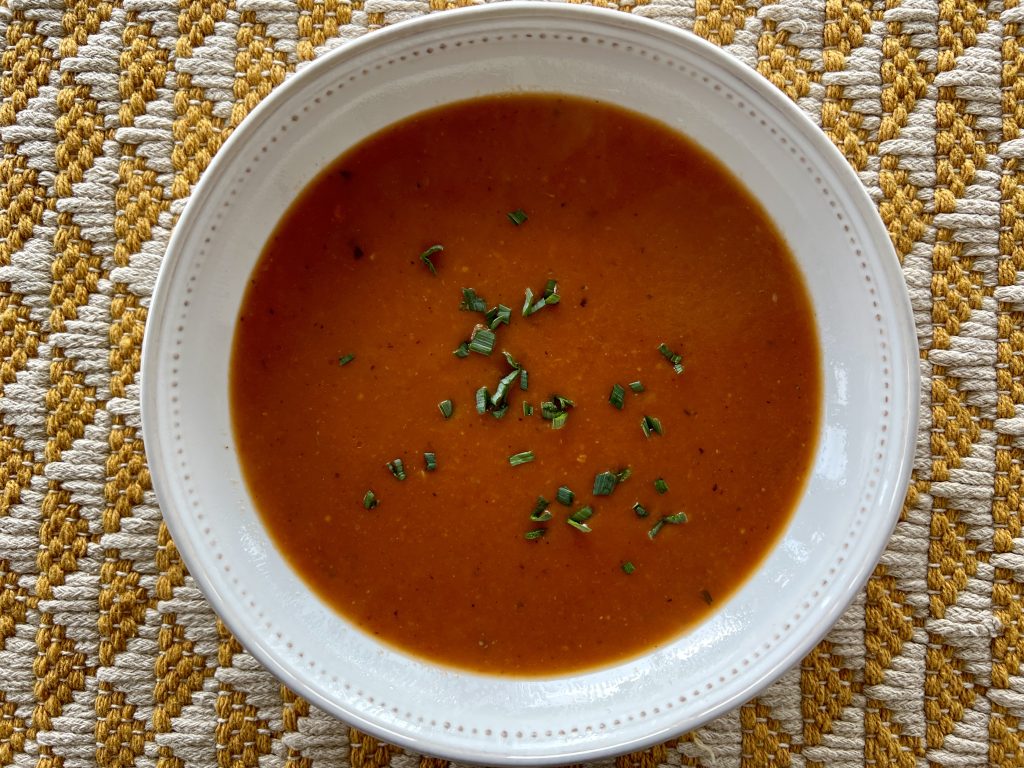
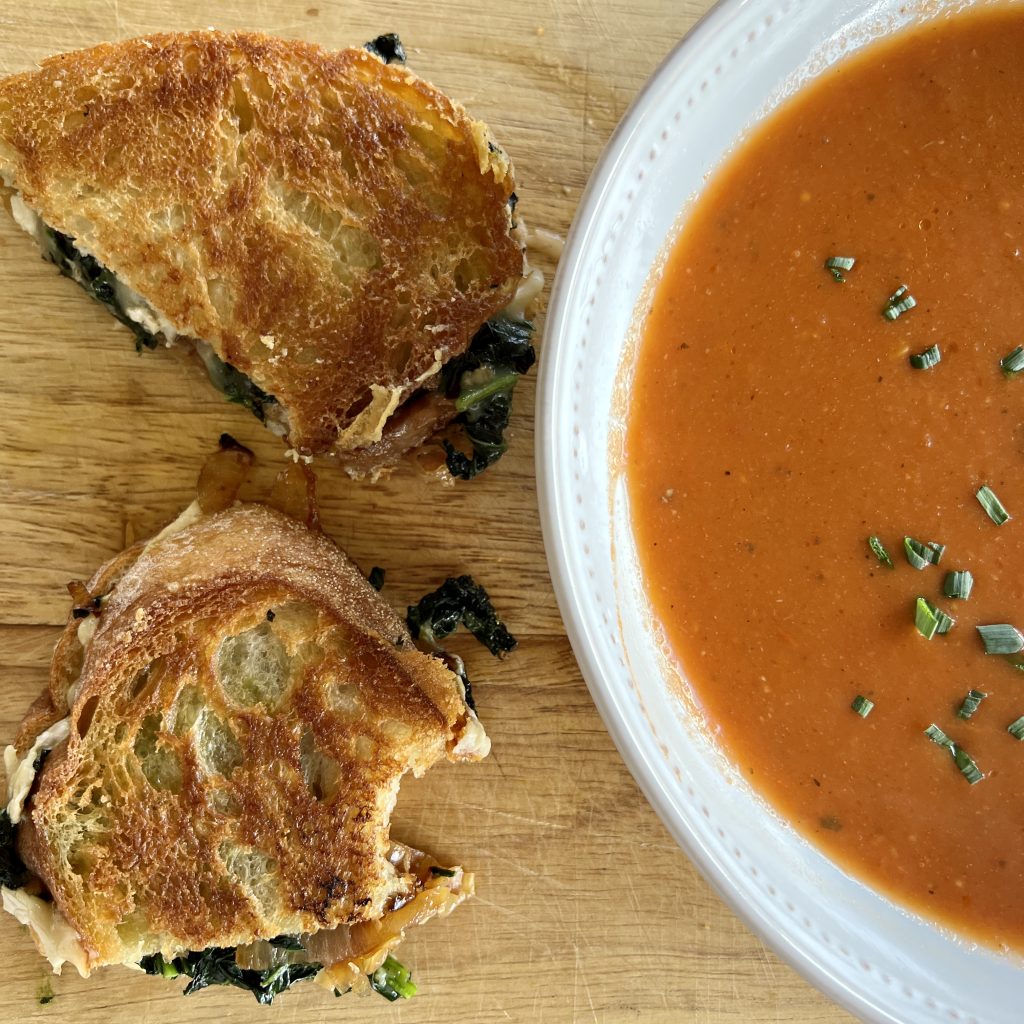
Yesterday I shared with you The World's Best Grilled Cheese Sandwich, made with garlicky greens, caramelized onion, and brie. It's only fitting that you have The World's Best Tomato Soup recipe to go with it. The two are a match made in heaven.

A Word About Canned Tomatoes

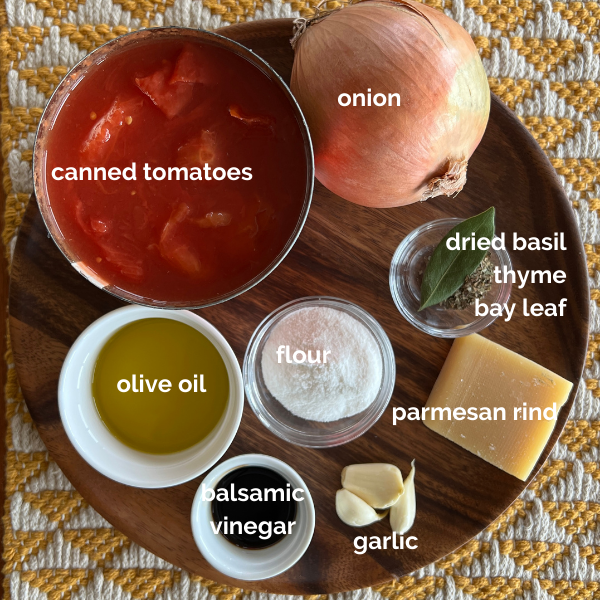
I've driven Interstate Five through California's agricultural regions many times. Enough times to see truckloads of produce pulling off the highway into the many canneries there. May I tell you that not all canned tomatoes are of the same quality? I've observed truckload after truckload of hard pink balls in the truck-trailers. It's not hard to know how they will perform in flavor and texture next to their red, ripe cousins. My practical observation is that you truly get what you pay for in canned tomatoes. Unless you use a lot of canned tomatoes, the price differential is relatively small. It might not make that much difference in a stew with lots of other flavors, but here's my rule of thumb: If the word tomato is in the title of the food I'm making, like tomato sauce, for example or the world's best tomato soup, I spend the extra dollar.

Making the World's Best Tomato Soup

tomato soup with garlicky greens and brie grilled cheese sandwich

First, lets talk equipment. This is a time when an immersion blender is more than handy. Yes, you can blend the soup in batches in either a food processor or blender. However, a stick blender will get the job done and reduce the amount of cleanup you'll have. I've not met a cook yet who would argue with that!

Because it's still late winter I used dried herbs and a bay leaf, which also gets blended into the soup, but in the growing season, trade those herbs out for fresh basil, fresh thyme, or any of the tender, leafy herbs that suit you.

Two other touches make the soup extra special. I save parmesan rinds for times like this. Just throw one in during the short simmering period for an extra flavor boost. The rind will soften and become somewhat gooey looking, but holds together just fine and can easily be fished out prior to blending. If you don't have a parm rind on hand that's just fine. The soup is still lovely so don't let that stop you from making it. The second bit of magic comes with a hearty drizzle of balsamic vinegar as a finishing touch.

The olive oil in here gives it a creamy texture and appearance, but if you love a splash of milk or cream in your tomato soup, by all means use it.

If you like this recipe, please leave it a star rating by clicking on the green stars below the title in the recipe card below. If you like the 101-Mile Kitchen project, I'd be honored if you subscribed to the newsletter!

A platter holding all the ingredients for The World's Best Tomato Soup
a top-down photo of a bowl of red tomato soup in a white bowl.

The World's Best Tomato Soup

Course: Appetizer, Main Dish, Quick + Easy, Soup + Stew
Cuisine: American
Season: All Season
Dietary: Gluten-Free
Preparation: Fast + Easy, One Pot/One Pan
Prep Time: 15 minutes
Cook Time: 30 minutes
Total Time: 45 minutes
Servings: 4
A few special touches make this recipe the only one you need for The World's Best Tomato Soup!
Print Recipe

Ingredients

  • 3 Tbsp. extra virgin olive oil
  • 1 large onion, peeled and diced
  • 3 cloves garlic, minced
  • ½ teaspoon dried thyme
  • ½ teaspoon dried basil
  • 1 bay leaf
  • 2 Tbsp. flour, rice flour, or 1-to-1 GF flour
  • 1 28 oz. can whole tomatoes and their juice
  • 2 cups water
  • 1 parmesan rind, optional
  • 1 teaspoon kosher salt
  • ground black pepper to taste
  • 2 Tbsp. balsamic vinegar

Instructions

  • Heat the olive oil in a large saucepan over medium heat. Add the diced onion and sauté until the onion has softened and is starting to become translucent. Add the garlic, thyme, basil and bay leaf and sauté another 2-3 minutes. Add the flour and sauté, stirring for another 2-3 minutes.
  • Add the tomatoes and their juices, the water, optional parmesan rind, salt, and pepper and bring to a simmer. Cover, and simmer for 30 minutes, stirring occasionally.
  • Remove the parmesan rind and blend the soup using an immersion blender, food processor, or blender. If using a food processor or blender, blend in batches. Blend until the soup is fairly smooth, but still has a slight amount of tomato texture. Remove from the heat and stir in the balsamic vinegar. Serve piping hot.
Platter Parsnip Poutine + Rich Mushroom Gravy on table with wine glasses and bottle of wine.

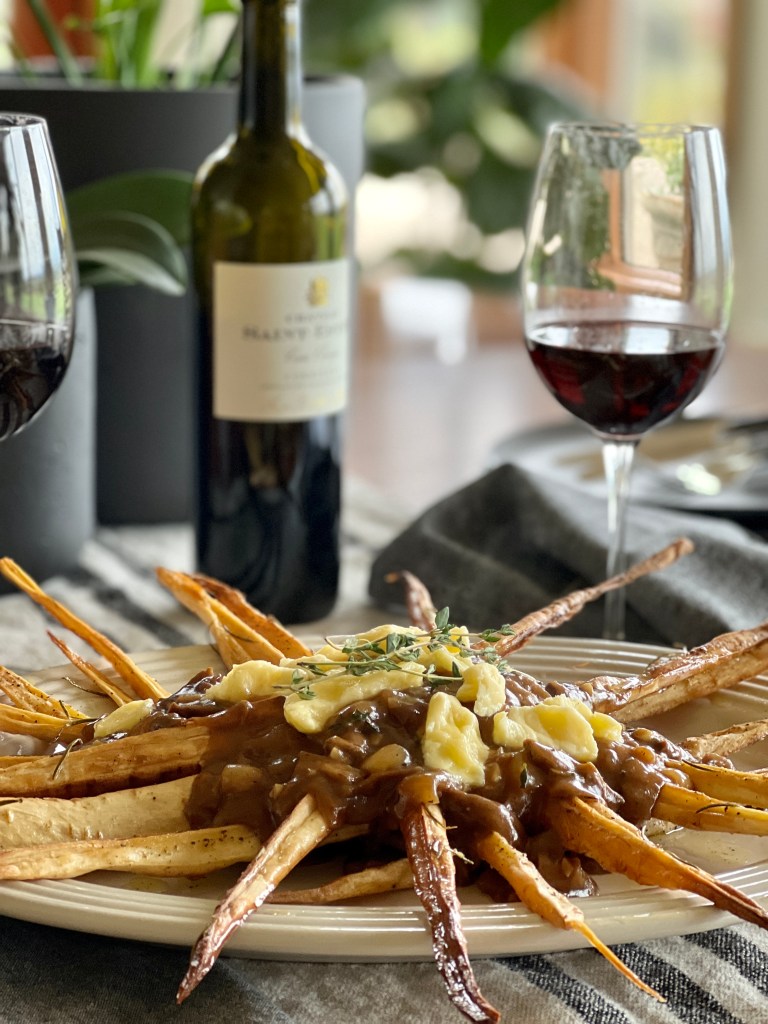
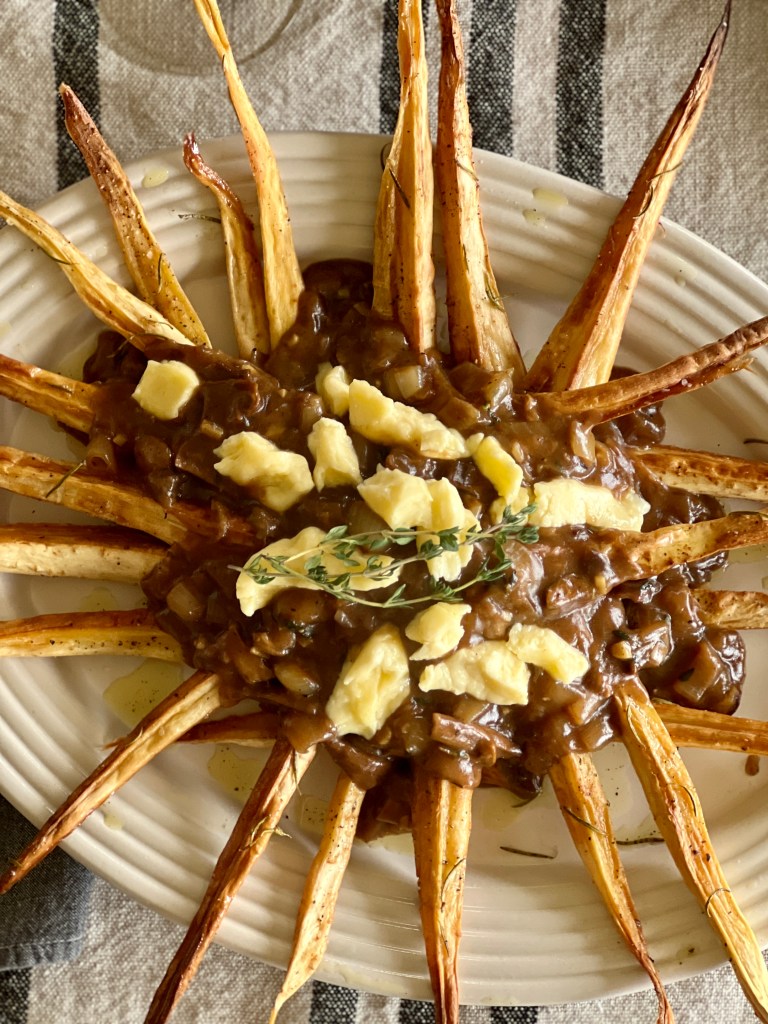
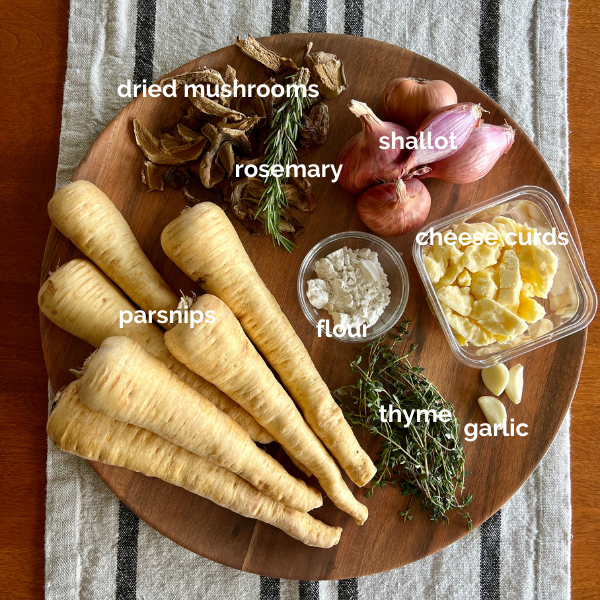
Parsnip Poutine + Rich Mushroom Gravy involves roasting quartered parsnips until partly chewy, partly crispy. A brown gravy smothers all good poutines. This one is a rich mushroom gravy redolent with shallots and herbs. Top the poutine off with Beaver Classic cheese curds, a project of Oregon State University's College of Agricultural Sciences, or any cheese curd or melting cheese you chose.

This recipe is designed for a very special group of people who started out as neighbors and became dear friends. Ever since we moved to the 101-Mile Kitchen we gather frequently to relax, shoot the breeze, eat and drink. This recipe is a thank you to these amazing souls who have kept my heart from drooping during the last 20 months of living in an upside down world, and to the universe for putting us in each other's paths.

Besides being funny, smart, and caring, our neighbors all enjoy cooking great food and drinking nice wine. (There might be a splash of bourbon here and there, too.) Sometimes we have a full-on meal, but most often we meet over easy noshes, charcuterie, spreads and dips, and casual dishes. I can't wait to make this poutine for them.

Overhead closeup photo of Parsnip Poutine with Rich Mushroom Gravy.

What is the Best Pairing?

While it makes a terrific main course at its heart poutine is bar food and doesn't need a precious pairing. I'd suggest a Southern Rhone style blend. This time I served the poutine with a very inexpensive ($13) 2017 Château Saint-Estève Cuvée Classique Corbières Rouge-- a nice old world 60% Grenache- 40% Syrah blend. It is lively, with whispers of herbs and deep fruit that compliment the umami and herbal flavors in the gravy.

Quady North GSM from Oregon's Rogue Valley and Reininger Helix SoRho from Washington are some of our favorite American GSM producers.

Of course most ales and beers are also delightful with poutine.

Making the Poutine + Gravy

Image of all the ingredients needed to make the parsnip poutine + rich mushroom gravy: parsnips, dried mushrooms, rosemary, shallot, flour, thyme, garlic, and cheese curds.

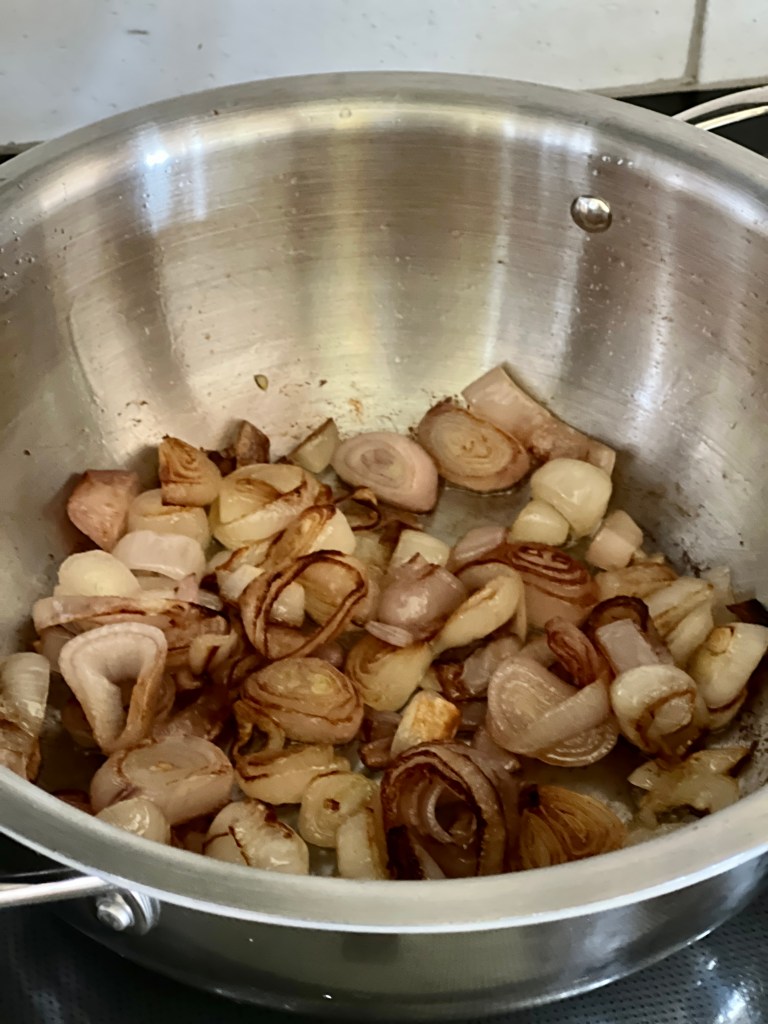
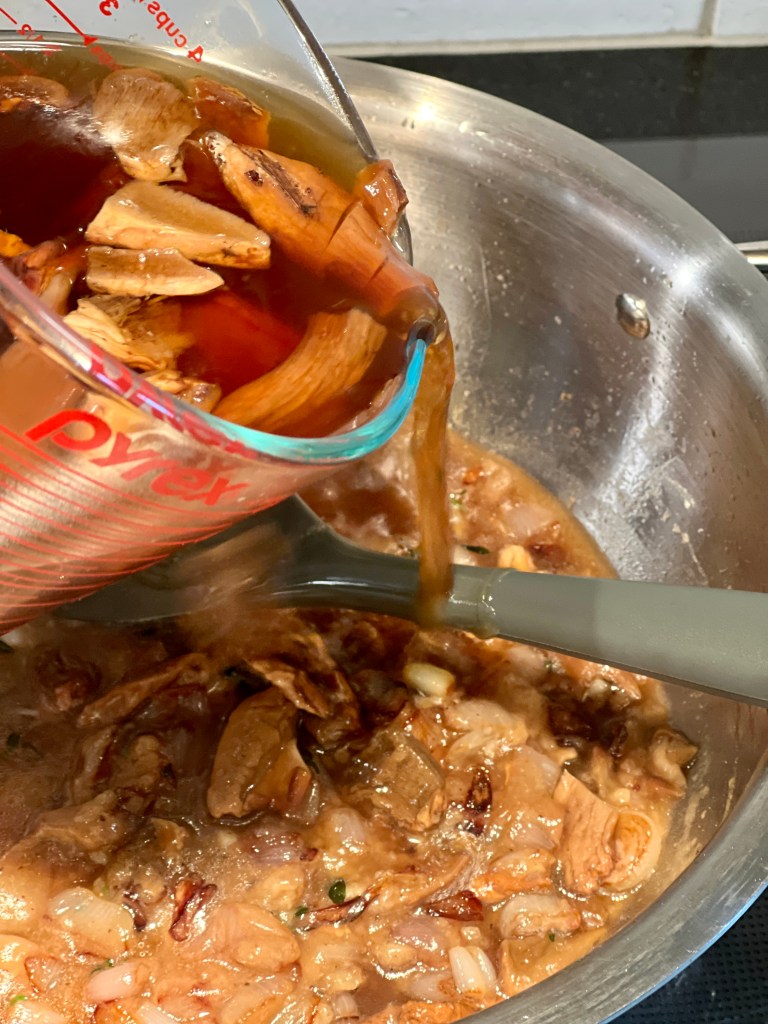
Parsnip Poutine + Rich Mushroom Gravy is another of those one-hour wonders. It takes maybe ten minutes to prep the ingredients, 16 minutes in the oven to get the parsnips on their tender and crunchy way while the mushrooms rehydrate, and another 15 or 20 minutes to make the gravy while the parsnips are finishing off. A foil-lined sheet pan, a large pan, a knife, and a bowl are the only tools used so clean-up is speedy.

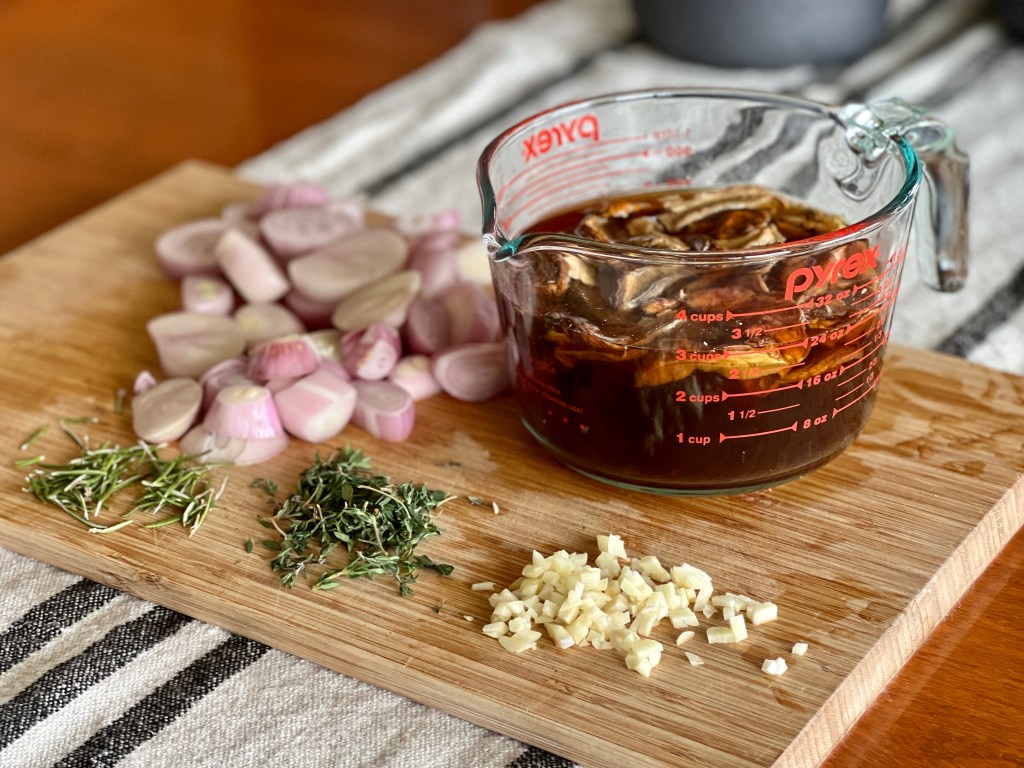
Parsnips and shallots grow just about anywhere, so they should fit in to most people's imaginary 101-mile sourcing radius. You can find dried Porcini mushrooms at many groceries and online. My favorite source is Pistol River Mushroom Farm in Southern Oregon. Dried mushrooms seem expensive until you realize that one ounce of dried mushrooms is equal to 8 ounces of fresh. The dark color of the soaking liquid becomes the intensely flavored broth for the gravy-- something a fresh mushroom just can't do.

As an aside, tuck this mushroom gravy recipe away to use in many other ways. I can't wait to ladle it onto a split and fluffed baked potato one cold winter's day.

Parsnip Poutine with Rich Mushroom Gravy on a platter, surrounded by wine bottle and glasses.

Parsnip Poutine + Rich Mushroom Gravy

Course: Appetizer, Main Dish
Season: Bounty (August - October), Mist (November - March)
Dietary: Dairy-Free, Egg-Free, Nut-Free, Vegetarian
Preparation: One Pot/One Pan, Roasting
Total Time: 50 minutes
Servings: 4 to 6
You'd never know there was no meat in this rich silky poutine gravy, and the crunchy, chewy roasted parsnips take it to new but familiar places. A fantastic main or "bar food" course for vegans and omnivores alike.
Print Recipe

Ingredients

  • 3 lb. parsnips
  • 2 teaspoons fresh rosemary leaves
  • extra virgin olive oil
  • 1 oz. dried porcini mushrooms, or other dried cooking mushroom
  • 12 oz. shallot, approximately 4 large peeled and sliced ½" thick
  • 3 cloves garlic, minced
  • 2 tablespoons fresh thyme leaves, plus more for garnish
  • tablespoons GF One-for-One flour, rice flour, or all-purpose flour
  • salt and pepper
  • ¼ lb. cheese curds, or goat cheese

Instructions

For the Parsnips

  • Preheat the oven to 400° convection and line a baking sheet with foil.
  • Trim and peel the parsnips. Quarter them lengthwise, and if they are especially thick, cut them again into eighths. Lay them out on the foil lined baking sheet, and drizzle them generously with olive oil. Toss them with your hands to evenly cover them in the olive oil, and spread them out flat at much as possible. Sprinkle them lightly with salt and black pepper. Bake for 16 minutes, and them flip them over. Reduce the oven heat to 350°. Sprinkle again with salt and pepper, and drizzle olive oil on any parts that look parched. Sprinkle the rosemary leaves over the parsnips and return to the oven for another 16-20 minutes. Check them often for doneness-- the thick tops will be browned and tender, the thin ends will be well browned and somewhat crispy.

For the Mushroom Shallot Gravy

  • As soon as the parsnips are in the oven, place the dried porcini in a 4-cup measuring cup or bowl, and cover with hot tap water to the 3-cup mark. Set aside.
  • Heat enough olive oil over medium-high heat to generously cover the bottom of a sauteuse or large pan. Slide in the sliced shallots and leave without turning until the bottoms are browned. Stir, flipping them over, and again allow them to brown. After the first ten minutes add the minced garlic, thyme, and a 4-finger pinch of salt. Continue the browning process until the shallots are completely tender but not mushy, and have a good amount of browned caramelization throughout.
  • Stir in the flour, and continuously stir until the flour is well incorporated and beginning to stick to the pan. Stir for about three minutes.
  • Gradually ladle in the soaked mushrooms and their dark brown soaking liquid, stirring between ladlefuls, until it it incorporated. You will see the gravy begin to thicken immediately-- stir throughout this process to avoid any lumps.
  • Stirring frequently, bring the gravy to a boil, and add some more salt. There should be about one teaspoon total in the gravy, or to taste. Add a very generous amount of black pepper to season. Allow the gravy to bubble and thicken for about 6 minutes.

Bring it All Together

  • Arrange the roasted parsnips on a large warmed platter in a spiky spoke-like fashion. Ladle the hot gravy in the center. Arrange the cheese curds over the gravy, and top with a bunch of thyme for garnish. Serve while piping hot.

Bowls of Pumpkin Black Bean Soup, a loaf of bread, and wine on a table ready for a party.

Soup as Your Secret Weapon

In case you haven't noticed, the world really needs us right now. The paradigm-looting pandemic isn't over. Differing points of view are dividing friends and neighbors when we aren't paying attention. It's as though the collective pulse is slow, the heartbeat is going quiet. Bold acts of friendship are as important as they ever were.

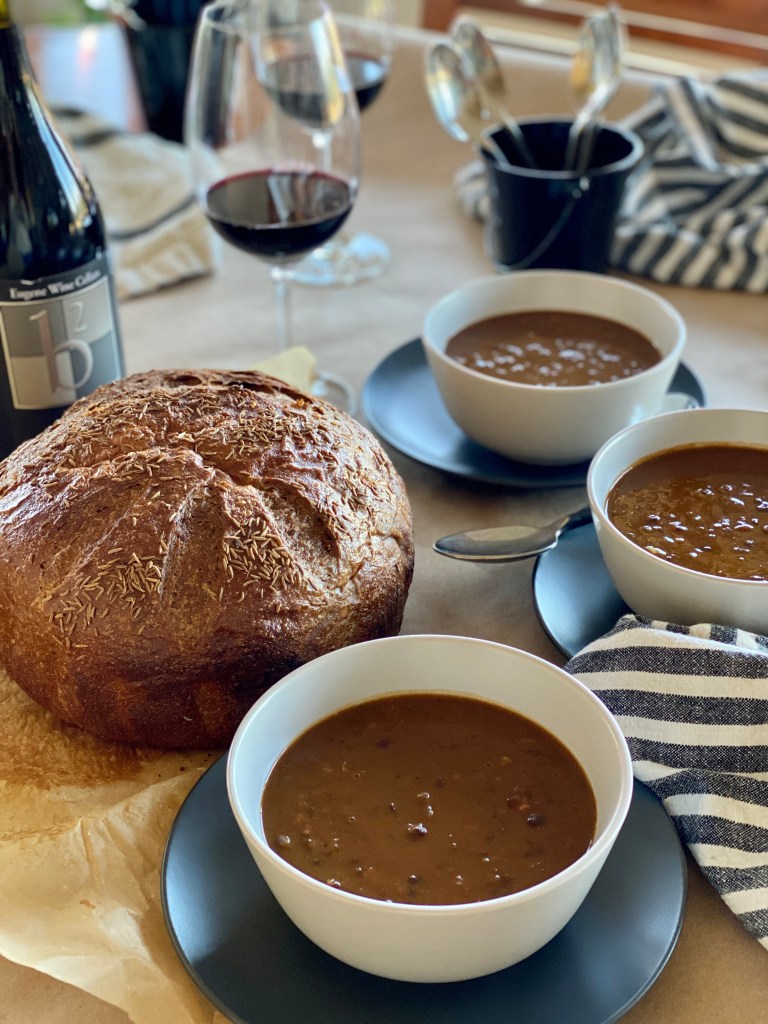
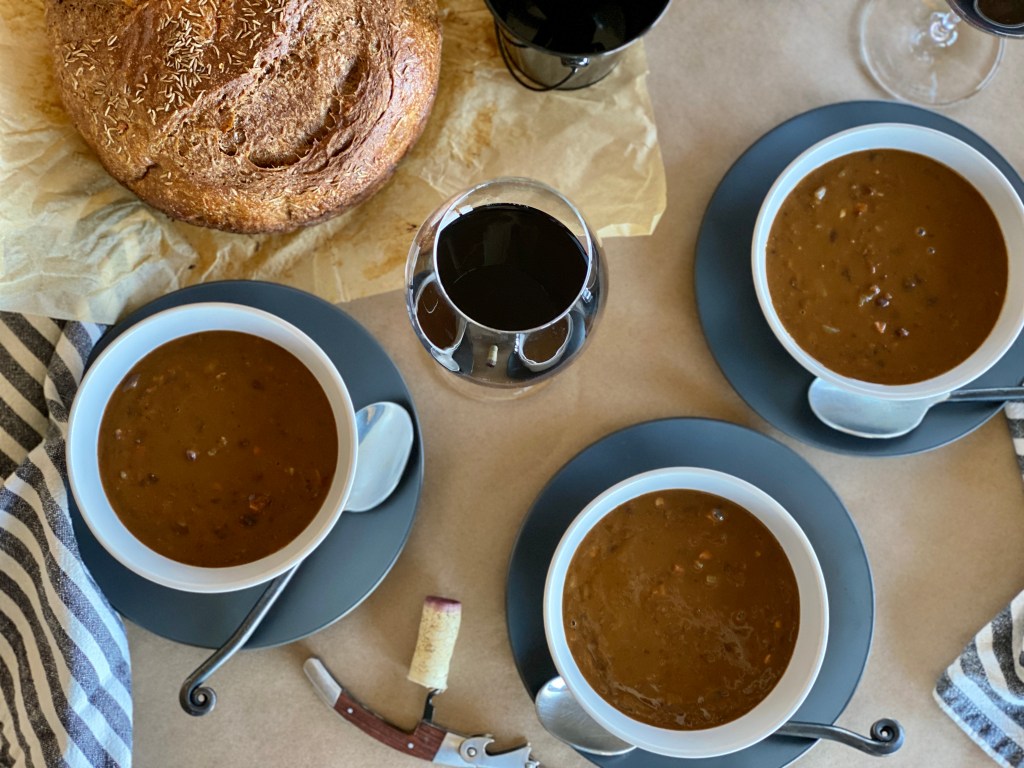
Lean in and let Pumpkin Black Bean Soup be one of your secret weapons in the defense of friendship.

Closeup of a bowl of pumpkin black bean soup.

Lean In, Full and Strong

I've found that leaning in to my loved ones and community happens best when I first make my own self full and strong. Now is the time to follow the pilot's directions. "Ladies and gentlemen, should the cabin lose pressure, oxygen masks will drop from the overhead area. Please place the mask over your own mouth and nose before assisting others.”

Simply put, if I run out of oxygen I cannot assist someone else with gaining theirs. If I'm gasping for air I am fairly useless in creating a safer, happier, nourishing place for others.

In this season known for its comfort food, let us remember this for ourselves. Eat reviving foods, feed ourselves well. Warm, spicy, hearty things that nourish not just our bodies, but our eyes and hearts and imaginations. And then share it with others out of our own fullness.

Overhead photo of bowls of pumpkin black bean soup, bread loaf, and wine glasses.

Make More Bean Soup Joy

Pumpkin Black Bean Soup is a stealthy way to make more joy. Make more festivity for Halloween night supper. Make more personal success-- image your game-day touchdown by sharing this big pot of soup with loved ones. Or make this soup as an easy dinner party with whoever it is that makes up your pod these days.

Or in support to yourself, make the whole big pot and parcel out 2-cup portions for your freezer. That way you'll always be fueled for your loving, life-giving actions even when you don't feel like cooking. The joyfully act of making the soup itself is a beautiful life-giver.

More About Pumpkin Black Bean Soup

A wooden platter with the recipe ingredients mis en place.

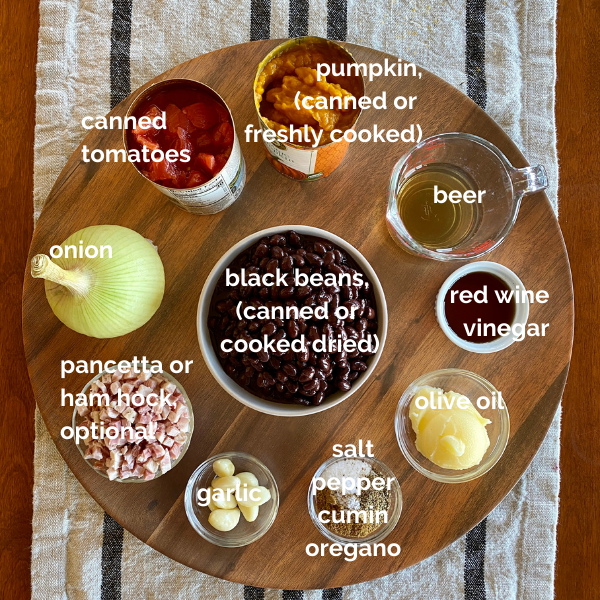
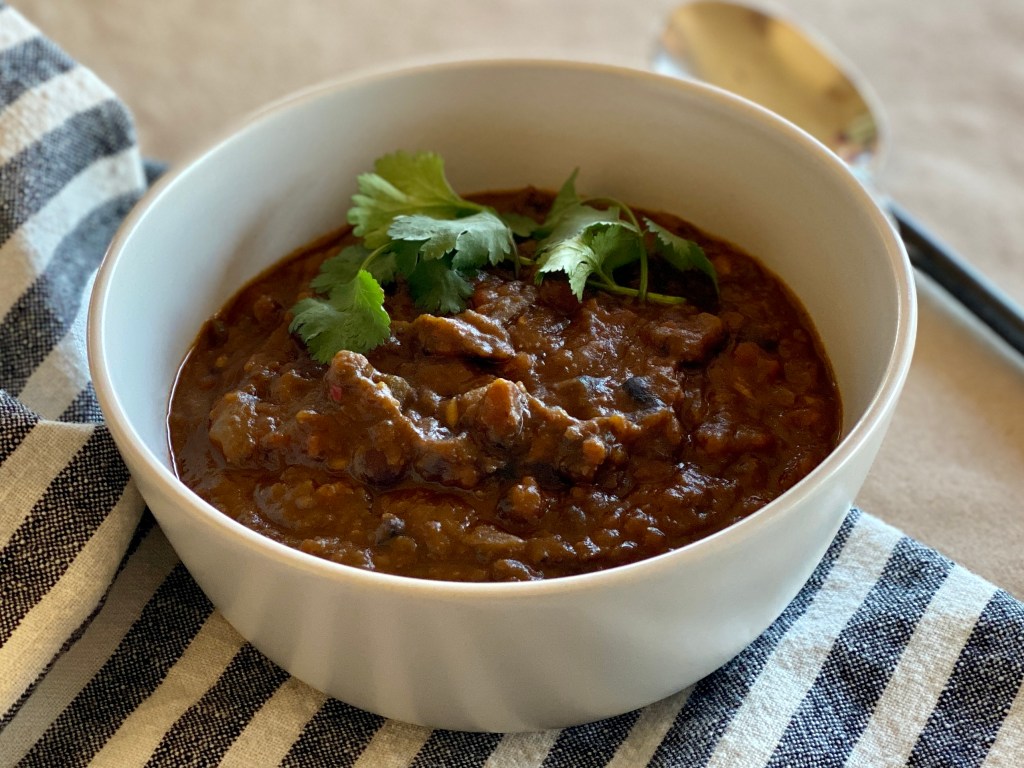
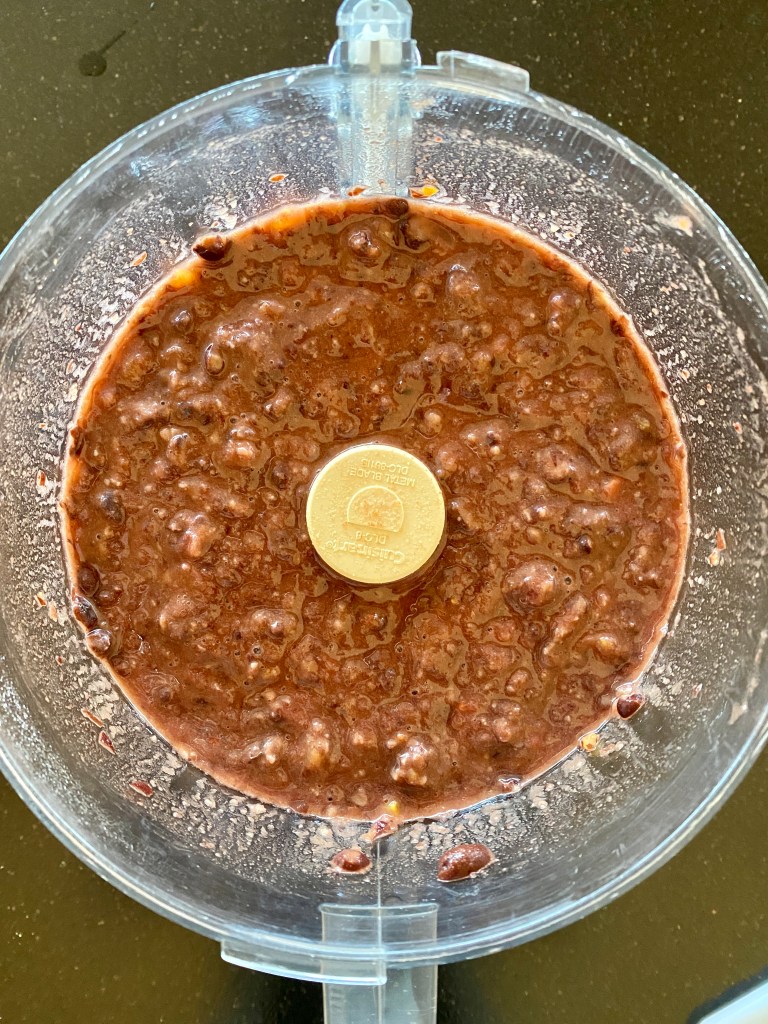
Put together this rich and fragrant rusty-brown soup in a flash with canned ingredients from your pantry, or with dried black beans you cook yourself. (Beans from Rancho Gordo are the best ever, and their Midnight Black Beans are perfect here.) Directions for the easy way and the beans-from-scratch way are included. I love it both ways, depending on the amount of time I've got to give. Click here for link to a Facebook Live video of me explaining the easy process of making pumpkin puree from scratch.

Make it vegan by omitting the ham hock or pancetta for another delicious way to go, even for committed meat-eaters.

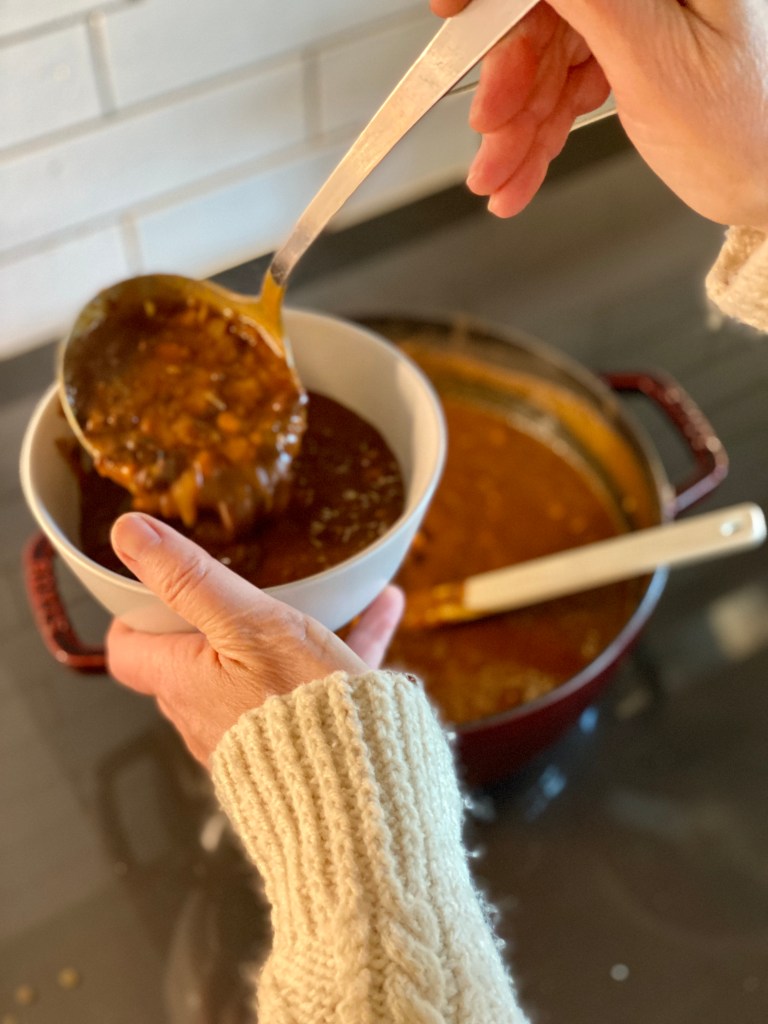
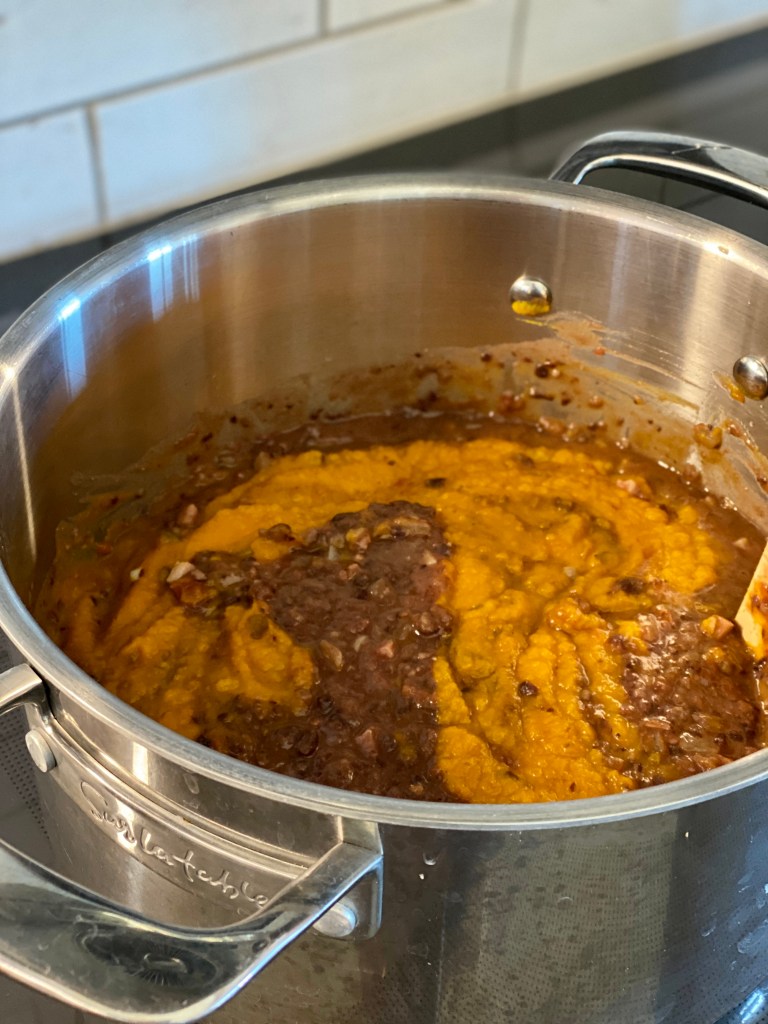
The aroma coming from the pot of this seasonal soup is so inviting and so comforting. Pumpkin gets a well-earned reprieve from its sugar and spice gig, making a happy marriage with the savory black beans and cumin. It really is the perfect thing for the chilly days ahead.

Oh, by the way, a perfect accompaniment to this warming soup is a huge loaf of Caraway Rye Black Bread. Together they make enough to feed a crowd of friends bent on making more joy, no matter what.

One bowl of Pumpkin Black Bean Soup with spoon.

Pumpkin Black Bean Soup

Course: Main Dish, Soup + Stew
Season: Bounty (August - October), Mist (November - March)
Dietary: Dairy-Free, Gluten-Free
Preparation: One Pot/One Pan
40 minutes
Total Time: 40 minutes
Servings: 2 quarts
Comfort food at its best, let Pumpkin Black Bean Soup be your secret weapon in defense of friendship. Pumpkin gets a reprieve from sugar and spice in this happy marriage of savory black beans and cumin.
Print Recipe

Ingredients

  • 4 15 oz. cans whole black beans, drained See Notes section for cooking beans from scratch.
  • 1 15 oz. can whole or diced tomatoes
  • 4 tablespoons olive oil
  • 2 cups onion, diced (about 2 large onions)
  • 2 poblano chilis, diced
  • 8 cloves garlic, minced
  • 8 oz. pancetta or bacon, diced (optional) Omit for vegan option.
  • 3 tablespoons ground cumin
  • 2 teaspoons Mexican oregano
  • 1 tablespoon Kosher salt
  • teaspoons ground black pepper
  • 2 15 oz cans pure pumpkin Or one 28 oz. can.
  • 4 cups water
  • 1 can Stout or other favorite beer (optional) I love Athletic Brewing Company's non-alcoholic All Out Stout for this.
  • 2-3 tablespoons red wine vinegar, or to taste at the table
  • pumpkin seeds, cilantro, green onion, and/or sour cream as toppings

Instructions

  • Blend together in a food processor half of the black beans and the canned tomatoes. Process until nearly smooth. Set aside.
  • Heat the olive oil in a large soup or stock pot to medium-high heat. Add the diced onions, poblano, garlic, pancetta (if using, salt, and pepper. Stir together, and allow the vegetables to thoroughly soften as the pancetta crisps up a bit, stirring frequently and adjusting heat to prevent them from browning, about 7 minutes. Add the cumin and Mexican oregano, stir, and allow to cook another 3 minutes or so.
  • Add the blended bean/tomato mixture to the sauteed vegetables and stir. Stir in the pumpkin, and then stir in the water and stout (if using). Simmer and stir frequently for 20 minutes or so to slightly condense and thicken, and to let the flavors come together. Stir in the remaining whole beans and serve. If you are making this in advance of serving time, add the beans in the last five minutes before serving to they don't overcook and collapse.
  • Right before serving, stir in the vinegar and taste to adjust seasoning. Ladle into bowls, serve plain, or garnish with your favorite combination of topping ingredients.

Notes

For cooking the black beans from scratch:
If you are cooking your black beans from their dried state, you can omit the pancetta and include a ham hock, which adds a lovely smoky flavor and a little smoked pork to the pot. For the vegan option, of course, do not add a hock.
You'll need:
Soak the beans 4-6 hours covered by 2" in water. Place the beans and their soaking water (I think this preserves some color, flavor, and nutrients, but you may also drain the beans and start with fresh water) and the ham hocks (if using) in a pot large enough to cover by 2" of water. Bring to a rolling boil for five minutes. Reduce heat to low and simmer for 1-2 hours, with a lid set ajar. Stir every now and then, and begin tasting for doneness at the one-hour mark. Try your best to not overcook the beans-- just cook until they are tender to the tooth, but have retained their shape. 
Proceed with the recipe as directed in step one. 
With this method, drain the beans through a colander and use the cooking liquid (pot liquor) to replace some or all of the water. This captures the extra flavor the cooking liquid offers into the soup. After the ham hock cools, pick any meat from it and reserve until step four, adding it back with the whole beans. 
Five-ingredient Celery Amandine is an amazing vegetable dish when made with farm or garden-fresh celery.

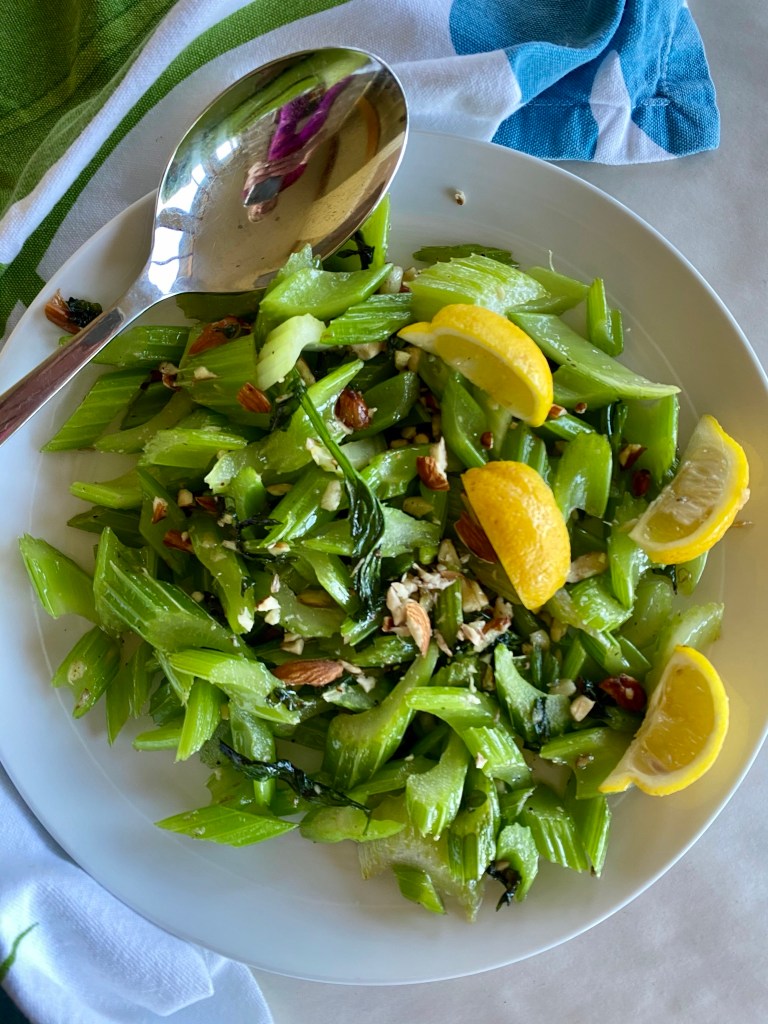
Have you ever thought about making celery a central stand-alone side-dish? I'm going out on a limb here to suggest, no, maybe not. And there is a reason why celery is last to be chosen for Team Exciting Foods.

Grocery store celery is pale, stringy, flavorless, and waterlogged in comparison to locally-grown, bright green, crisp version that hasn't been trucked half-way around the world. Grocery-store celery is a good second-string addition to a soup, stew, or casserole where little is expected of it.

Farmers market or garden-grown celery, on the other hand, is heads above its grocery grocery store kin. If you want a true All-Star for the dinner plate win, growing some or buying direct from a farm is the only way to go.

Take a crack at the bat with this sautéed celery amandine. It is proof that celery is more than a minor-league bench player at your table.

Celery Amandine Throwback

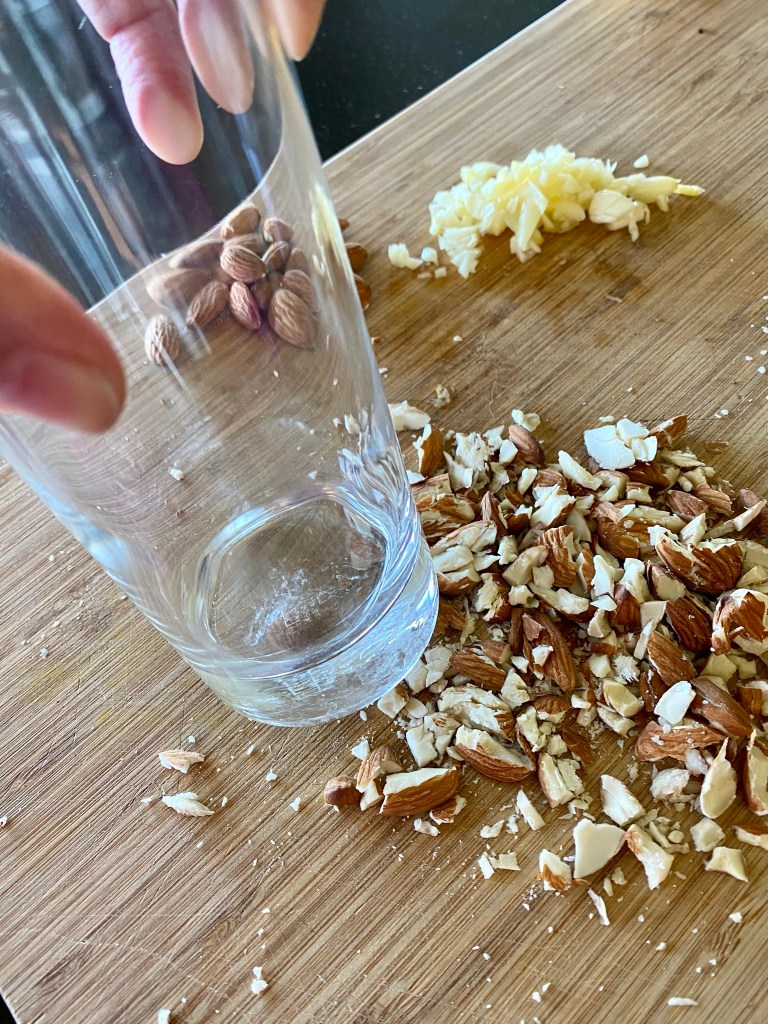
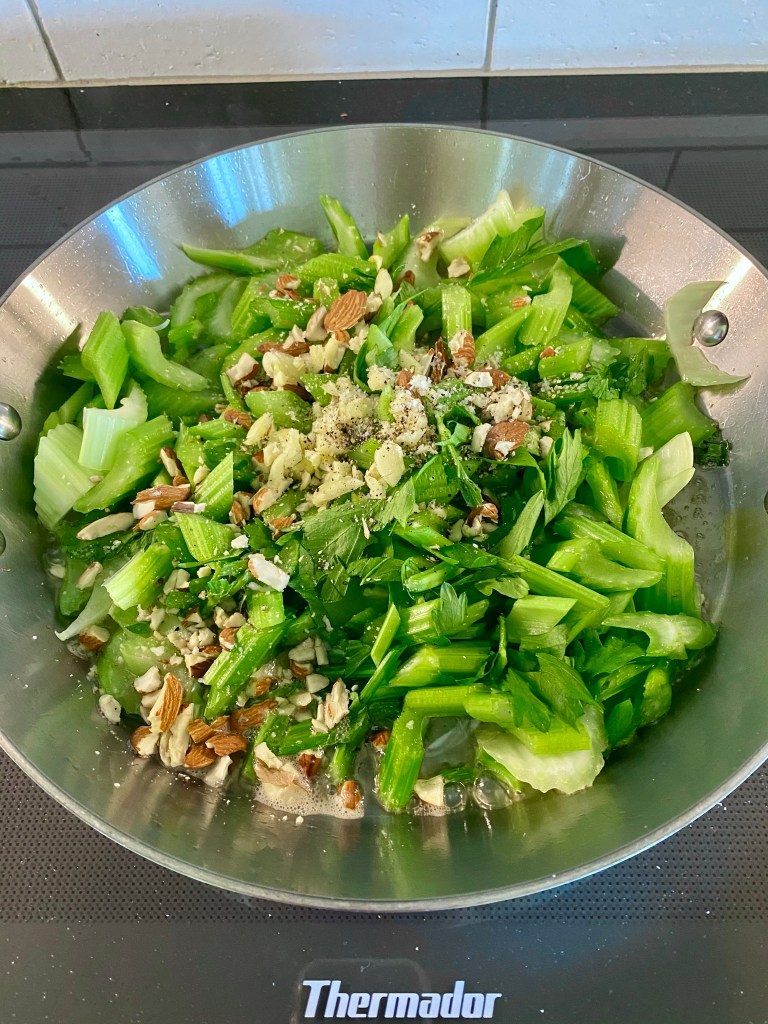
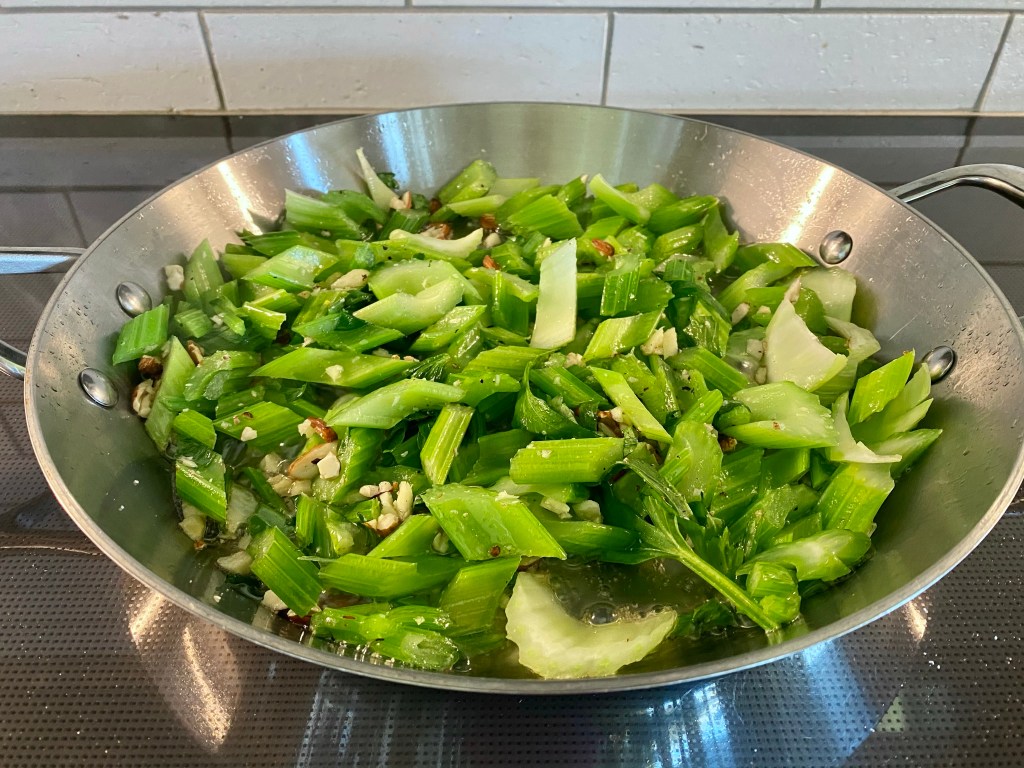
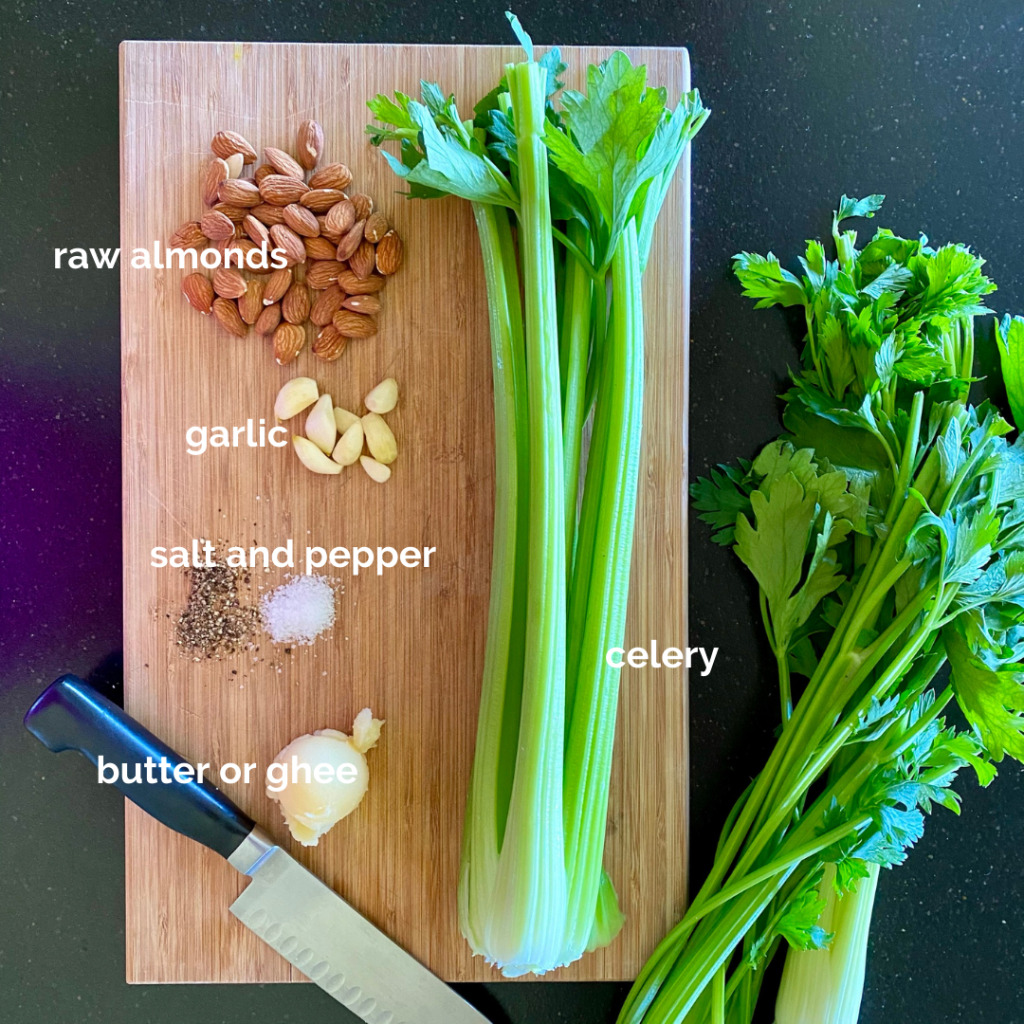
This recipe comes from the wayback machine. My mom made it as a vegetable side dish when I was a kid and its crunchy, buttery, nutty place on my plate always made me happy. Spotting crisp bright organic celery at the farmers market recently brought it back to mind.

It takes four or five ingredients, and is table-ready in under 10 minutes.

I intentionally make extra of this, as it is a nice addition to a lunchtime rice and bean bowl, next to a scrambled egg, or sprinkled with a little vinegar or more lemon juice as a pickley nosh with a sandwich.

platter of celery amandine with lemon wedges

Home Run Celery Amandine

Course: Salad, Side Dish
Cuisine: French
Season: Bounty (August - October), Evergreen (April - July)
Dietary: Dairy-Free, Egg-Free, Gluten-Free, Vegetarian
Preparation: Fast + Easy, One Pot/One Pan
Prep Time: 5 minutes
Cook Time: 5 minutes
Total Time: 10 minutes
Servings: 4
With just a few handy ingredients and 10 minutes or less to the table, take a crack at the bat with this sautéed celery amandine. It is proof that celery is more than a bench player at your table.
Print Recipe

Ingredients

  • 1 small head garden fresh celery (about 3-4 stalks per person)
  • ¼ cup raw whole almonds
  • 4 cloves garlic, crushed and lightly chopped
  • 1 Tbsp. butter or ghee
  • 1 Tbsp. olive oil
  • 1 lemon, cut in wedges (optional)
  • salt and pepper to taste

Instructions

  • Wash and dry the celery and slice it ¼- ½“ inch thick on a sharp diagonal. (The diagonals look beautiful, but also expose more surface area for flavor.) Crush the almonds with the bottom of a glass or by tapping on them with a meat mallet to get rough pieces of mixed sizes. Crush and lightly chop through the garlic cloves. (Crushing the nuts and garlic makes more textural and visual interest than chopping.) Slice the lemon into 6-8 wedges and flick away any seeds you see.
  • Heat a skillet to medium-high heat. (6.5 or 7 on my induction cooktop.) When the skillet is hot, add the butter and olive oil. Add the celery to the pan and give it a shake to let the slices settle in.
  • Toss the nuts, garlic and salt and pepper to taste on top of the celery. Stir a few times while the celery just begins to soften and turn bright green, about 4-5 minutes. Remove it from the heat before you think you should. You'll enjoy this best if the celery retains is crunchy texture.
  • Serve with a lemon wedge, if desired. This is good served right out of the skillet, or at room temperature.

Notes

Make It Your Own:
For vegan option, replace the butter with cooking oil of your choice.
Give this exact treatment to sugar peas in their pod- just a flash in the hot skillet with the other ingredients makes another vegetable winner!
Omit the garlic if that's not for you.

Follow Me

Welcome!

Photo of 101-Mile Kitchen blog owner.

You’re in the right place!  I’m Pam Spettel, home cooking expert and guide, and I’m here to show you how to break up with cooking and hospitality anxiety, learn how to use recipes as guides rather than strict rules, and let your cooking intuition and confidence soar.

Superpower: Dreaming up recipes that work, serving them to my friends and family, and writing little stories about how cooking them well is the same as loving well.

Inspiration: Ingredients! The fresh, colorful, fragrant, local, seasonal ingredients found in the Pacific Northwest are my creative medium.

Heroes: Local food and wine producers– the people who keep me, my family, and our community nourished and happy.

More . . .

Top