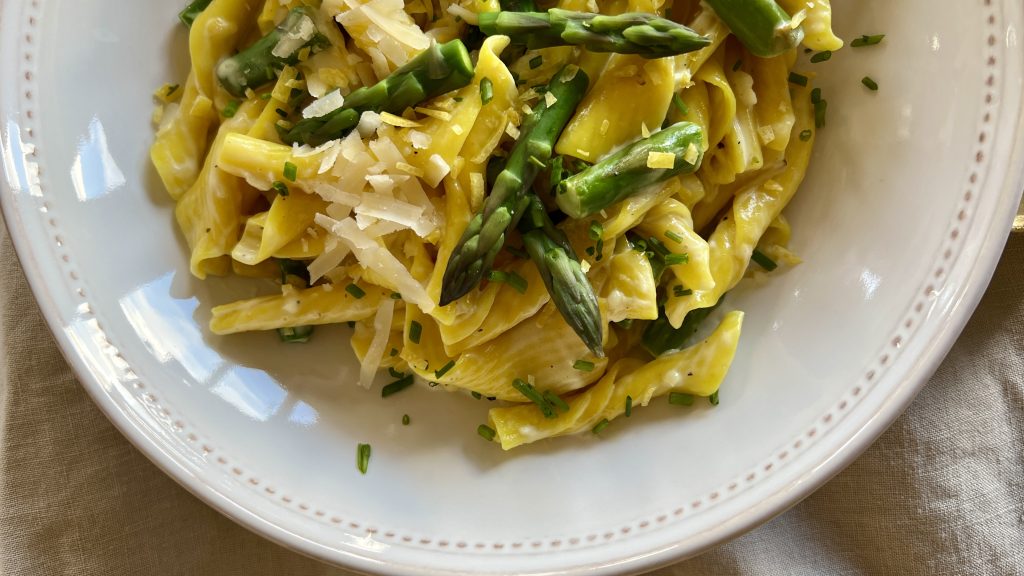
After a loooong winter's nap, I'm back to share with you a most exciting recipe for spring. Creamy Lemon Pasta is the culinary world's daffodil equivalent-- bright sunny lemons, some fresh herbs, and peas or asparagus tips bring good sunny cheer. The creamy sauce works itself out in less time than the pasta needs for cooking. The whole thing from start to finish takes about 20 minutes, a very pleasant hat-tip to spring.
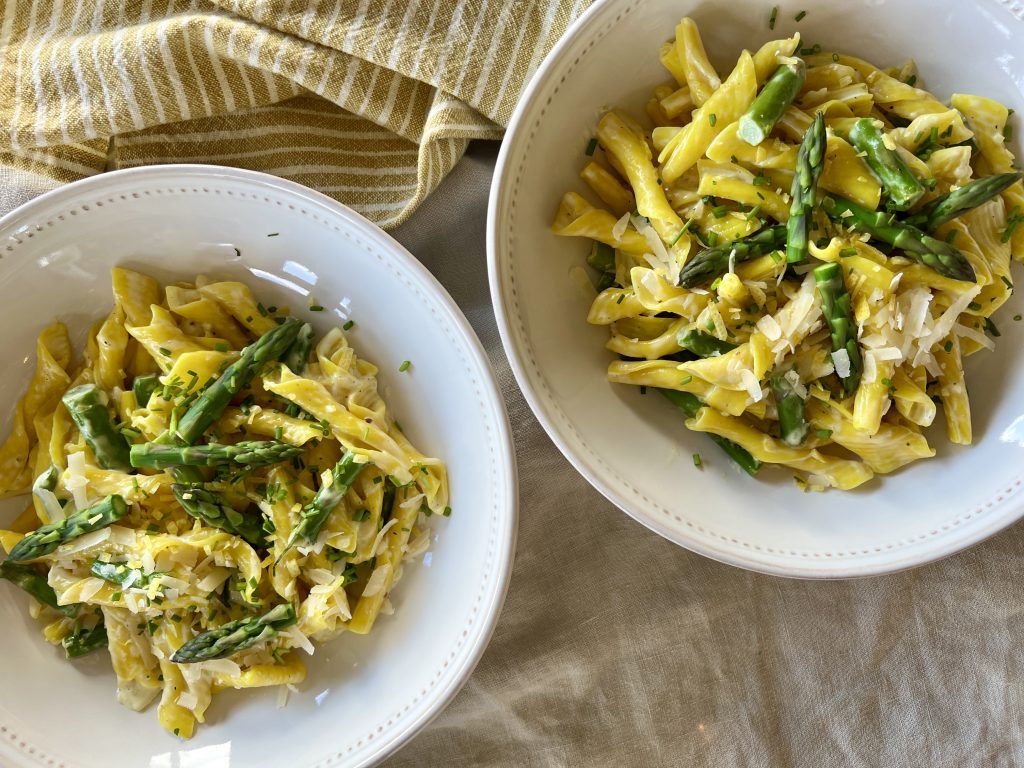
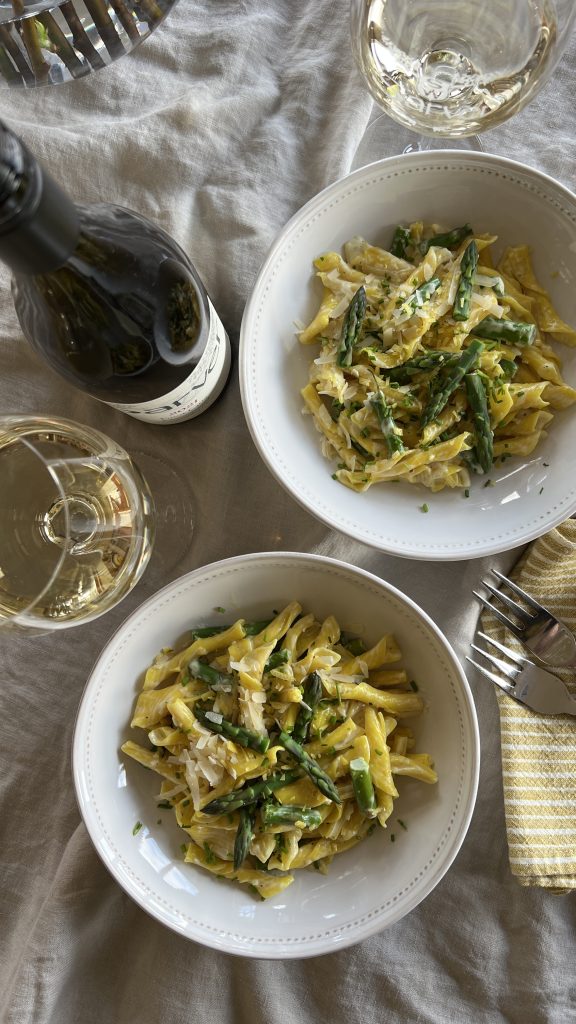
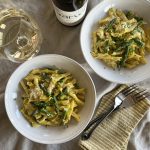
Heap your creamy lemon pasta into a bowl all by itself, or serve it with a salad and or a protein of your choice. Keep it simple, though, to impress yourself with luxury and comfort, all dressed in yellow.
About the Recipe
While this recipe is scaled for four servings, if you're a household of one or two you won't regret having leftovers. (It can easily be doubled to serve eight to ten, and is perfect for Easter dinner.) The ingredient list is short. Yay. There is just enough sauce to make the creamy lemon pasta velvety and lush without it being a gut bomb.
The pasta I've used here is a seasonal offering from Trader Joe's-- Lemon Torchietti--infused with lemon flavor that's perfect with this recipe. Grab some if you can find it. TJ's also often carries a lemon pappardelle which is nice, too. But this creamy lemon pasta recipe certainly doesn't require lemon-flavored pasta. Use what you have, use what you love.
Do give this a try. It is in my regular rotation, as it is so versatile and remarkably delicious.
This comforting, quick pasta is the culinary equivalent of the springtime daffodil, featuring lemon and peas or asparagus. It feels very fancy, but is remarkably simple.
8ouncespastatorchietti, penne, ziti, pappardelle are all good choices
8ouncesfresh or frozen peas, or asparagus cut into 1" piecesoptional
1 cupheavy cream
2 small or 1 mediumlemons, zest and juice
2 cloves garlic, peeled and finely minced or pressed
½teaspoon salt, plus more for pasta water
black pepper to taste (be generous!)
1-2teaspoonsthyme leaves, removed from stemsoptional
2 ouncesParmesan cheese, coarsely grated(about ½ cup)
Instructions
Bring a large saucepan full of water to boil on high heat. Generously salt the water, about 1 tablespoon. Cook according to package timing or until just tender. Don't overcook! About two minutes before the pasta is ready, add the peas or asparagus pieces, if using.
Save about a ½ cup of the pasta water, drain the pasta and vegetables and return them to their pan.
While the pasta is cooking, in a small saucepan combine the cream, the microplane lemon zest, garlic, salt, pepper, and thyme leaves if using. Stirring regularly, bring to a forceful simmer for 3-4 minutes.
Pour the cream mixture and half the cheese into the pasta and vegetables.Stir in the lemon juice. If the sauce needs thinning, add some of the pasta water a tablespoon or two at a time, stirring until it is light and silky. Plate into a serving bowl or individual pasta bowls. Garnish with remaining cheese and a sprinkling of herbs, if using..
Notes
To rewarm leftovers in the microwave, sprinkle on 2-3 tablespoons water and cook at 70% power, checking a 90 second intervals, until hot.
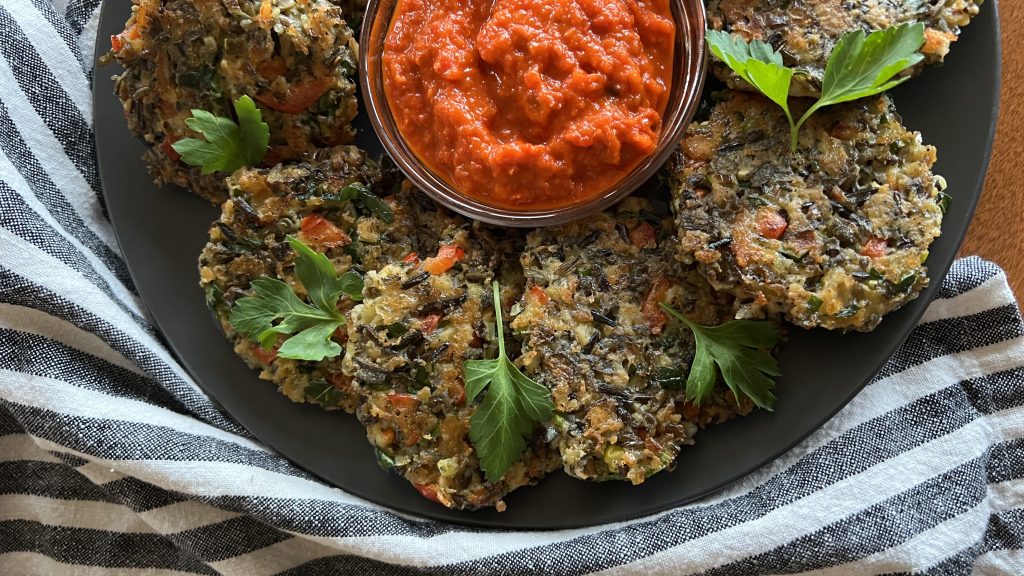
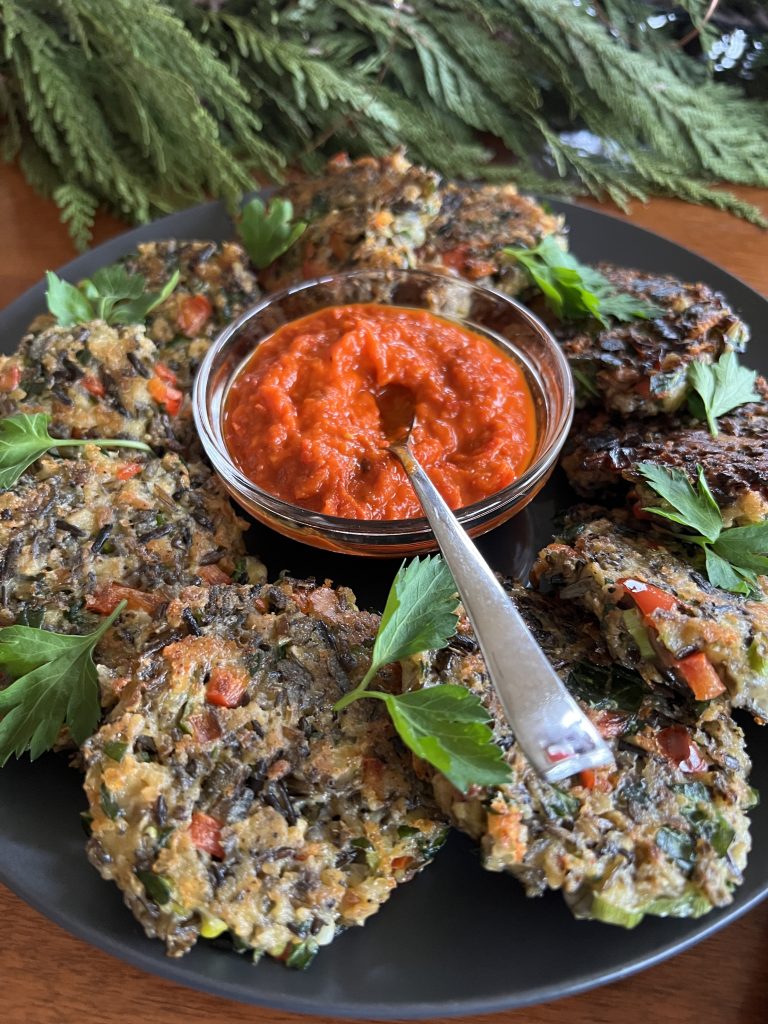
I've been dreaming of developing a recipe for Wild Rice Fritters and Red Pepper Dip for months, and it finally took shape in this last puff of space of the year.
I love this span of time. The old year is essentially over. The new year is drawing its own deep breath readying for its debut. In this liminal vacuum, dreaming and realigning with nature happen without much effort. I begin celebrating the quieter side of winter.
Christmas is over and we’re supposed to be hauling trees out of the house, but I couldn’t resist hanging this windfall fir branch from my kitchen rafters, and lighting it up to extend my celebration of winter.
Wild Rice Fritters, Perfect for the Season
The 101-Mile Kitchen spirit emphasizes eating seasonally, but along with that comes living seasonally. Like a bear in its wintery den, my digestion slows this time of year. Eating smaller meals that feature storage ingredients like dried beans and wild rice, squashes, and root vegetables makes the best sense when I'm listening to my body.
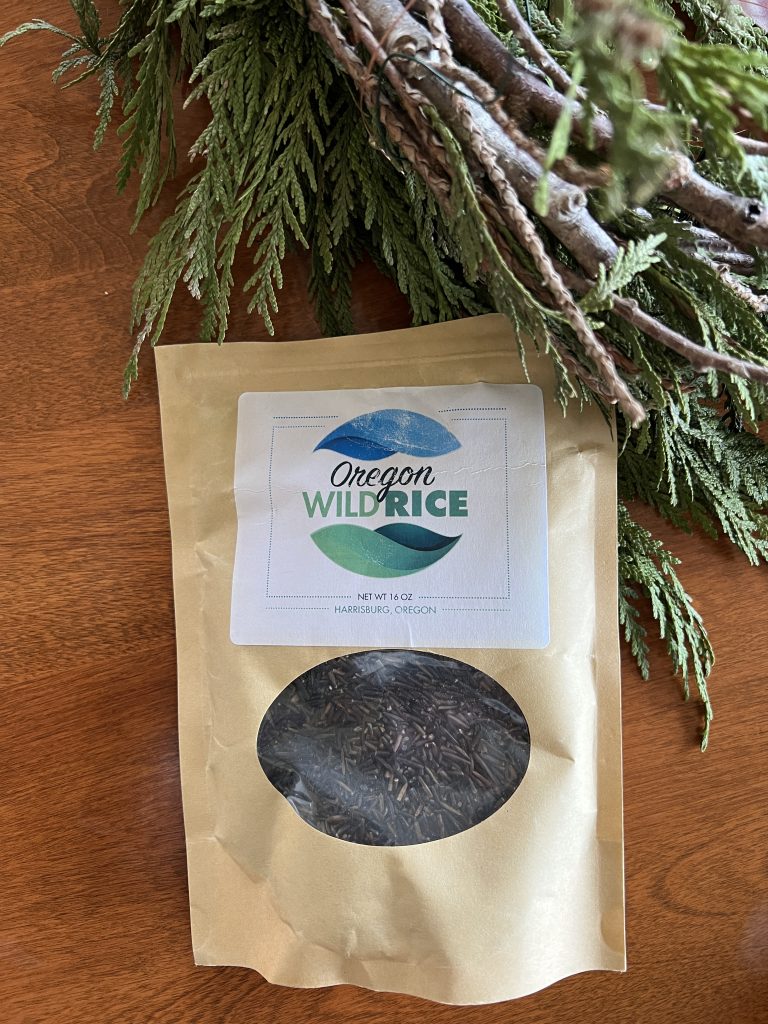
Wild rice fritters make a satisfying small meal or appetizer, or a great side dish to a larger winter meal. I use Oregon's very own Oregon Wild Rice, about 20 miles as the crow flies from our 101-Mile Kitchen hillside. The Langdon family stopped draining their fields of the autumn rains to convert their former grass-seed operation to wild rice in 2016, bringing their farmer practices in better line with nature. We've become the beneficiaries by enjoying their flavorful wild rice more often.
Versatile and Simple Red Pepper Dip
When it comes to injecting bright color to our meals this time of year, this red pepper dip really delivers. The beautiful bright red-orange dip is also delightful along with roasted Brussels sprouts halves, as sandwich spread, (do try it on grilled cheese sandwiches), and as a pizza sauce.
Other Light But Satisfying Wintery Meals You Might Like:
1cupwild rice, raw(You will have about one cup of rice left over for another use.)
3 largeeggs
3green onions, thinly sliced
½red or yellow bell pepper
1oz.spinach leaves, thinly sliced and then chopped (about 1 cup)
2cloves garlic, minced or pressed
1tablespooncapers, minced
4 oz.fontina, gruyere, or cheddar cheese, grated
1teaspoonsea salt
1/2teaspoonfreshly ground black pepper
1cupplain cracker crumbs, finely crushed
1tablespoonbutter
1 tablespoon olive oil, plus 1 teaspoon for rice
For the Red Pepper Dip
12 oz.jarroasted red peppers
1tablespoonolive oil
1 clovegarlic, smashed
½teaspoonsalt
2teaspoonsbalsamic vinegar or blackstrap vinegar
Instructions
Make the Fritters
Place the rice in a small saucepan and rinse with cold water. Carefully drain and add one teaspoon olive oil and 2½ cups water. Stir. Bring to a boil, then cover and drop the temperature to low. Cook until the rice is tender and the grains are beginning to unfurl. Drain through a fine mesh strainer and allow to cool while you carry on.
In a large mixing bowl, whisk the eggs. Add the green onions, red or yellow bell pepper, spinach, garlic, capers, cheese, salt and pepper, and stir.
Add two cups of the cooled wild rice and the cracker crumbs. Stir together thoroughly.
Heat a large stainless steel or cast iron skillet over medium high heat. Heat the butter and olive oil to the pan until bubbly. Using a ¼ cup scoop or measuring cup for consistent size, form patties with your hands, and drop them into the hot skillet. Press down on them gently to flatten them in the skillet. Cook for about 4-5 minutes per side until well-browned and crispy, adjusting temperature as necessary to keep them from burning. You will do this in two batches. Remove cooked fritters to a paper-towel-lined cutting board or plate.
Place the cooked fritters on a serving plate along with a small bowl of Trader Joe's Roasted Red Pepper Spread for dipping. Enjoy these hot or room temperature. Freeze leftovers for up to two weeks. Rewarm in a 350° oven.
Make the Red Pepper Dip
Drain the roasted red peppers well, and lay them out on a double layer of paper towels, or more sustainably, on a double layer of cotton dish cloth. Press the peppers firmly to release as much moisture as possible. Dry them off.
Add all ingredients except the peppers to a food processor and process until the garlic is finely minced. Add the peppers, and process until the peppers are not quite smooth and the dip is homogenous. Store in a recycled jar with tight-fitting lid for up to five days. Serve at room temperature.
Notes
The beautiful bright red dip is also delightful with roasted Brussels sprouts halves, as a spread on ham, turkey, roast beef, or stacked vegetable sandwiches, grilled cheese sandwiches, and as a pizza sauce.
Here is a small collection of my holiday favorite recipes that will take you from Thanksgiving into New Years. Like most everything I present to you, these highlight seasonal ingredients, and are typically full of love but not labor. As a person predisposed to the holiday scaries brought about by being a solo planner, cook, and hostess for far too many years, I no longer have time or energy for the complicated.
I grew up in a small family who lived far away from any relatives, so Thanksgivings included the complete standards but on a small scale, always prepared beautifully by my mom. I also raised my own family far away from any relatives, so that pattern repeated. If I were hosting Thanksgiving this year, it would the 38th time in the last 41 years. That's a lot of holiday cooking!
Now, my sweetheart and I have a combined seven grown kids, and ten amazing grandkids. This year we are visiting a daughter in Texas and her beautiful family. I get to relax a bit and be the assistant!
Here are some recipes that work for smaller groups, or perhaps step out of tradition a wee bit if your weary of the classic standards.
Holiday Recipe Starters
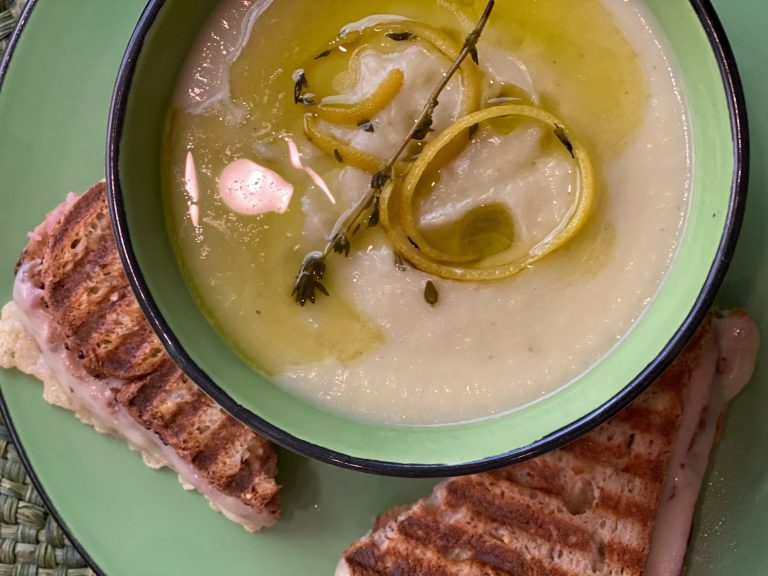
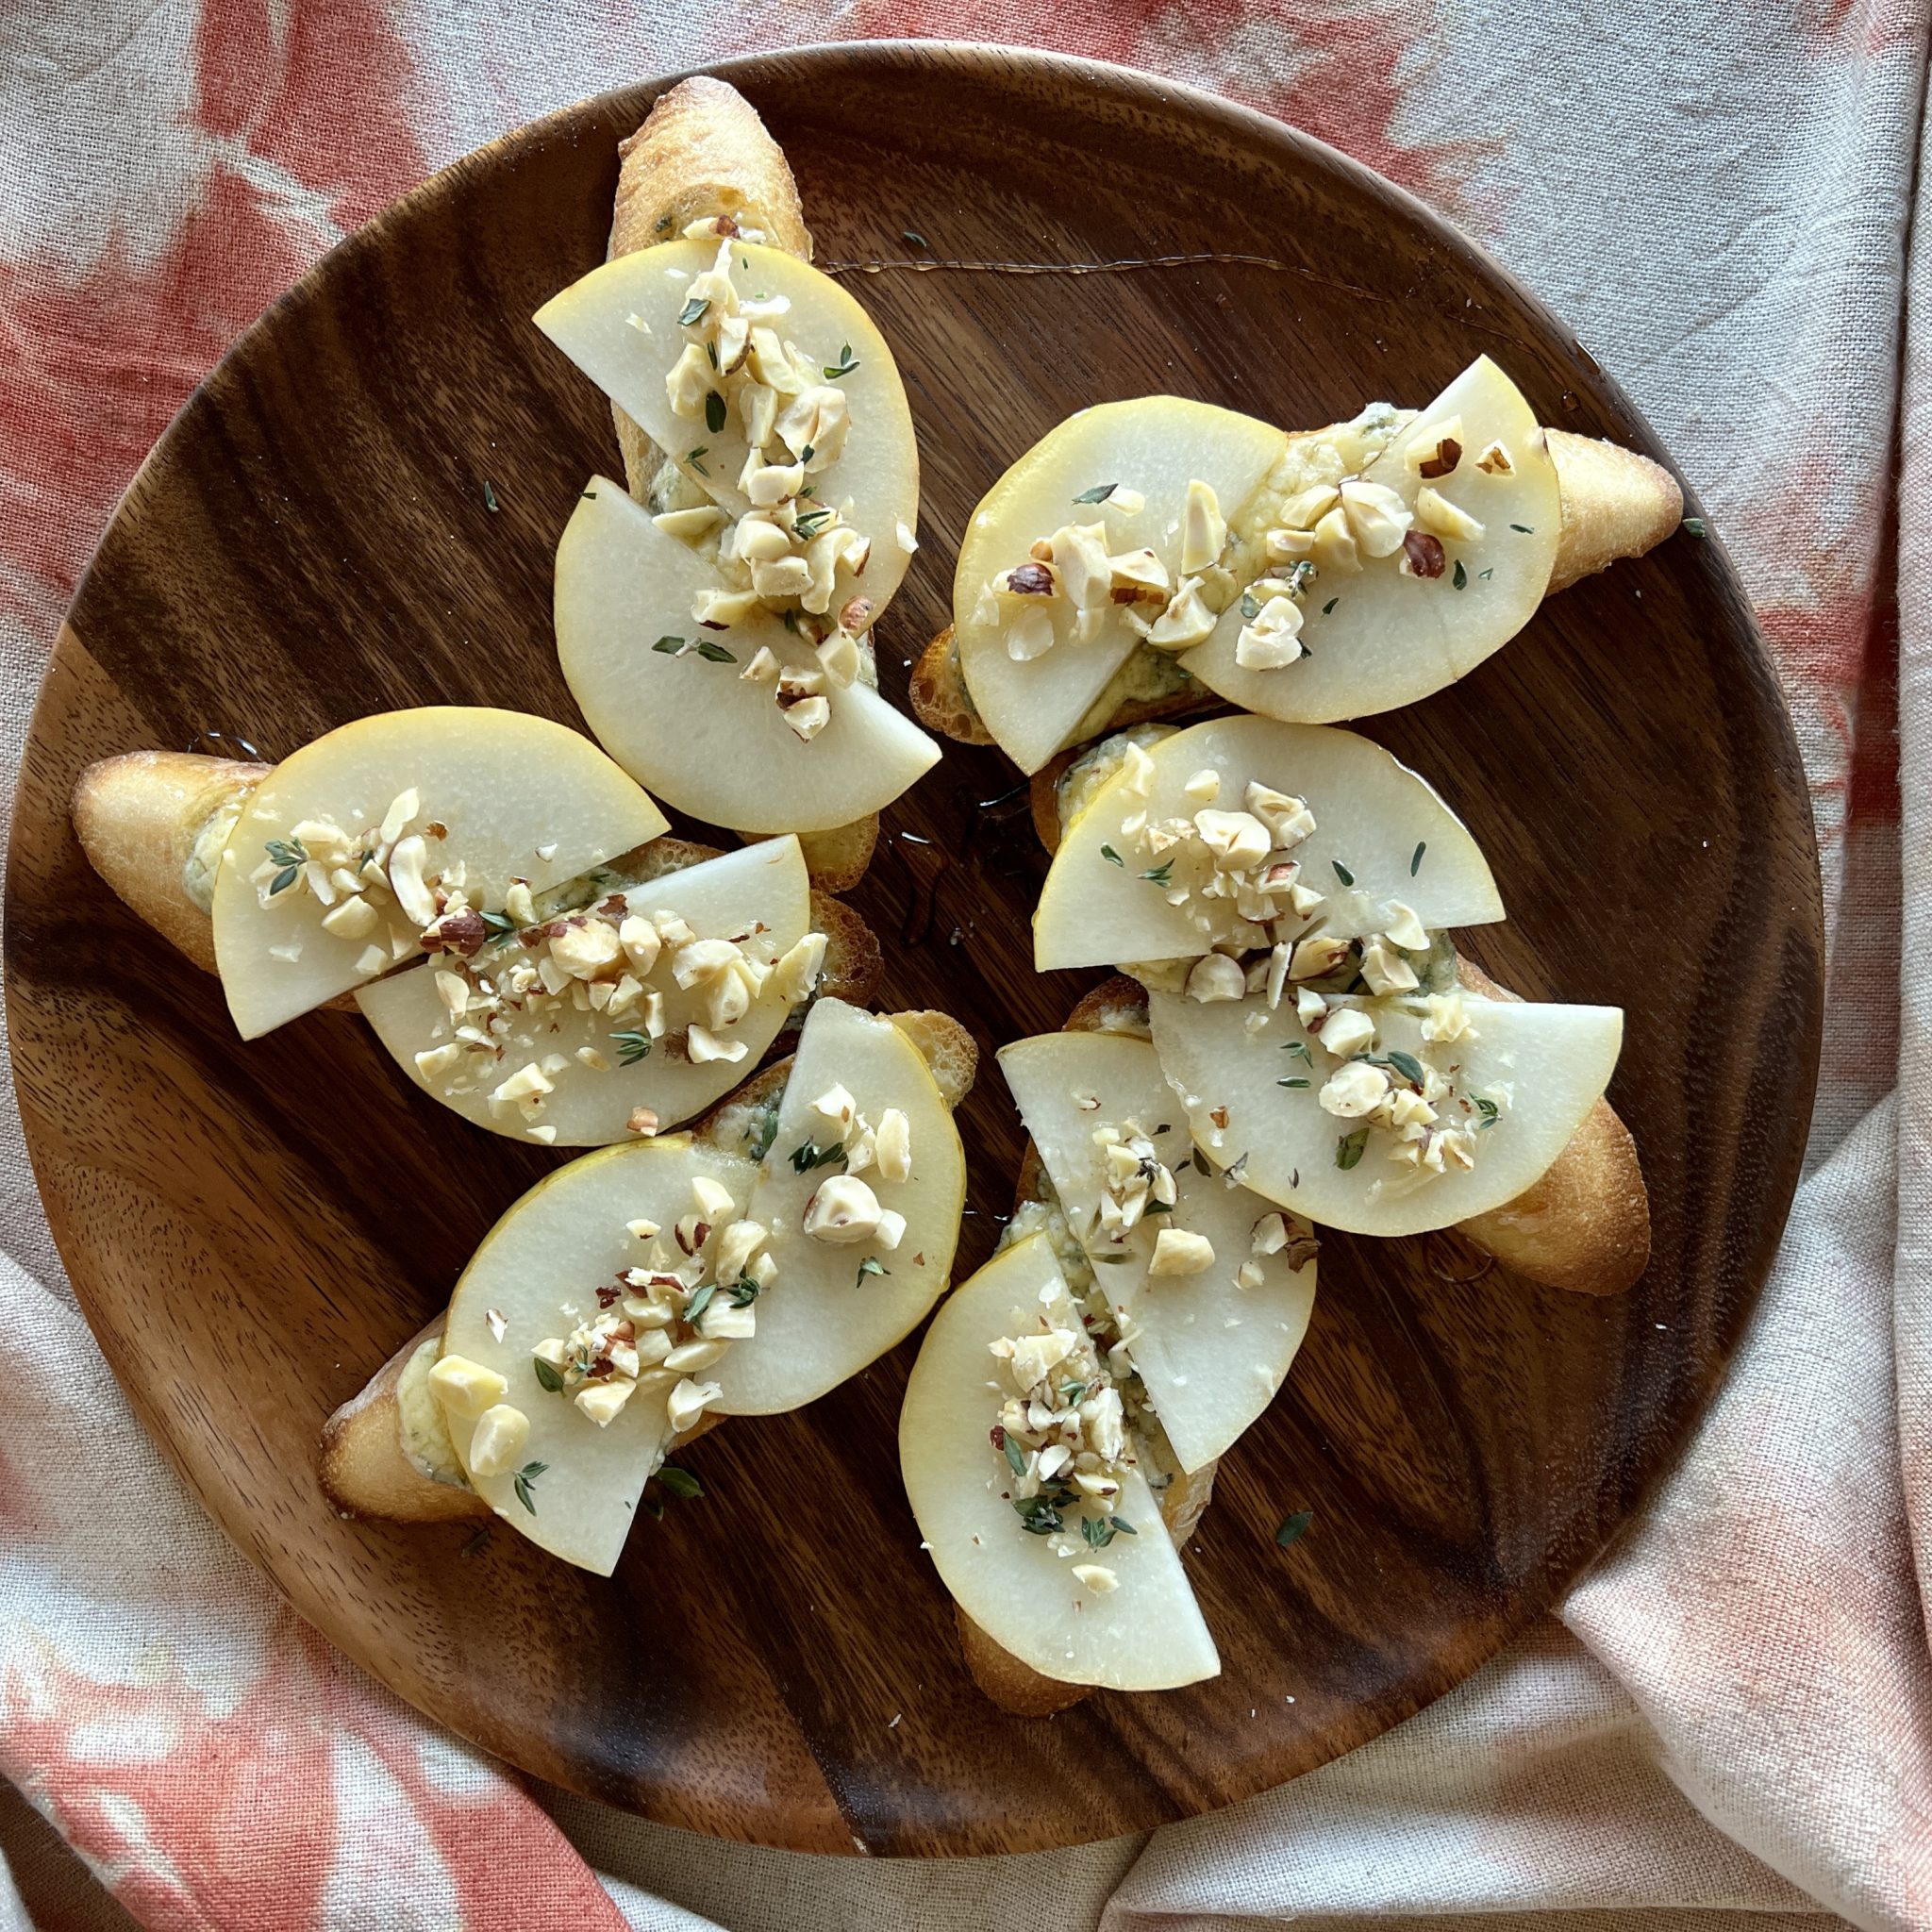
Winter White Vegetable SoupBlue Cheese + Pear Tartine
I love handing guests a cup of soup as they arrive this time of year. A cup or small mug of soup, like this Winter White Vegetable Soup, or its winter squash version (also within this recipe), is portable as guests mingle and makes a nice handwarmer coming in from the cold. This recipe has enough body and flavor to make it delicious and noteworthy, but it light enough to keep from spoiling anyone's appetite. This pureed soup requires using an immersion blender, so if you don't have one, now is the time. (This is the one I have and love.) An immersion blender is also a truly fantastic Christmas or Chanukah gift for budding cooks, or anyone who doesn't have one. Another big plus-- this soup can be made two or three days ahead and rewarmed at the last minute.
Blue Cheese and Pear Tartine (like a crostata or bruschetta) are frankly amazing. The favors sing. Use this throughout the holiday season, whether its a quiet night at home, or if you are hosting or taking food to a party.
Beautiful Sides, Salads, and Cranberries
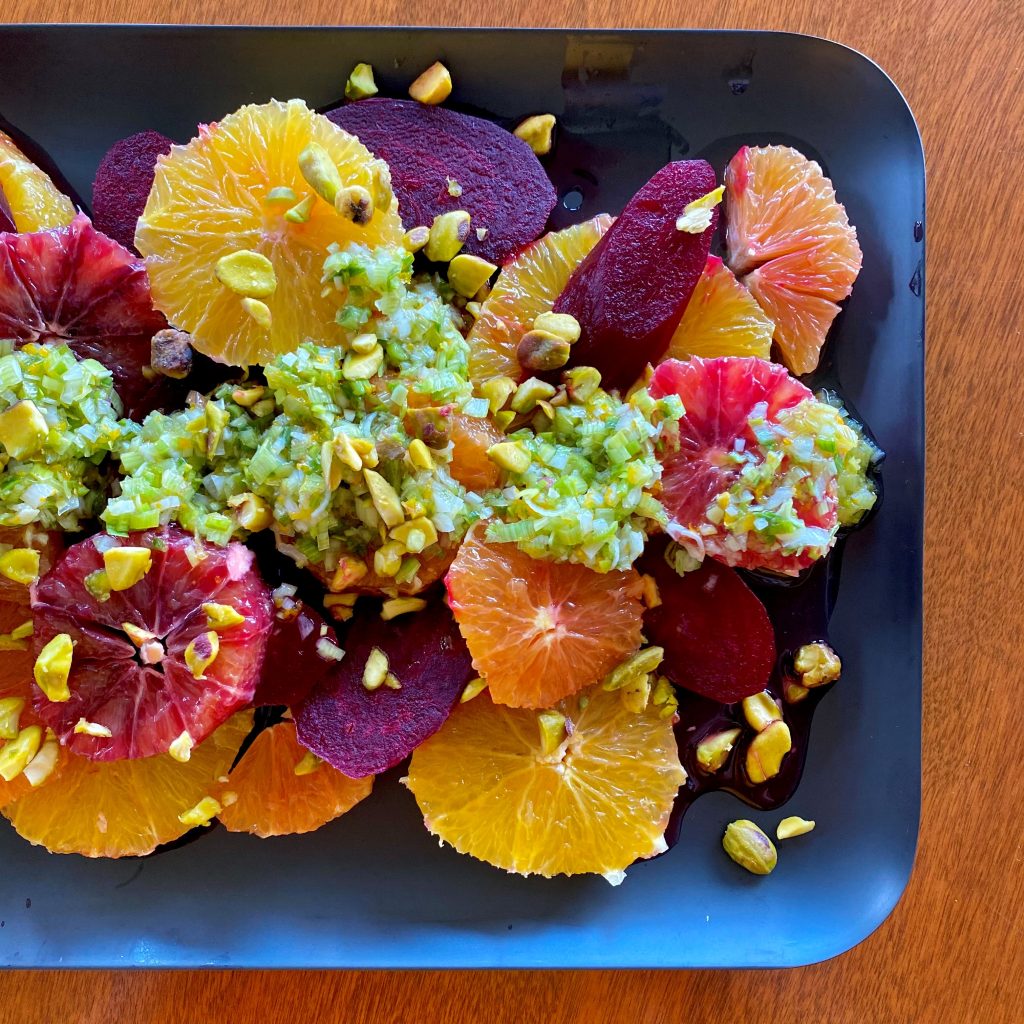
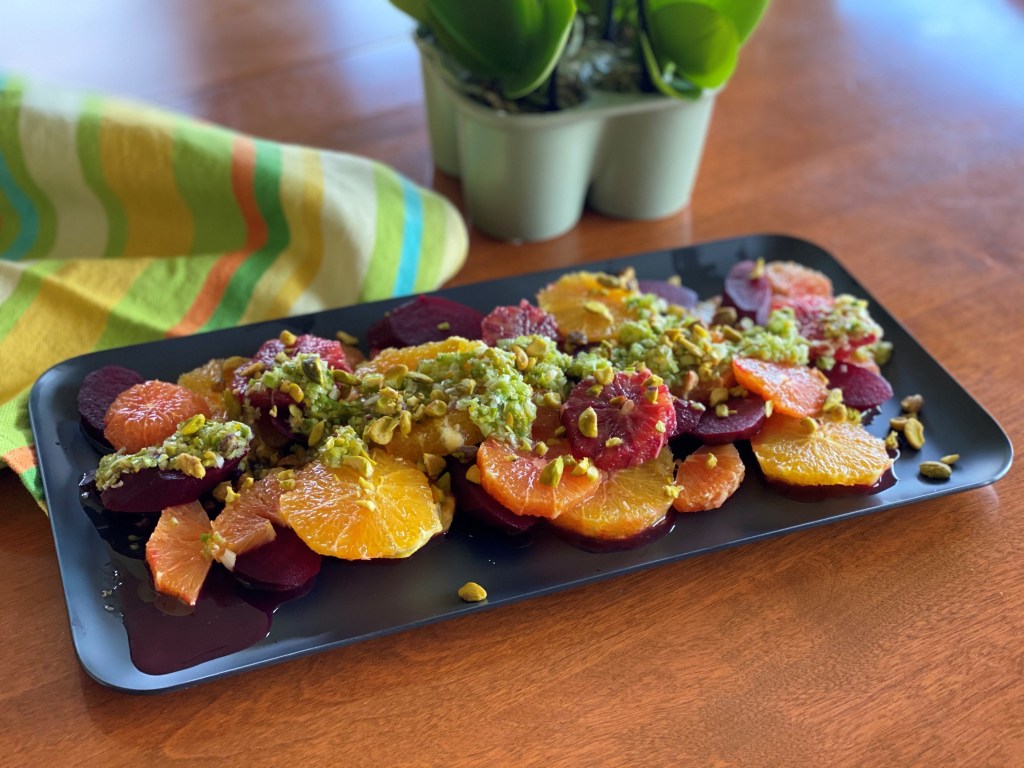
Some of my favorite holiday recipes include Citrus Rush Beet Orange Salad. I love this one for it's pop of gently acidity that seems to be very welcome with all of the other buttery dishes. It is so pretty, and the components can be made ahead.
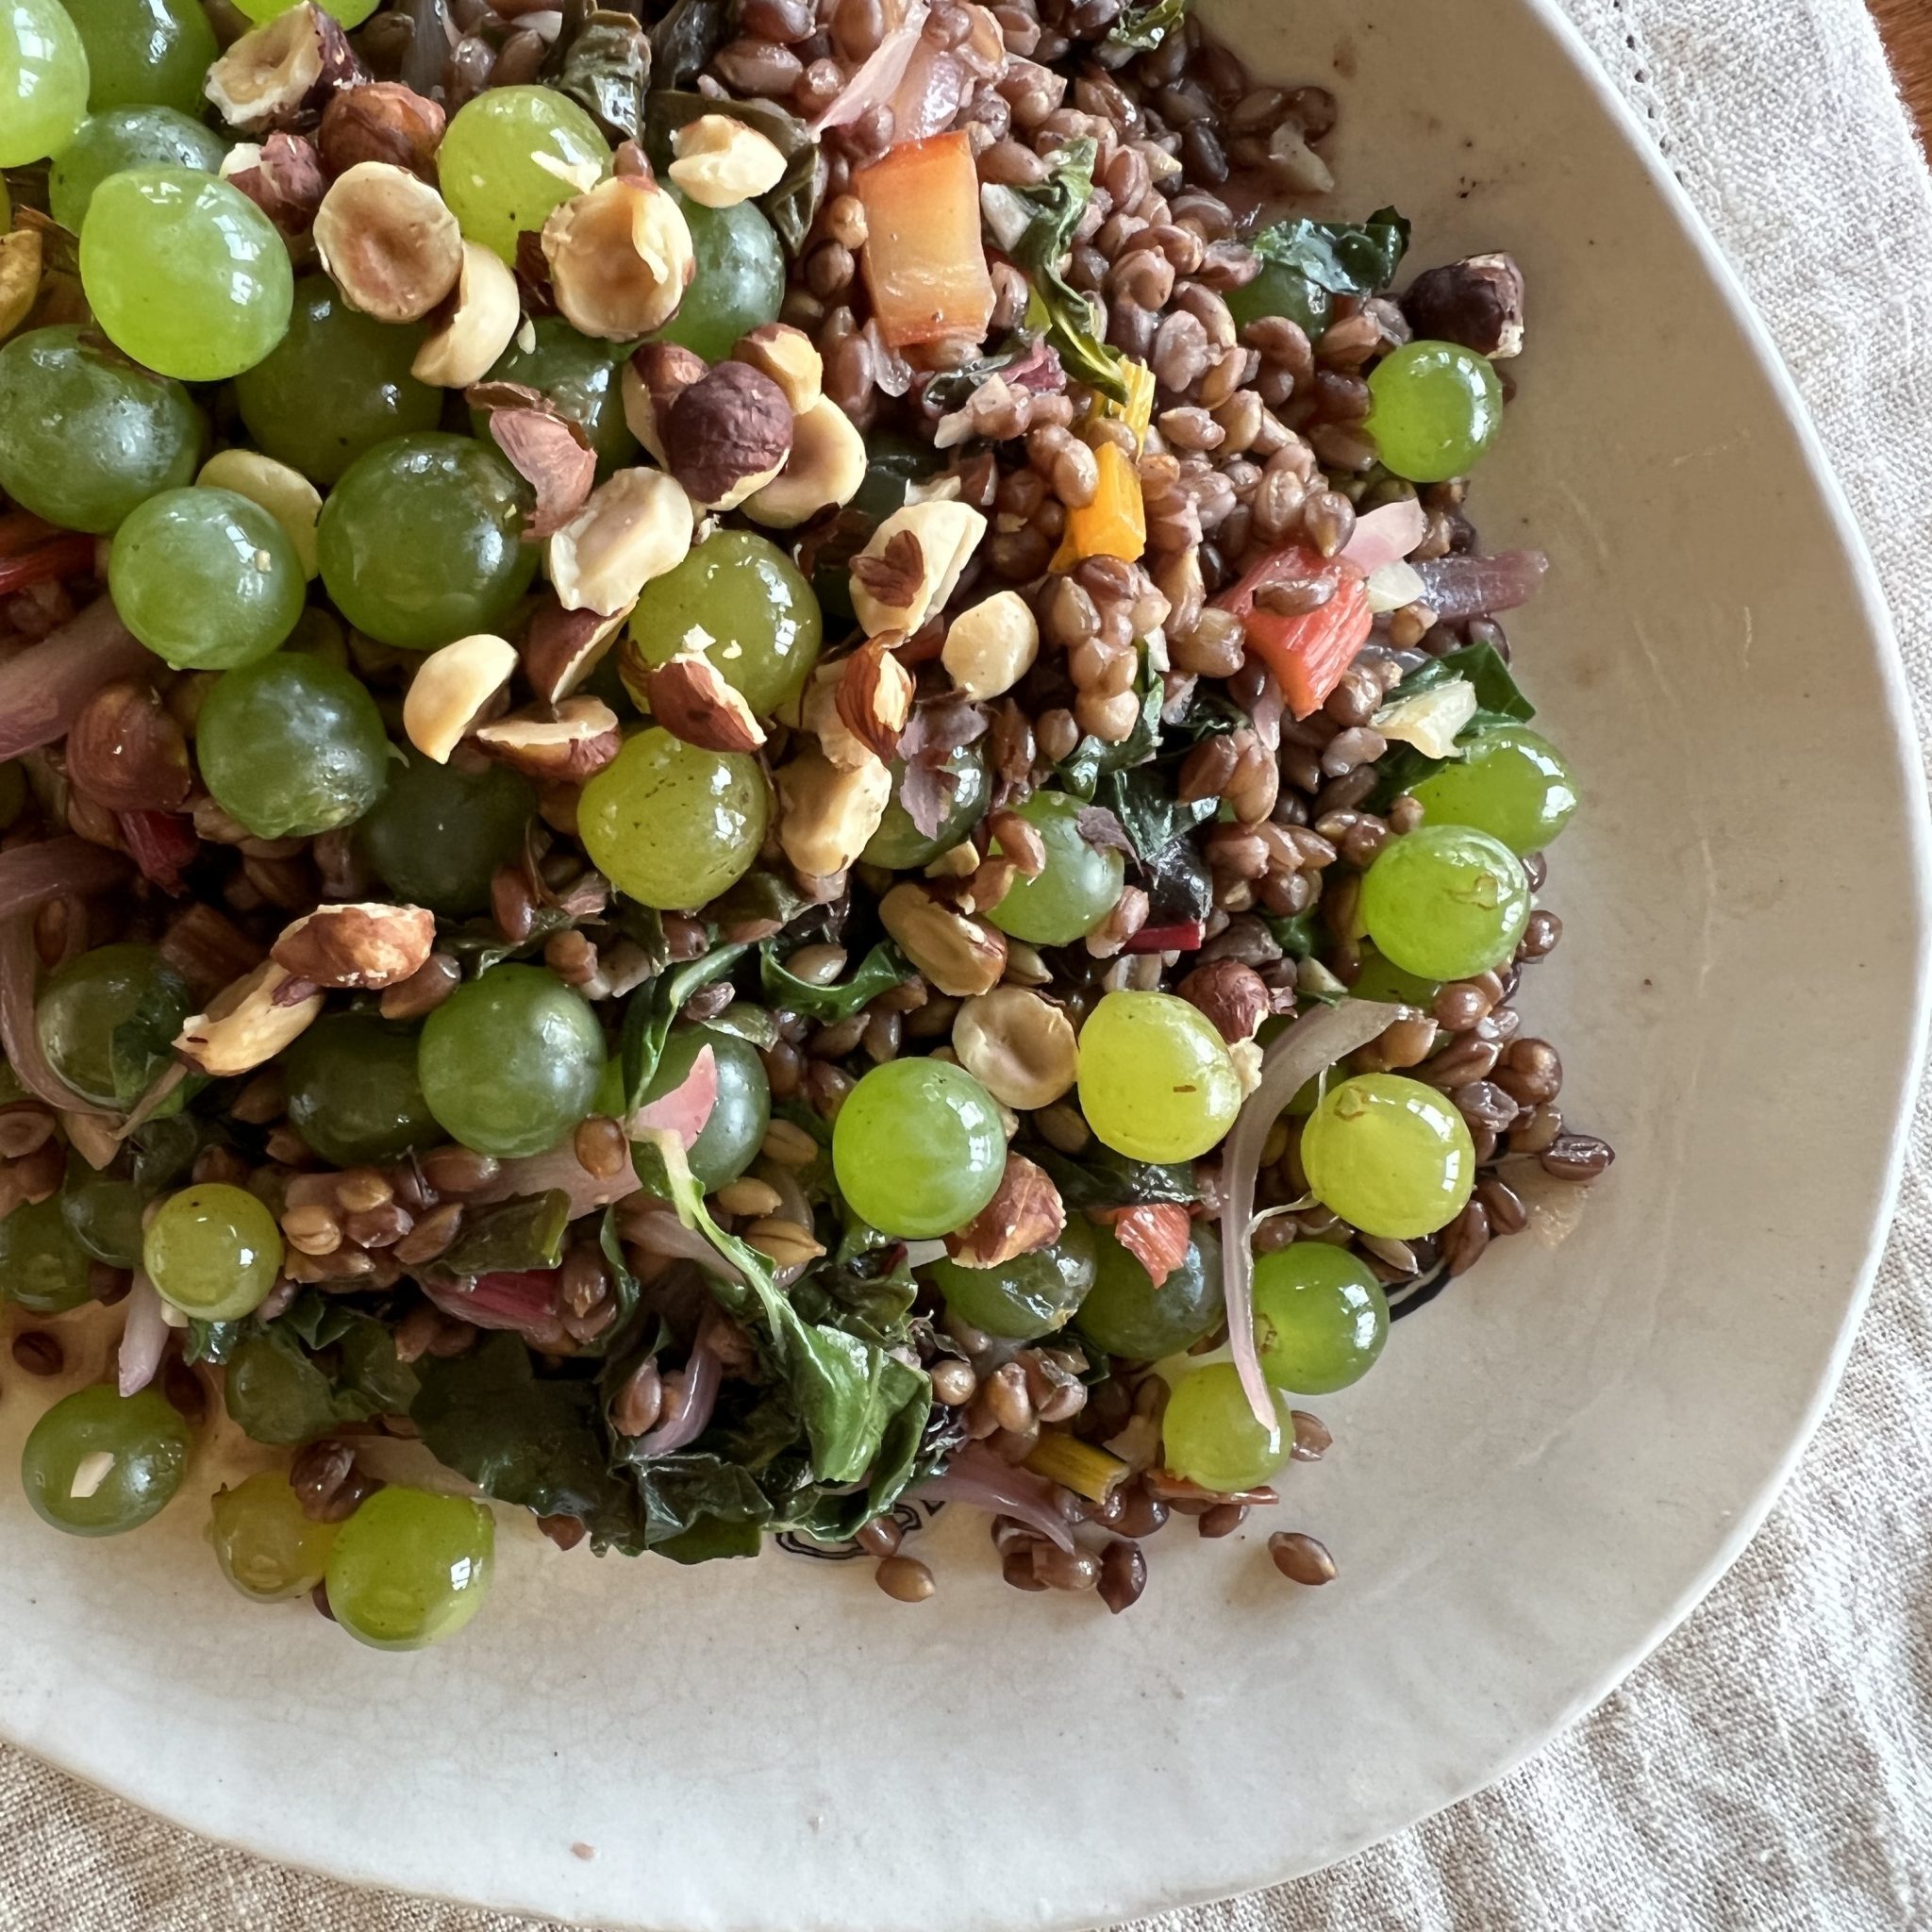
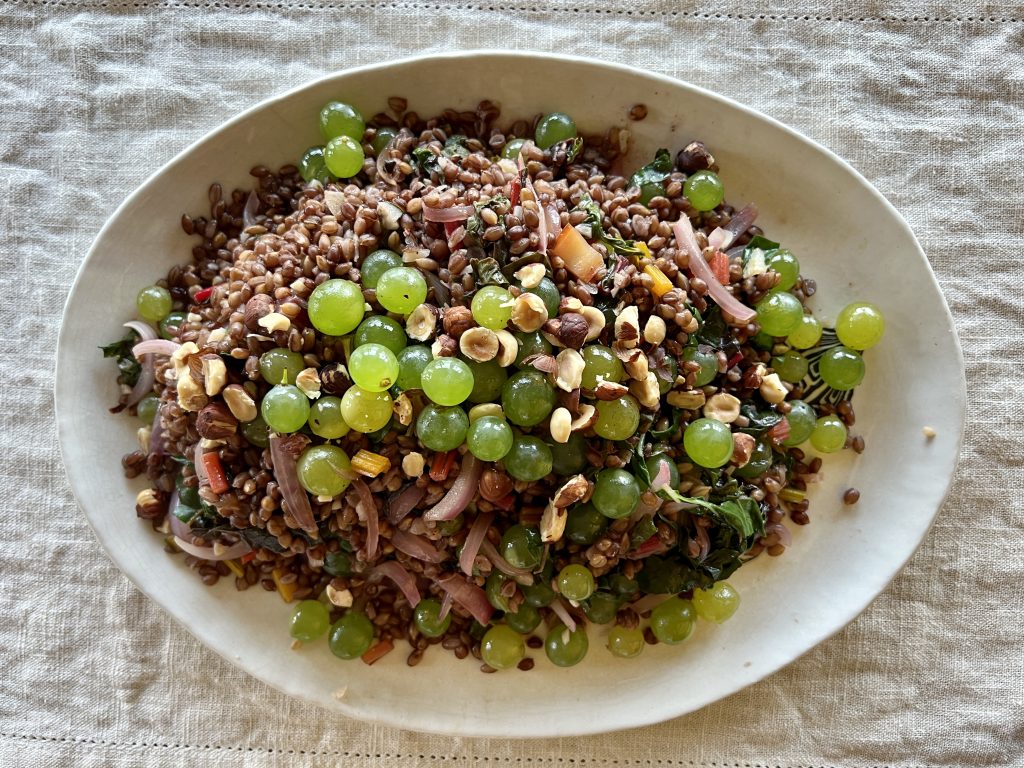
Autumn Grains, Grapes, and Greens is beautiful, and blurs the line between side dish and salad. With it's grain base, it is also wonderful to serve when vegans and vegetarians are at your table. They will truly know you love them!
Beet Orange SaladGrains, Grapes, and Greens Salad
As for cranberry sauce, I love hearing about everyone's favorite recipe. There are so many ways to enjoy cranberries, and it seems that once we hit on our favorite there's no room for change. This is the recipe I've used since the early '90s, and my daughter makes it every year now, too. Cranberry Sauce with Raspberry Vinegar was originally from Bon Appetit magazine, and you can find it here. I've used several blueberry and blackberry vinegars in it with equal deliciousness (P.S.-- don't be tempted to scrimp on the raspberry vinegar. That's where the magic is. And if you can get your hands on it, this blueberry or blackberry vinegar is glorious.)
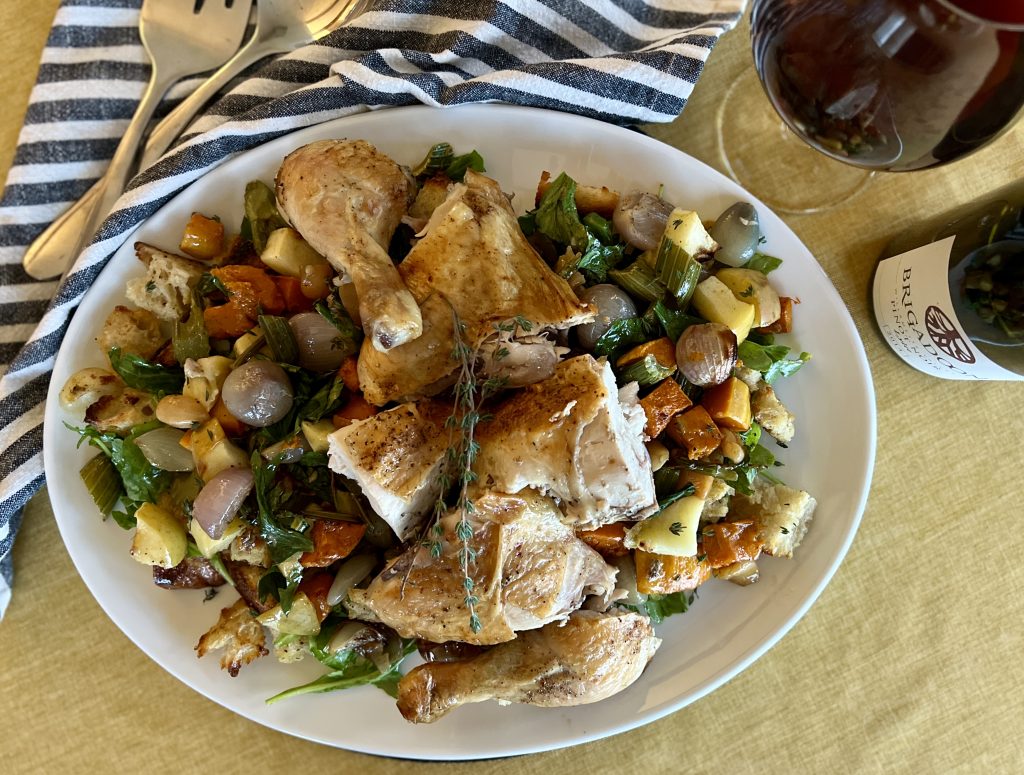
Alternate Main Course
So maybe there's just two or three of you, and a big bird doesn't sound like fun. You still want something seasonal and special, but don't want to be at it all day. Another holiday favorite recipe is my Roasted Chicken + Autumn Bread Salad is really all the glory with a fraction of the time and work. Hey, it's still poultry, right? The bread salad takes the place of stuffing, vegetable sides, and refreshing salad all at once. It truly is Thanksgiving or Christmas dinner worthy.
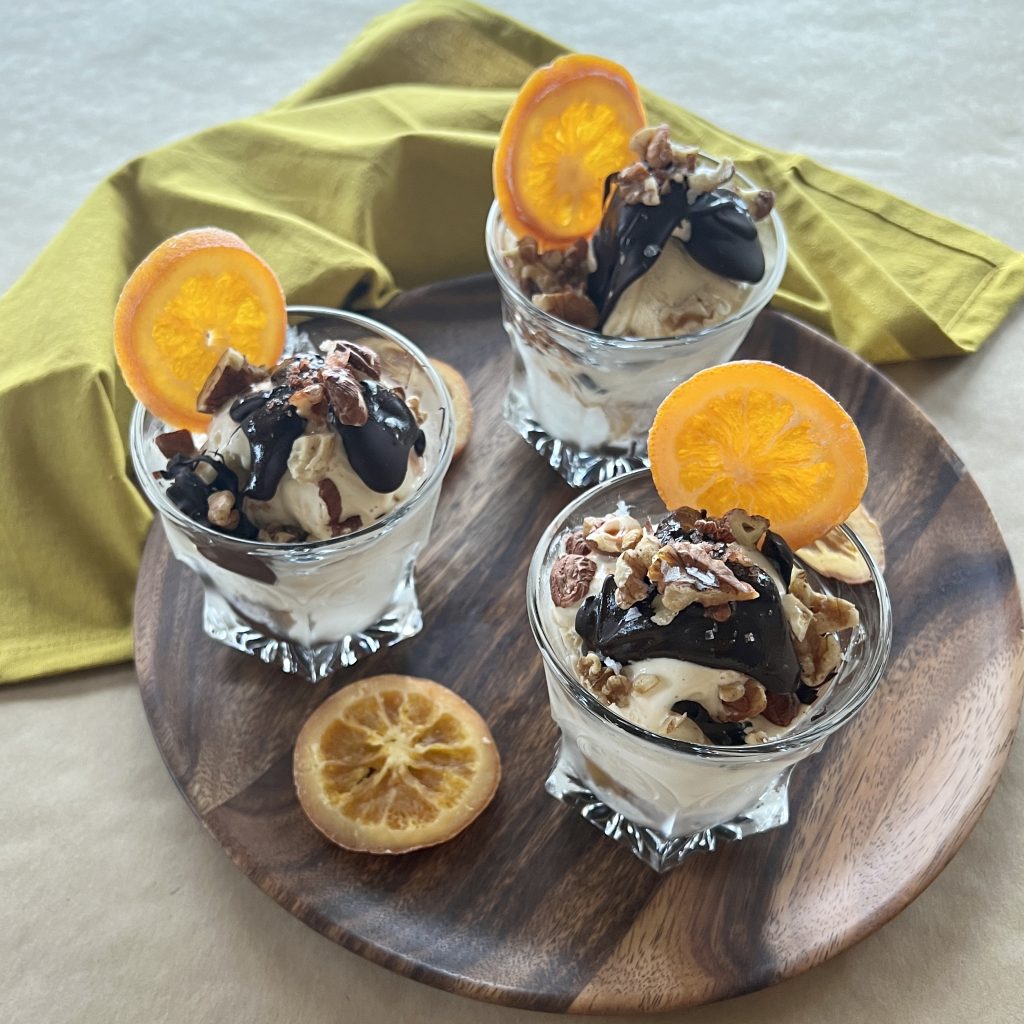
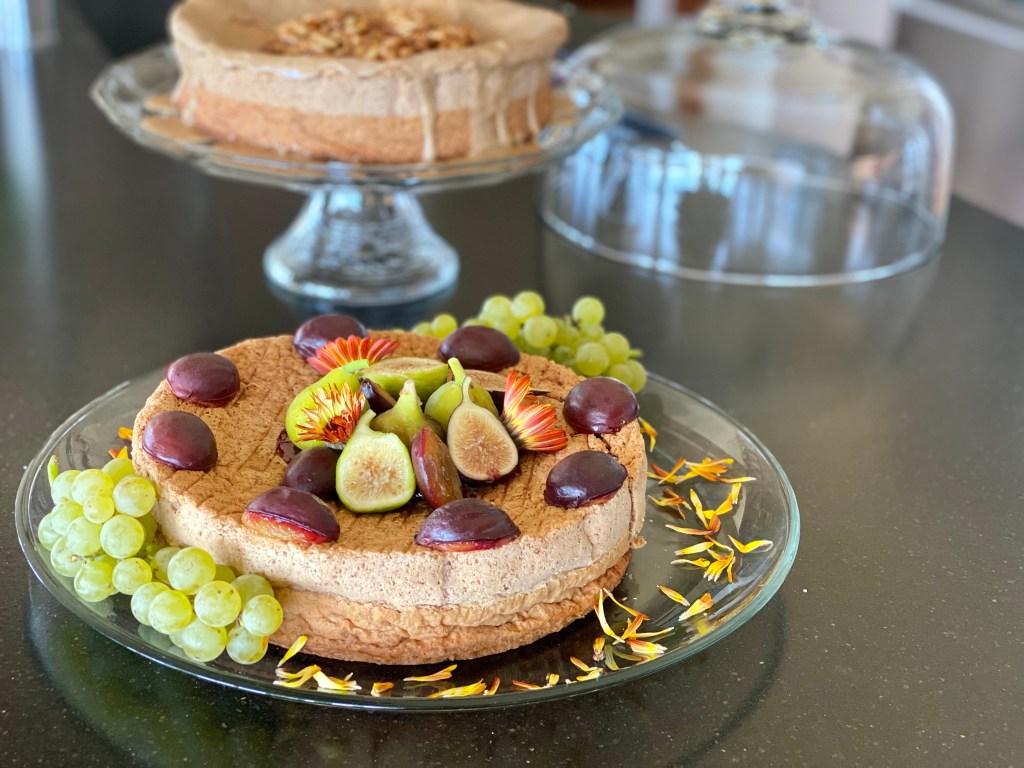
Dessert
Nutty Chocolate Port SundaeFlourless Walnut Cake, plain, coffee, or spice versions
It might be because of my old pastry chef days of making and rolling a dozen pastry crusts every Monday, but making pies feels pretty tedious amidst all of the other pre-holiday meal components. If you have non-pie eaters or gluten free eaters, these two recipes will save the day.
Flourless Walnut Cake (use GF flour to dust your pan) is so lovely, and so simple. Ground walnuts, some eggs, and sugar are all you need. And better yet, you can opt for the coffee flavored version, or the spice cake version. This flexible recipe gives you these flavor choices, or make it plain and serve it with the ice cream of your choice. So good, so pretty, and so simple.
If you want to keep it really simple, how about a rich and very adult wintry Nutty Chocolate Port Ice Cream Sundae? This takes 10 minutes, and yet is as elegant and rich as any other dessert ever. And with this choice, you won't spend one minute baking. (The candied orange slices that make this so wonderful are available at most Trader Joe's stores.)
However you do your holiday, do it in a way that's authentic to you! Pure traditionalist or thoroughly modern; formal or casual; fancy or simple are all valid. It's easy to get caught up in the perfect Instagramable holiday, but it is only as wonderful as you feel!
Have you joined the 101-Mile Kitchen community? If not, we'd love to have you. You can take care of that right here, and when you do I'll send you my free Top Five Cool-Weather Cooking Guide downloadable as a thank you!
This post contains affiliate links, including but not limited to Amazon. As an Amazon Associate I earn from qualifying purchases.When you use these links to buy something I may earn a commission at no cost to you. Product affiliation helps me to keep this site ad-free while providing you with the content you enjoy. I only promote items that I use, like, and trust, or would invest in myself.
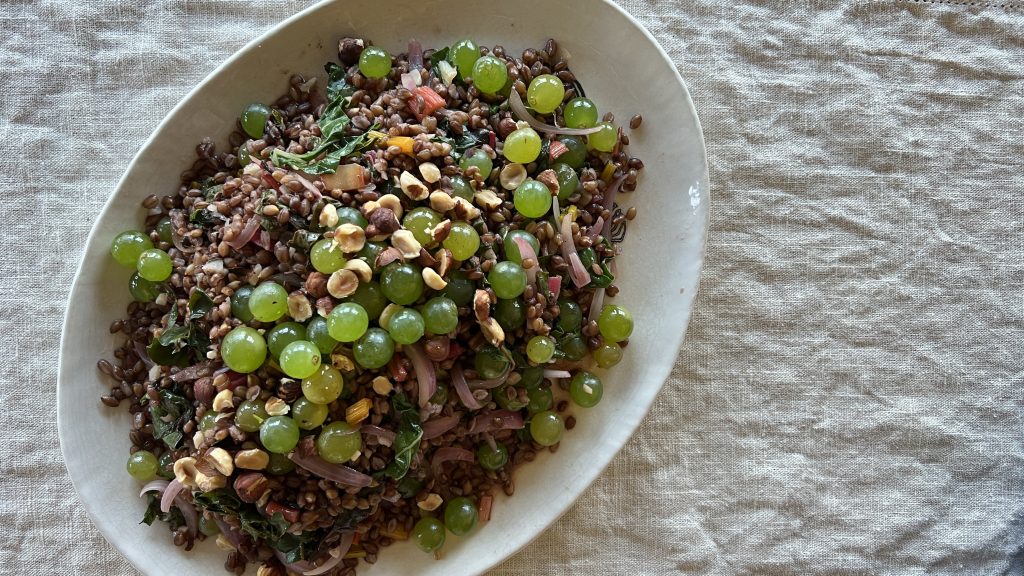
Today I'm teaching my community how to make this wonderful warm autumn grains, grapes, and greens pilaf. Our phenomenal Lane County Farmers Market has hosted a series of cooking demonstrations generously funded by the Upper Willamette Soil and Water Conservation District. Some fabulous local chefs have been smashing it up with their demos all summer long. And today, it's me, a professional home cook sharing with the crowd. I'm extremely honored to be among this group of people, making our local foods more accessible to our community, and adding value to those shopping at our market.
About This Grains, Grapes and Greens Pilaf
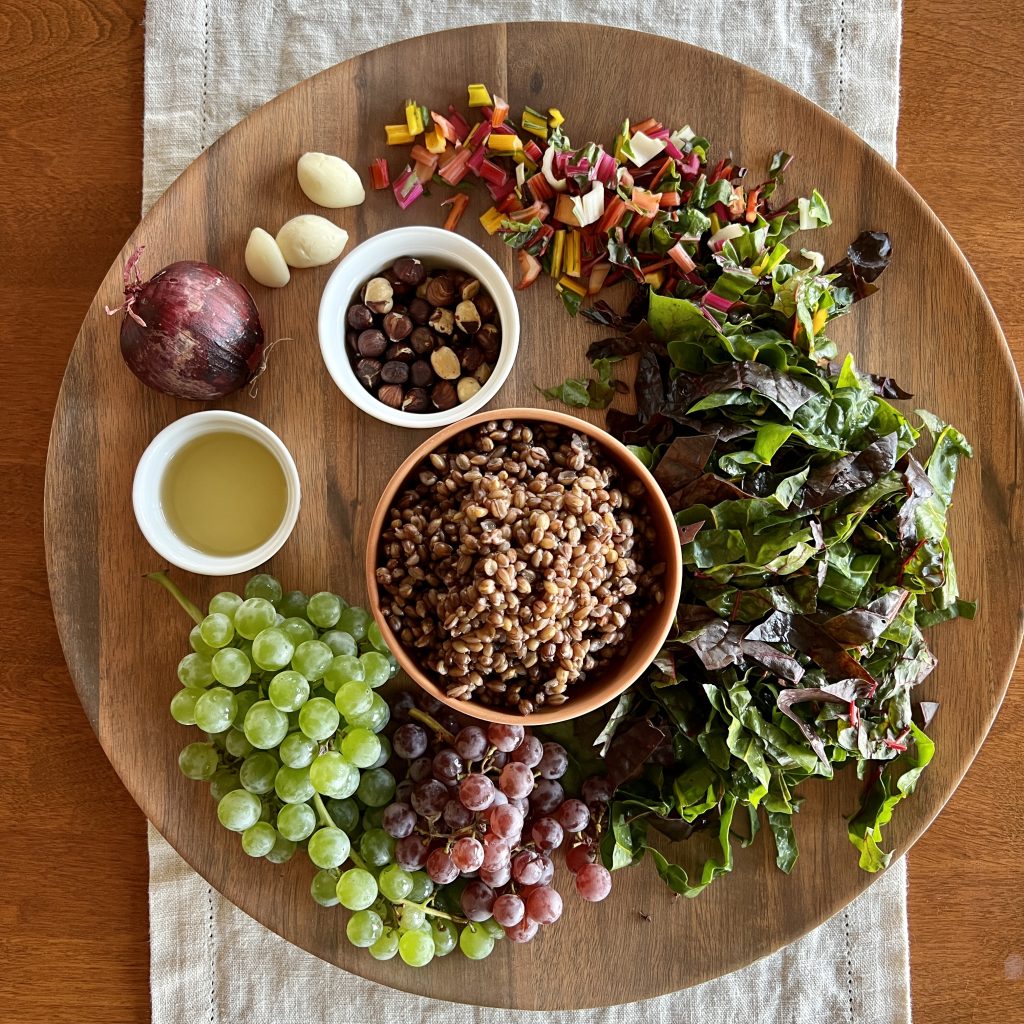
With the exception of olive oil, salt, and pepper, every single ingredient in this dish was purchased at the farmers market. My intent in developing today's recipe was to stuff it full of local ingredients, spotlighting ingredients that abound at the market today and the growers and producers who bring them to us. This very moment. This exact week of this exact season. I wanted my dish to taste like Oregon at this very moment. There is a good chance that many of these ingredients will give you that "terroir", or sense of place, if you live in the northern hemisphere. If you live down under, file this away for your autumn cooking next April.
Grains, Grapes, and Greens is a Seasonally Flexible Recipe
This recipe rendition captures autumn, with grapes coming ripe and wintery greens, still tender and young, just now coming to market. Grains are enduring-- we enjoy them throughout the year. Here are some change-ups you might make with this idea, no matter the season:
Replace the grapes with apples, firm pears, or segmented citrus. In the summer, blueberries, pitted cherries, and diced stone fruit will work wonderfully.
Rotate through barley, wheat berries, farro, freekeh, and the array of colorful rices-- black, brown, red, and purple. They all work perfectly as the base for this type of warm salad or pilaf.
What nuts grow in your area? We're famous for our hazelnuts here in Oregon. As a matter of fact, we grow 99% of the U.S. hazelnut crop. Use whatever nut you have or love. Almonds, pecans, and walnuts are equally good here. Even pine nuts, really a seed, not a nut, would be wonderful.
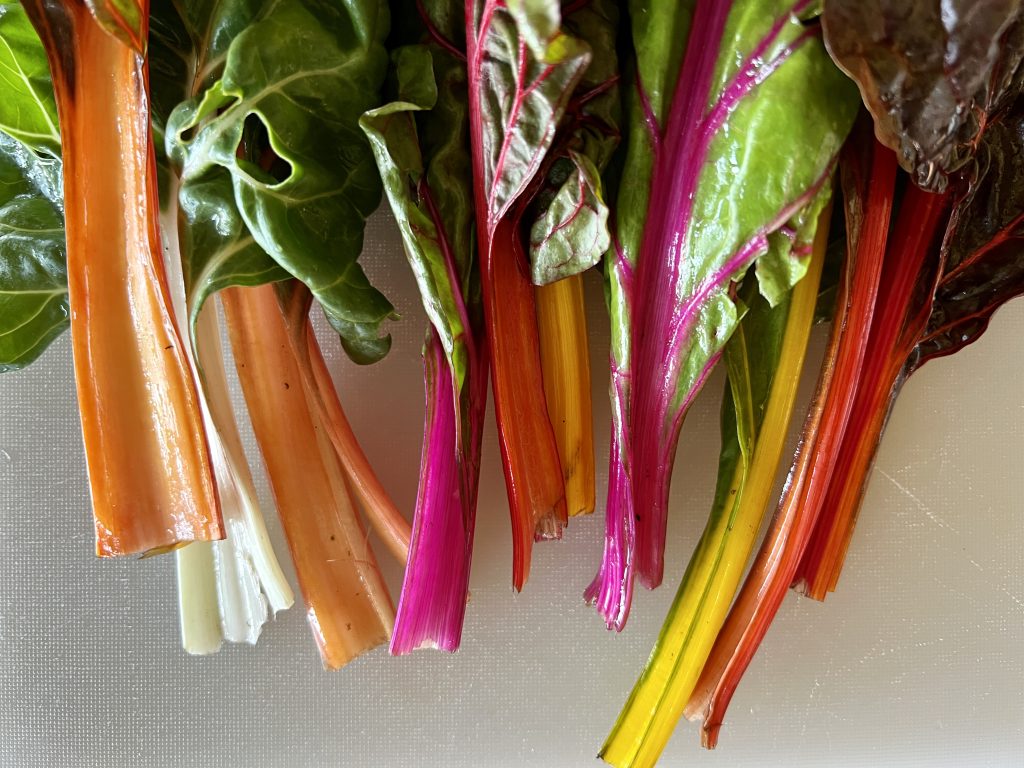
Whatever hearty, sauté-able green you can put your hands on would be fantastic. Kales, chards, collards, mustards, dandelions, nettles, and arugulas are the first ones that come to mind. Swap at your whim, or whatever is available. Today I'm using rainbow chard-- look at its vibrant colors!
Rainbow chard adds some dazzling color to the pilaf.
Have you joined the 101-Mile Kitchen community? If not, we'd love to have you. You can take care of that right here, and when you do I'll send you my Top Five Tips and Recipes for Cool-Weather Cooking downloadable as a thank you!
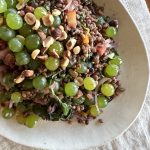
Warm grains like barley, farro, or brown rice, gently sauteed greens, and juicy just harvested grapes and a quick in-the-skillet vinaigrette make this dazzling Pacific Northwest-centric pilaf sparkle. Or, use it as a warm salad. Either way, healthy never tasted so good.
Cook the grains pasta style: Rinse the grains and place them in a medium saucepan and fill the pan with at least 6 cups of water. Add a healthy pinch of salt and stir. Bring to a boil, stir again, and adjust the heat to a slowly bubbling simmer. Cook for 45 - 60 minutes or until the barley is plump and tender. Drain well.
While the barley is simmering, wash the greens and remove the stems. Slice the stems into ½" pieces. stack the leaves on top of each other, and roll the stack into a long cigar shape. Slice through the roll first lengthwise, and then into 1" pieces.
In a large skillet, warm the olive oil over medium heat. Add the shallot and garlic and saute for 1-2 minutes. Add the cut greens to the pan and saute, stirring every minute or two, until the greens have become tender and soft. Salt and pepper the greens to taste (about 1 teaspoon salt, 1/3 teaspoon pepper).
Stir in the warm grains and the vinegar. Taste and adjust the seasoning if you'd like. Remove the pan from the heat. Stir in about half the grapes.
Place the warm pilaf in serving bowl or platter. Top with the remaining grapes and the crushed hazelnuts. Serve warm or at room temperature.
Notes
+ Jane Touzalin of The Washington Post says it best."Hulled barley, considered a whole grain, has had just the indigestible outer husk removed. It’s darker in color and has a little bit of a sheen. Pearled barley, also called pearl barley, is not a whole grain and isn’t as nutritious. It has lost its outer husk and its bran layer, and it has been polished. It has a lighter, more matte appearance."They can be used interchangeably. However, hulled barley is a more nutritious whole grain and also holds its shape better is soups and stews. Hulled barley takes up to an hour to cook, whereas the pearled kind cooks in about 30-45 minutes.
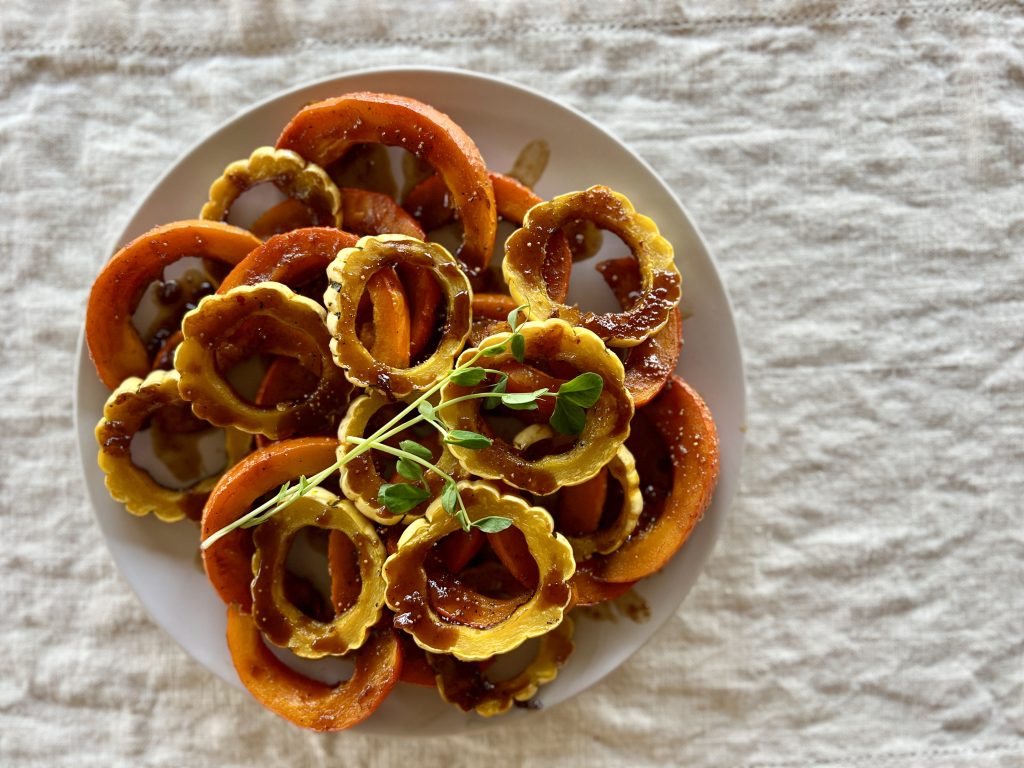
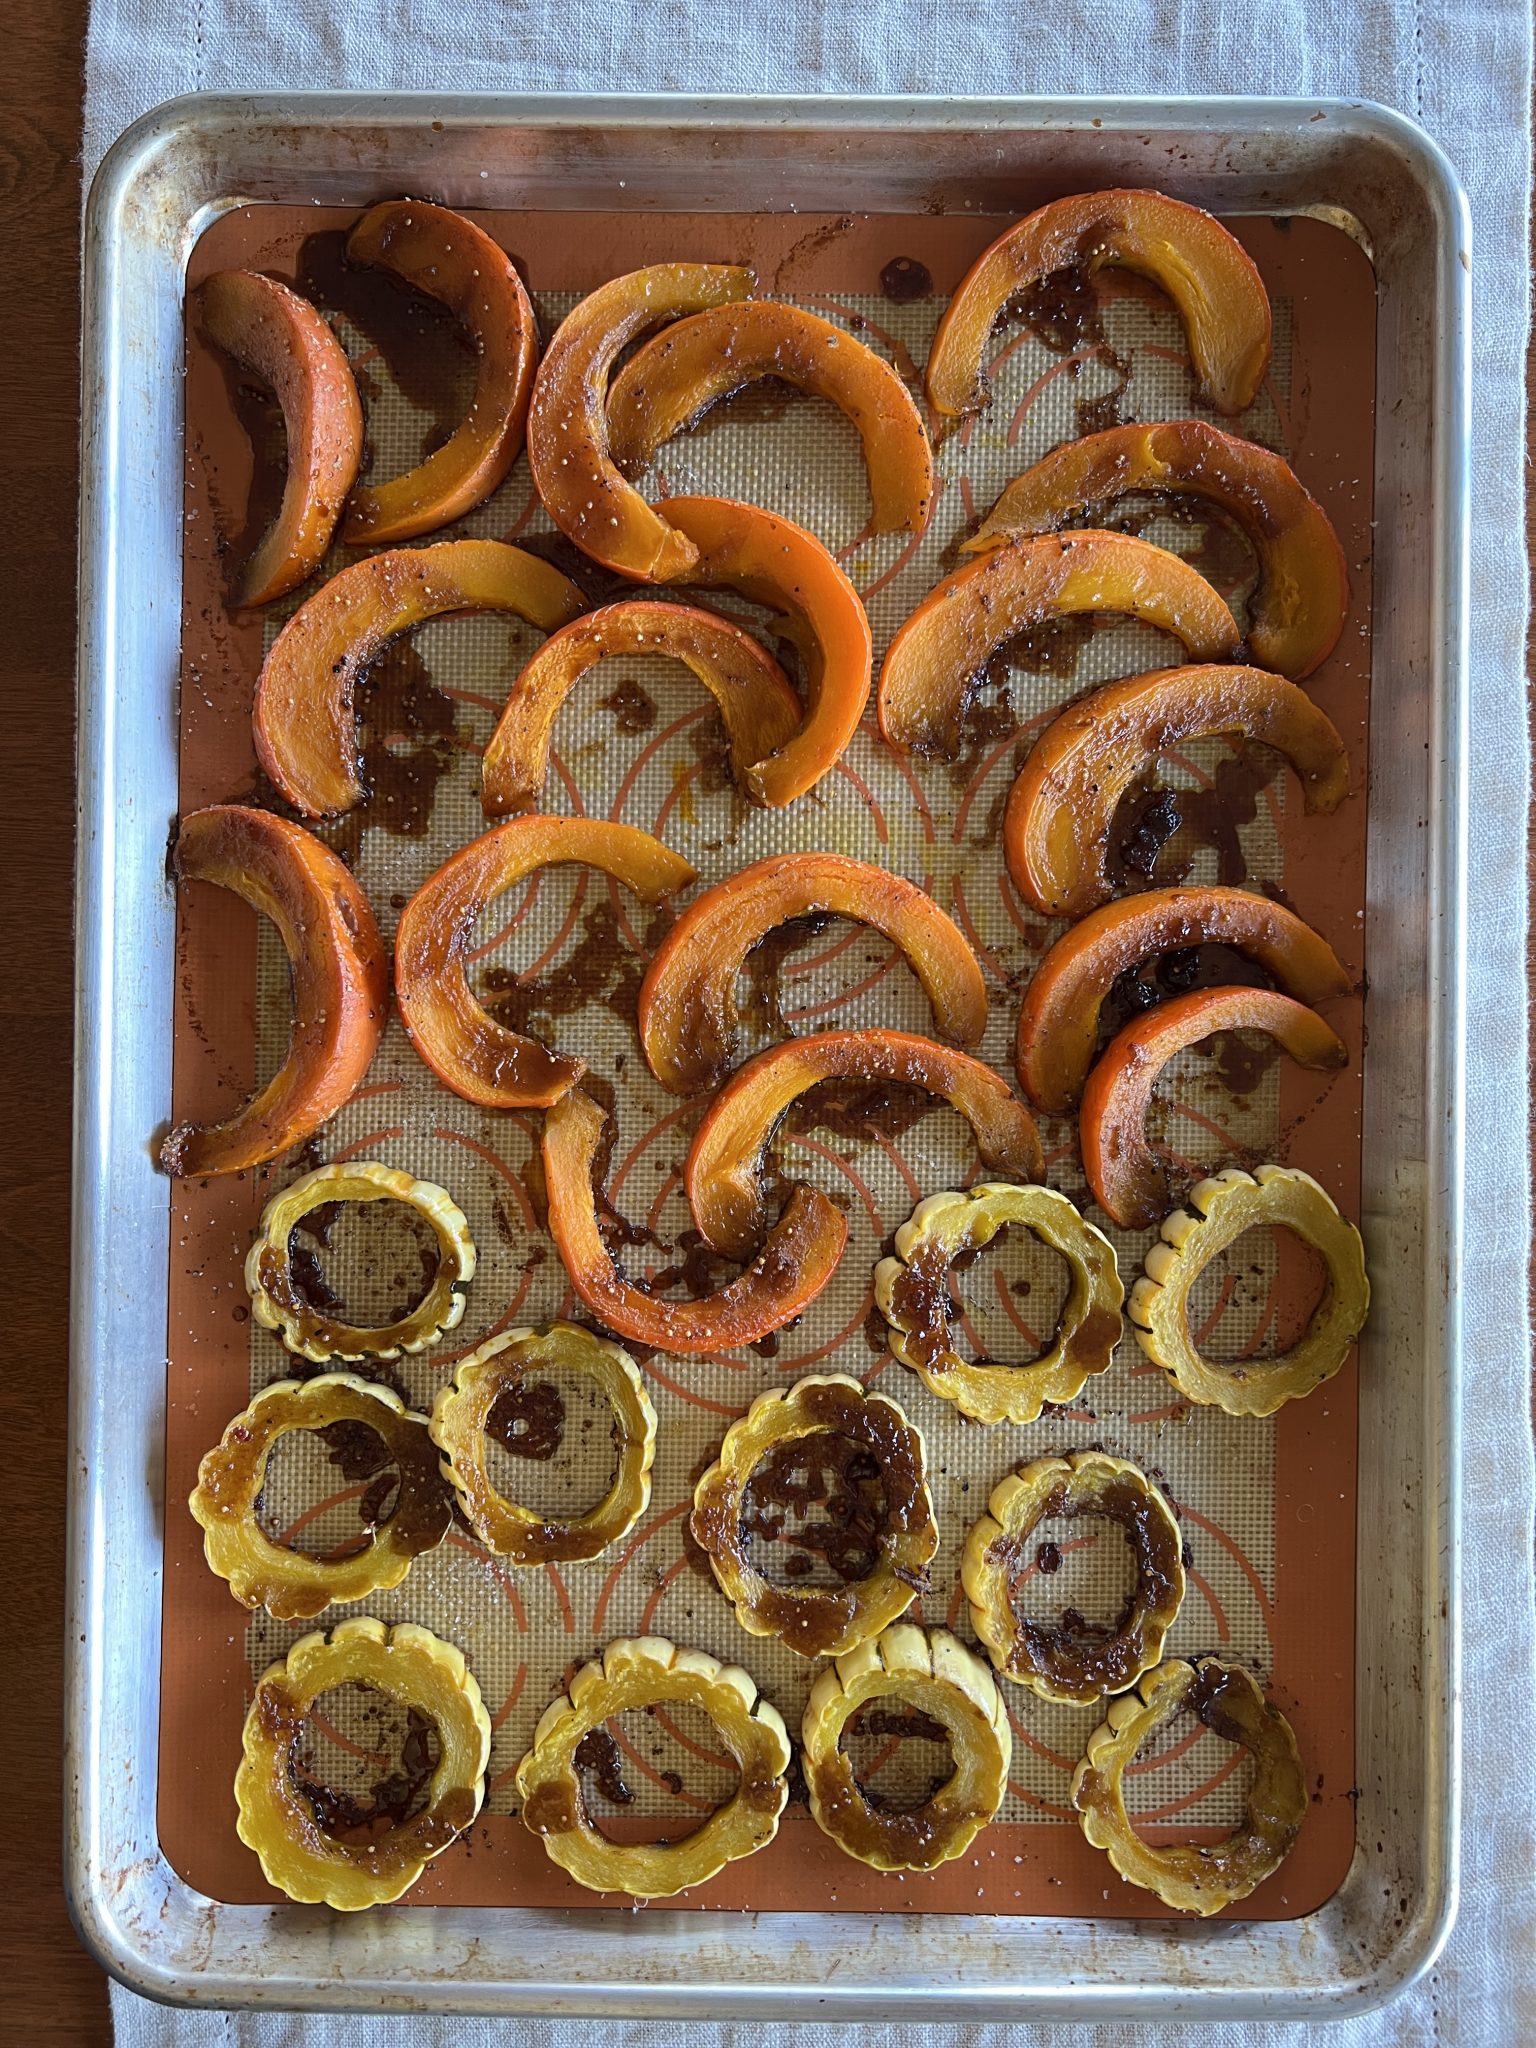
Is it possible to be glum in the presence of orange things, like this autumn sunset-hued roasted fig-glazed winter squash? As autumn comes knocking, this three-ingredient wonder is a cheery and scrumptious welcome to the cool-weather cooking season.
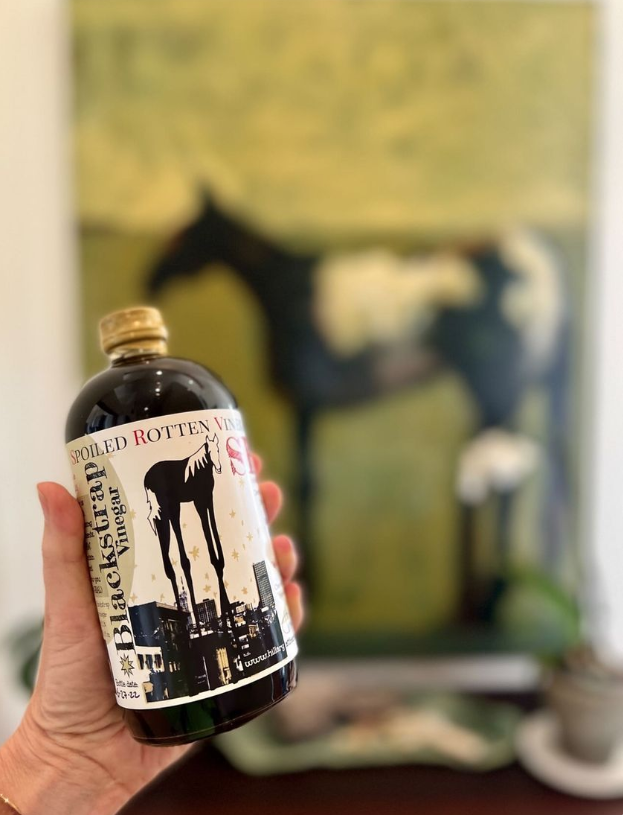
Like an oven being lit, my imaginative cooking fires are lit by trying new ingredients. This little recipe started when I was recently introduced to blackstrap vinegar. At our farmers market, I met Klee and Cherie Wiles-Pearson of Spoiled Rotten Vinegar who make, among other vinegar, the award-winning blackstrap vinegar used in this dish. They appropriately call it "One American's retort to Italy's aged Balsamic." Blackstrap molasses makes it full-bodied, rich, and sweet, and it works in most applications where one would normally reach for Balsamic. One sip of this living food and I am forever hooked.
Klee ferments and bottles Spoiled Rotten Vinegar's distinctive vinegars. Cherie designs the beautiful, information-filled labels that highlight the work of local artists. The charming Spoiled Rotten Vinegar bottles are not made to be hidden behind cupboard doors.
Ways to Use Your Fig-Glazed Squash
Besides straight-up out of the oven, here are other some ways to put this fig-glazed winter squash to work from now until spring.
Lay the roasted rings over a bed of cooked barley, farro, wild rice, quinoa, etc. that has been mixed with olive-oil-cooked onion and perhaps chopped parsley. Drizzle the whole thing with the glaze.
For a salad, put the roasted squash on a bed of slivered kale that has been tossed in a spoonful of the glaze and sprinkle on chopped toasted hazelnuts.
Tuck halved or quartered figs in and around the squash for a lovely fall touch.
Utilize the heat of your oven and make fig-glazed squash alongside a roasted chicken, turkey breast, pork loin, or pork tenderloin. They are delicious together, and energy efficient this way!
Try the glazed squash in a rice bowl, along with some browned tofu or leftover protein.
Tips for Preparing Winter Squashes
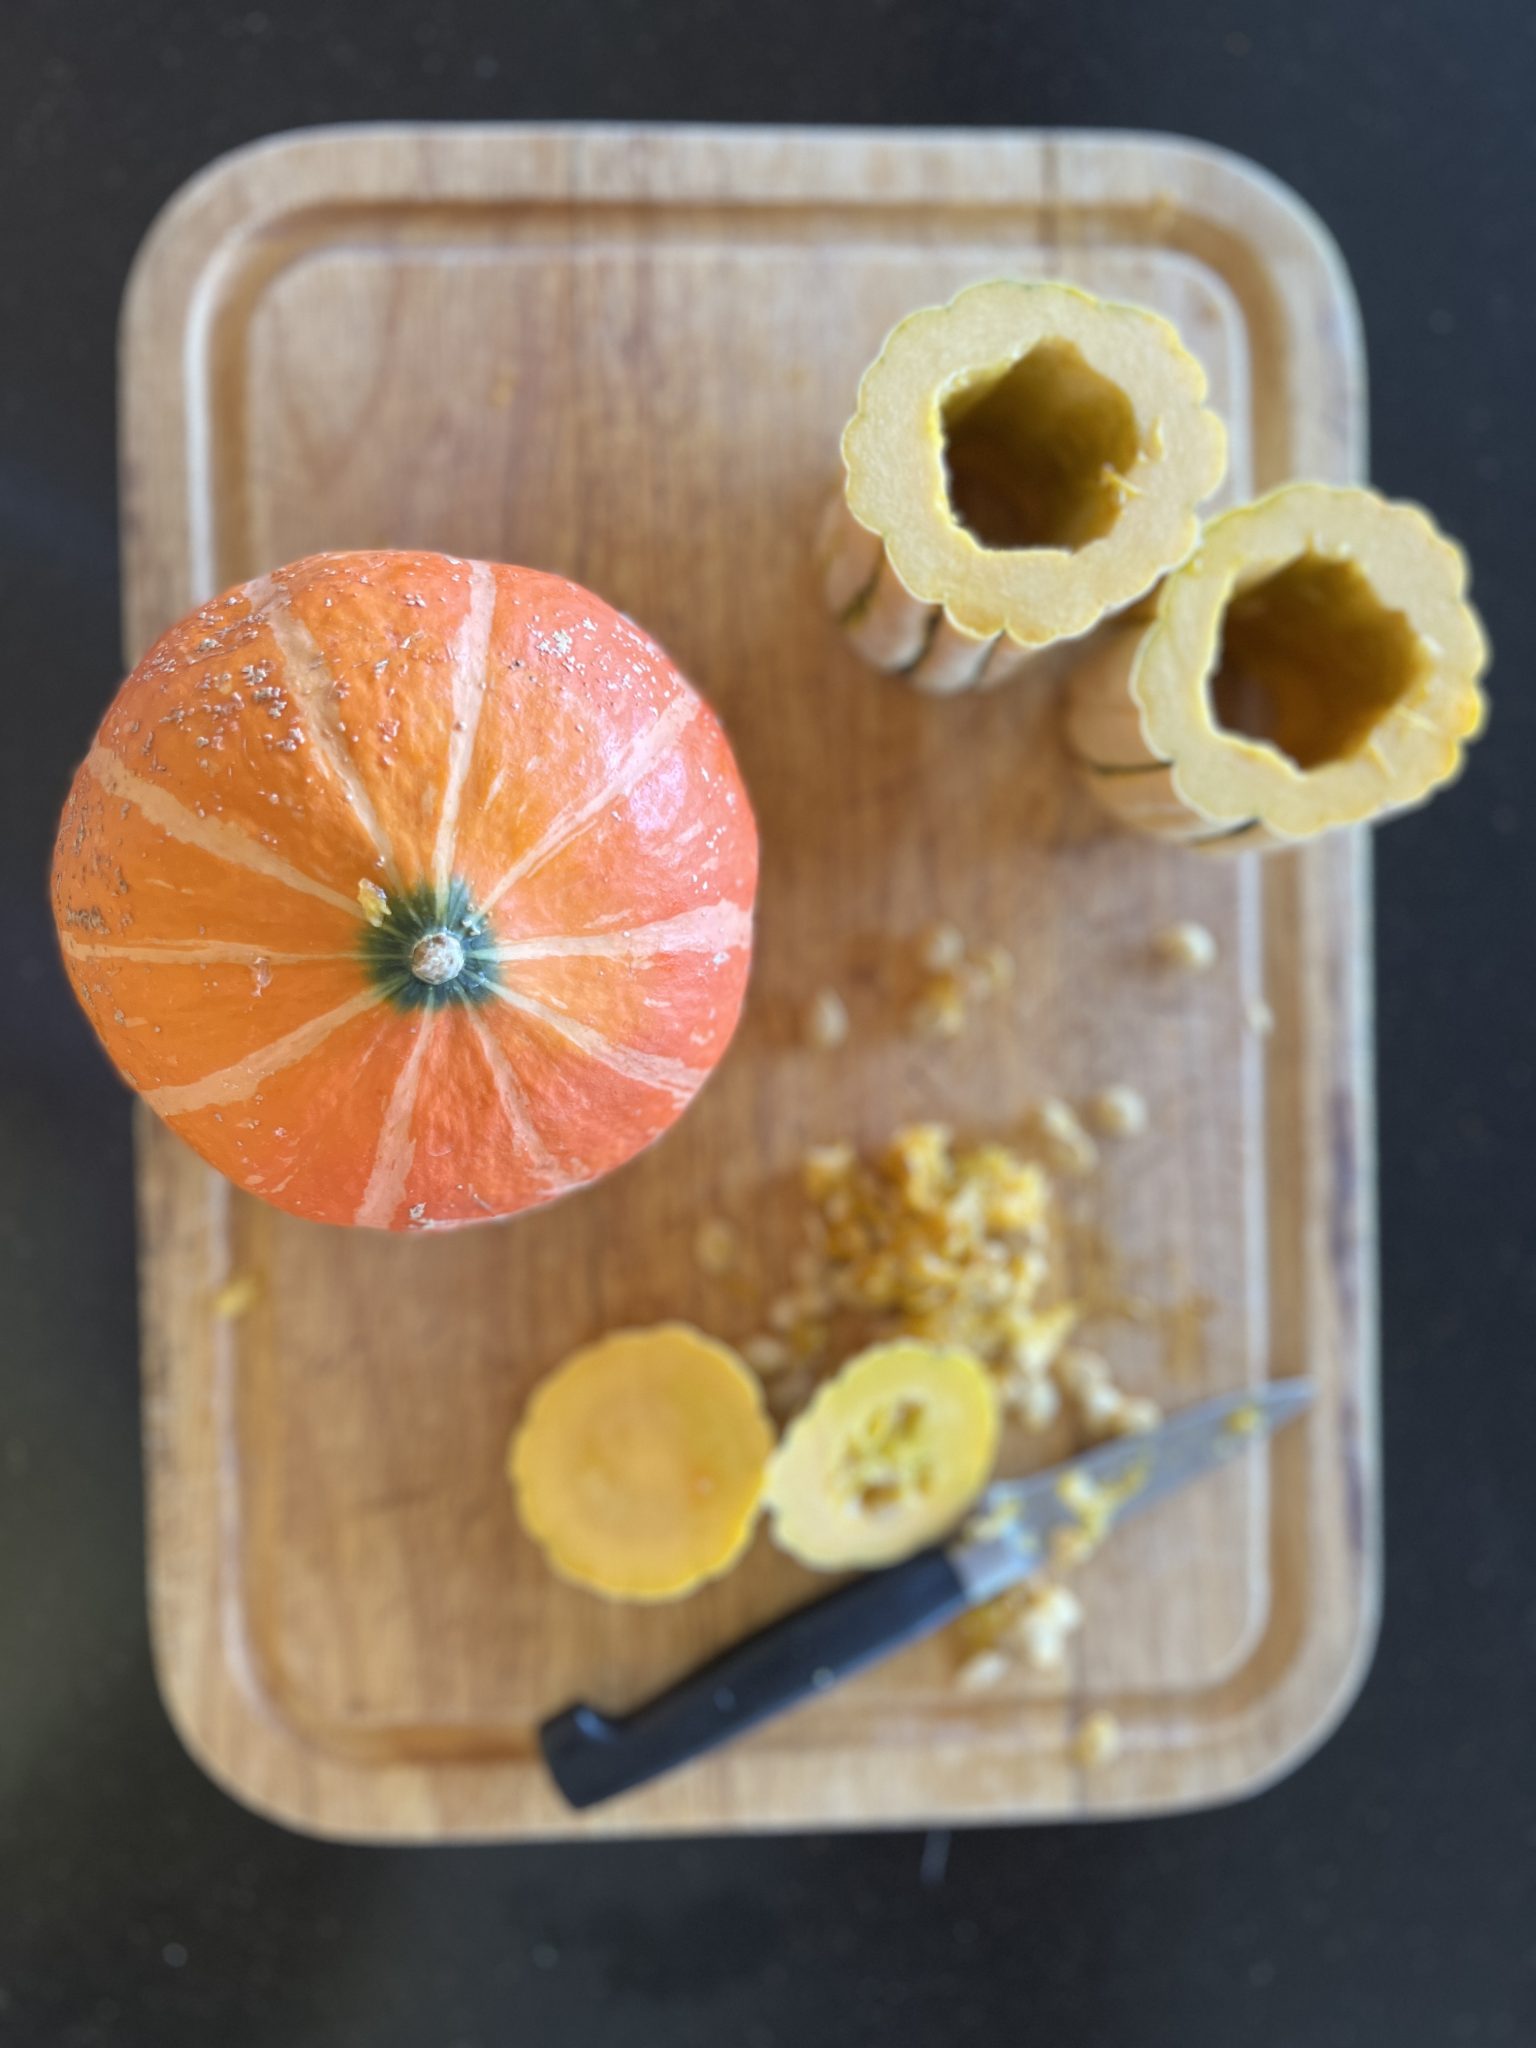
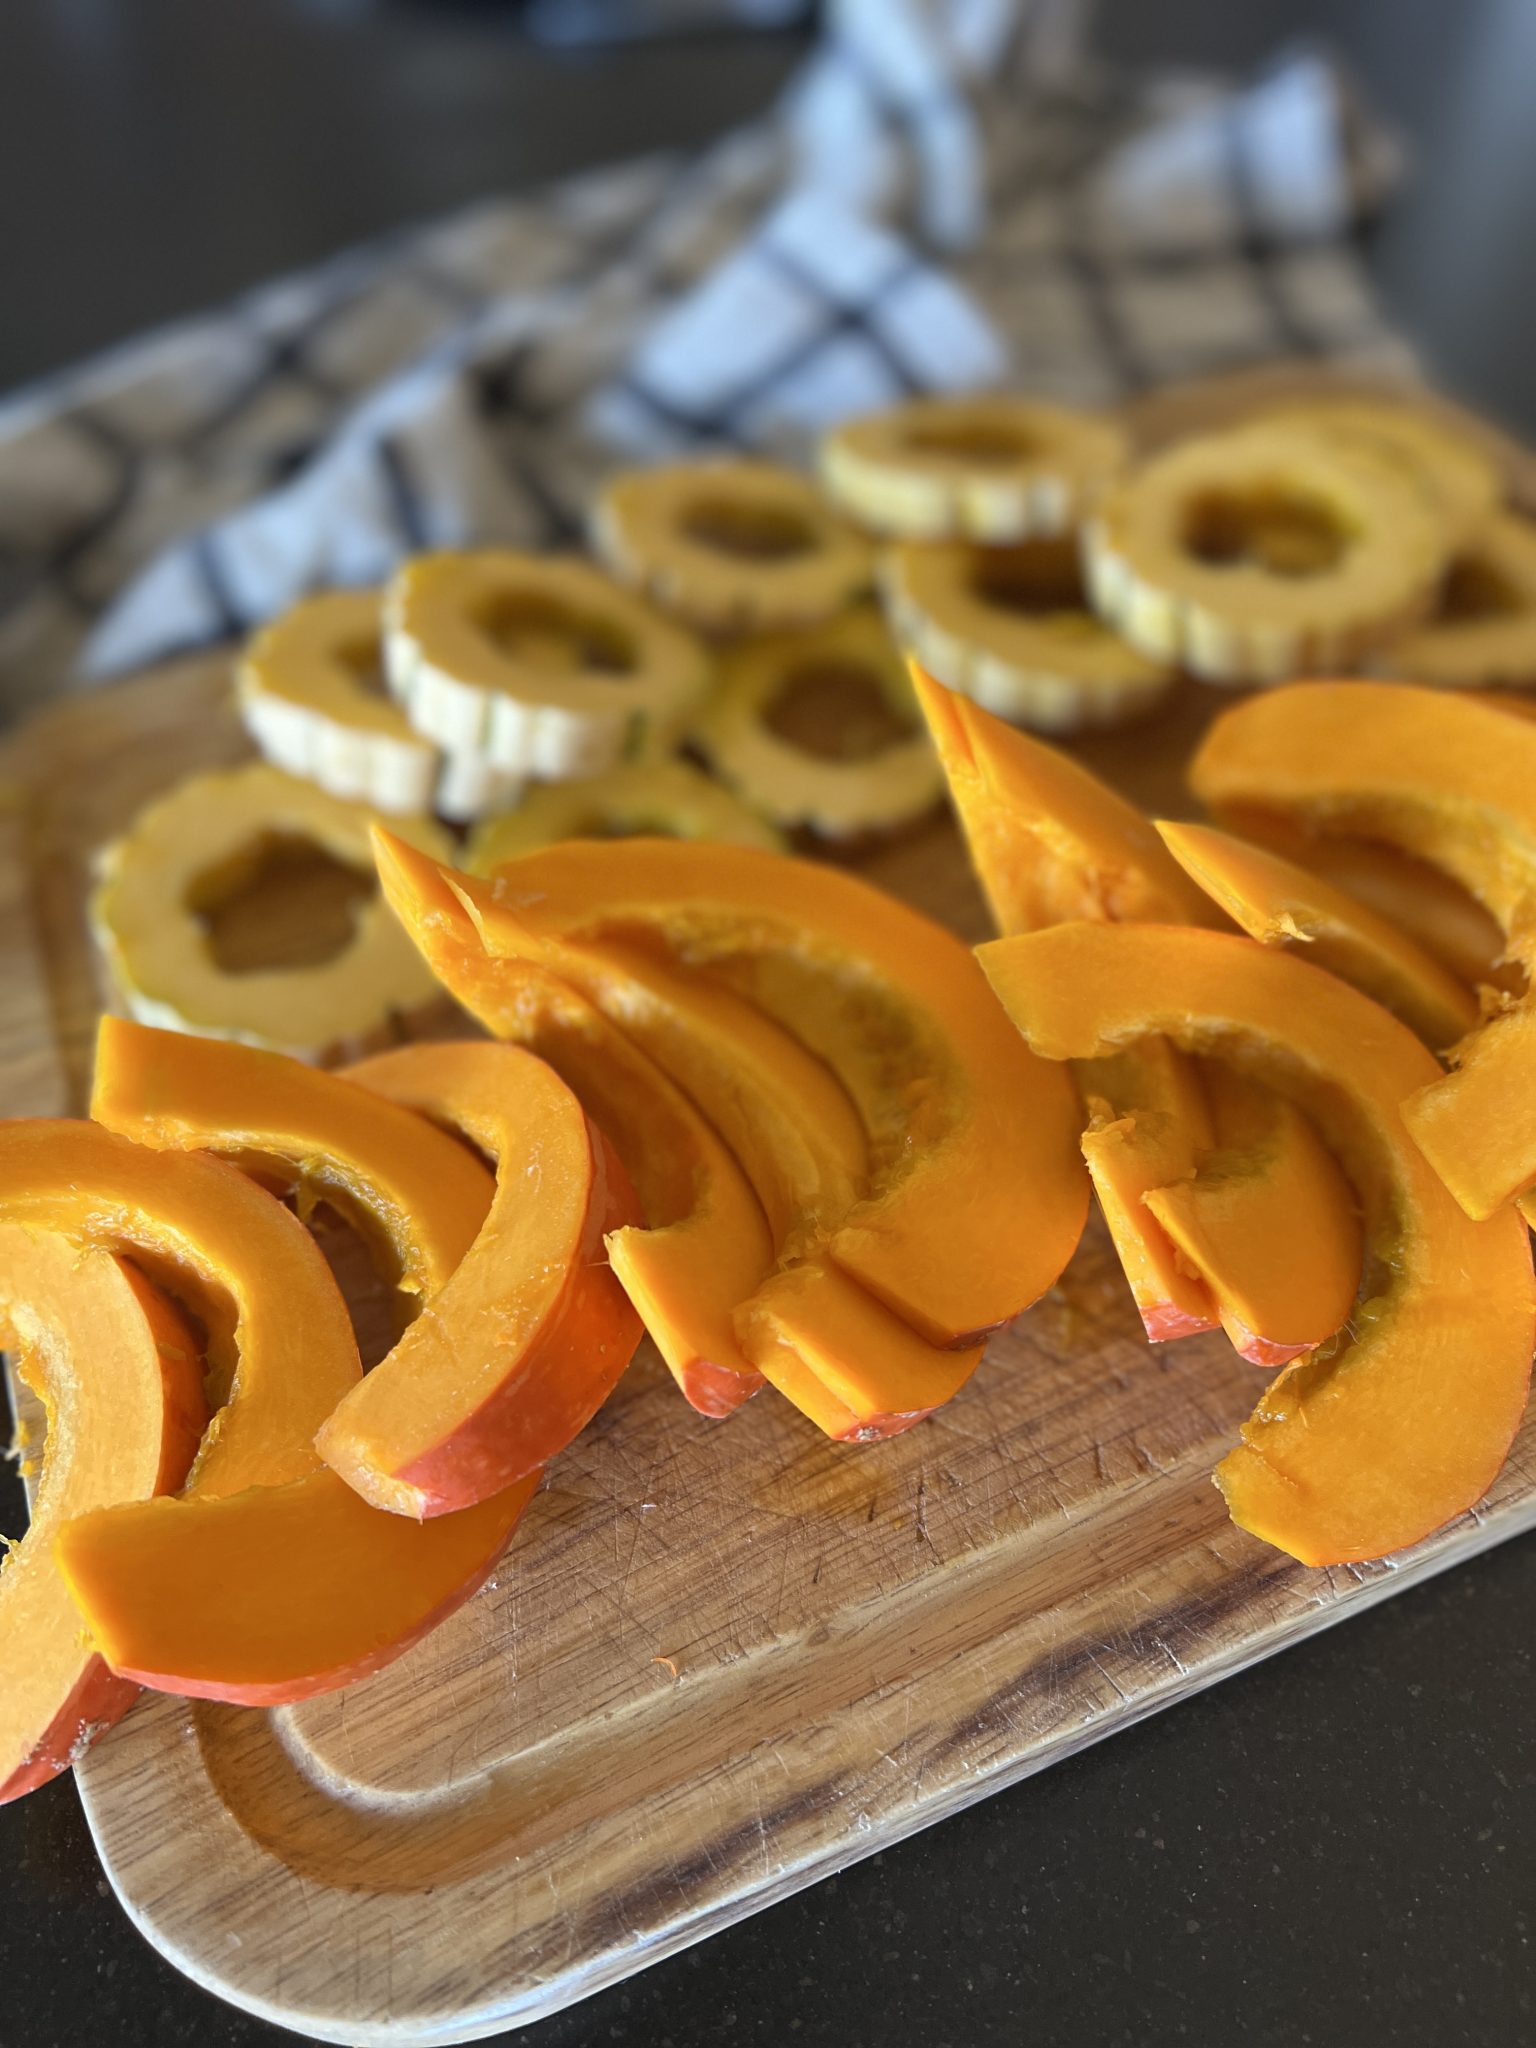
What variety of winter squash wouldn't be lovely in this recipe? I am wildly fond of the Red Kuri variety, not only because of its red-orange luminosity, but also because it cooks to a silky texture without falling apart. Kabocha squash is similar. And don't forget Delicata, which offers a yellow contrast and is a great little squash, too. Except for butternut, none of the varieties listed in the recipe below require peeling. Their skins soften equally to the flesh when roasted.
Scrub winter squash and then microwave it for 2 minutes or so on high power before cutting into it. This allows the knife to slide through the squash more easily. I think it makes scooping the seeds out a little easier, too.
Making the Fig-Glazed Winter Squash
Above all, don't give up on this recipe if you can't find blackstrap vinegar. Dark Balsamic is a worthy substitute.
Where are fig jams, spreads, or butters found? Many grocery stores that have a gourmet-style cheese section carry fig jam, spread, or butter. Ask there. Trader Joe's fig butter is good and is generally the most affordable. I keep a jar or two of it around for cheese boards and cheesy paninis. You may also find it in the jams and jellies section of your grocery. This is the fig spread I'm using at the moment, and it is excellent.
The density of the glaze is dependant on the particular fig jam, spread, or butter you use. If your glaze is so thick that it doesn't drizzle off your mixing spoon, thin it with a tablespoon or so of water. You want it just loose enough to drizzle in a thin ribbon. If you happen to thin it too much, just reduce the fig/vinegar mixture back down in a small saucepan over medium heat for a few minutes.
Save any glaze leftovers and use it in a salad dressing. With a little olive oil added, it is terrific on a leafy salad with apples, chopped dried figs, and some toasted nuts.
Store leftover fig-glazed squash tightly covered in the fridge. Then rewarm it gently in a microwave oven or a toaster oven.
This post contains affiliate links, including but not limited to Amazon. As an Amazon Associate I earn from qualifying purchases. When you use these links to buy something I may earn a commission at no cost to you. Product affiliation helps me to keep this site ad-free while providing you with the content you enjoy. I only promote items that I use, like, and trust, or would invest in myself.
2poundswinter squash, one variety, or a colorful mixred kuri, delicata, acorn, butternut, kabocha, Hubbard, etc. (this was one medium delicata and one small red kuri)
Preheat the oven to 400° convection roast. Scrub the squash, cut them in half, and remove the seeds. Slice the squash into ½" slices. In the case of Butternut squash, slice the sold neck pieces in half. Lay the squash slices on a silicone mat-lined or parchment-lined baking sheet. Drizzle about 1 tablespoon olive oil over the squash, and lightly sprinkle with salt and pepper. Roast for 10 minutes.
While the squash is beginning to roast, mix the fig jam, blackstrap or balsamic vinegar, salt and pepper in a small bowl. Add up to 1 tablespoon of water to the mix to make it thin enough to drip from the spoon.
After the squash has roasted for ten minutes, bring it out of the oven and flip each piece over. Drizzle the slices with about half of the fig glaze mixture. Reduce the oven temperature to 375°, and roast for another 10-12 minutes, until the squash is browned in spots, fork-tender and somewhat translucent in color, and the glaze has thickened. Watch this closely toward the end so the glaze doesn't burn.
Arrange the squash rings and/or slices on a serving platter. Drizzle a few more spoonsful of the reserved glaze over the top, and serve. A green garnish (like parsley or microgreens) makes the colors really pop! Leftovers store nicely in a covered container in the refrigerator.
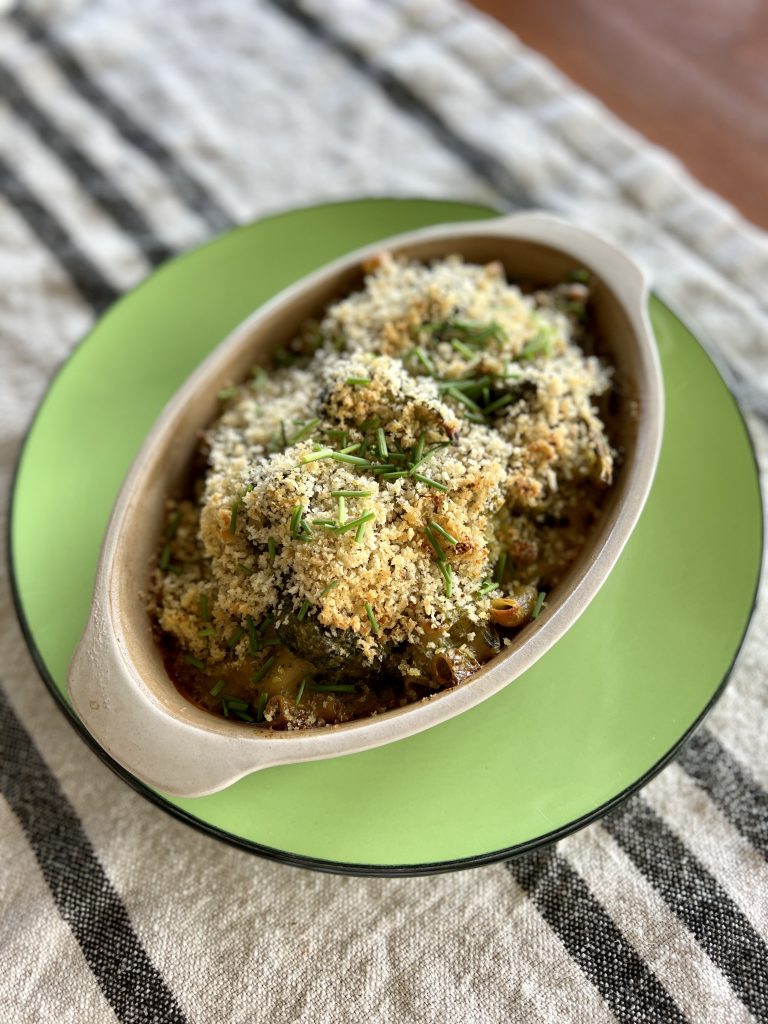
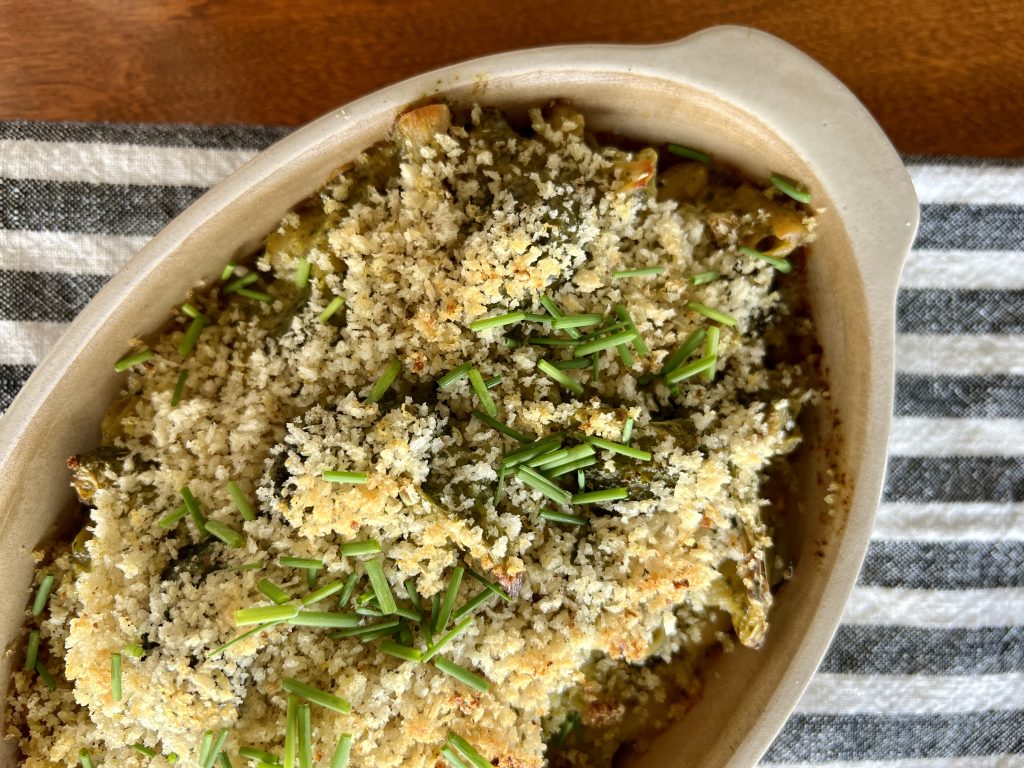
Adulting has been especially challenging this week, and comfort food has been as important as ever. Green Goddess Macaroni and Cheese has that magical combination of being carb-y, cheesy-gooey, and packed full of good-for-you stuff that ensures that if this is all you eat for a week, you'll at least be getting your vegetables.
This recipe amps up the adult factor with the addition of Dijon mustard and a few anchovies to the cheesy base. These additions offer an exciting depth of flavor snuggled up with the same cozy familiarity you expect from good ol' macaroni and cheese.
How Can I Help?
When the going gets tough for friends and family we ask, "How can I help?" Often the response is something like, "Well, there's nothing anyone can really do except send your love/ good energy/ healing thoughts/ prayers." I'm a big fan of asking the universe to surround my beloveds in need, but when I hear that there's nothing I can physically do to help it is frustrating to not DO something.
This week the shoe is on the other foot. I have been on the other side of those words how can I help? and have learned their hidden power.
Even when there is nothing practical others can do to help, the willingness of a friend to accept a small chunk of my burden has a remarkable effect. Every person who asks this forms a network of support and love that lessens my emotional weight. Every one of the beautiful souls who steps forward to ask how can I help? becomes an invisible army around us-- my family and me.
So never be discouraged if there's "nothing you can do". Your presence, your calls, your prayers and good juju are so important. So impactful. So encouraging. Such a display of kindness. Love personified, even.
And, if you can, show up with a dish like this one so your loved one is sure to eat their vegetables all wrapped up in the comfort of good ol' macaroni and cheese.
What Wine Should I Pair with Green Goddess Macaroni and Cheese?
Anchovies and Dijon mustard make this recipe incredibly wine-friendly, not that plain mac and cheese needs a lot of help with that! And this week there definitely has been wine! We found the 2020 Conde Valdemar Blanco Rioja from Valdemar Estates Winery in Walla Walla, Washington to be a better than perfect pairing. It is light, clean, and refreshing-- in other words, a wonderful foil to the rich cheese dish. This is truly a joyful wine.
Making Green Goddess Macaroni and Cheese
I used to always make mac and cheese with this ratio: One pound pasta/ 4 tablespoons flour/ 4 tablespoons butter/ 4 cups milk/ 4 cups (one pound) shredded cheese. This ratio feeds a tribe.
Since most of us here are feeding one, two, three or four people on a daily basis I've revised my formula: One-half pound pasta/ 2 tablespoons butter/ 2 tablespoons flour/ 2 cups milk/ 2 cups (1/2 pound) shredded cheese. In our household, that makes enough for a very handy two meals apiece. If you are feeding a bigger household, guests, or a gathering, just double the recipe as it is written.
Yes, there are little anchovy fishies tucked into this dish. Umami, friend! Do give them a try. Adding the raw broccoli florets to the mixture right before baking keeps them a wee bit crunchy and not lost in the creamy pasta. The crispy topping adds a wonderful textural note, too. You may be tempted to forgo that part, but it is a low-effort-high-reward addition.
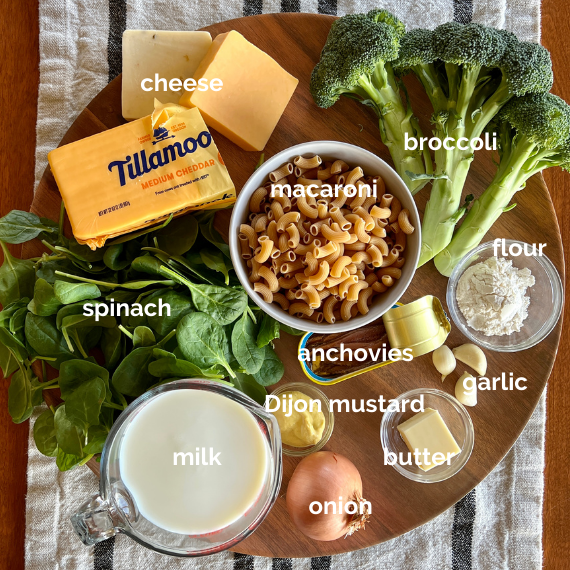
You'll also note that I used our local favorite Tillamook Creamery Cheddar and Monterey Jack cheeses in this dish. If you don't have a local cheesemaker near you, these are worth seeking out.
Other Comfort Foods for When the Going Gets Rough. . .
. . . for you, or for those you love: Carrot Risotto with Green Garlic Sauce: Recipe Here. Easy Winter White Vegetable Soup and Infinite Variations: Recipe Here.
Green Goddess Macaroni + Cheese
Course: Main Dish, Quick + Easy, Side Dish
Cuisine: American
Season: All Season
Prep Time: 20 minutesminutes
Cook Time: 30 minutesminutes
Total Time: 50 minutesminutes
Servings: 4
Familiar comfort food, with a green goddess veggie twist.
8oz.macaroni other small pastaregular or gluten free
2Tbsp.butter
½onion, finely diced
2 clovesgarlic, minced
4oil-packed anchovies, drained and mined (optional)
1large stemsbroccoli, stem peeled and diced, florets broken apart
2Tbsp.all-purpose or rice flouruse rice four of GF 1- to- 1 flour for GF
1tsp.salt
1/2tsp.finely ground black pepper
2cupsmilk
1Tbsp.Dijon mustard
6oz.fresh spinach
8oz. grated cheddar, Monterey jack, or pepper jack cheese (2 cups)or a mix of any of these to equal 2 cups
Crispy Garlic Lemon Topping
½cuppankoregular or gluten free
1Tbsp.olive oil
zest of one lemon
1clovegarlic, grated into bowl
Instructions
Make the Topping
Combine all ingredients in a small bowl, and stir thoroughly. Set aside.
Make the Mac and Cheese
Preheat the oven to 350°. Put a pot of salted water on to boil for the macaroni. Cook the macaroni according to package directions.
In a large saucepan or Dutch oven, melt the butter. Add the diced onion, garlic, anchovies, and diced broccoli stems. (Reserve the broccoli florets for later.) Sauté over medium-high heat until the vegetables are tender, about five minutes.
Stir in the flour and salt and pepper. Add the milk and Dijon mustard, and continue stirring as the mixture thickens and begins to bubble, about 5-6 minutes.
Stir the spinach into the milk mixture until it is wilted. Use a blender (working in batches) or a immersion blender right in the pot to blend the vegetables into the milk mixture, turning it green. Stir in the cheese until it it completely melted. Stir in the broccoli florets. Pour the ingredients into a 9" x 13" baking dish.
Spread the crispy topping over the macaroni mixture. Bake until hot and bubbly, and the edges begin to brown. Allow to set 5 minutes before serving.
Notes
Don't let the anchovies scare you. They add a depth of flavor (nothing fishy) and elevate this dish to a wonderful adult comfort food!
Feasts, cookie platters, cocktail parties, and office holiday goodies, oh my! As fun as it is, it doesn't take long to feel the overwhelm of holiday system overload, just when the mood of the day calls for merry and bright. As a remedy to seasonal splurges, include a salad of roasted mushrooms, warm grains, and baby spinach into your menu this week.
Making the Roasted Mushroom, Grain and Spinach Salad
This quick little main-course salad starts with four easy-to-come by ingredients and a light but flavorful lemon vinaigrette. The vinaigrette is made even better by using Meyer lemons, just coming into peak season.
Here I go on about celery again. Celery adds an essential textural crunch to this dish, and a bit of delicious freshness that you will welcome to your winter plate. I view this as this as a subtle necessity.
In the extraordinary Pacific Northwest food playground we have easy access to an array of cultivated and wild mushrooms. One trial of this recipe I used a shiitake-only approach. Another trial used a melange of chestnut, oyster, shiitake, and crimini mushrooms. I loved it both ways. If you can only access white buttons or brown criminis, please use them! Your dish will be as delicious as ever.
You have a lot of running room when it comes to the grain you use in your roasted mushroom salad. I used Purple Valley Barley, an organic product from my local Lonesome Whistle Farm. Lonesome Whistle also carries wheat berries, emmer (a farro) and oat groats that would be perfect. If you are new to this type of thing and eat gluten, I suggest starting with pearled barley, or just jump right in and try one of the above grains. If you eat gluten-free, give buckwheat groats or brown rice a try.
What Wine Should I Serve with Roasted Mushroom, Grain, and Spinach Salad?
I started off suggesting a mushroom, warm grain, and spinach salad as a detoxifying healthy choice, so maybe through the holidays consider a tonic of pomegranate juice and sparkling water? Or not! I highly suggest the Artisanal Wine Cellars 2015 Dukes Family Vineyard Pinot Noir. Tom and Patty Feller, and their daughter, Mia, are a family operation dedicated to handcrafted expressive wines. The grapes in this bottle were grown by Pat and Jackie Dukes of Dukes Family Vineyard. We view the Artisanal's Pinot Noirs to be beautiful wines at incredible values.
Roasted mushrooms, warm chewy grain, and fresh spinach dressed in the best ever lemon vinaigrette. This fantastic fast and easy layered salad is hearty enough for satisfying cool weather meals, light enough to counterbalance seasonal feasts and spurges.
1½lb.mushrooms of your choice, singularly or in combinationcrimini, shiitake, chestnut, chanterelle, hedgehog, button, etc.
5stalkscelery, and leaves if your head has them
1cupwhole grain of your choice, prepared according to package directions and kept warm*barley; emmer, spelt, or einkorn farro; wheat berries; oat or buckwheat groats; brown, black, purple, red, or wild rice, etc.
8-10oz.fresh baby spinach
lemon vinaigrette, recipe below
zest of 2 lemons, in strips
Best Ever Lemon Vinaigrette
½cuplemon juice, Meyer lemon preferred, zested firstabout 2 large lemons
2clovesgarlic, pressed or very finely minced
1shallot, finely minced
tsp.maple syrup
salt and pepper to taste
Instructions
Preheat the oven to 400° convection. Line a baking sheet with foil and spray it with oil or non-stick spray.
Begin cooking your chosen grain according to package directions. (For example, quick-cooking par cooked farro from Trader Joes takes 10 minutes to cook; unhulled barley takes up to 40 minutes.) Once it is cooked, keep it warm while the other steps come together.
Prepare the Best Ever Lemon Vinaigrette, recipe below.
Wipe mushrooms clean and trim them if necessary. If you are using shiitakes, remove the stems. Leave the small ones whole, cut the medium-sized ones in half, and the largest ones into quarters for similarly sized pieces that will roast at the same rate. Place them in a heap on the prepared baking sheet. Spoon about ¼ of the lemon vinaigrette over the mushrooms. Use your hands to toss the mushrooms in the vinaigrette, coating each piece lightly and evenly. Spread the mushroom pieces out on the pan, and place in the oven. Roast for 12 minutes, remove from the oven and stir. Spread them out again and roast them for another 10 minutes or so until they are deeply colored and their juices have almost evaporated. Don't leave them much longer than this or they will lose their tenderness.
While the mushrooms are roasting, thinly slice the celery and set aside. When the grains are cooked and drained, stir in ¼ of the vinaigrette and continue to keep gently warm. Place the spinach on the platter or individual plates.
When the mushrooms are done roasting, add the sliced celery and give it a good toss. Spoon the dressed grains in the center of the plate, and top with the mushroom/celery mixture. Drizzle a little more of the vinaigrette over the layered salad.** Garnish with strips of lemon zest, which are not only eye-catching, but add a delicious flavor note. Serve while warm.
Make the Best Ever Lemon Vinaigrette
Combine all ingredients on a pint-sized jar with a tight fitting lid. Shake until the salt and maple syrup are dissolved. Shake before each use.
Notes
*I've made this recipe using organic locally-grown barley, with buckwheat groats, and with a package of "10-Minute Farro" sometimes found at Trader Joes. Follow the package directions for any grain you use for both serving size and cooking times. **You will have a little of the vinaigrette left over. Don't be sad about this-- use it on your next kale or lettuce salad, on top of baked or broiled fish, or to dress a pan of roasted vegetables. When Meyer lemons are in season, be sure to use them. The typical Eureka or Lisbon lemons are wonderful, too, but Meyers offer a step up in flavor.I recently found that the water that remains when cooking whole-grain barley is delicious as a sipper. Cook the barley "pasta-style" floating freely in a pot of water, and reserve the water. It's as tasty as any stock, and can be used as a soup base or warming cup. This recipe is easily halved and easily doubled. If you double it, use two sheet pans to roast the larger amount of mushrooms.
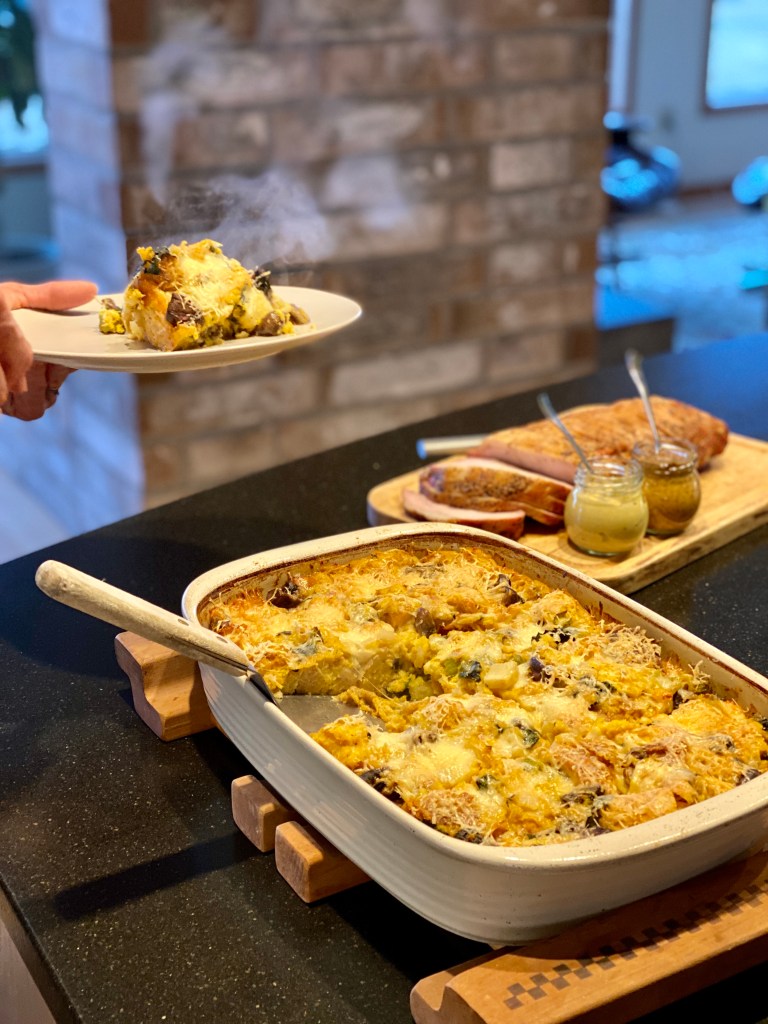
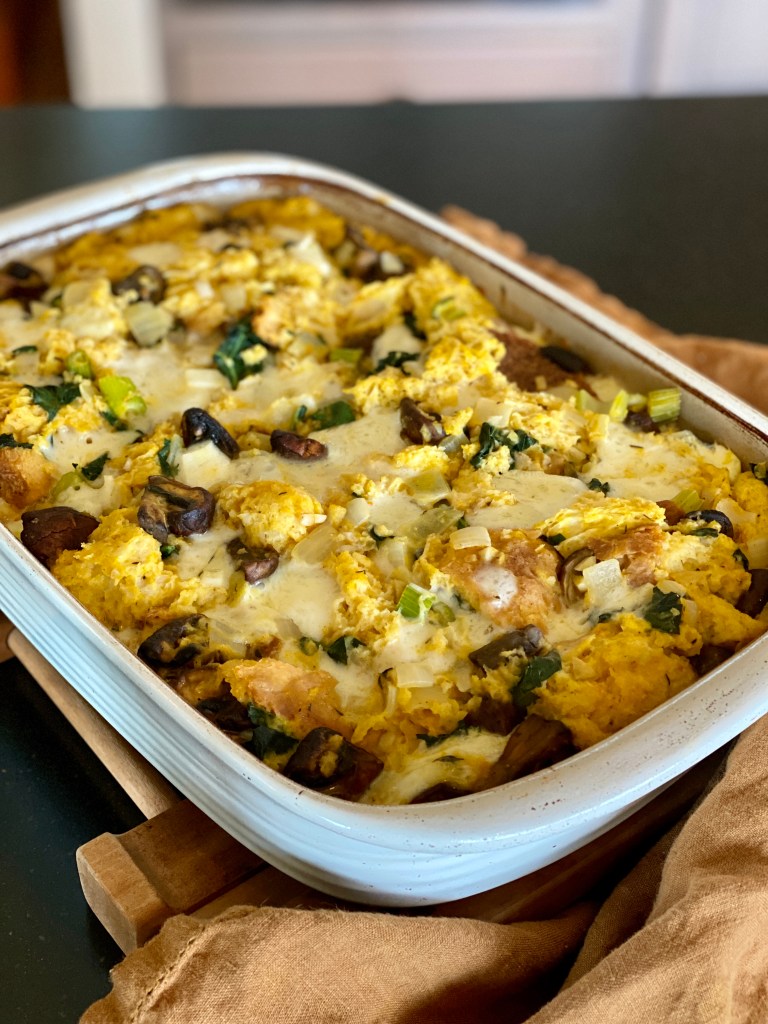
Bread turns golden as it soaks up the pumpkin-based custard.
Pumpkin can't seem to get away from the use of sugar and cinnamon-y pumpkin pie spices that relegate it to the sweets table. This Savory Pumpkin Bread Pudding-- with things like onions and herbs-- opens a whole new world of pumpkin possibilities.
Here, the dusky earthiness of pumpkin is the perfect match to lots of herbs, mushrooms, and two cheeses in the recipe. Think of it like a cheesy stuffing baked outside the bird, or like a strata.
Savory Pumpkin Bread Pudding Brings People Together
The people who gather at my table represent a wide range of dietary needs and preferences and, if you live in America in 2021, this is likely the case for you, too. This bread pudding is easily modified to meet the challenges of nourishing a dietarily diverse crowd. And the challenges of the cook organizing meals for them!
Having dishes on the table that respect everyone's needs can be a challenge that you likely know all too well. Above all, it is important to me that there be food that all my beloveds can share. I want no one to feel left out when the oohs and ahhs start happening!
This Savory Pumpkin Bread Pudding serves as a hearty main course for non-meat-eaters, and a tasty side dish for meat-eaters. Tailor it to your crowd by trading plant milk for dairy milk, and non-dairy cheese for the Parmesan and Fontina. Gluten-free bread is an easy swap that everyone will enjoy. However, egg substitutes have not been tested in this recipe.
Making the Savory Pumpkin Bread Pudding
Firstly, start with an artisan-style bread with lots of bubbles and holes in the crumb that create cozy spaces for the eggy pumpkin custard to rest. Day-old bread is even better, because it will soak up the custard best and bake up with a more firm sliceable texture.
After that, making pumpkin puree from scratch is really easy in an Instant Pot. Try making a batch or two to freeze and have on hand for all your pumpkin cooking and baking. The convenience of canned pumpkin is great, but there is a quality trade-off.
Things you'll need to make a Savory Pumpkin Bread Pudding of your own.
The make-ahead nature of Savory Pumpkin Bread Pudding makes it a great addition to your Thanksgiving table, or any time. Assemble the bread pudding the day before you need it, then baked it off on serving day. I hope you enjoy having pumpin in this savory way!
8ouncesfontina cheese, diced into about 1/4" cubesfor dairy-free version, omit or replace with a firm dairy-free melting cheese
salt and pepper to taste
Instructions
Oil a deep 9" x 13" baking dish or casserole. Preheat the oven to 350°.
Wash and dice the onion, celery, mushrooms, kale, and herbs. Dice the fontina and finely grate the Parmesan. Set aside.
Make a custard by first whisking the pumpkin puree and eggs together, then slowing whisking in the milk to combine. Add in about ¾ cup of the Parmesan, the nutmeg, 1 teaspoon salt, and freshly ground black pepper to taste. Set aside.
In a large skillet set over medium-high heat, add half the olive oil or butter. Add the onions and celery and sauted, stirring frequently, until the onions become translucent and soft without browning, about 5-7 minutes. While the onions are softening, in your largest mixing bowl, use your fingers to tear the bread into bite-sized chunks. Remove the crust only if it is especially thick and tough, otherwise include it. Lightly salt the bread and toss it.
When the onions and celery are tender, add them to the bread. Heat the rest of the olive oil or butter in the skillet and sauted the mushrooms until they have released some of their moisture and are beginning to brown, about 5-7 minutes. Add in the garlic, kale and ½ teaspoon or so of salt and a generous amount of pepper and sauted another 2-3 minutes until the kale has softened a little and the mushrooms are well-browned. Add them to the bread and onion mixture in the large bowl. Add the diced fontina if using, and give the ingredients in the bowl a good toss.
Pour the reserved pumpkin custard mixture over the bread and vegetables and gently stir with a rubber spatula, scraping down the sides and bringing the ingredients up from the bottom to evenly coat them with the custard mixture. Tip it out into the prepared baking pan.
Cover the dish tightly with foil. Bake for 45 minutes, remove the dish from the oven and remove the foil. Sprinkle the remaining Parmesan over the top, and bake for another 15 minutes until the cheese is browned and bubbling. Remove from the oven and allow to set for 10 minutes before serving. The pieces cut nicely into squares like lasagne, or can be spooned out with a large spoon.
Notes
Make It Your Own:Add chunks of squash or pumpkin, use mustard greens or chard instead of the kale, try different cheeses and herbs. Follow your heart and use what you have!
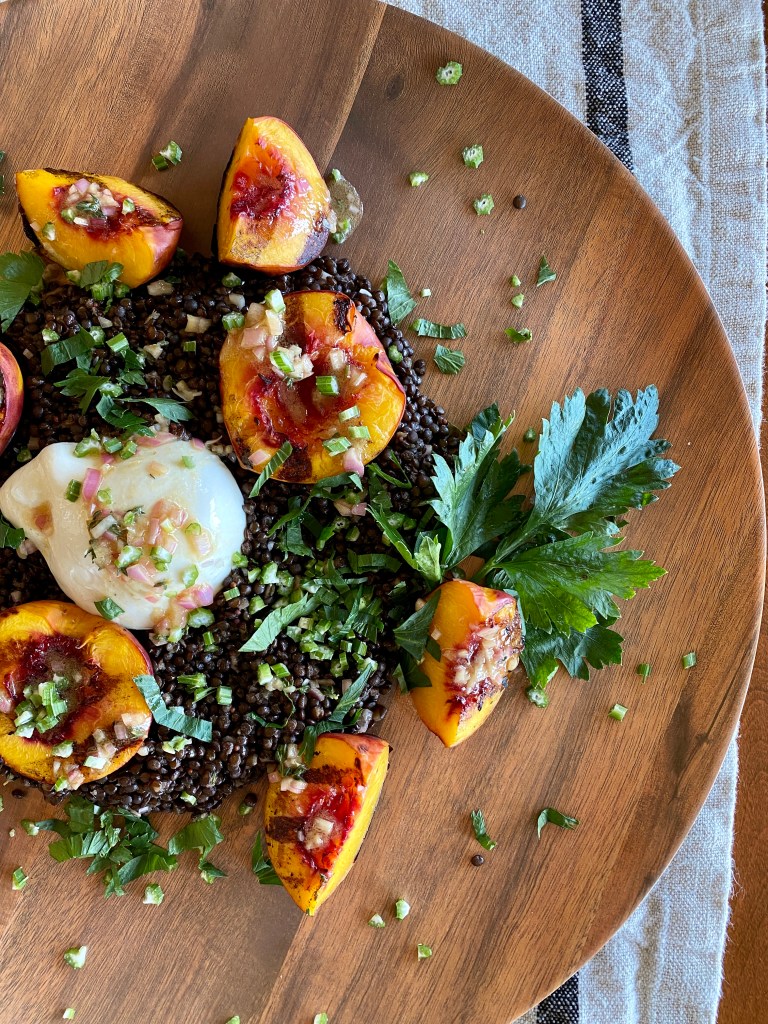
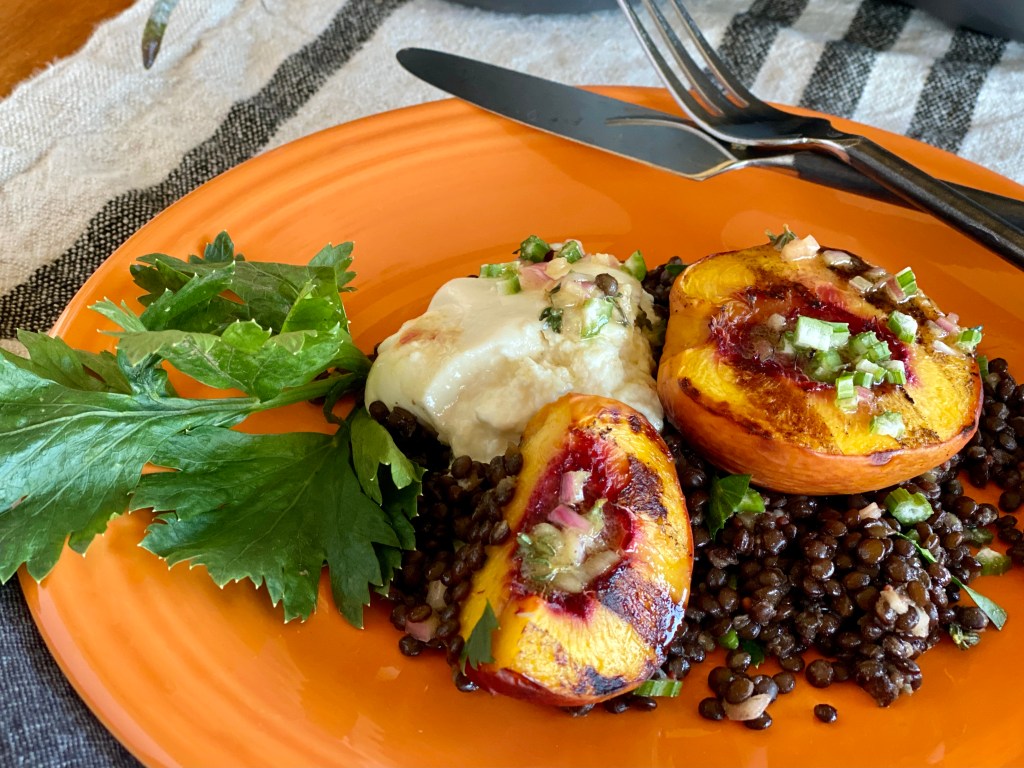
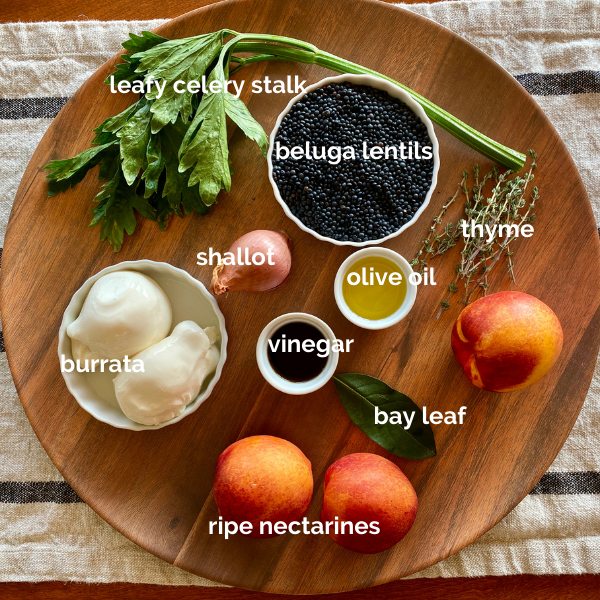
Beautiful Black Beluga Lentil, Grilled Nectarine + Burrata Salad
I've been experimenting with the design Rule of Threes in my cooking. Used in graphic design, interior design, and fashion-- really anywhere design concepts are applied-- the principle is that things arranged in groups of three are more appealing, evocative, and satisfying.
Long ago, it is said, Nordstrom sales associates were required to dress this way-- skirt, blouse, sweater; slacks, shirt, vest; dress, boots, scarf, etc. Accessories were the grace notes added to the rule of threes formula. I've begun to think this is true for the food on a plate as well.
Not only does this method of cooking work from a taste and visual point of view, but it is actually pretty easy to pull together a dynamic dish using this concept.
Beluga Lentil, Grilled Nectarine + Burrata Salad
In this 30-minute dish the triad of warm earthy lentils, smoky-sweet nectarines, and cool creamy burrata is more than the sum of its parts. Each of the parts requires very little or no preparation. The simple vinaigrette acts like the jewelry that ties the whole ensemble together.
The rule of threes concept worked perfectly in this recent red pepper, white bean, and feta recipe, too. The smoky bright red peppers, the earthy light white beans, and sharp tangy feta create a synergy that is tied together with a crown of herb sauce. Magnificent, yet simple.
It only looks challenging! Make Beluga Lentil, Grilled Nectarine + Burrata Salad soon for an ever so delicious, beautiful, fancy-fast-easy brunch, lunch, or dinner. Make it vegan by omitting the burrata, and it is still delicious. Serve it alongside meat, or enjoy it as a vegetarian main course.
How can you use this Rule of Threes concept in your cooking and meal planning? I'd love to hear about your ideas and experiments!
Beluga Lentil, Grilled Nectarine + Burrata Salad
Course: Breakfast + Brunch, Main Dish, Quick + Easy, Salad, Side Dish
This triad of earthy lentils, smoky-sweet nectarines, and creamy burrata is more than the sum of its parts. Quick to make but ever so delicious and versatile, make this soon for a fancy-easy brunch, lunch, or dinner. Make it vegan by omitting the burrata, and it's still delicious.
In a small jar with a tight-fitting lid, place the minced shallot and Dijon mustard. Stir gently. Add about half of the thyme leaves stripped from the stems, salt and pepper. Cover the shallot mixture with the vinegar of your choice. Eyeballing it, add enough olive oil to double the volume in the jar, or about the same in height to the shallots and vinegar. Shake until the salt is mostly dissolved and the mustard is thoroughly incorporated. Set aside.
Now Make the Beluga Lentil, Grilled Nectarines + Burrata
Light or preheat your grill for a hot, direct fire/heat.
In a medium saucepan, place the lentils, bay leaf, a pinch of salt, and 3 1/2 cups water. Bring lentils to a boil, then reduce heat to a low simmer. Cook uncovered, stirring every 5 minutes or so, for about 20 minutes or until the lentils are al dente, but not mushy and broken. Begin chcking their doneness at the 15 minute mark.
While the lentils are cooking, place the halved nectarines on a preheated grill over direct heat. Oil the grates first, and place the nectarine halves cut side down. Do not move them until the 3 minute mark, and check for rich grill marks. They may need another minute or so to become deeply marked. Flip them and grill another 3 minutes until the skins have grill marks, for a total of 6-7 minutes. Don't let the nectarines overcook-- you just want them warmed through and kissed with flavor from the grill.
When the lentils are done, drain off any remaining liquid. Sitr in the diced celery and leaves, reserving some of the leaves for garnish. Mound this onto plates or a serving platter.
Arrange the nectarines on to mounded lentils. You may chose to halve some of them.
Place the burrata on top of the lentils. Sprinkle the remaining thyme and celery leaves over the top and serve.
Notes
This recipe serves three people as a main course, or six people as a side dish.This salad is especially luxurious served warm, but equally delightful served chilled, especially if you need to make the components ahead of time.Peaches would be just as lovely in this dish as the nectarines. Use what you have or prefer.Recipe star ratings are very welcome and appreciated. Thank you for taking the time to provide your feedback this way.
It is an odd little kid who prefers observing adults above hanging out with other kids, but that is how I was issued. With the focus of Jane Goodall and the sofa as my cover, I studied grown-ups and all forms of their behavior; language, cultural and social norms, and how curiously their developed biology drove their actions. Kids I found to be mostly mean, addled, and ridiculous.
It will not surprise you, then, to know I hated peanut butter and jelly sandwiches. The basic components were good, I thought. But jelly seeping through the bread, the gluey palate-sticking nature of the thing, and the whole sandwich mangled by the smacking of a thermos inside the lunchbox of a girl with a purposeful stride? Thank you, but no.
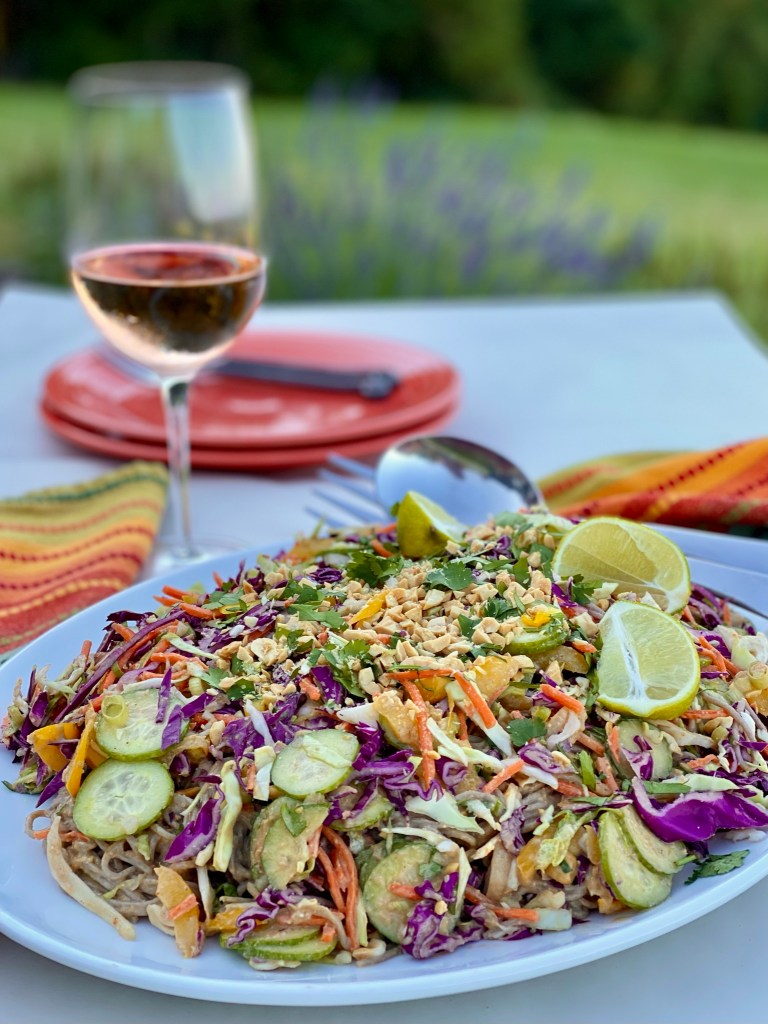
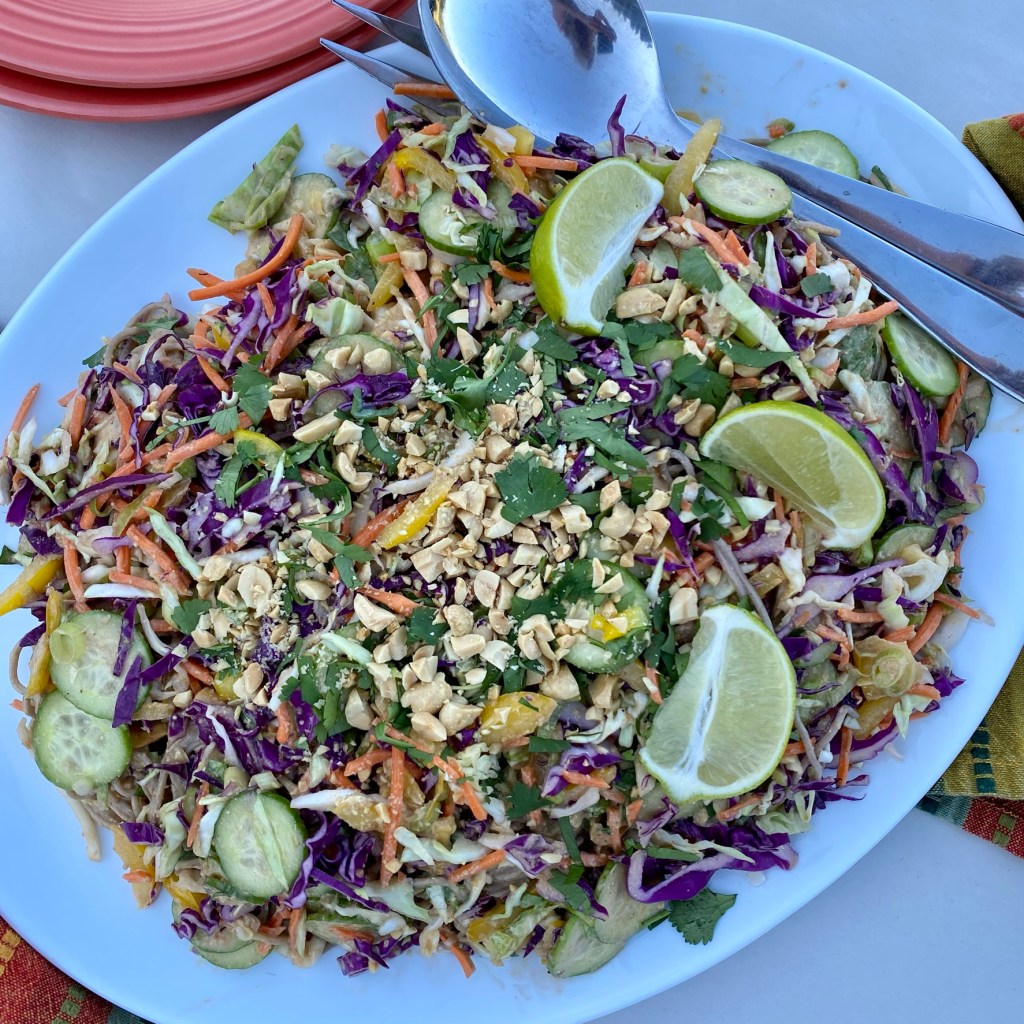
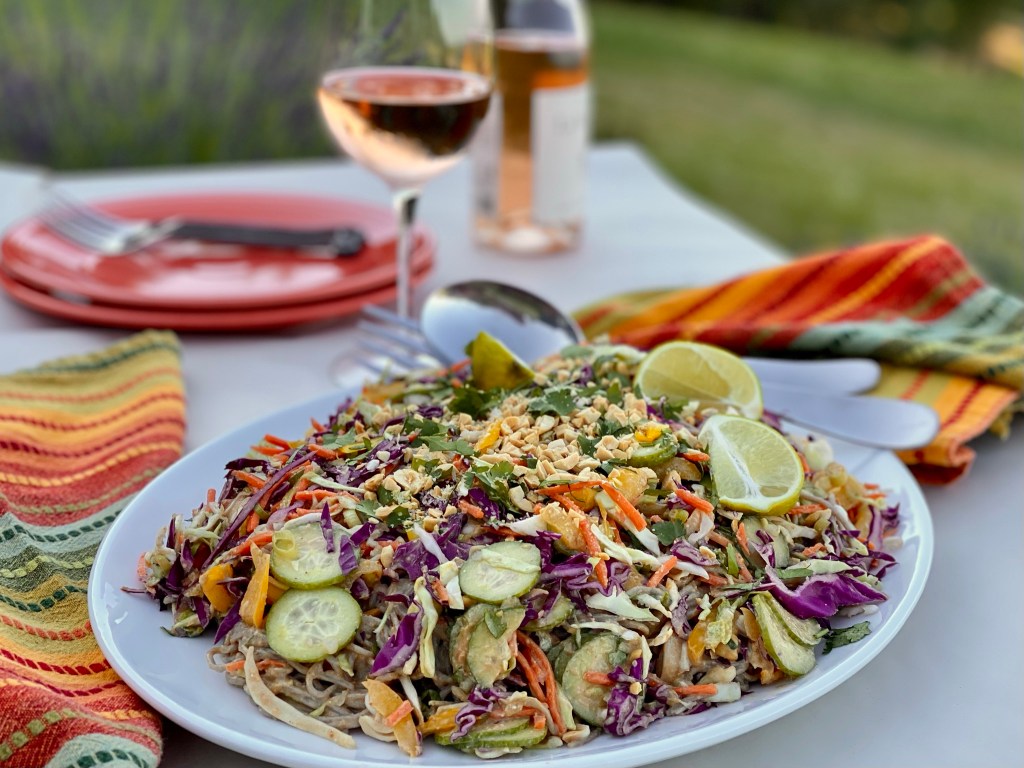
If Crunchy Cold Buckwheat Noodles in Peanut Sauce had been popular among suburban moms so long ago, it would have been my absolute lunchbox preference. A tangle of chewy buckwheat noodles and colorful crunchy vegetables draped in a velvet cloak of spicy, gingery peanut sauce is arguably the best use of peanut butter. It would have had me daydreaming about girls in Indonesian -- where peanut sauce originates-- wondering if they liked math any better than me, if their parents fought, and whether they moved a lot or got to live in one house their whole life. I would have wished the Weekly Reader to do a story on them so I could know.
This recipe is for my grandchildren should they want something other than jelly and bread with the peanut butter in their lunchboxes.
Chewy soba noodles and crackly-fresh vegetables are draped in a velvety, gingery peanut sauce. Make it in less than 20 minutes for a speedy dinner, but be sure to make extra-- it holds well for tomorrow's lunches or picnics. Easily halved or doubled, this all-ages people pleaser will be a welcome addition to your meal rotation.
3Tbsp.fresh squeezed lime juice or rice wine vinegar
2Tbsp.sugar, brown sugar, honey, or maple syrup
2Tbsp.toasted sesame oilalso called dark sesame oil
1 tsp. -1 Tbsp.Sriracha or hot chili garlic sauce to taste
1Tbsp.grated fresh ginger and its juice
1-2 grated garlic cloves
Noodle Salad
10 oz.soba (buckwheat) noodlesudon, ramen, or rice noodles or even spaghetti are also good choices. Use gluten free noodles if you'd like
6 cupsfresh crunchy raw vegetables (see list below to mix and match*)chopped , coarsely grated, or thinly sliced
3-4green onions, sliced
1bunchcilantro, coarsely chopped
¼ cuppeanuts, coarsely chopped (optional)
Peanut Sauce (above)
1lime, cut in wedges for serving
Instructions
In a medium bowl that allows room for whisking, whisk peanut butter to loosen it. Add each ingredient one at a time, whisking thoroughly after each addition. (You are making an emulsion, and adding the liquids slowly in batches prevents a sloshy mess from forming. It will actually go faster this way, and will minimize cleanup.)
Whisk in warm water, one tablespoon at a time, until the sauce thickly drips from the whisk. You want the sauce to be thin enough to easily coat the nooks and crannies of the vegetables and noodles, but to retain some body. Depending on the thickness of your peanut butter and the room temperature, you will add between 1 Tablespoon and ¼ cup of water. Taste and make any adjustments of sweetener, lime juice, spicy heat, or perhaps salt. Set the peanut sauce aside.
Place a pot of salted water on to boil. Cook soba noodles according to package directions. When done, rinse in cold water until the noodles are completely cold.
While the water is heating and the noodles are cooking, prep your vegetables including the green onions. Aim for small dice, or thin matchstick pieces so that you can fork up a mix of vegetables and noodles in each bite. Place all the vegetables in a large bowl..
Coarsely chop the cilantro and peanuts. Keep a few tablespoons of each aside for garnish, and place the rest in the bowl. When the noodles are cooked, rinsed, and drained, add them to the bowl. Give everything a gentle toss.
Add about ½ cup of the peanut sauce to the bowl, and give everything a gentle but thorough toss, until all ingredients are evenly coated with peanut sauce. Add more sauce, tablespoon by tablespoon, until the salad is dressed to your liking.
Plate the salad individually or transfer it to a serving bowl or platter. Sprinkle cilantro, peanuts, and sesame seed on top. Serve with a lime wedge.
Refrigerate any leftovers in an airtight container. Will keep nicely for a day.
Notes
*Fresh crunchy vegetable options. Use what the garden or farmers market gives you, or what you have in your crisper:
cucumber*
green and/or purple cabbage
red or yellow bell pepper
snow or sugar-snap peas
carrot
radish
kohlrabi
white turnips
green or yellow summer squash*
*Best added only if you'll consume the entire recipe right away, as they go soft and watery overnight. I don't mind this, but you might!
Follow Me
Welcome!
You’re in the right place! I’m Pam Spettel, home cooking expert and guide, and I’m here to show you how to break up with cooking and hospitality anxiety, learn how to use recipes as guides rather than strict rules, and let your cooking intuition and confidence soar.
Superpower: Dreaming up recipes that work, serving them to my friends and family, and writing little stories about how cooking them well is the same as loving well.
Inspiration: Ingredients! The fresh, colorful, fragrant, local, seasonal ingredients found in the Pacific Northwest are my creative medium.
Heroes: Local food and wine producers– the people who keep me, my family, and our community nourished and happy.
We use cookies on our website to give you the most relevant experience by remembering your preferences and repeat visits. By clicking “Accept”, you consent to the use of ALL the cookies.
This website uses cookies to improve your experience while you navigate through the website. Out of these, the cookies that are categorized as necessary are stored on your browser as they are essential for the working of basic functionalities of the website. We also use third-party cookies that help us analyze and understand how you use this website. These cookies will be stored in your browser only with your consent. You also have the option to opt-out of these cookies. But opting out of some of these cookies may affect your browsing experience.
Necessary cookies are absolutely essential for the website to function properly. These cookies ensure basic functionalities and security features of the website, anonymously.
Cookie
Duration
Description
cookielawinfo-checkbox-analytics
11 months
This cookie is set by GDPR Cookie Consent plugin. The cookie is used to store the user consent for the cookies in the category "Analytics".
cookielawinfo-checkbox-functional
11 months
The cookie is set by GDPR cookie consent to record the user consent for the cookies in the category "Functional".
cookielawinfo-checkbox-necessary
11 months
This cookie is set by GDPR Cookie Consent plugin. The cookies is used to store the user consent for the cookies in the category "Necessary".
cookielawinfo-checkbox-others
11 months
This cookie is set by GDPR Cookie Consent plugin. The cookie is used to store the user consent for the cookies in the category "Other.
cookielawinfo-checkbox-performance
11 months
This cookie is set by GDPR Cookie Consent plugin. The cookie is used to store the user consent for the cookies in the category "Performance".
viewed_cookie_policy
11 months
The cookie is set by the GDPR Cookie Consent plugin and is used to store whether or not user has consented to the use of cookies. It does not store any personal data.
Functional cookies help to perform certain functionalities like sharing the content of the website on social media platforms, collect feedbacks, and other third-party features.
Performance cookies are used to understand and analyze the key performance indexes of the website which helps in delivering a better user experience for the visitors.
Analytical cookies are used to understand how visitors interact with the website. These cookies help provide information on metrics the number of visitors, bounce rate, traffic source, etc.
Advertisement cookies are used to provide visitors with relevant ads and marketing campaigns. These cookies track visitors across websites and collect information to provide customized ads.