This recipe is designed for a very special group of people who started out as neighbors and became dear friends. Ever since we moved to the 101-Mile Kitchen we gather frequently to relax, shoot the breeze, eat and drink. This recipe is a thank you to these amazing souls who have kept my heart from drooping during the last 20 months of living in an upside down world, and to the universe for putting us in each other's paths.
Besides being funny, smart, and caring, our neighbors all enjoy cooking great food and drinking nice wine. (There might be a splash of bourbon here and there, too.) Sometimes we have a full-on meal, but most often we meet over easy noshes, charcuterie, spreads and dips, and casual dishes. I can't wait to make this poutine for them.
What is the Best Pairing?
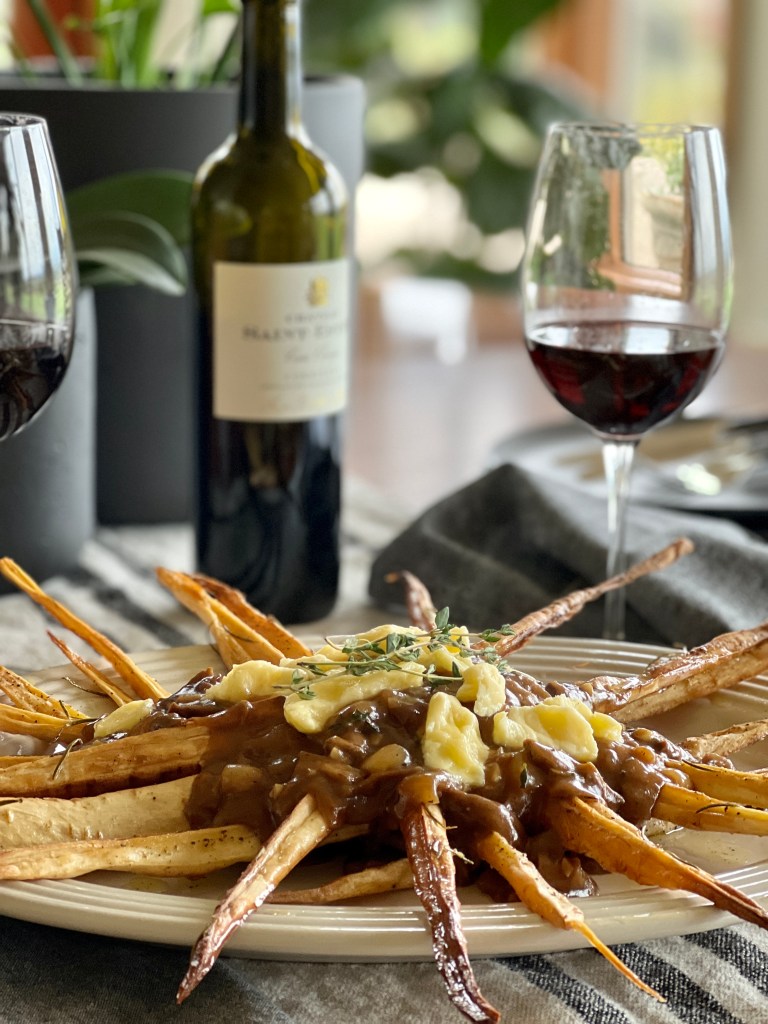
While it makes a terrific main course at its heart poutine is bar food and doesn't need a precious pairing. I'd suggest a Southern Rhone style blend. This time I served the poutine with a very inexpensive ($13) 2017 Château Saint-Estève Cuvée Classique Corbières Rouge-- a nice old world 60% Grenache- 40% Syrah blend. It is lively, with whispers of herbs and deep fruit that compliment the umami and herbal flavors in the gravy.
Of course most ales and beers are also delightful with poutine.
Making the Poutine + Gravy
Parsnip Poutine + Rich Mushroom Gravy is another of those one-hour wonders. It takes maybe ten minutes to prep the ingredients, 16 minutes in the oven to get the parsnips on their tender and crunchy way while the mushrooms rehydrate, and another 15 or 20 minutes to make the gravy while the parsnips are finishing off. A foil-lined sheet pan, a large pan, a knife, and a bowl are the only tools used so clean-up is speedy.
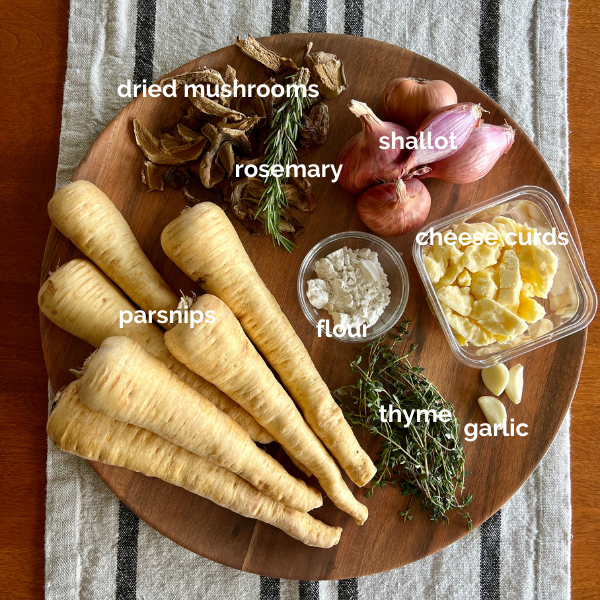
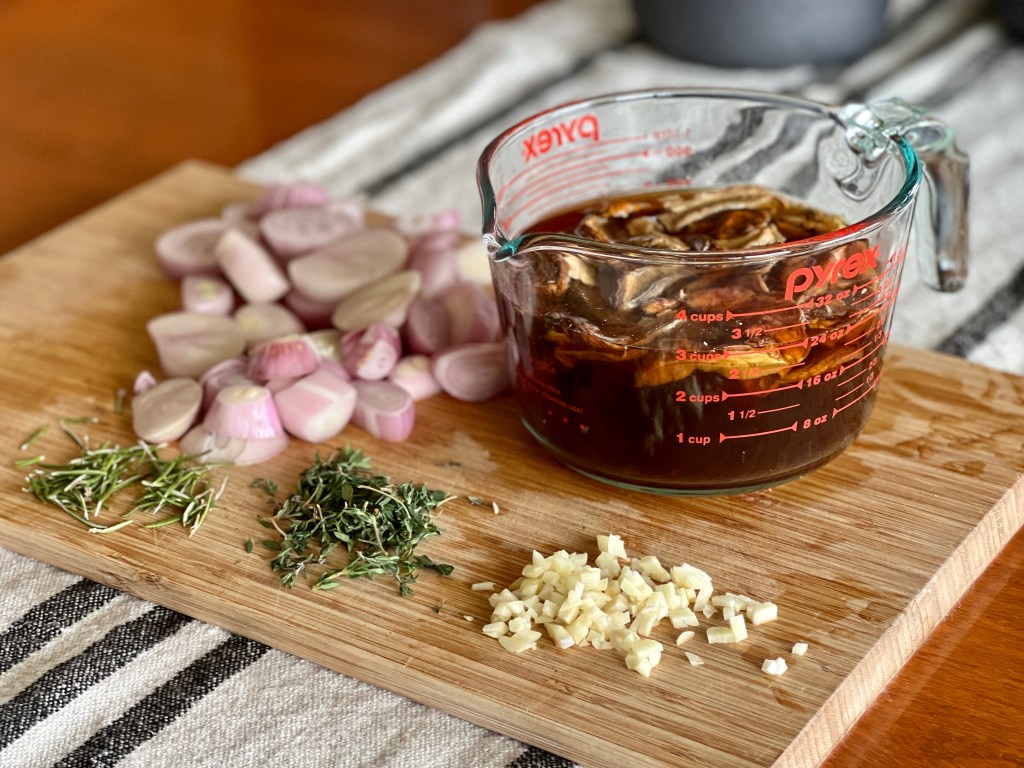
Parsnips and shallots grow just about anywhere, so they should fit in to most people's imaginary 101-mile sourcing radius. You can find dried Porcini mushrooms at many groceries and online. My favorite source is Pistol River Mushroom Farm in Southern Oregon. Dried mushrooms seem expensive until you realize that one ounce of dried mushrooms is equal to 8 ounces of fresh. The dark color of the soaking liquid becomes the intensely flavored broth for the gravy-- something a fresh mushroom just can't do.
As an aside, tuck this mushroom gravy recipe away to use in many other ways. I can't wait to ladle it onto a split and fluffed baked potato one cold winter's day.
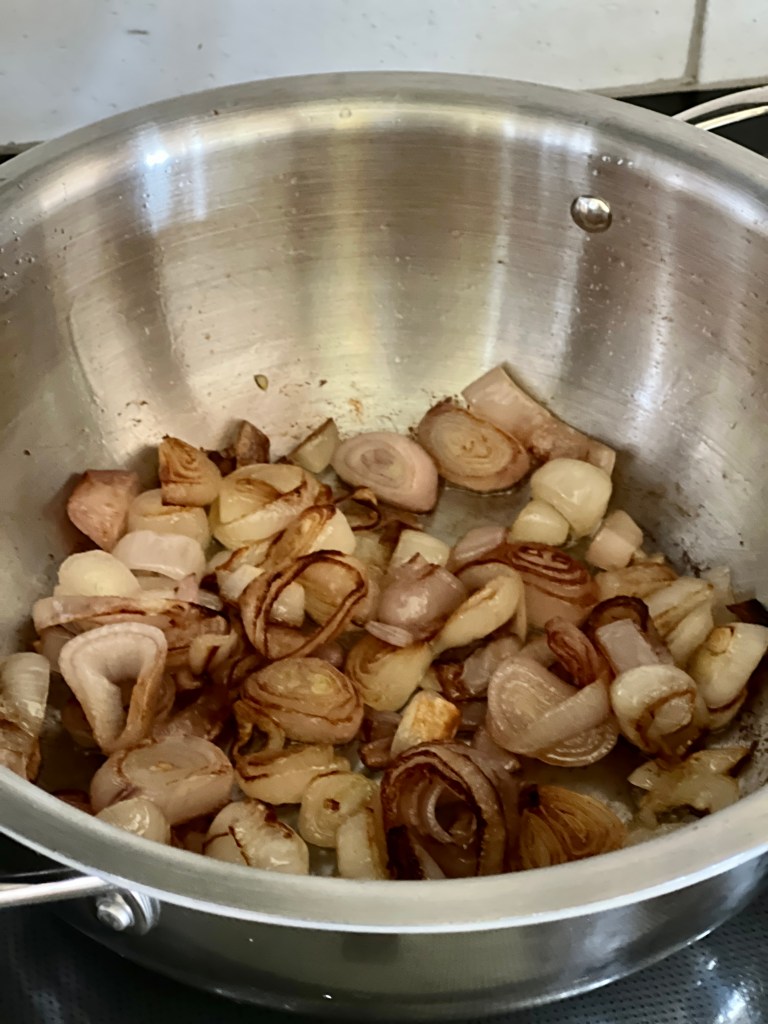
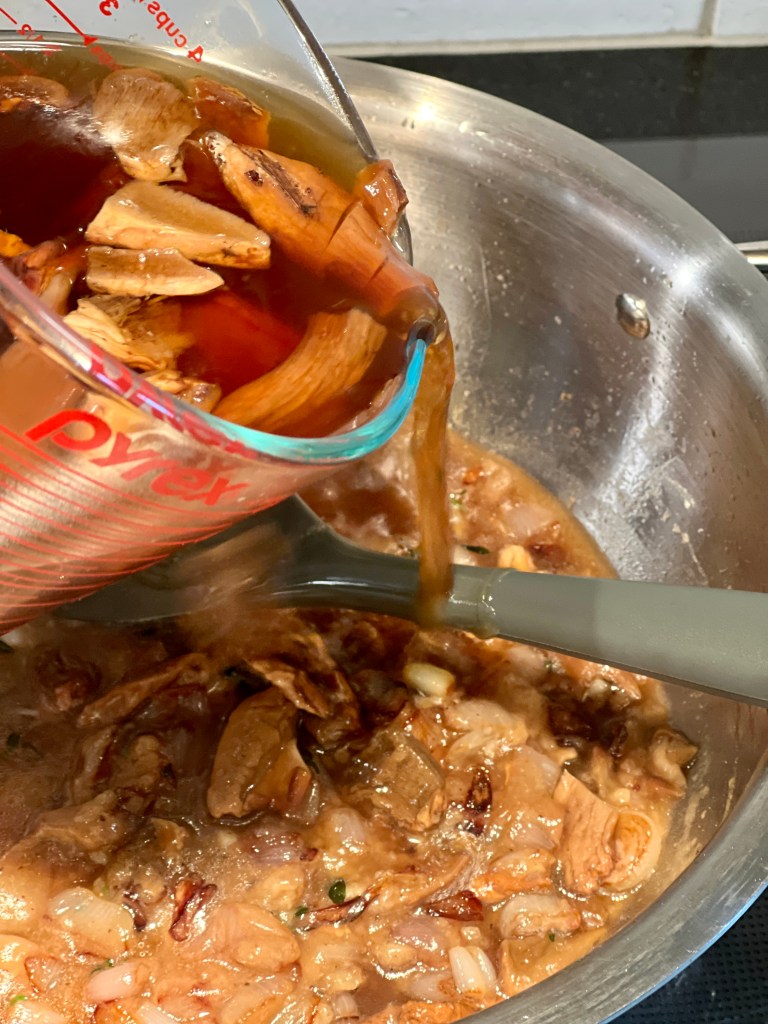
The parsnips roast, the mushrooms soak and the shallots, garlic, and herbs are prepped; caramelizing the shallots; the mushrooms and their soaking water go into the gravy; everything is plated and topped with cheese curds.
You'd never know there was no meat in this rich silky poutine gravy, and the crunchy, chewy roasted parsnips take it to new but familiar places. A fantastic main or "bar food" course for vegans and omnivores alike.
1 oz.dried porcini mushrooms, or other dried cooking mushroom
12oz.shallot, approximately 4 large peeled and sliced ½" thick
3clovesgarlic, minced
2tablespoonsfresh thyme leaves, plus more for garnish
2½tablespoonsGF One-for-One flour, rice flour, or all-purpose flour
salt and pepper
¼lb.cheese curds, or goat cheese
Instructions
For the Parsnips
Preheat the oven to 400° convection and line a baking sheet with foil.
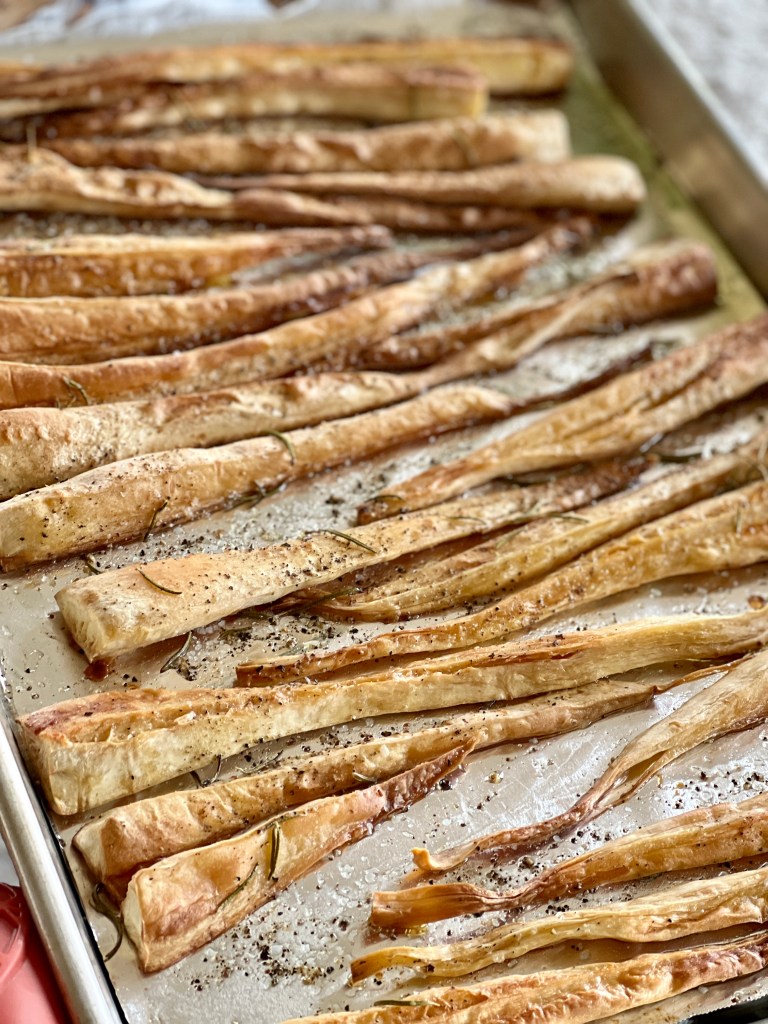
Trim and peel the parsnips. Quarter them lengthwise, and if they are especially thick, cut them again into eighths. Lay them out on the foil lined baking sheet, and drizzle them generously with olive oil. Toss them with your hands to evenly cover them in the olive oil, and spread them out flat at much as possible. Sprinkle them lightly with salt and black pepper. Bake for 16 minutes, and them flip them over. Reduce the oven heat to 350°. Sprinkle again with salt and pepper, and drizzle olive oil on any parts that look parched. Sprinkle the rosemary leaves over the parsnips and return to the oven for another 16-20 minutes. Check them often for doneness-- the thick tops will be browned and tender, the thin ends will be well browned and somewhat crispy.
For the Mushroom Shallot Gravy
As soon as the parsnips are in the oven, place the dried porcini in a 4-cup measuring cup or bowl, and cover with hot tap water to the 3-cup mark. Set aside.
Heat enough olive oil over medium-high heat to generously cover the bottom of a sauteuse or large pan. Slide in the sliced shallots and leave without turning until the bottoms are browned. Stir, flipping them over, and again allow them to brown. After the first ten minutes add the minced garlic, thyme, and a 4-finger pinch of salt. Continue the browning process until the shallots are completely tender but not mushy, and have a good amount of browned caramelization throughout.
Stir in the flour, and continuously stir until the flour is well incorporated and beginning to stick to the pan. Stir for about three minutes.
Gradually ladle in the soaked mushrooms and their dark brown soaking liquid, stirring between ladlefuls, until it it incorporated. You will see the gravy begin to thicken immediately-- stir throughout this process to avoid any lumps.
Stirring frequently, bring the gravy to a boil, and add some more salt. There should be about one teaspoon total in the gravy, or to taste. Add a very generous amount of black pepper to season. Allow the gravy to bubble and thicken for about 6 minutes.
Bring it All Together
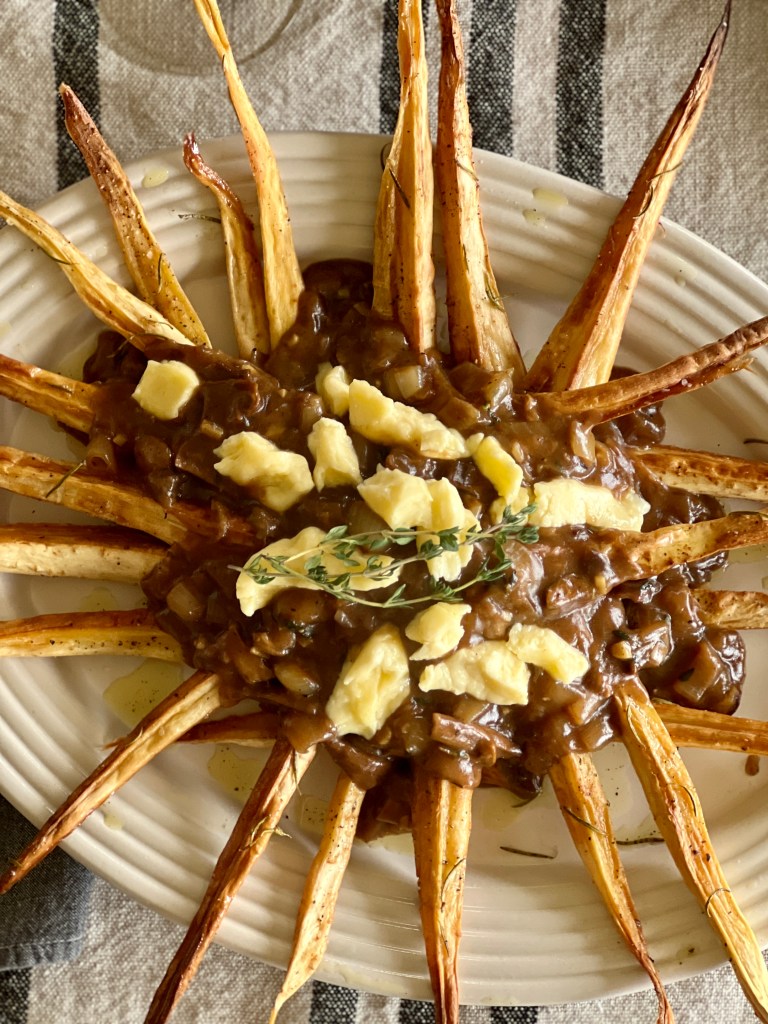
Arrange the roasted parsnips on a large warmed platter in a spiky spoke-like fashion. Ladle the hot gravy in the center. Arrange the cheese curds over the gravy, and top with a bunch of thyme for garnish. Serve while piping hot.
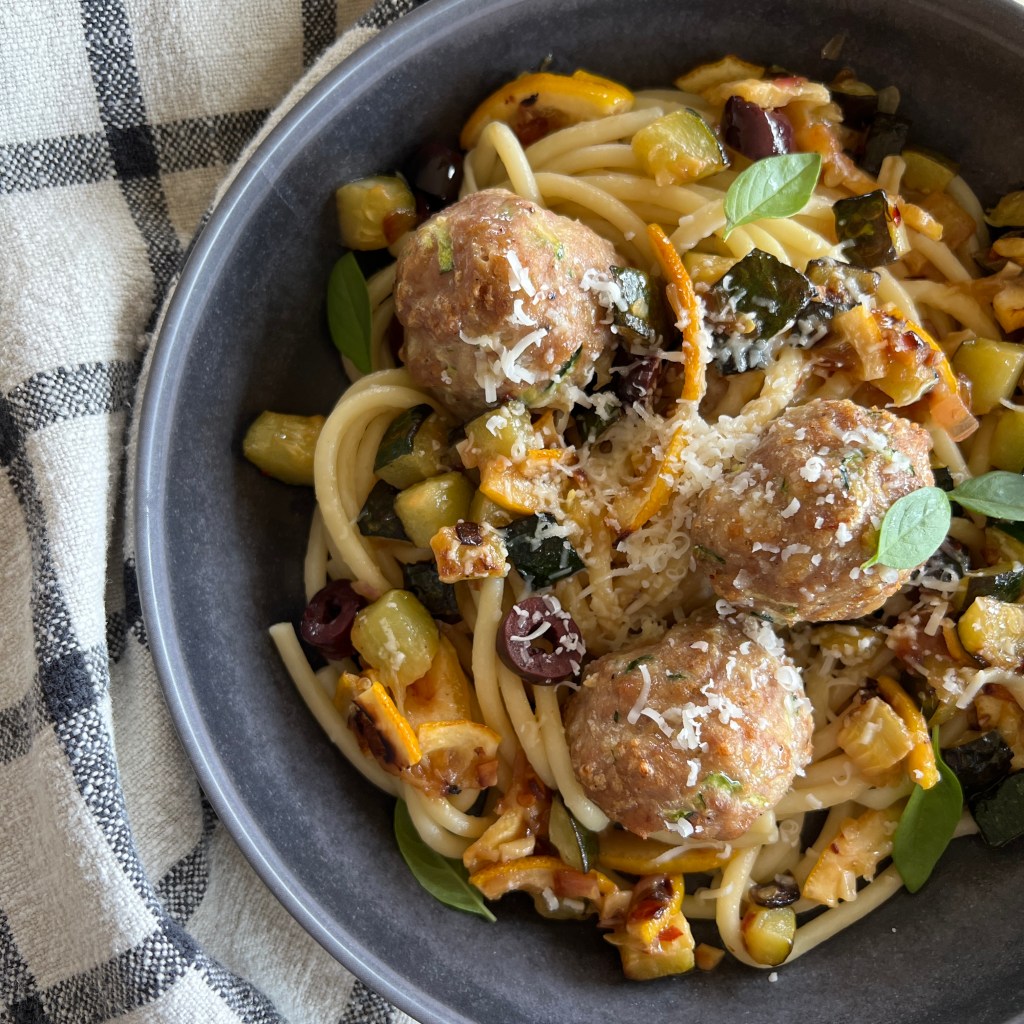
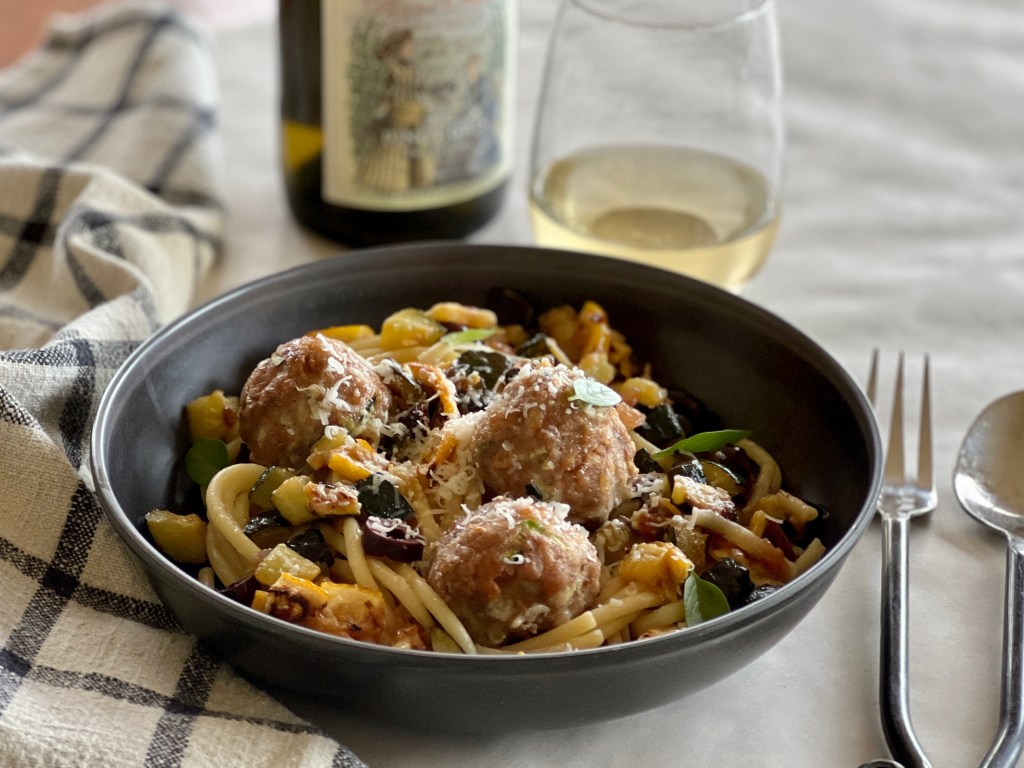
Turkey Meatball + Roasted Lemon Zucchini Pasta is one of the tastiest recipes you can have in your weeknight toolbox. Pop these juicy meatballs into the oven and they'll be done in twenty minutes-- as long as it takes to get the rest of the dinner together. This fun and exciting weeknight meal is ready in under an hour, but is definitely company-worthy.
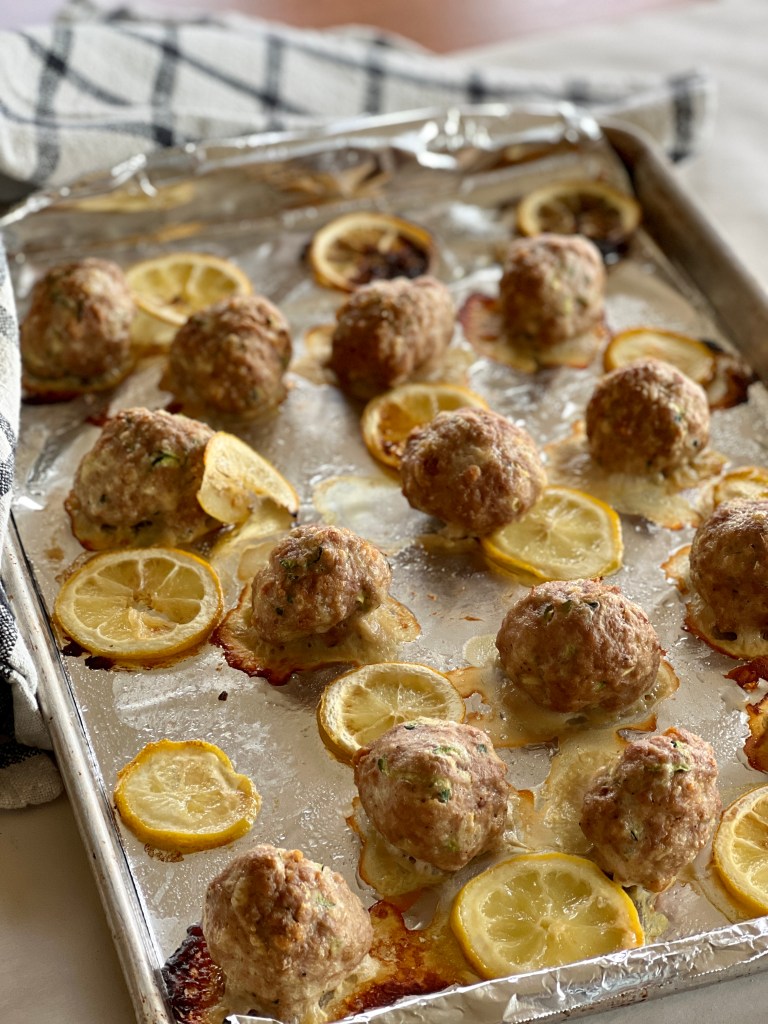
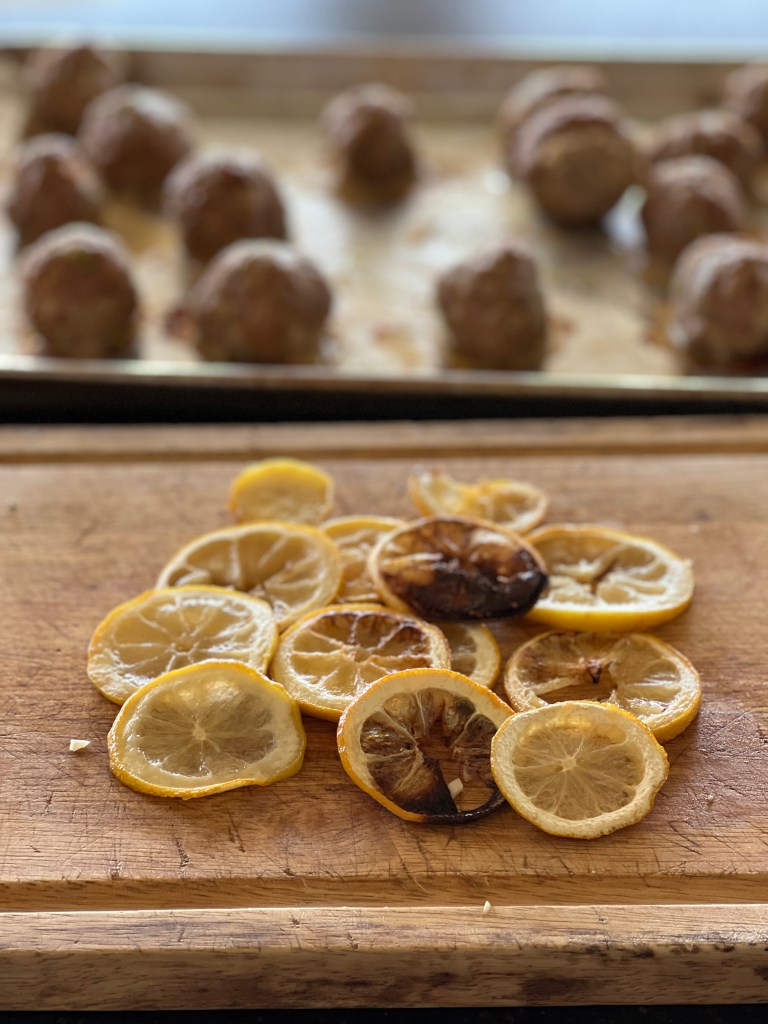
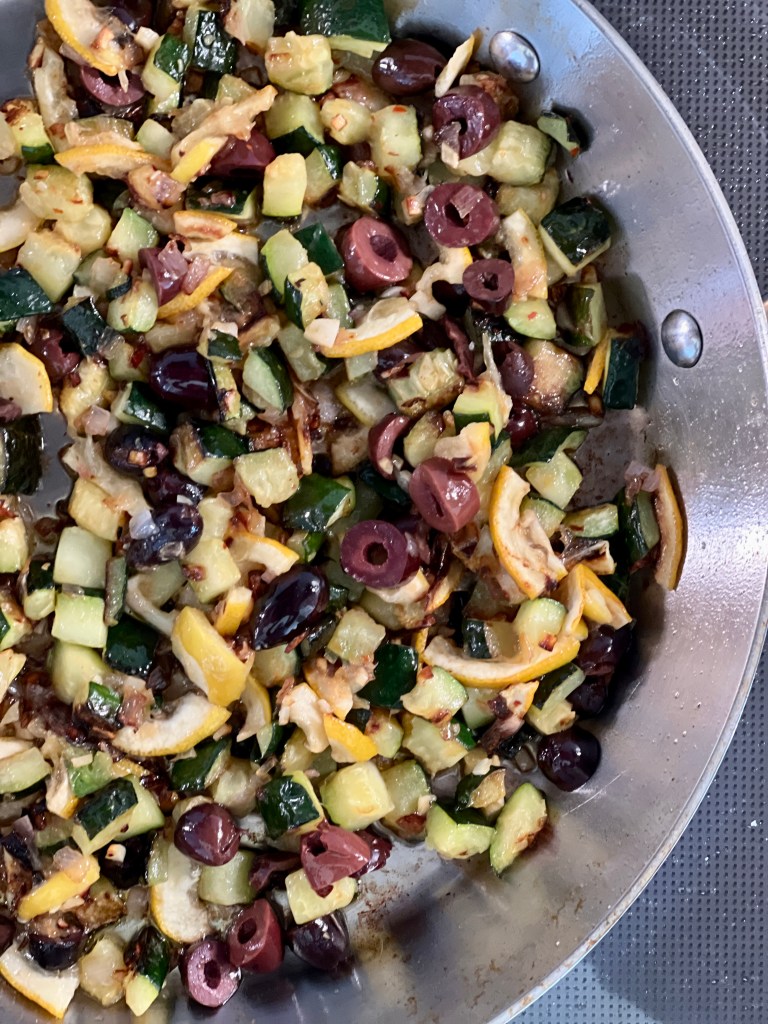
Lemon slices roast alongside the meatballs, then are chopped and added to the sauce with briny chopped olives to give this simple dish huge flavor for the amount of effort it takes.
Our household is not yet ready to make the shift to an entirely plant-based diet, but we make incremental steps in that direction. This turkey meatball and roasted lemon pasta is chock full of zucchini. The turkey meatballs hold a lot of zucchini which lightens the meatballs. Reduce and replace the volume of turkey with even more zucchini if that's where your dietary choices are taking you. In the future I'll be experimenting with replacing the turkey with mashed beans for a completely meatless "meatball."
Making the Turkey Meatball + Roasted Lemon Zucchini Pasta
Meatballs and sliced lemon roast together; Roasted lemon will go into the sauce; Prepping the vegetables for the sauce; Quickly saute the sauce while the meatballs roast and the pasta cooks; Toss the cooked pasta into the sauce with some of its cooking water.
First, form the meatballs and lay them out on a sheet pan with the sliced lemon which will go into the sauce after it roasts. The meatballs and lemon roast together while a pot of water boils for the pasta and a simple robust mediterranean sauce sautes. Then toss together the pasta and sauce with some of the pasta cooking water. Then top it off with the meatballs, and viola-- dinner is served.
A few common ingredients are all it takes for this easy weeknight pasta.
What Wine Shall I Serve?
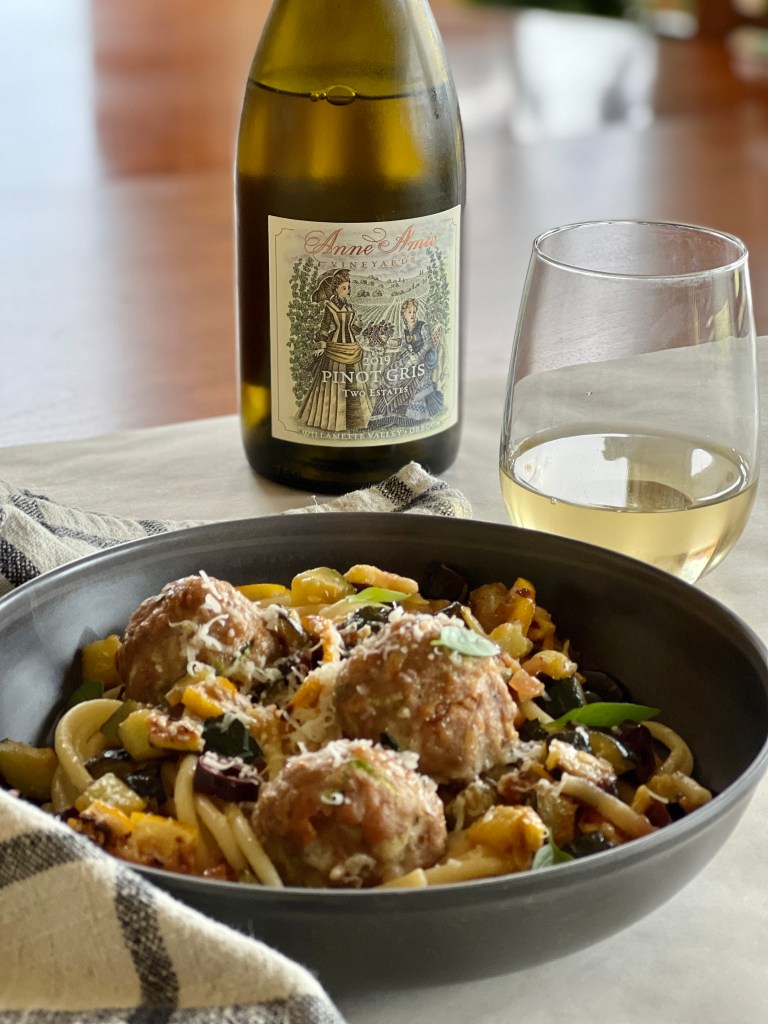
Turkey meatballs and roasted lemon zucchini pasta is perfect with Anne Amie 2019 Pinot Gris.
The mediterranean flavors in the sauce-- garlic, condensed roasted lemon, and Kalamata olives-- were perfect with the Willamette Valley wine producer Anne Amie2019 Pinot Gris. 15% of the Pinot Gris barrels in this vintage were fermented in neutral barrels and aged on the lees, giving it a soft, round mouthfeel not often found in a Pinot Gris. This very enjoyable wine is found within our 101-mile sourcing radius!
In general, a dry white wine with some citrus and minerality will be a perfect match. Experiment and have fun finding those that you most enjoy.
Turkey Meatball + Roasted Lemon Zucchini Pasta
Course: Main Dish
Cuisine: Italian, Mediterranean
Total Time: 55 minutesminutes
Servings: 4
Tucking a little zucchini into the meatballs lightens this hearty, comforting pasta dish that is loaded with delicious bright flavor. Less than an hour from start to finish makes it easy enough for a weeknight, but it's fancy enough for company.
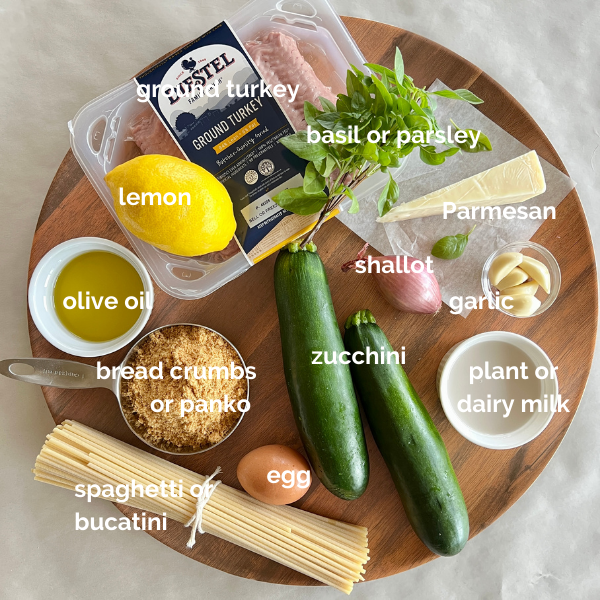
1 cuppanko or purchased bread crumbsboth are available in gluten-free options
¾cupmilk, dairy or plant
1large egg
1 ½cupsgrated zucchinisqueezed of moisture in a clean kitchen towel
1poundground turkey94% lean will be juicier than 99% lean
1 ¼cupfinely grated parmesan cheesereserve ¼ cup for serving. For dairy-free, replace this with 1-2 Tablespoons nutritional yeast.
2clovesgarlic, pressed
1teaspoonsalt
1teaspoononion powder, optional
1largeor two smaller lemons, sliced 1/2›" thin
For the Pasta and Roasted Lemon Sauce
¾poundspaghetti or bucatinior gluten free pasta
extra virgin olive oil
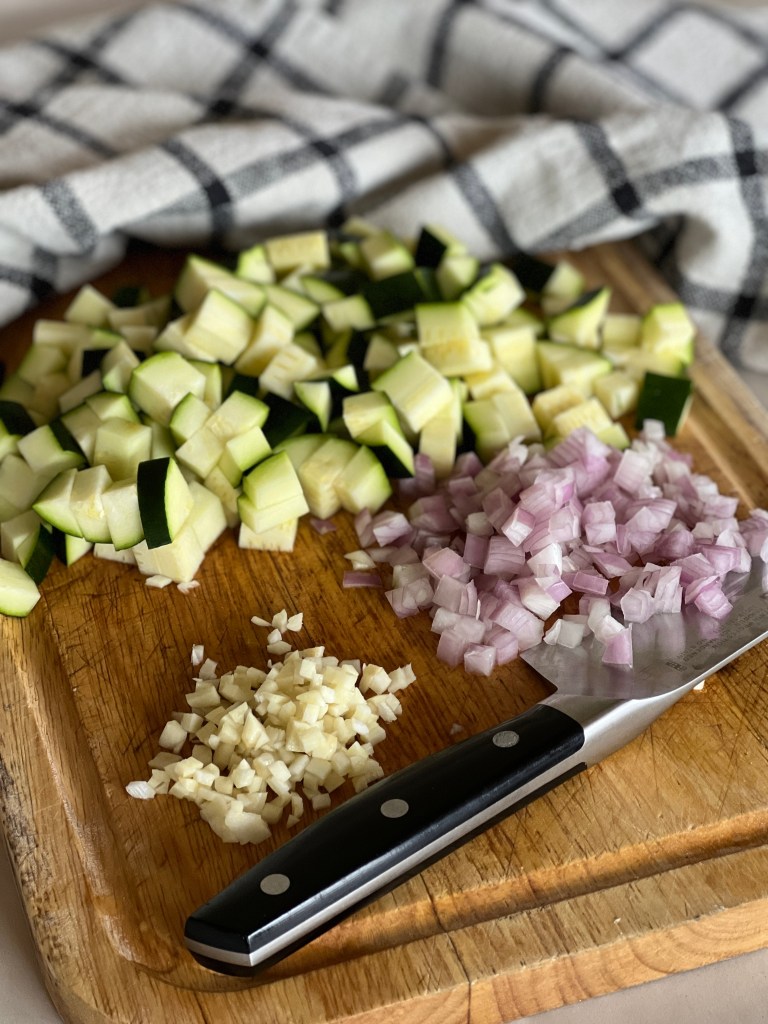
3-4cupszucchini, diced in about 1/4" pieces
1shallot, finely diced
4 cloves garlic, finely minced
1teaspoonsalt
½teaspoonred pepper flake
1/2cupKalamata olives or other black olives, roughly chopped
roasted lemon slices, above, chopped into small piecesthe lemon slices will roast at the same time at the meatballs, so they are included in the above ingredient list
Chopped flat-leaf parsley or basil for garnish
Instructions
Make the Meatballs
Line a sheet pan with foil and spray it with oil spray. Preheat the oven to 375°.
In a large mixing bowl stir together the panko and milk and let rest for 5 minutes while the crumbs absorb the milk. Add the squeezed grated zucchini, turkey, 1 cup parmesan, garlic salt, and onion powder, if using. Mix everything together with you hands until thoroughly combined.
Use an ice cream or cookie scoop to form the meatballs, rinsing your hands in cold water to smooth the balls and place them on the sheet pan. (This makes 12-14 meatballs, depending on the size of your scoop.) Place lemon slices around the meatballs on the foil-lined sheet. Bake the meatballs for about 20 minutes, or until they are lightly browned and the lemon slices have softened. Some of them may have browned edges.
When the lemon slices are cool enough to handle, stack them up on a cutting board and cut them into quarters. Set aside for the sauce.
Make the Pasta and Roasted Lemon Zucchini Sauce
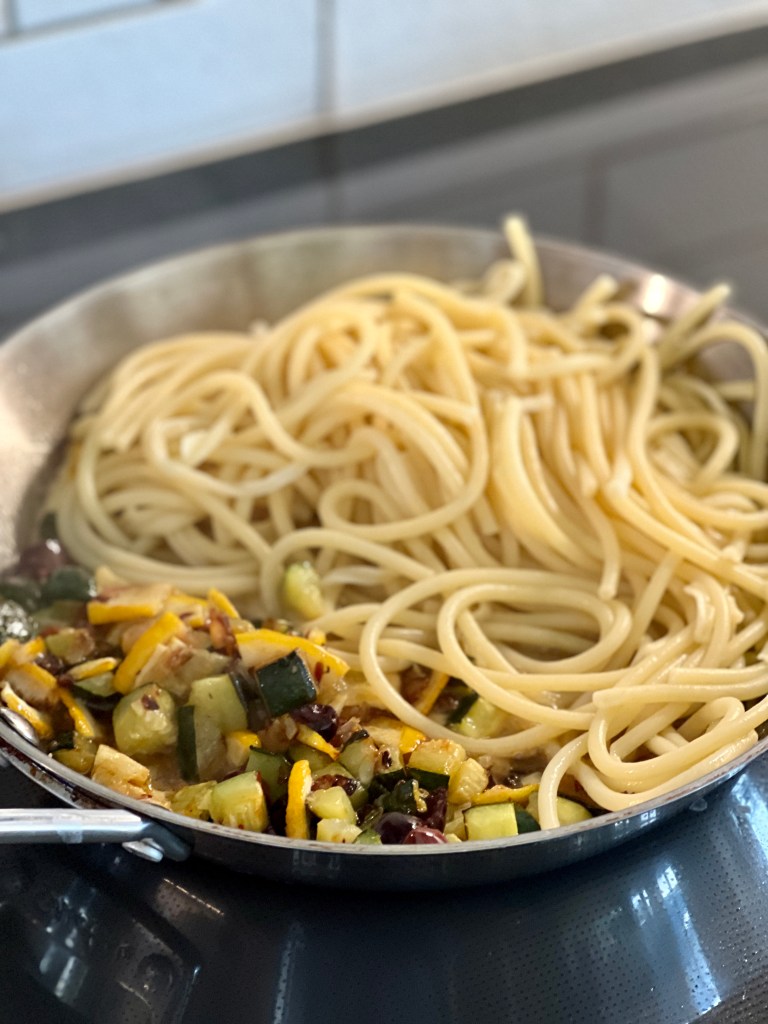
While the meatballs are in the oven, bring a pot of water to boil and cook the pasta according to package instructions. Reserve one cup of pasta water.
While the water is boiling, place enough olive oil to amply cover the bottom of your largest skillet over medium-high heat. It may seem like a lot, but the oil will become your pasta sauce so be generous. When the oil is hot add the zucchini, shaking the pan to settle the zucchini in to the pan. Leave it to brown without stirring for 2 - 3 minutes. Stir the zucchini around and shake the pan again, and add the shallot, garlic, salt, and red pepper flake on top. Adjust the temperature if needed to allow the browning to continue without burning, stirring every 2 minutes or so until all the vegetables are lightly caramelized and cooked through, about 8 minutes total.
With the heat still on the skillet, add the Kalamata olives and reserved roasted lemon to the zucchini mixture. Use tongs to lift the al dente pasta into the skillet with the sauce. Add ½ cup of the pasta water and use tongs to mix the sauce and pasta together. As the water absorbs you may want to add the rest of the water, tossing the pasta and sauce together as it becomes silky and coats the pasta.
Serve the pasta and sauce on plates or bowls, and nestle in the meatballs on top. Garnish with the remaining parmesan and parsley or basil. Drizzle with additional olive oil if desired.
Notes
For a dairy-free version, omit the parmesan from the meatball mixture and add 1 Tablespoon nutritional yeast. You may also sprinkle some nutritional yeast as a garnish to the finished dish. For a gluten-free version, use gluten-free bread crumbs or panko, and GF pasta.For a vegan option, omit meatballs and just roast the sliced lemon alone.Double the meatball portion of the recipe-- The meatballs freeze well and can be added to any pasta and sauce, or make great meatball sandwiches.
Other Cool-Weather Pasta Recipes and Zucchini Recipes
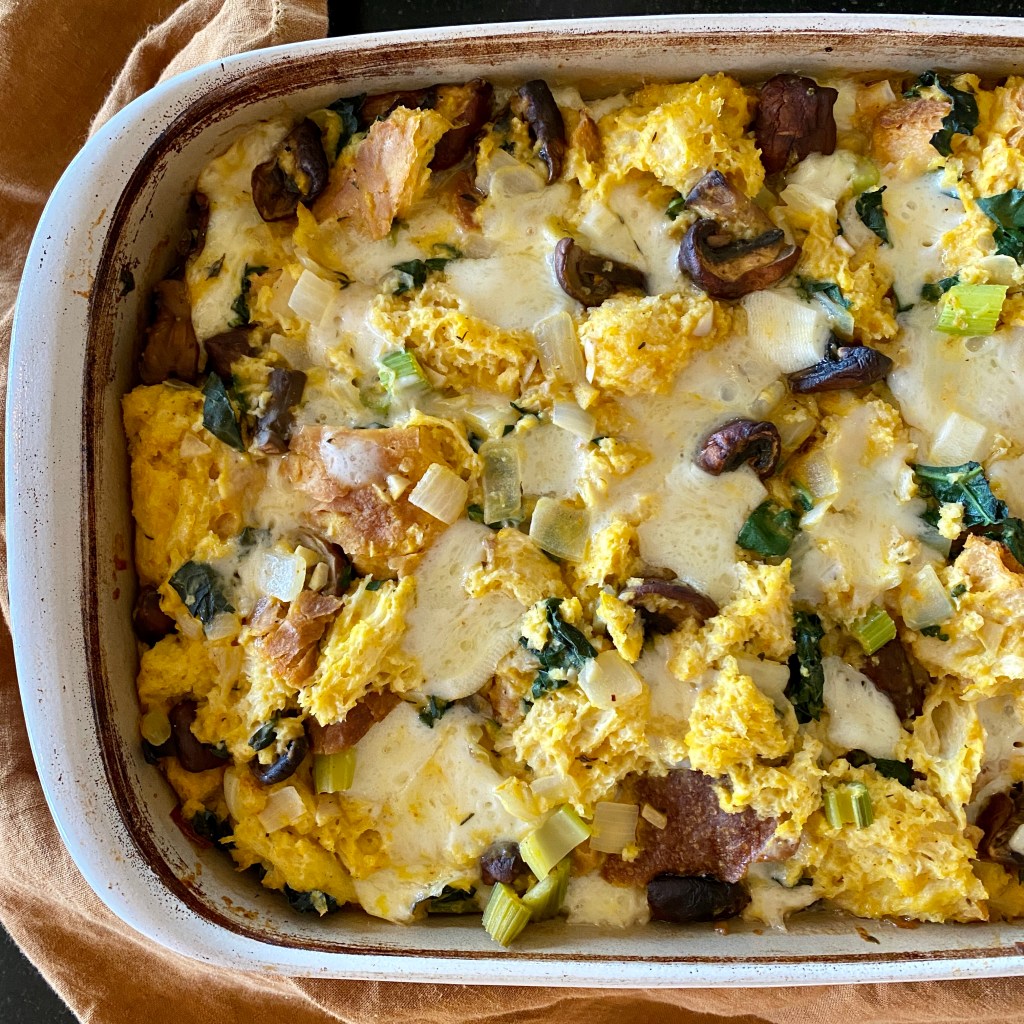
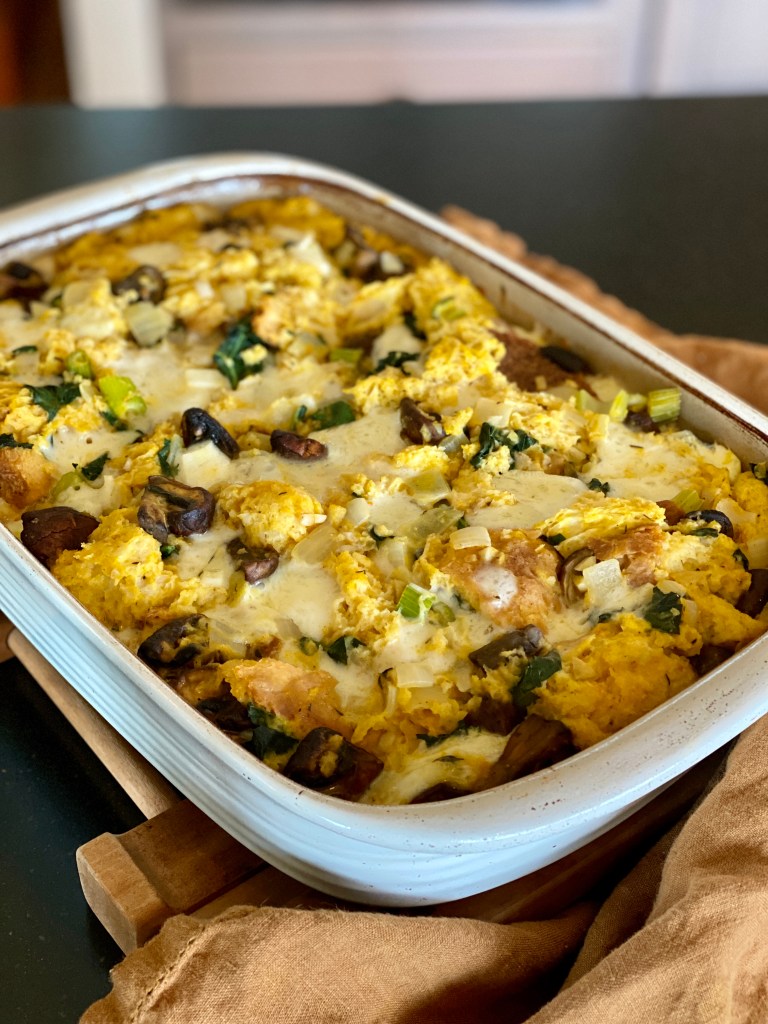
Bread turns golden as it soaks up the pumpkin-based custard.
Pumpkin can't seem to get away from the use of sugar and cinnamon-y pumpkin pie spices that relegate it to the sweets table. This Savory Pumpkin Bread Pudding-- with things like onions and herbs-- opens a whole new world of pumpkin possibilities.
Here, the dusky earthiness of pumpkin is the perfect match to lots of herbs, mushrooms, and two cheeses in the recipe. Think of it like a cheesy stuffing baked outside the bird, or like a strata.
Savory Pumpkin Bread Pudding Brings People Together
The people who gather at my table represent a wide range of dietary needs and preferences and, if you live in America in 2021, this is likely the case for you, too. This bread pudding is easily modified to meet the challenges of nourishing a dietarily diverse crowd. And the challenges of the cook organizing meals for them!
Having dishes on the table that respect everyone's needs can be a challenge that you likely know all too well. Above all, it is important to me that there be food that all my beloveds can share. I want no one to feel left out when the oohs and ahhs start happening!
This Savory Pumpkin Bread Pudding serves as a hearty main course for non-meat-eaters, and a tasty side dish for meat-eaters. Tailor it to your crowd by trading plant milk for dairy milk, and non-dairy cheese for the Parmesan and Fontina. Gluten-free bread is an easy swap that everyone will enjoy. However, egg substitutes have not been tested in this recipe.
Making the Savory Pumpkin Bread Pudding
Firstly, start with an artisan-style bread with lots of bubbles and holes in the crumb that create cozy spaces for the eggy pumpkin custard to rest. Day-old bread is even better, because it will soak up the custard best and bake up with a more firm sliceable texture.
After that, making pumpkin puree from scratch is really easy in an Instant Pot. Try making a batch or two to freeze and have on hand for all your pumpkin cooking and baking. The convenience of canned pumpkin is great, but there is a quality trade-off.
Things you'll need to make a Savory Pumpkin Bread Pudding of your own.
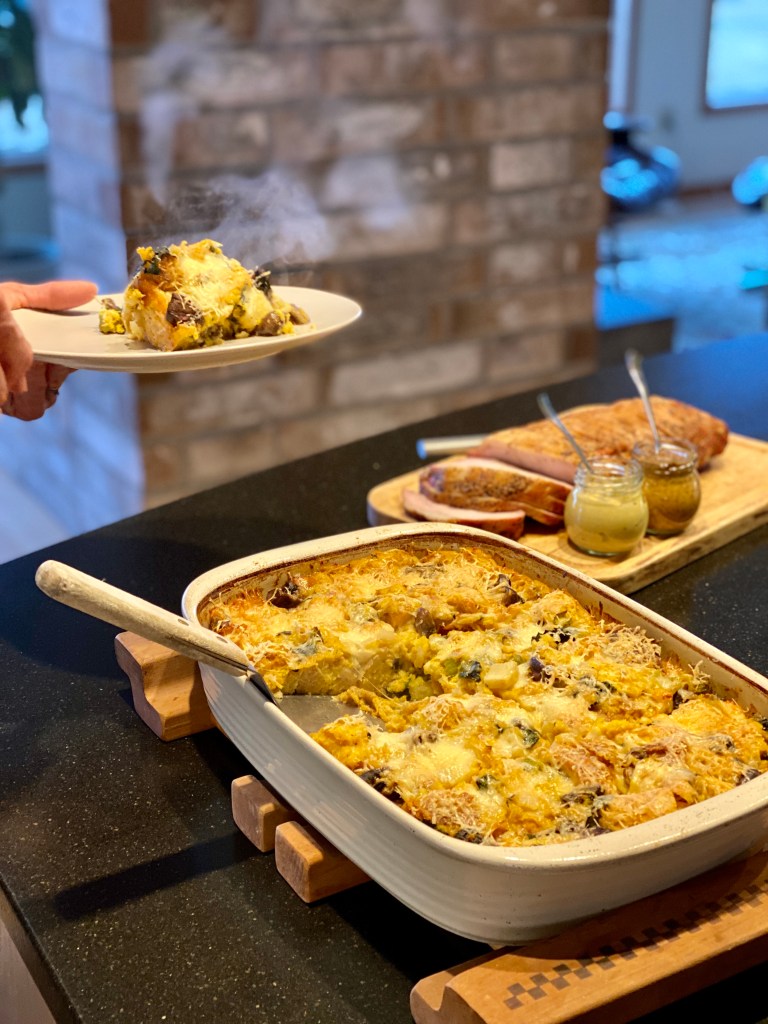
The make-ahead nature of Savory Pumpkin Bread Pudding makes it a great addition to your Thanksgiving table, or any time. Assemble the bread pudding the day before you need it, then baked it off on serving day. I hope you enjoy having pumpin in this savory way!
8ouncesfontina cheese, diced into about 1/4" cubesfor dairy-free version, omit or replace with a firm dairy-free melting cheese
salt and pepper to taste
Instructions
Oil a deep 9" x 13" baking dish or casserole. Preheat the oven to 350°.
Wash and dice the onion, celery, mushrooms, kale, and herbs. Dice the fontina and finely grate the Parmesan. Set aside.
Make a custard by first whisking the pumpkin puree and eggs together, then slowing whisking in the milk to combine. Add in about ¾ cup of the Parmesan, the nutmeg, 1 teaspoon salt, and freshly ground black pepper to taste. Set aside.
In a large skillet set over medium-high heat, add half the olive oil or butter. Add the onions and celery and sauted, stirring frequently, until the onions become translucent and soft without browning, about 5-7 minutes. While the onions are softening, in your largest mixing bowl, use your fingers to tear the bread into bite-sized chunks. Remove the crust only if it is especially thick and tough, otherwise include it. Lightly salt the bread and toss it.
When the onions and celery are tender, add them to the bread. Heat the rest of the olive oil or butter in the skillet and sauted the mushrooms until they have released some of their moisture and are beginning to brown, about 5-7 minutes. Add in the garlic, kale and ½ teaspoon or so of salt and a generous amount of pepper and sauted another 2-3 minutes until the kale has softened a little and the mushrooms are well-browned. Add them to the bread and onion mixture in the large bowl. Add the diced fontina if using, and give the ingredients in the bowl a good toss.
Pour the reserved pumpkin custard mixture over the bread and vegetables and gently stir with a rubber spatula, scraping down the sides and bringing the ingredients up from the bottom to evenly coat them with the custard mixture. Tip it out into the prepared baking pan.
Cover the dish tightly with foil. Bake for 45 minutes, remove the dish from the oven and remove the foil. Sprinkle the remaining Parmesan over the top, and bake for another 15 minutes until the cheese is browned and bubbling. Remove from the oven and allow to set for 10 minutes before serving. The pieces cut nicely into squares like lasagne, or can be spooned out with a large spoon.
Notes
Make It Your Own:Add chunks of squash or pumpkin, use mustard greens or chard instead of the kale, try different cheeses and herbs. Follow your heart and use what you have!
Soup as Your Secret Weapon
In case you haven't noticed, the world really needs us right now. The paradigm-looting pandemic isn't over. Differing points of view are dividing friends and neighbors when we aren't paying attention. It's as though the collective pulse is slow, the heartbeat is going quiet. Bold acts of friendship are as important as they ever were.
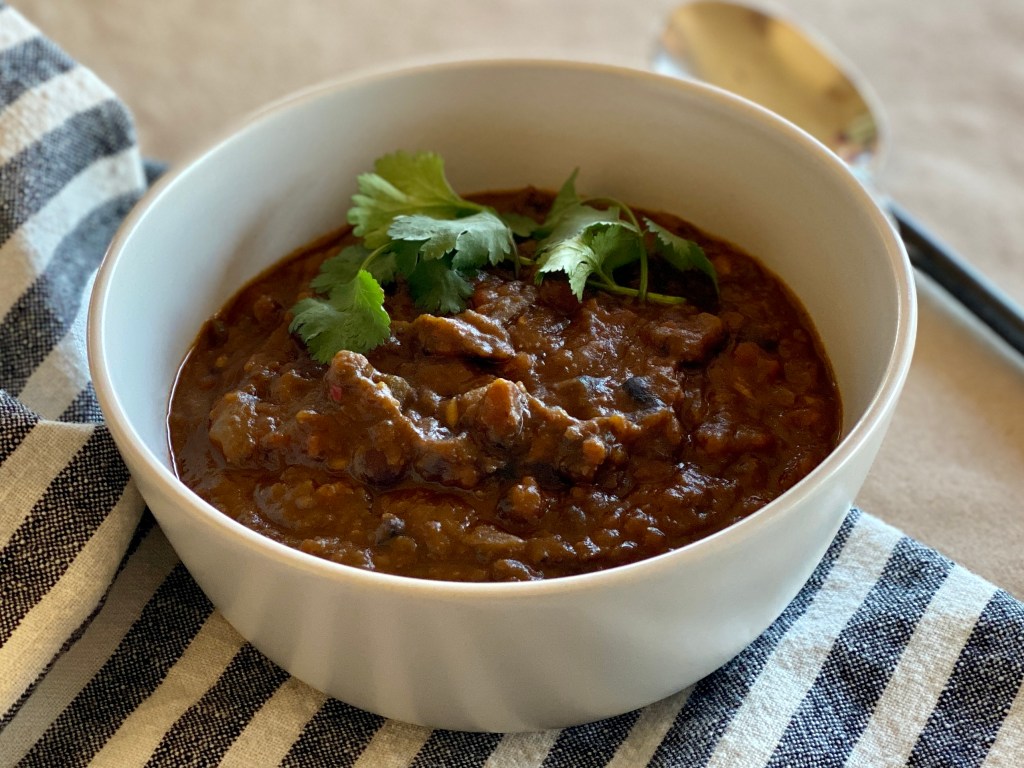
Lean in and let Pumpkin Black Bean Soup be one of your secret weapons in the defense of friendship.
Lean In, Full and Strong
I've found that leaning in to my loved ones and community happens best when I first make my own self full and strong. Now is the time to follow the pilot's directions. "Ladies and gentlemen, should the cabin lose pressure, oxygen masks will drop from the overhead area. Please place the mask over your own mouth and nose before assisting others.”
Simply put, if I run out of oxygen I cannot assist someone else with gaining theirs. If I'm gasping for air I am fairly useless in creating a safer, happier, nourishing place for others.
In this season known for its comfort food, let us remember this for ourselves. Eat reviving foods, feed ourselves well. Warm, spicy, hearty things that nourish not just our bodies, but our eyes and hearts and imaginations. And then share it with others out of our own fullness.
Make More Bean Soup Joy
Pumpkin Black Bean Soup is a stealthy way to make more joy. Make more festivity for Halloween night supper. Make more personal success-- image your game-day touchdown by sharing this big pot of soup with loved ones. Or make this soup as an easy dinner party with whoever it is that makes up your pod these days.
Or in support to yourself, make the whole big pot and parcel out 2-cup portions for your freezer. That way you'll always be fueled for your loving, life-giving actions even when you don't feel like cooking. The joyfully act of making the soup itself is a beautiful life-giver.
More About Pumpkin Black Bean Soup
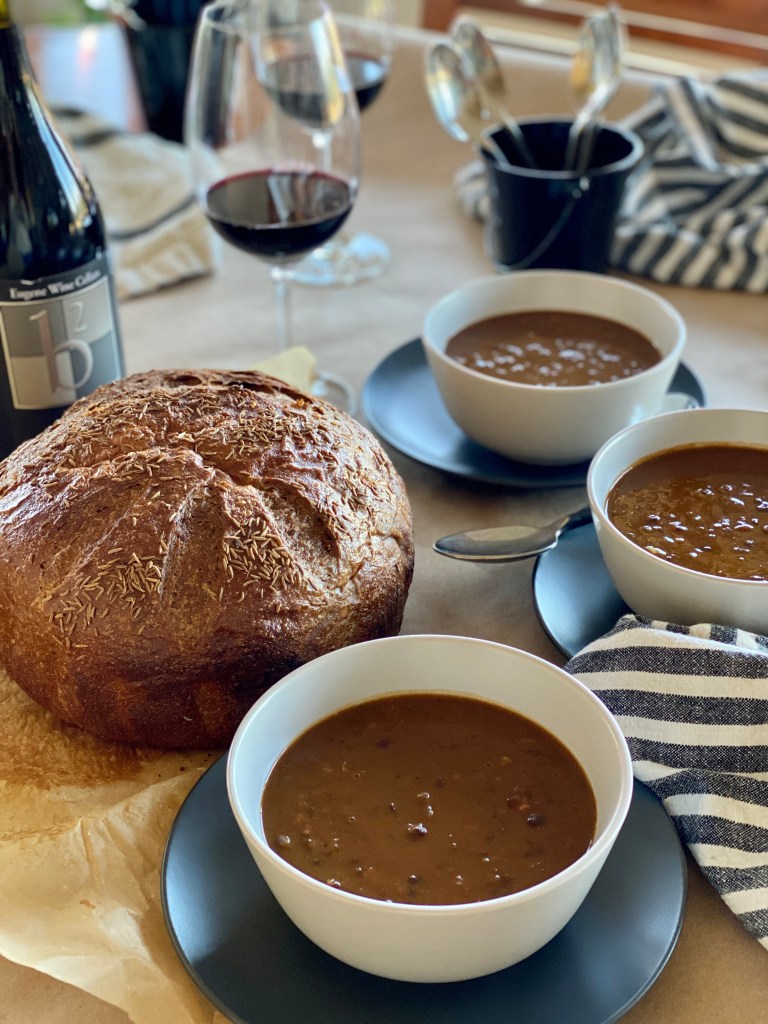
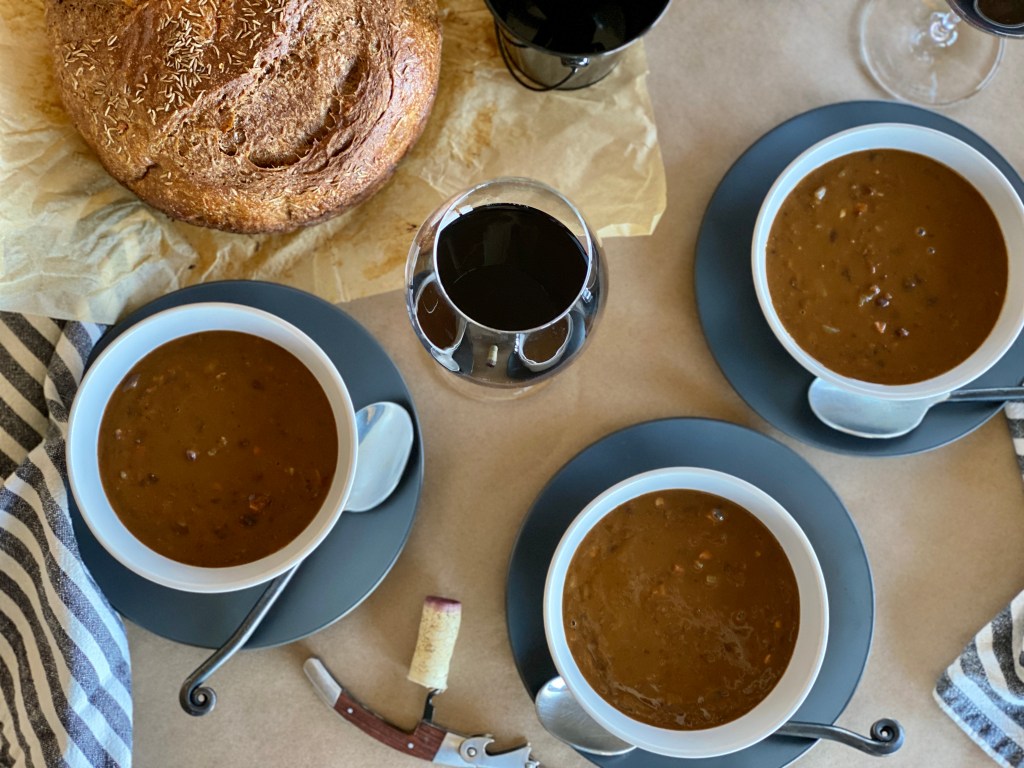
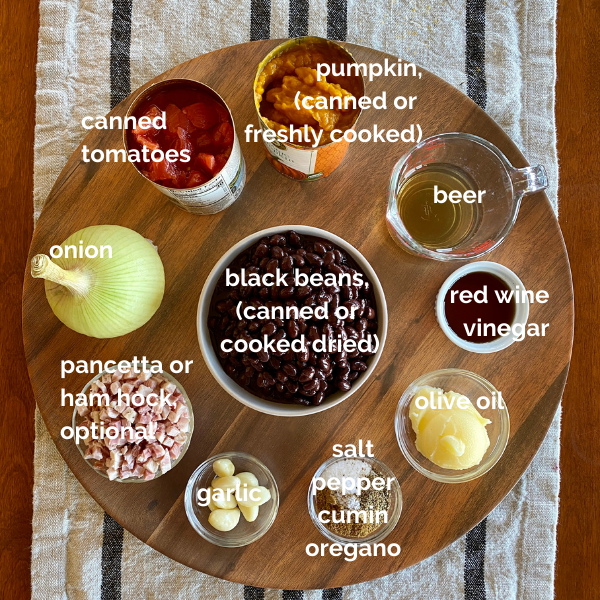
Put together this rich and fragrant rusty-brown soup in a flash with canned ingredients from your pantry, or with dried black beans you cook yourself. (Beans from Rancho Gordo are the best ever, and their Midnight Black Beans are perfect here.) Directions for the easy way and the beans-from-scratch way are included. I love it both ways, depending on the amount of time I've got to give. Click here for link to a Facebook Live video of me explaining the easy process of making pumpkin puree from scratch.
Make it vegan by omitting the ham hock or pancetta for another delicious way to go, even for committed meat-eaters.
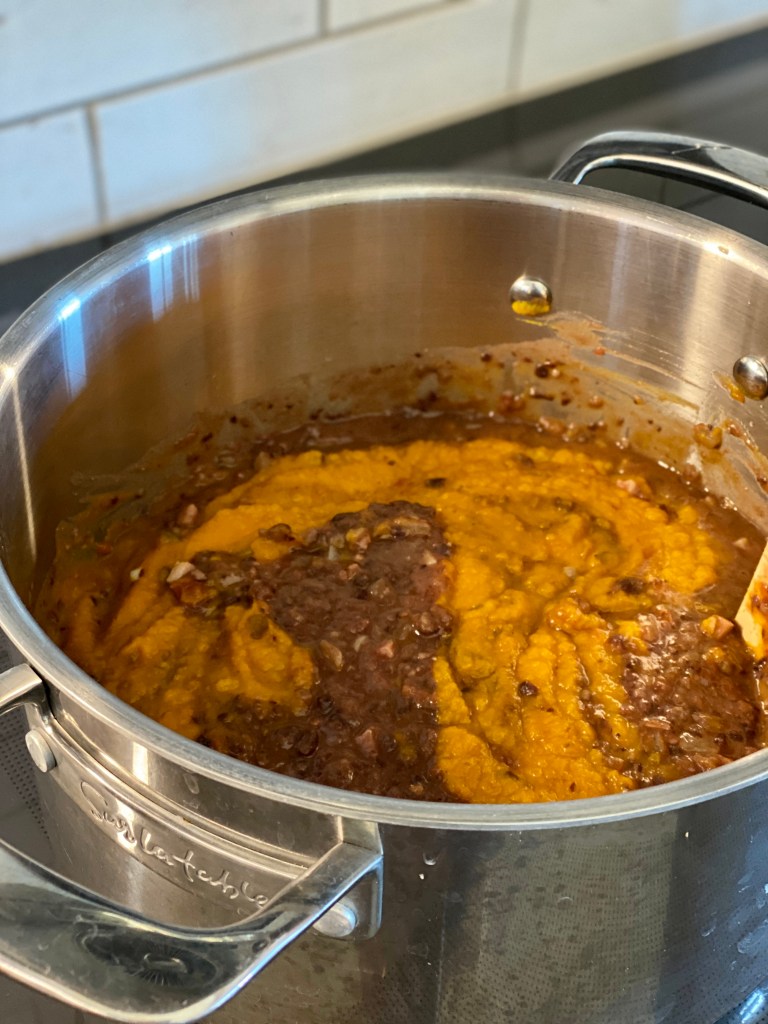
1. Saute onions, poblano, garlic, pancetta (optional,) and spices in olive oil. 2. Blend half the beans with the canned tomatoes until mostly smooth. 3. Stir in the blended beans and tomatoes, pumpkin, and beer. 4. Right before serving, stir in red wine vinegar. Serve topped with a little cilantro, green onion, and sour cream, if desired.
The aroma coming from the pot of this seasonal soup is so inviting and so comforting. Pumpkin gets a well-earned reprieve from its sugar and spice gig, making a happy marriage with the savory black beans and cumin. It really is the perfect thing for the chilly days ahead.
Oh, by the way, a perfect accompaniment to this warming soup is a huge loaf of Caraway Rye Black Bread. Together they make enough to feed a crowd of friends bent on making more joy, no matter what.
Comfort food at its best, let Pumpkin Black Bean Soup be your secret weapon in defense of friendship. Pumpkin gets a reprieve from sugar and spice in this happy marriage of savory black beans and cumin.
2-3 tablespoonsred wine vinegar, or to taste at the table
pumpkin seeds, cilantro, green onion, and/or sour cream as toppings
Instructions
Blend together in a food processor half of the black beans and the canned tomatoes. Process until nearly smooth. Set aside.
Heat the olive oil in a large soup or stock pot to medium-high heat. Add the diced onions, poblano, garlic, pancetta (if using, salt, and pepper. Stir together, and allow the vegetables to thoroughly soften as the pancetta crisps up a bit, stirring frequently and adjusting heat to prevent them from browning, about 7 minutes. Add the cumin and Mexican oregano, stir, and allow to cook another 3 minutes or so.
Add the blended bean/tomato mixture to the sauteed vegetables and stir. Stir in the pumpkin, and then stir in the water and stout (if using). Simmer and stir frequently for 20 minutes or so to slightly condense and thicken, and to let the flavors come together. Stir in the remaining whole beans and serve. If you are making this in advance of serving time, add the beans in the last five minutes before serving to they don't overcook and collapse.
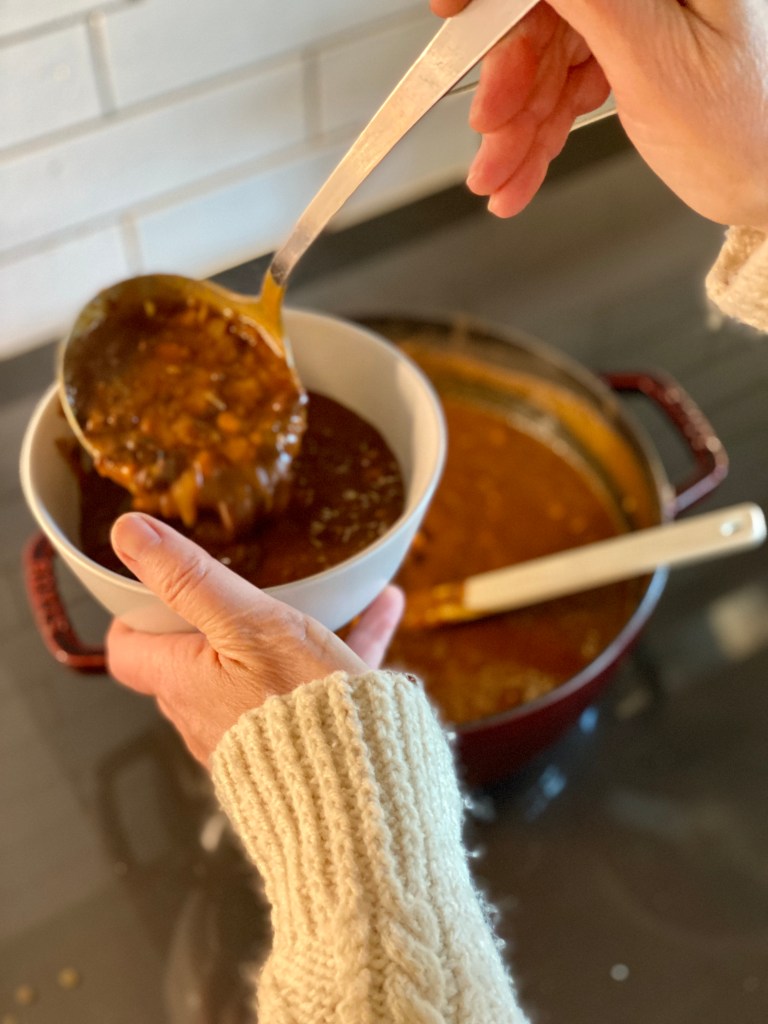
Right before serving, stir in the vinegar and taste to adjust seasoning. Ladle into bowls, serve plain, or garnish with your favorite combination of topping ingredients.
Notes
For cooking the black beans from scratch:If you are cooking your black beans from their dried state, you can omit the pancetta and include a ham hock, which adds a lovely smoky flavor and a little smoked pork to the pot. For the vegan option, of course, do not add a hock.You'll need:
Soak the beans 4-6 hours covered by 2" in water. Place the beans and their soaking water (I think this preserves some color, flavor, and nutrients, but you may also drain the beans and start with fresh water) and the ham hocks (if using) in a pot large enough to cover by 2" of water. Bring to a rolling boil for five minutes. Reduce heat to low and simmer for 1-2 hours, with a lid set ajar. Stir every now and then, and begin tasting for doneness at the one-hour mark. Try your best to not overcook the beans-- just cook until they are tender to the tooth, but have retained their shape. Proceed with the recipe as directed in step one. With this method, drain the beans through a colander and use the cooking liquid (pot liquor) to replace some or all of the water. This captures the extra flavor the cooking liquid offers into the soup. After the ham hock cools, pick any meat from it and reserve until step four, adding it back with the whole beans.
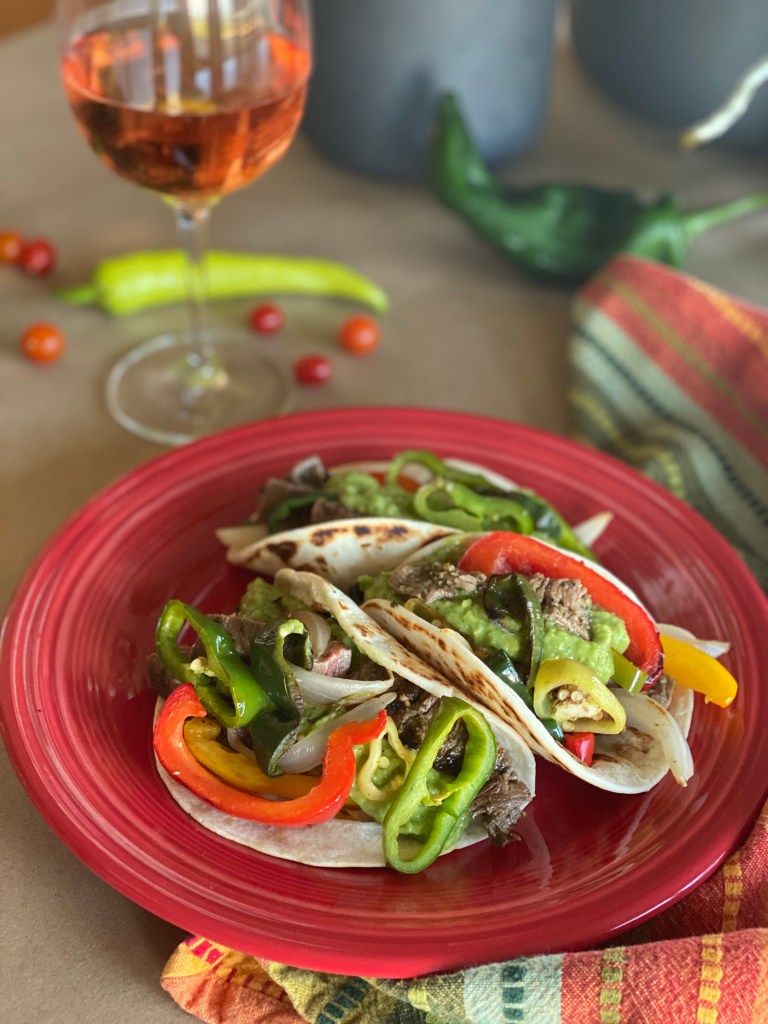
Back in the '80s we thought we were so cool to make fajitas at home. Tex-Mex was a new rage and it became a fun new party food. Back in those days, we made fajitas with a thick London broil, sliced and then marinated, each slice grilled individually. The peppers (only green bells were readily available in those days) and onion were flash-sauted on the stovetop. What did we know?
Thinking of fajitas immediately brings back the scents of onions and peppers cooking, the sounds of laughter with friends, little kids running around everywhere. It's clearly time to revisit fajita making and zhoosh it up a little.
The Marinade and the Meat
Swapping bavette steak (also called sirloin flap) for the London broil is a nice improvement from the way-back machine version. Bavette comes from the bottom of the sirloin section of a beef near the flank and has a texture very similar to flank or skirt steak. Its nice marbling offers a wonderful flavor, and it is infinitely more tender than the good ol' London broil ever hoped to be.
To highlight the texture of the meat and ensure it's tenderness, but sure to slice it thinly and against its grain. The dotted lines in this diagram show the inherent grain of the meat. The knife shows the direction the blade should cut through it to go against the grain. This way, it becomes much more enjoyable to chew.
Bavette lends itself to a good bath in a marinade, absorbing its flavors well which this marinade delivers. Four easy ingredients-- fresh lime juice, a handful of cilantro, garlic, salt, and a quick whiz in a food processor are all you need.
A very hot grill lets you achieve a flavorful sear without overcooking. The wind was blowing hard the day I photographed this and my grill grates just couldn't get hot enough to lay down those gorgeous char lines. Such is the life of a home cook.
The Peppers and Onion
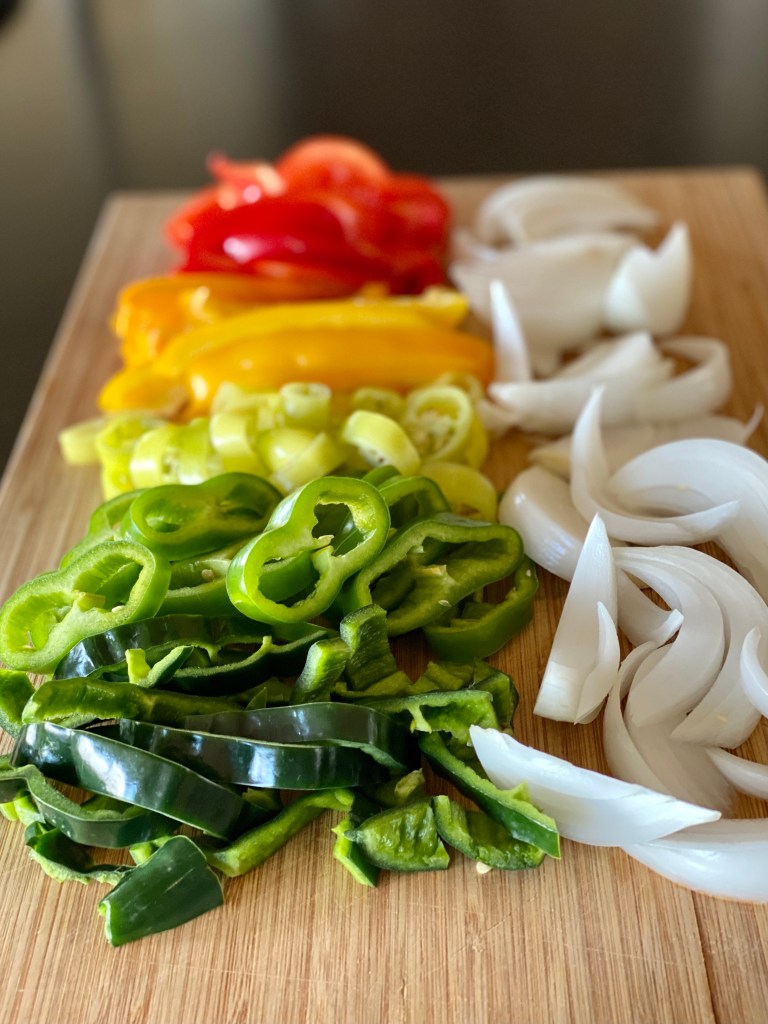
Use a good mix of peppers for a flavor, texture, and color explosion!
The updated version goes way beyond green bell peppers. The end-of-summer treasure trove of colorful peppers makes it easy to stuff your fajitas with a balance of flavor and color. Use all the colors! Reds, oranges, yellows, chartreuse, grassy greens and deep greens mixes means you'll be including the array of sweet, hot, mild, earthy, bright flavors.
The onions should be white. Period. Clean and crisp is best here.
Now is the time to invest in a grill pan if you don't already have one, as they should be on end-of-season sales. Cut your vegetables to size-- a mix of strips and rings is fun and beautiful-- and toss them into a pre-heated grill pan that has first been sprayed with a cooking oil spray. Blast them with a good amount of heat-- you want them to begin to char without overcooking. Char for flavor, but still with some good crunch for texture.
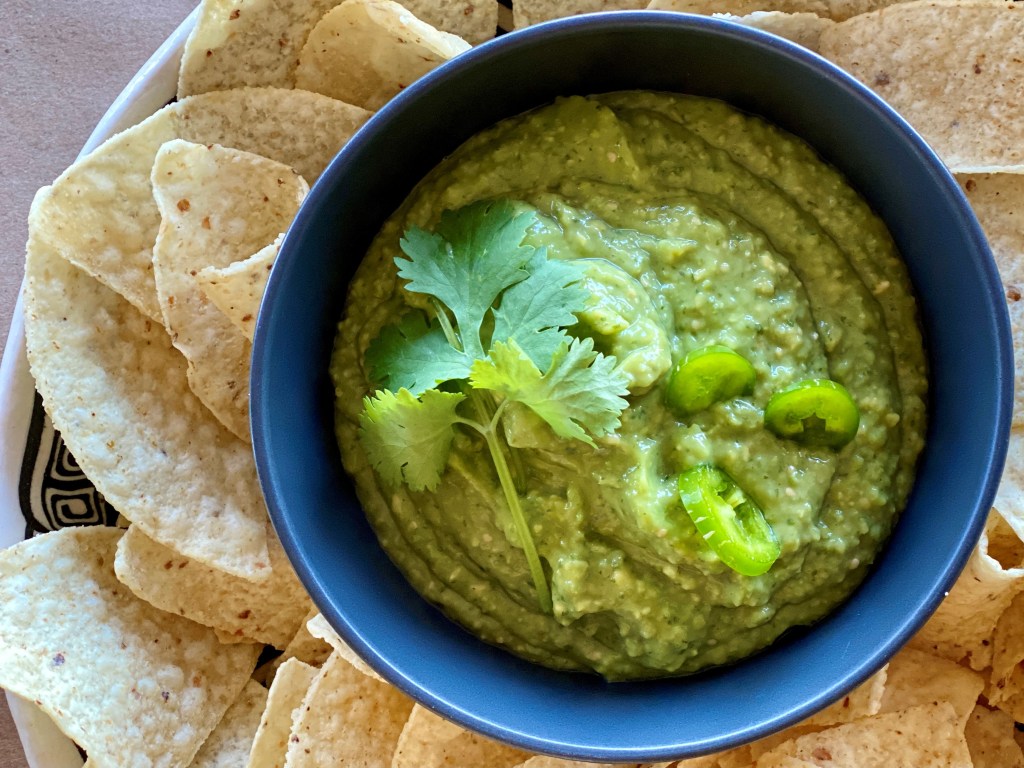
The Avocado Tomatillo Salsa
Avocado-Tomatillo Salsa
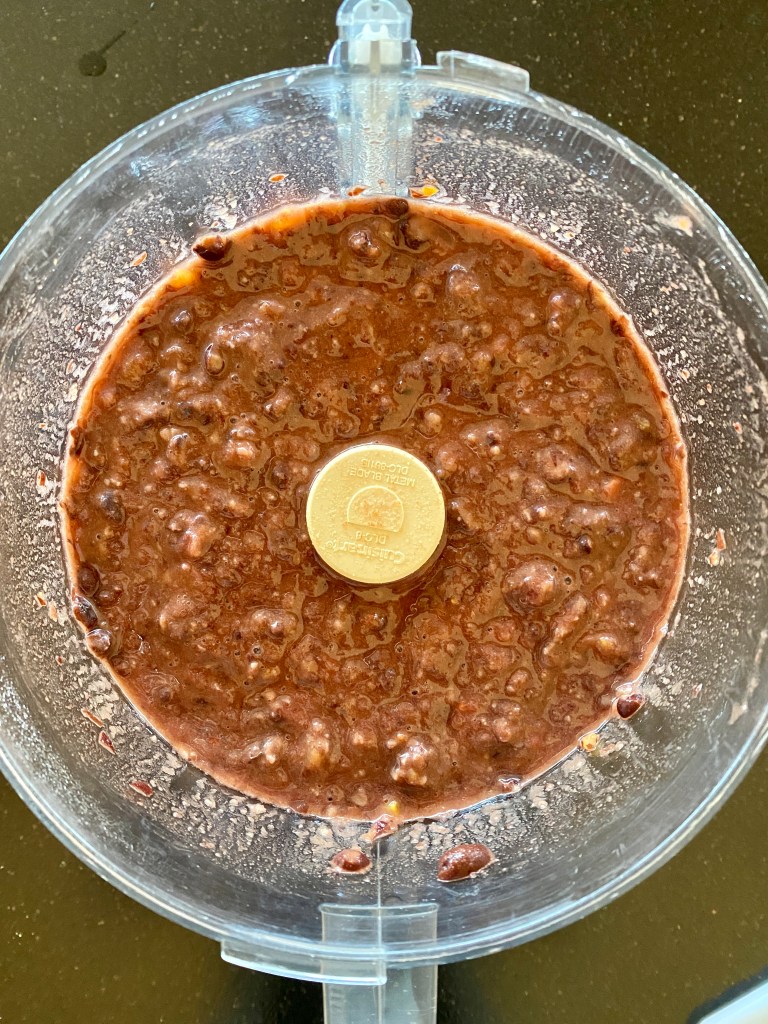
Let's straighten this out right away: This is not guacamole. One bite and you will see the difference. This simple element could easily be the star of the show. Avocado, tomatillo, and little cilantro if you want, garlic, and salt gets quickly pureed in the food processor happens in minutes start to finish. Because the base ingredients are the same, you don't even have to wash the food processor bowl out first.
You'll want to add this four-ingredient salsa to your go-to list. It is so good on everything. Everything. Rice bowls, snacking with chips, tacos, mixed with some chopped cooked chicken and a few crunchy vegetables for a new chicken salad, potatoes, eggs; you name it.
I'm so happy to have rediscovered homemade fajitas. A few ingredient additions, and grilling the peppers and onions fills the air with that unmistakable fajita scent. I'll definitely make this new and improved '20s version for gatherings coming up.
Sizzling grilled beef and the aroma of grilled peppers topped with the best of salsas you will want to add to your repertoire. This zhooshed-up version of the '80s classic is easy to scale for gatherings, family meals, or just yourself.
1½poundsBavette (sirloin flap) steak, or skirt steak
1½poundsmixed peppers (red, yellow and orange bells, Hatch, poblano, Hungarian, banana, etc.)Use what the garden or farmers market is offering!
2mediumwhite onions
12taco-sized flour tortillas
Avocado-Tomatillo Salsa
3avocados, ripe
1 poundtomatillos, papery husks removed and washed
2clovesfresh garlic, peeled
½bunchfresh cilantro (optional)
½-1jalapeno, roughly chopped
salt to taste
Instructions
For the Marinade
Add the first four ingredients to the bowl of a food processor. Whirl, scraping down the sides of the bowl, until well blended and the cilantro is just shy of smooth. Place the Bavette steak in a one-gallon zip-lock bag and pour in the marinade. Place in the refrigerator and allow to marinate at least one and not more than four hours, turning and smooshing the bag occasionally to distribute the marinade.
Prep the peppers and onions and set aside until time to grill.
Heat a gas grill to high (about 500°) and let the grates get very hot. For a charcoal grill, build a bed of charcoal large enough to cook your grill pan of vegetables and the steak over hot direct heat. Place the grill pan on the grates while the grill heats.
Start the vegetables first: Spray your hot grill pan with cooking spray (stand back and be very careful to avoid flames) and scoot all the vegetables into it. Do not disturb the vegetables for 2-3 minutes to allow some charring before turning them. Do this several times throughout the cooking to get a nice char without overcooking the vegetables. depending on the heat of your grill, the size of your grill pan, and the amount of vegetables, this can take 10-20 minutes.
When the vegetables are about 5 minutes from being ready, spray the grates where the meat will cook, and place the meat on the grill. Again, do not disturb the meat to allow for great charring. After 2-3 minutes, check for char and flip. Repeat on the second side. It is very easy to overcook this thinner cut of meat, which may render it tough, so again, err on the side of caution.
While the meat is resting, heat a skillet to medium-high. Toast the tortillas until they are warm, soft, and beginning to blister, flipping once, about a total of 1 minute each. Slice the steak thinly across the grain. Pile peppers and onions and sliced steak into the tortillas and top with the avocado-tomatillo salsa. Serve!
For the Avocado-Tomatillo Salsa
Toss all ingredients into the bowl of your food processor. Pulse at first until the ingredients start moving freely, then whirl until a creamy pureed consistency. Refrigerate until serving. Don't be afraid to make a double batch, as this creamy/tangy salsa is divine on so many things. It keeps well for about three days in your fridge, if it lasts that long.
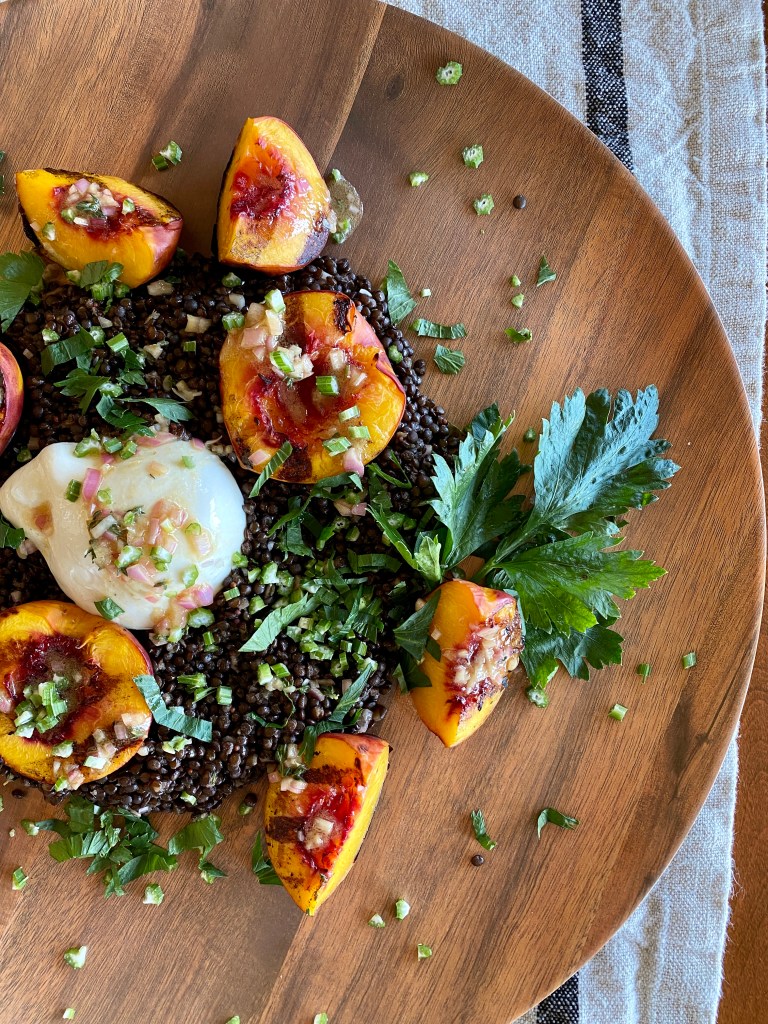
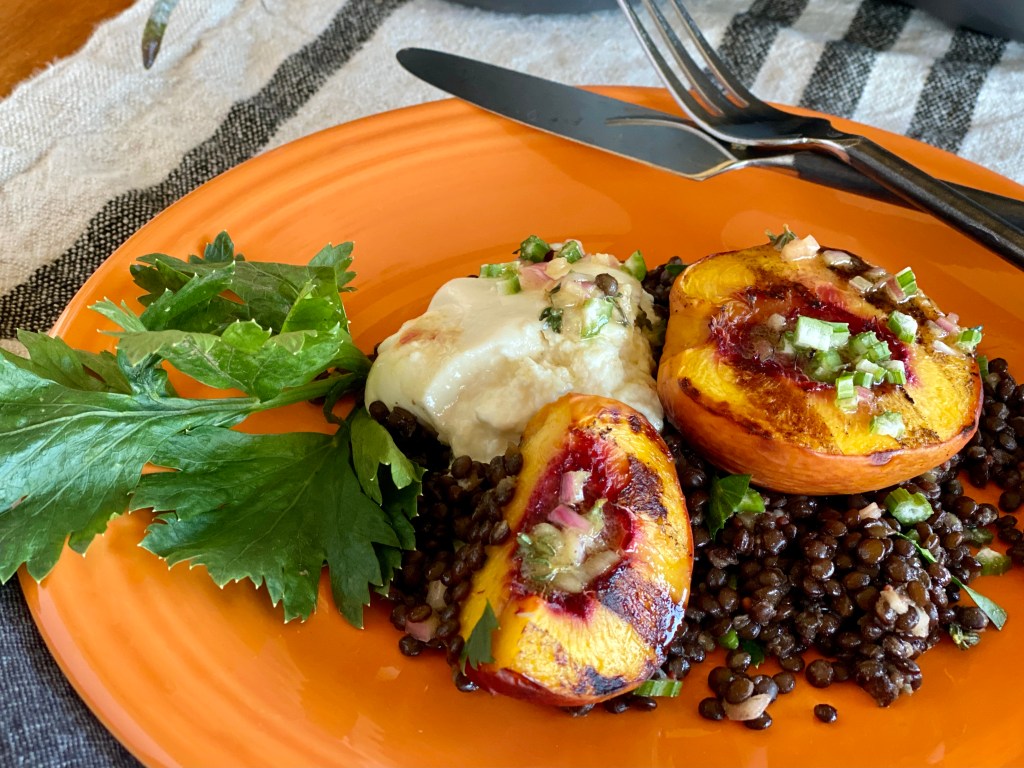
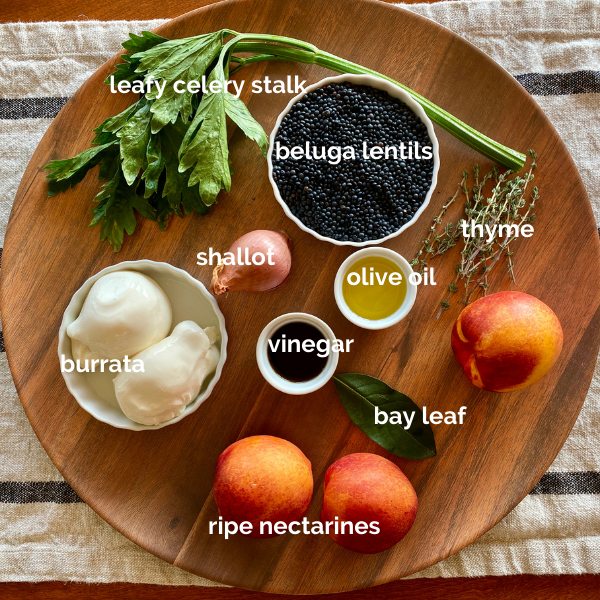
Beautiful Black Beluga Lentil, Grilled Nectarine + Burrata Salad
I've been experimenting with the design Rule of Threes in my cooking. Used in graphic design, interior design, and fashion-- really anywhere design concepts are applied-- the principle is that things arranged in groups of three are more appealing, evocative, and satisfying.
Long ago, it is said, Nordstrom sales associates were required to dress this way-- skirt, blouse, sweater; slacks, shirt, vest; dress, boots, scarf, etc. Accessories were the grace notes added to the rule of threes formula. I've begun to think this is true for the food on a plate as well.
Not only does this method of cooking work from a taste and visual point of view, but it is actually pretty easy to pull together a dynamic dish using this concept.
Beluga Lentil, Grilled Nectarine + Burrata Salad
In this 30-minute dish the triad of warm earthy lentils, smoky-sweet nectarines, and cool creamy burrata is more than the sum of its parts. Each of the parts requires very little or no preparation. The simple vinaigrette acts like the jewelry that ties the whole ensemble together.
The rule of threes concept worked perfectly in this recent red pepper, white bean, and feta recipe, too. The smoky bright red peppers, the earthy light white beans, and sharp tangy feta create a synergy that is tied together with a crown of herb sauce. Magnificent, yet simple.
It only looks challenging! Make Beluga Lentil, Grilled Nectarine + Burrata Salad soon for an ever so delicious, beautiful, fancy-fast-easy brunch, lunch, or dinner. Make it vegan by omitting the burrata, and it is still delicious. Serve it alongside meat, or enjoy it as a vegetarian main course.
How can you use this Rule of Threes concept in your cooking and meal planning? I'd love to hear about your ideas and experiments!
Beluga Lentil, Grilled Nectarine + Burrata Salad
Course: Breakfast + Brunch, Main Dish, Quick + Easy, Salad, Side Dish
This triad of earthy lentils, smoky-sweet nectarines, and creamy burrata is more than the sum of its parts. Quick to make but ever so delicious and versatile, make this soon for a fancy-easy brunch, lunch, or dinner. Make it vegan by omitting the burrata, and it's still delicious.
In a small jar with a tight-fitting lid, place the minced shallot and Dijon mustard. Stir gently. Add about half of the thyme leaves stripped from the stems, salt and pepper. Cover the shallot mixture with the vinegar of your choice. Eyeballing it, add enough olive oil to double the volume in the jar, or about the same in height to the shallots and vinegar. Shake until the salt is mostly dissolved and the mustard is thoroughly incorporated. Set aside.
Now Make the Beluga Lentil, Grilled Nectarines + Burrata
Light or preheat your grill for a hot, direct fire/heat.
In a medium saucepan, place the lentils, bay leaf, a pinch of salt, and 3 1/2 cups water. Bring lentils to a boil, then reduce heat to a low simmer. Cook uncovered, stirring every 5 minutes or so, for about 20 minutes or until the lentils are al dente, but not mushy and broken. Begin chcking their doneness at the 15 minute mark.
While the lentils are cooking, place the halved nectarines on a preheated grill over direct heat. Oil the grates first, and place the nectarine halves cut side down. Do not move them until the 3 minute mark, and check for rich grill marks. They may need another minute or so to become deeply marked. Flip them and grill another 3 minutes until the skins have grill marks, for a total of 6-7 minutes. Don't let the nectarines overcook-- you just want them warmed through and kissed with flavor from the grill.
When the lentils are done, drain off any remaining liquid. Sitr in the diced celery and leaves, reserving some of the leaves for garnish. Mound this onto plates or a serving platter.
Arrange the nectarines on to mounded lentils. You may chose to halve some of them.
Place the burrata on top of the lentils. Sprinkle the remaining thyme and celery leaves over the top and serve.
Notes
This recipe serves three people as a main course, or six people as a side dish.This salad is especially luxurious served warm, but equally delightful served chilled, especially if you need to make the components ahead of time.Peaches would be just as lovely in this dish as the nectarines. Use what you have or prefer.Recipe star ratings are very welcome and appreciated. Thank you for taking the time to provide your feedback this way.
Hello there, and how are you? Are you getting enough summer joy?
I've been thinking about all I want to soak up before summer is over. Here is what I am inspired to do before the season changes:
Eat all the canteloupes. I'm always sad when there are no more for the year.
Read a book in the hammock, start to finish. Not in one day, but over a few, maybe napping between pages.
Star gaze. The Perseids meteor shower peaks this week. Check out SkyView Lite, a free app that makes the constellations and planets come alive. When observing the night sky I feel very small, at once frightening and comforting.
Make more summer fruit sorbet, like this one, and this one. We've had chocolate, apricot, blueberry, and blackberry sorbets this year, too, and I'll share those recipes with you, next summer.
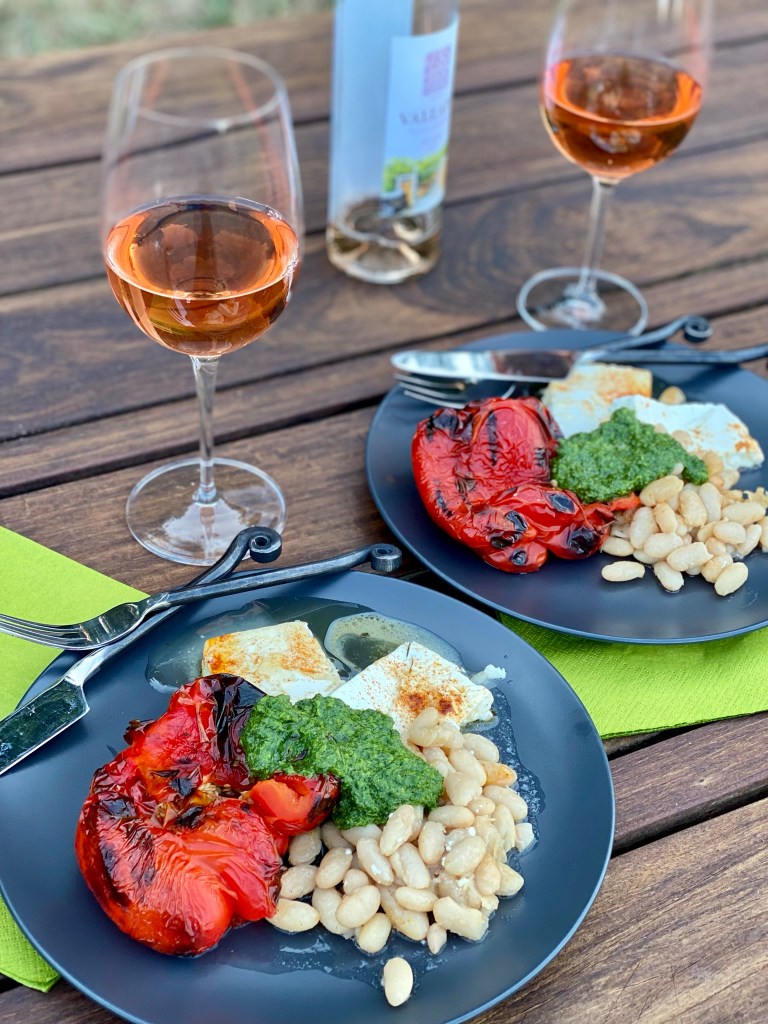
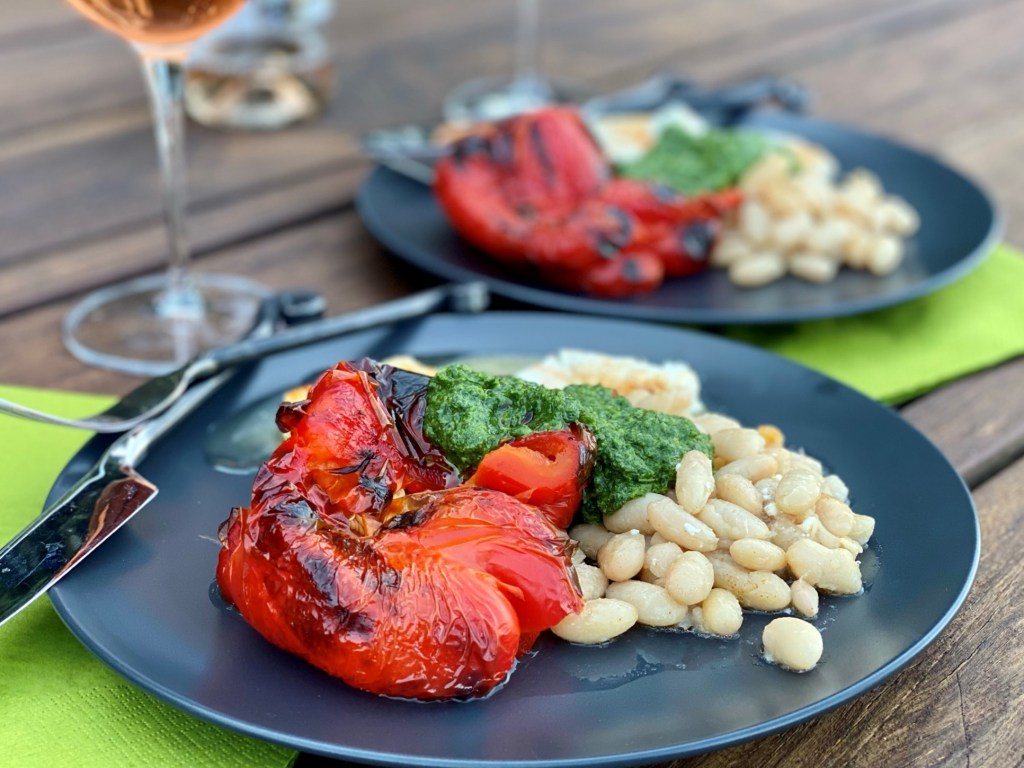
Roasted red peppers, white beans, Feta, and green herb sauce
And more to make sure of:
Eat as many grilled hamburgers, vegetables, and fish as I can.
Enjoy every meal outside. Mornings on the porch are charming. Mid-day snacks in the shade of the trees are refreshing. Dinners looking out at the valley are inspiring. Soon we won't have a choice but to eat inside.
Invite as many outdoor gatherings as we can with friends and family. Nobody knows what's going to happen to our ability to gather come fall, so I will soak up all the community I can now.
Show my appreciation to farmers by visiting as many farmer markets and stands as I can. Farmers are working so hard to bring their beautiful bounty to us. (See the Find a Farmers Market Near You links in the footer of this page for a market near you.)
Roasted Peppers, White Beans, Feta, and Herb Sauce
Using the grill to get quick and easy meals done is another summer joy I can't get enough of. This recipeless recipe is long on gourmet attitude, short on effort to actualize. Eight ingredients, three of which are herbs, and 15 minutes at the grill and, viola, you are a summer foods genius.
What are you doing to make the summer last? What will you miss about summer when it's passed?
Roasted Red Peppers, White Beans, Feta + Simple Herb Sauce
Long on gourmet attitude, short on effort and time, this recipeless guide makes summer dinner go easy. Eight ingredients, under 30 minutes, and you are a cooking genius! Use the same guide in the autumn using your oven to roast the peppers and warm the Feta and beans.
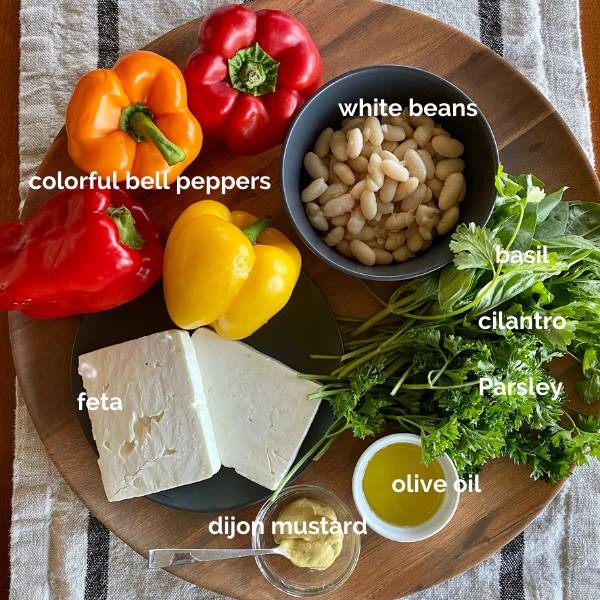
1cup eachFresh basil, parsley, and cilantro leaves and tender stems, packed and lightly chopped
¼cupExtra virgin olive oil
1tablespoonDijon mustard
Salt and Pepper, to taste
Peppers, White Beans + Feta
1Red, orange, or yellow bell pepperper person
3ouncesFeta, block-styleper person
1cupCannelini or other white beansper person
Smoked paprika, Aleppo pepper, or Espeletteoptional
Instructions
Simple Herb Sauce
Place all sauce ingredients in a food processor or blender. Whiz or whirl them all together with a healthy five-finger pinch or salt and a healthy cracking of black pepper until it is creamy and pesto-like, but not ablsolutely pureed. Add a tablespoon or two of water to loosen the sauce, if desired. It's nicest if it puddles slightly rather than stands at attention. Set aside.
Peppers, White Beans + Feta
Stretch out a double-thick layer of foil big enough to hold the beans and feta in a single layer, folding the edges up to contain juices. If you have a grill basket use it instead, lining it with one layer of foil.
Over medium direct heat on a gas or charcoal grill, roast the peppers. Turn them frequently to char the entire outside. If they are burning at all, move them off the heat to cook indirectly, and back and forth to get a nice roasted exterior. The peppers will puff up a bit, and will eventually collapse into beautiful modern art shapes, full of condensed juices that will deliciously spill out when each diner cuts into them. This should take 10-15 minutes, depending on the heat of your grill.
About half way through cooking the peppers, place the foil or grill basket on the heat. Add the beans and Feta in one layer, drizzling them lightly with olive oil and sprinkling with the paprika, Aleppo, or Espelette, if using. Allow them to warm, and even brown a little if that happens, while the peppers finish.
Move the wrinkly cooked peppers to individual plates or a platter, along with the beans and Feta. Place a big spoonful of simple herb sauce in the center. The peppers will release their warm rich juices into the plate as they are cut into, adding to the sauce. Serve!
Notes
If you are using dried beans, cook according to one of the easy Rancho Gordo methods. If you don't have a grill or make this during cool-weather months, use the same guide with your oven to roast the peppers and warm the beans and Feta.
It is an odd little kid who prefers observing adults above hanging out with other kids, but that is how I was issued. With the focus of Jane Goodall and the sofa as my cover, I studied grown-ups and all forms of their behavior; language, cultural and social norms, and how curiously their developed biology drove their actions. Kids I found to be mostly mean, addled, and ridiculous.
It will not surprise you, then, to know I hated peanut butter and jelly sandwiches. The basic components were good, I thought. But jelly seeping through the bread, the gluey palate-sticking nature of the thing, and the whole sandwich mangled by the smacking of a thermos inside the lunchbox of a girl with a purposeful stride? Thank you, but no.
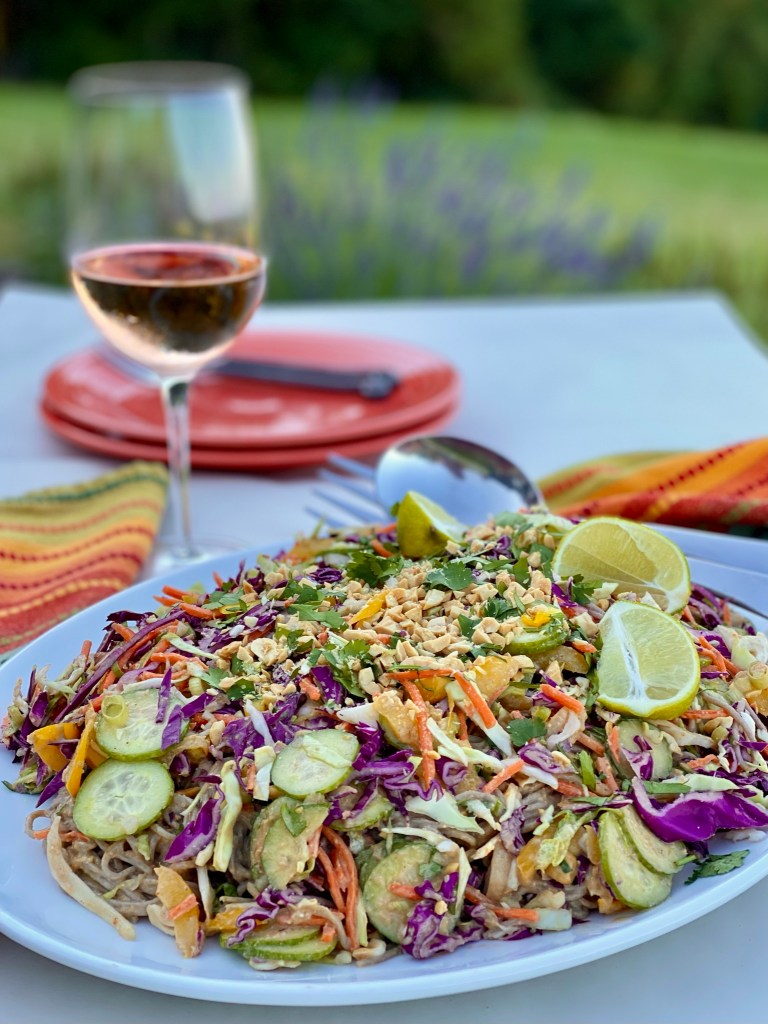
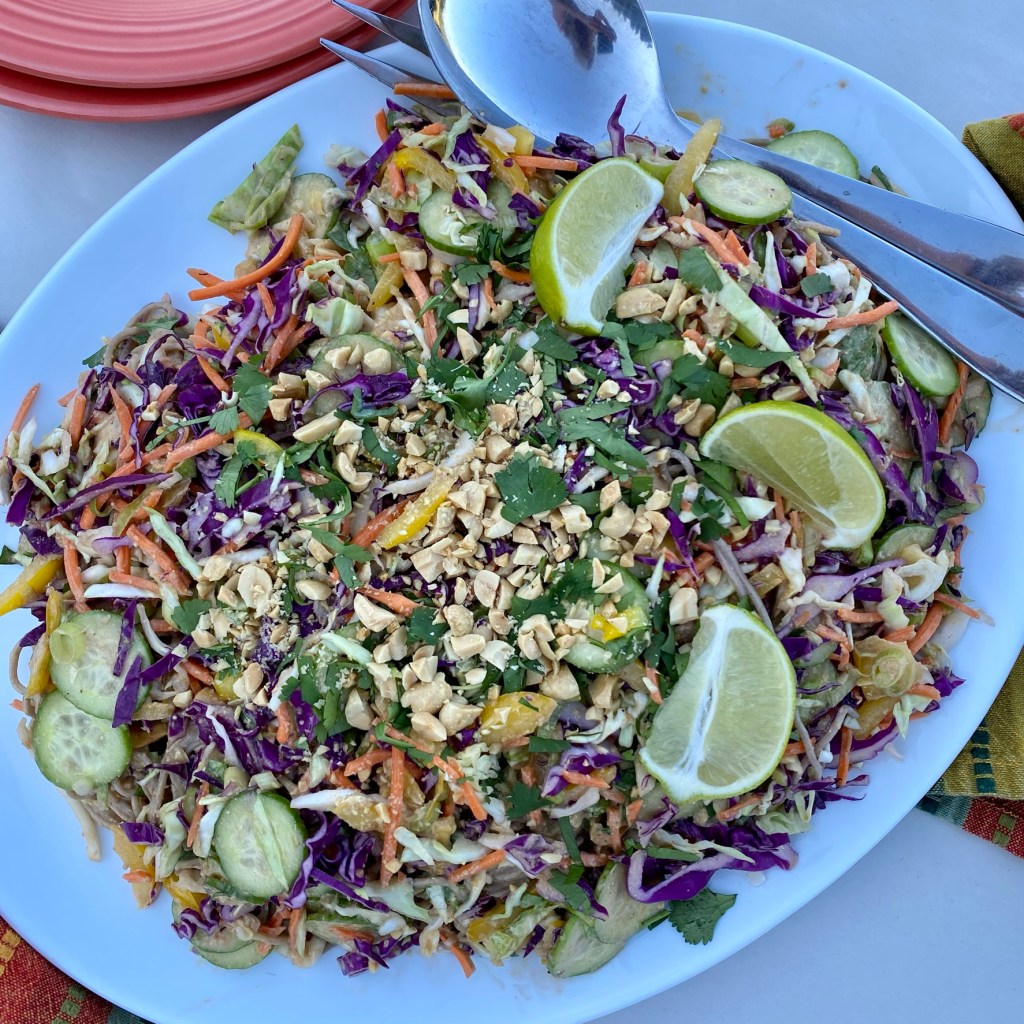
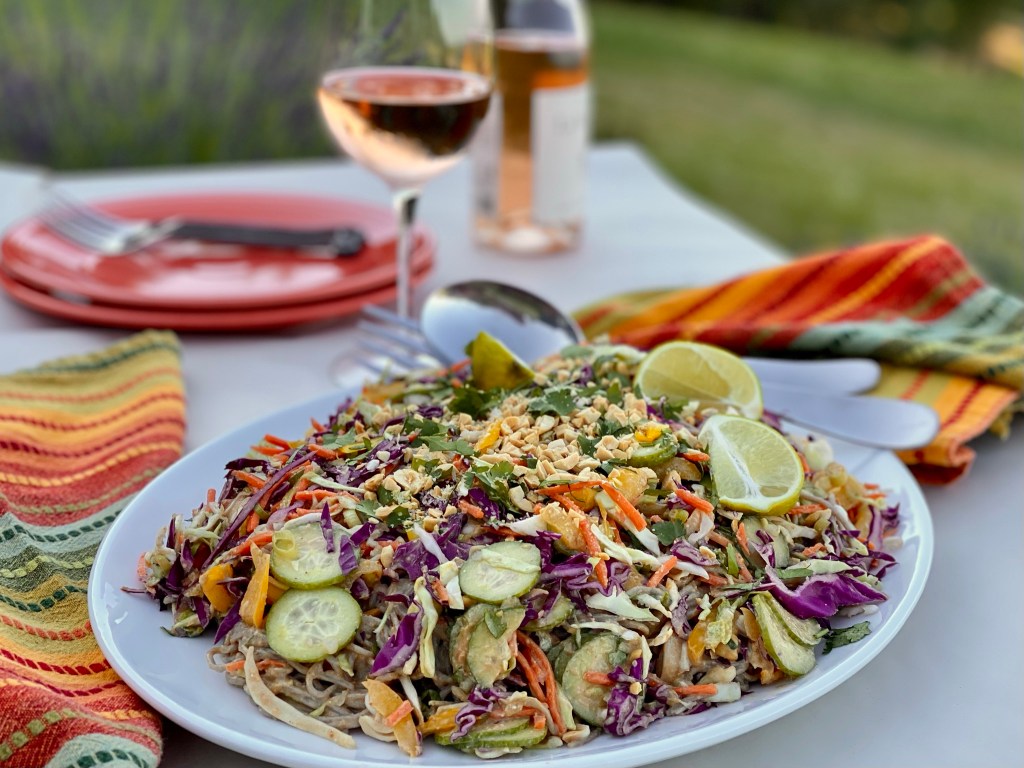
If Crunchy Cold Buckwheat Noodles in Peanut Sauce had been popular among suburban moms so long ago, it would have been my absolute lunchbox preference. A tangle of chewy buckwheat noodles and colorful crunchy vegetables draped in a velvet cloak of spicy, gingery peanut sauce is arguably the best use of peanut butter. It would have had me daydreaming about girls in Indonesian -- where peanut sauce originates-- wondering if they liked math any better than me, if their parents fought, and whether they moved a lot or got to live in one house their whole life. I would have wished the Weekly Reader to do a story on them so I could know.
This recipe is for my grandchildren should they want something other than jelly and bread with the peanut butter in their lunchboxes.
Chewy soba noodles and crackly-fresh vegetables are draped in a velvety, gingery peanut sauce. Make it in less than 20 minutes for a speedy dinner, but be sure to make extra-- it holds well for tomorrow's lunches or picnics. Easily halved or doubled, this all-ages people pleaser will be a welcome addition to your meal rotation.
3Tbsp.fresh squeezed lime juice or rice wine vinegar
2Tbsp.sugar, brown sugar, honey, or maple syrup
2Tbsp.toasted sesame oilalso called dark sesame oil
1 tsp. -1 Tbsp.Sriracha or hot chili garlic sauce to taste
1Tbsp.grated fresh ginger and its juice
1-2 grated garlic cloves
Noodle Salad
10 oz.soba (buckwheat) noodlesudon, ramen, or rice noodles or even spaghetti are also good choices. Use gluten free noodles if you'd like
6 cupsfresh crunchy raw vegetables (see list below to mix and match*)chopped , coarsely grated, or thinly sliced
3-4green onions, sliced
1bunchcilantro, coarsely chopped
¼ cuppeanuts, coarsely chopped (optional)
Peanut Sauce (above)
1lime, cut in wedges for serving
Instructions
In a medium bowl that allows room for whisking, whisk peanut butter to loosen it. Add each ingredient one at a time, whisking thoroughly after each addition. (You are making an emulsion, and adding the liquids slowly in batches prevents a sloshy mess from forming. It will actually go faster this way, and will minimize cleanup.)
Whisk in warm water, one tablespoon at a time, until the sauce thickly drips from the whisk. You want the sauce to be thin enough to easily coat the nooks and crannies of the vegetables and noodles, but to retain some body. Depending on the thickness of your peanut butter and the room temperature, you will add between 1 Tablespoon and ¼ cup of water. Taste and make any adjustments of sweetener, lime juice, spicy heat, or perhaps salt. Set the peanut sauce aside.
Place a pot of salted water on to boil. Cook soba noodles according to package directions. When done, rinse in cold water until the noodles are completely cold.
While the water is heating and the noodles are cooking, prep your vegetables including the green onions. Aim for small dice, or thin matchstick pieces so that you can fork up a mix of vegetables and noodles in each bite. Place all the vegetables in a large bowl..
Coarsely chop the cilantro and peanuts. Keep a few tablespoons of each aside for garnish, and place the rest in the bowl. When the noodles are cooked, rinsed, and drained, add them to the bowl. Give everything a gentle toss.
Add about ½ cup of the peanut sauce to the bowl, and give everything a gentle but thorough toss, until all ingredients are evenly coated with peanut sauce. Add more sauce, tablespoon by tablespoon, until the salad is dressed to your liking.
Plate the salad individually or transfer it to a serving bowl or platter. Sprinkle cilantro, peanuts, and sesame seed on top. Serve with a lime wedge.
Refrigerate any leftovers in an airtight container. Will keep nicely for a day.
Notes
*Fresh crunchy vegetable options. Use what the garden or farmers market gives you, or what you have in your crisper:
cucumber*
green and/or purple cabbage
red or yellow bell pepper
snow or sugar-snap peas
carrot
radish
kohlrabi
white turnips
green or yellow summer squash*
*Best added only if you'll consume the entire recipe right away, as they go soft and watery overnight. I don't mind this, but you might!
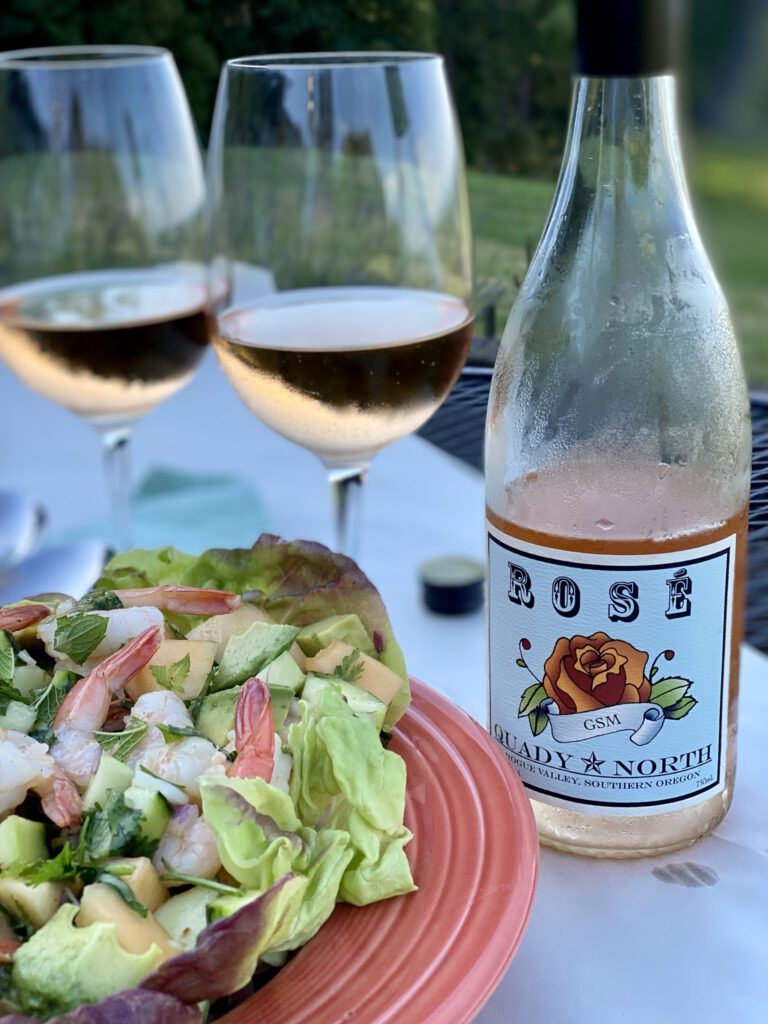
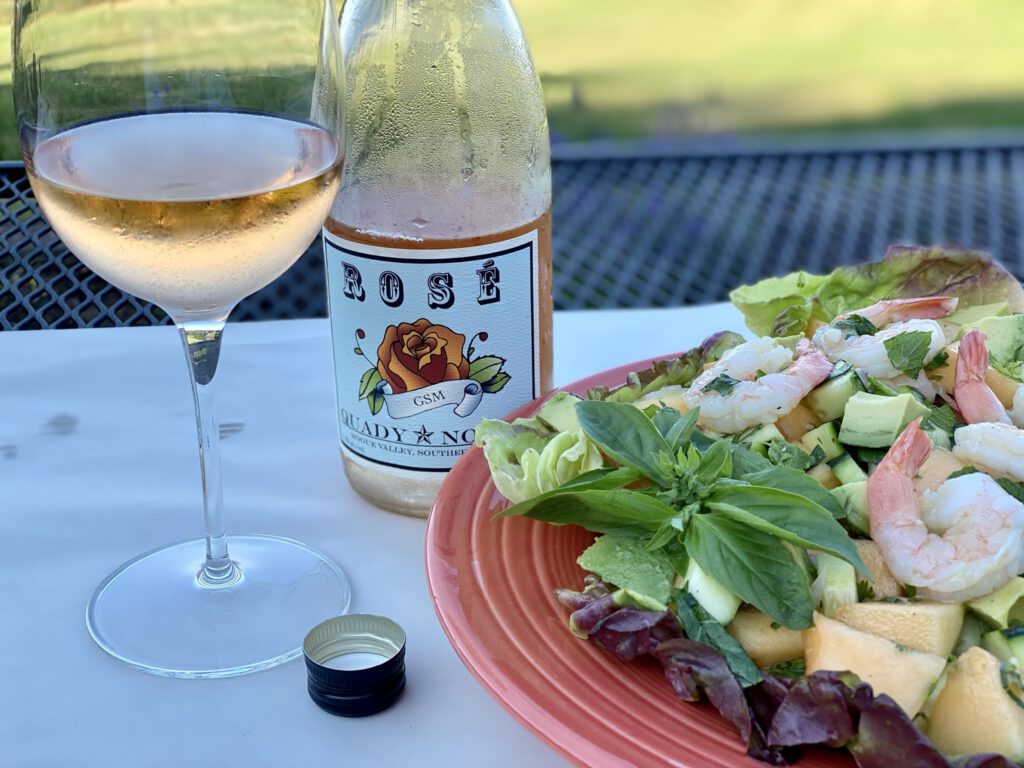
Scorching record-breaking heat is promised across much of the U.S. this week, and you need cooling solutions, right? You're going to need this-- the best simple yet fancy cooling salad I can think of-- light, fresh and hydrating, and ever so tasty. When you eat it, try to imagine someone nearby fanning you with a palm leaf. Can you feel it?
Made with 48% Grenache, 42% Syrah, 9% Mourvedre, and 1% Counoise, it is quite dry and full of the mineral qualities I associate with a Provençal rosed. Its lower alcohol also makes it perfect for summer. You may notice a little orange peel aroma on the nose, and soft fruit and rain water filling out the mid-palate.
Quady North is organically farmed and LIVE certified for its sustainable winegrowing practices. Quady focuses on "small lot Loire-ish and Rogue Rhone releases". There we go talking about France again!
Screwtop equals picnic friendly!
He would not remember me, but years ago I met Quady North's fearless leader, Herb Quady, at a wine symposium. I knew I'd like him when he told of how people choose their favorite wines. He said something like, "It is the one you had that night under the stars with friends, someone was playing your favorite song on a guitar, and maybe you were falling a little in love." And, well, their labels are fantastic-- The tattoos I'll never have.
One last thing about Quady wines. At least for now, if you order two bottles shipping is free, and if you purchase a case you receive a 10% discount on this already quite affordable wine. Value added! (This is not a sponsored promotion.)
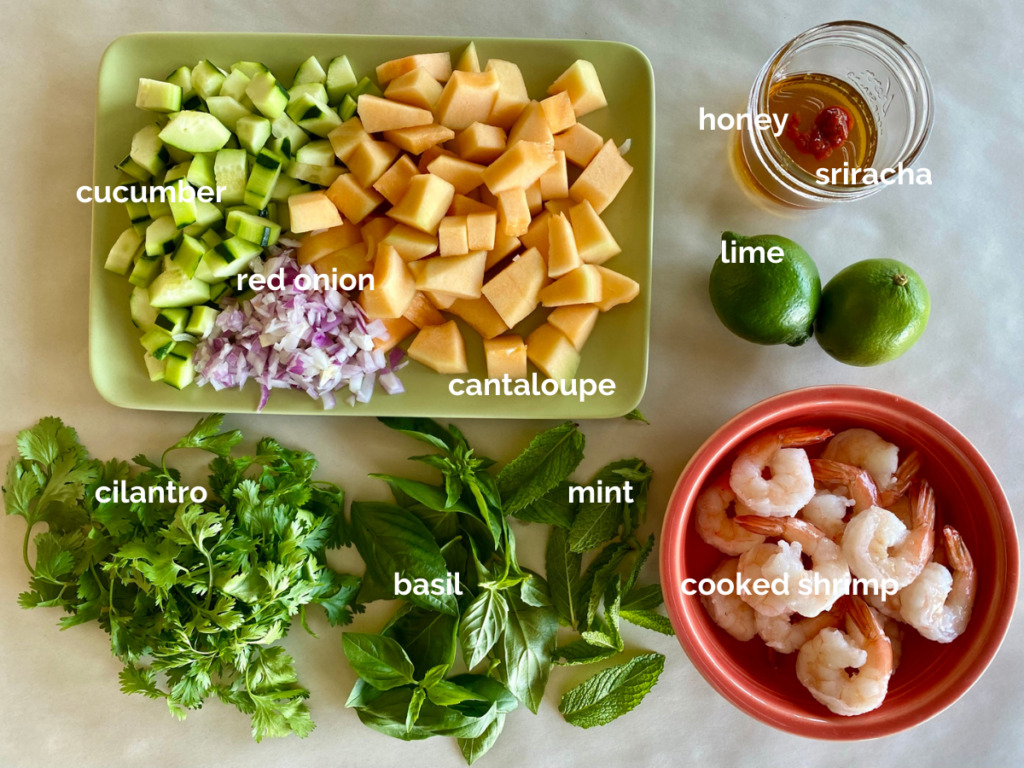
The Sweet + Spicy Shrimp Melon Salad
Even boiling water for pasta or standing at the grill sounds a bit exhausting in heat like this. Sweet + Spicy Shrimp Melon Salad is a no-cook endeavor if you buy your shrimp already cooked, and please do! After a few chops of a knife and a few shakes of a jar you'll be made in the shade.
For a vegan option, sizzle bite-sized cubes of pressed tofu in hot oil until they brown, allow them to cool, and treat them the same as you would the shrimp.
Avocado-- a last minute addition-- and olive oil are other ingredients you'll need
Sweet + Spicy Shrimp and Melon Salad
Course: Main Dish, Quick + Easy, Salad
Season: Evergreen (April - July)
Dietary: Dairy-Free, Egg-Free, Gluten-Free
Preparation: Fast + Easy
Prep Time: 15 minutesminutes
Total Time: 15 minutesminutes
Servings: 2main course or 4 as a side
Perfect for the hottest days of summer, this simple yet fancy cooling salad is light, fresh and hydrating. . . and ever so tasty. No-cook and made in minutes, you'll be sitting in the shade in no time.
6-8per personcooked chilled shrimp, preferably shelled and tail-on
¾averagecantaloupe, chilled and diced
1longcucumber, chilled and diced
½cuppurple onion, scallion, or sweet onion
1largeavocado, diced
2cupscilantro, basil, mint, and chives, chopped and lightly packed in any combination or alone
¼ - ½cupSweet + Spicy Dressing, below
Sweet + Spicy Dressing
¼cuphoney
2 limes, juiced
1Tbsp.Sriracha, or to taste
1tablespoonolive or vegetable oil
Salt and pepper to taste
Instructions
Gently toss all ingredients except avocado in a large bowl. Top the salad with the cubed avocado tucked here and there. (This keeps the avocado from being squished!) Serve.
Sweet + Spicy Dressing
Place all ingredients in a screwtop jar. Shake until the honey and salt are dissolved. Store any leftovers in the refrigerator for use on other summer fruit-based salads.
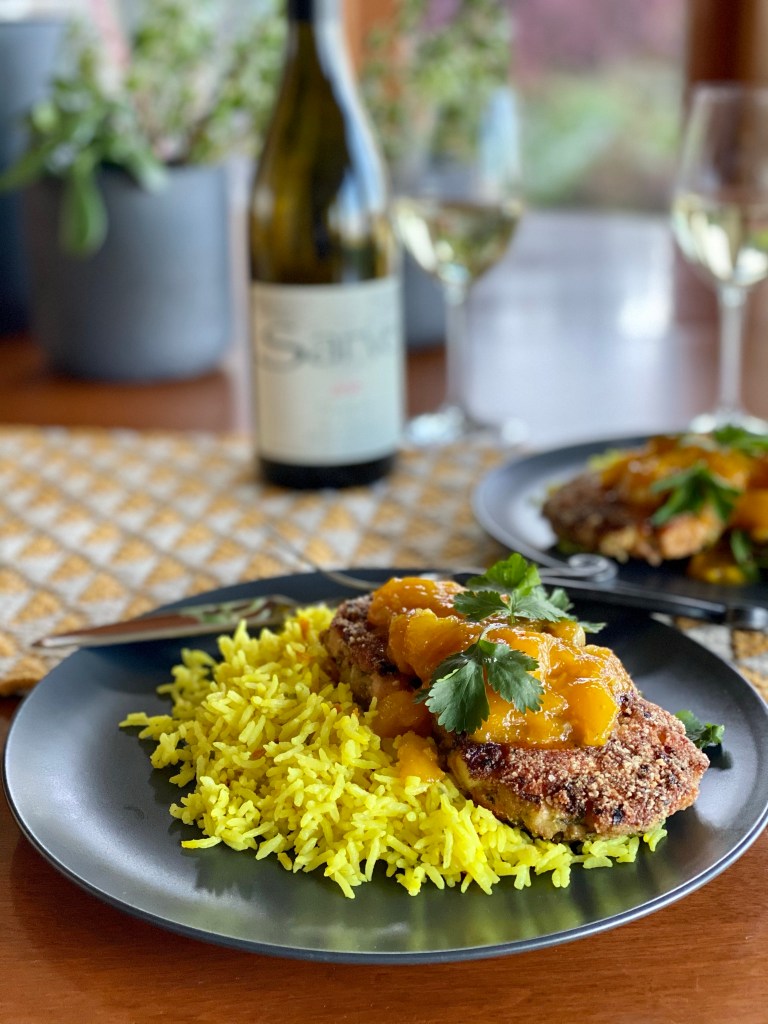
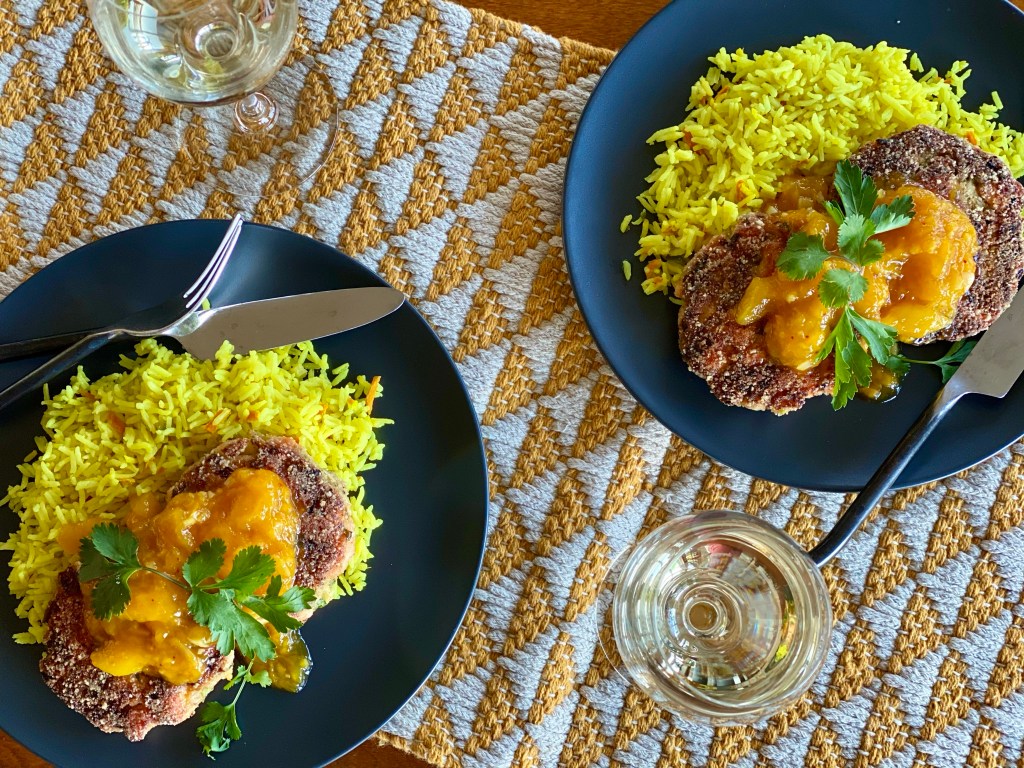
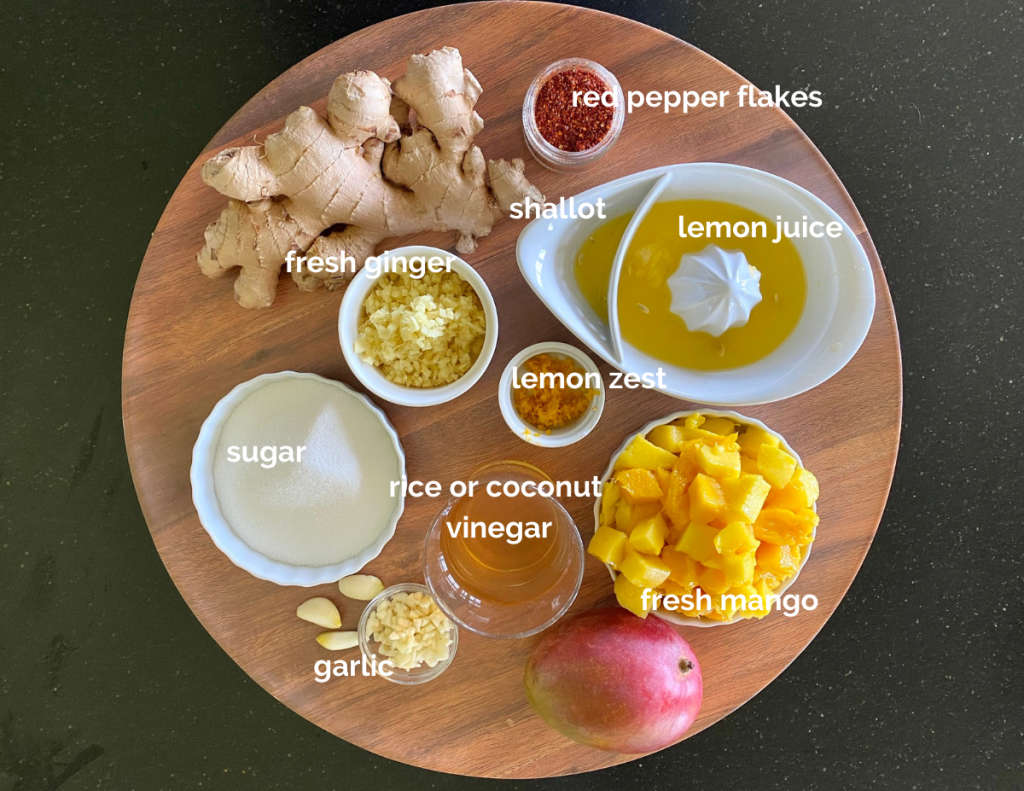
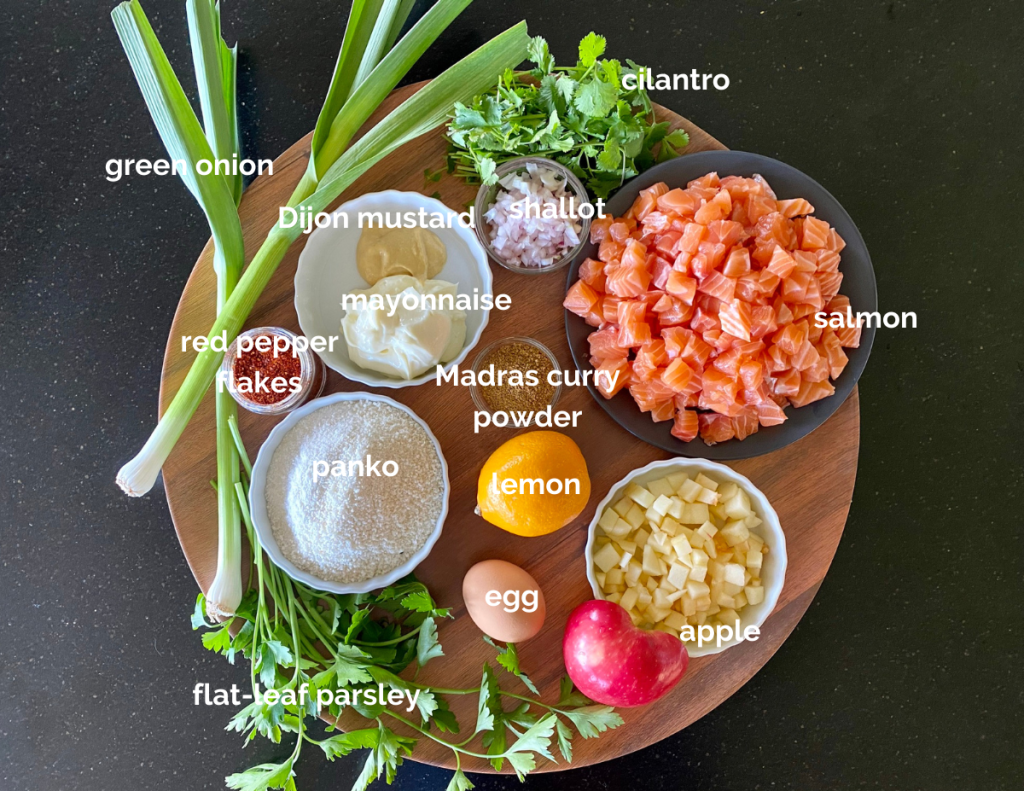
I consider Curried Salmon Cakes with Mango Chutney and Coconut Rice my springtime signature dish. Do you have a show-stopping dish in your cooking bag of tricks?
You'll know the recipe. People lean forward over their plates to inhale its aroma and turn their focus to their fork or spoon. A hush falls over the table. An eater's brow becomes furrowed in concentrated curiosity, quiet little sighs or hums bubble up as a delicate soundtrack to the moment. Time becomes momentarily suspended.
All of a sudden, that focused calm breaks into cheery chatter and conviviality brighter than before. Life goes on with this one subtle experience tucked into it. And this is when you know.
Credit for this curried salmon cake recipe goes to our friend Larry Deck. He once served it as a late-night New Year's Eve dinner and I was transfixed. The brightness of the homemade chutney and light curry notes in the salmon cakes was a sunny counterpoint to that dark winter night.
It highly likely that I let out a long, deep hhhmmmmmmmm that night.
This recipe was also a super-fun contest winner for me. See more about that here. (And thank you again, King Estate, for the lovely experience!)
Wine Pairing for Curried Salmon Cakes + Mango Chutney
Curried Salmon Cakes, Mango Chutney, and Coconut Rice is a heavenly match with any of King Estate's Pinot Gris. I am especially fond of their Domaine Pinot Gris with its pear, tangerine and Meyer lemon peel aromas and flavors, clean minerality, and silky texture. My husband and I featured the Domaine Pinot Gris at our wedding day brunch.
Just like today's recipe trio, this wine is full of happy memories.
The salmon cakes, chutney, and rice make an all-season dish, but I most often make it in late spring when the market is flush with fresh ripe mangoes and Copper River salmon are making their first run. The gingery coconut rice got added over the years and creates a truly perfect flavor and texture triad.
Good to note is that the mango chutney is fantastic with roasted pork and on a cheese platter, and the chartreuse-colored rice will make its way into your rotation apart from the salmon cake and chutney elements.
Any type of salmon you can access is just right for this dish. You're really in luck if your fish market sells salmon trimmings by the bag at a discount, which are perfect since a filet gets chopped anyway. With all of the flavorful ingredients added, the subtleties among salmon varieties can be lost. Go with what you've got.
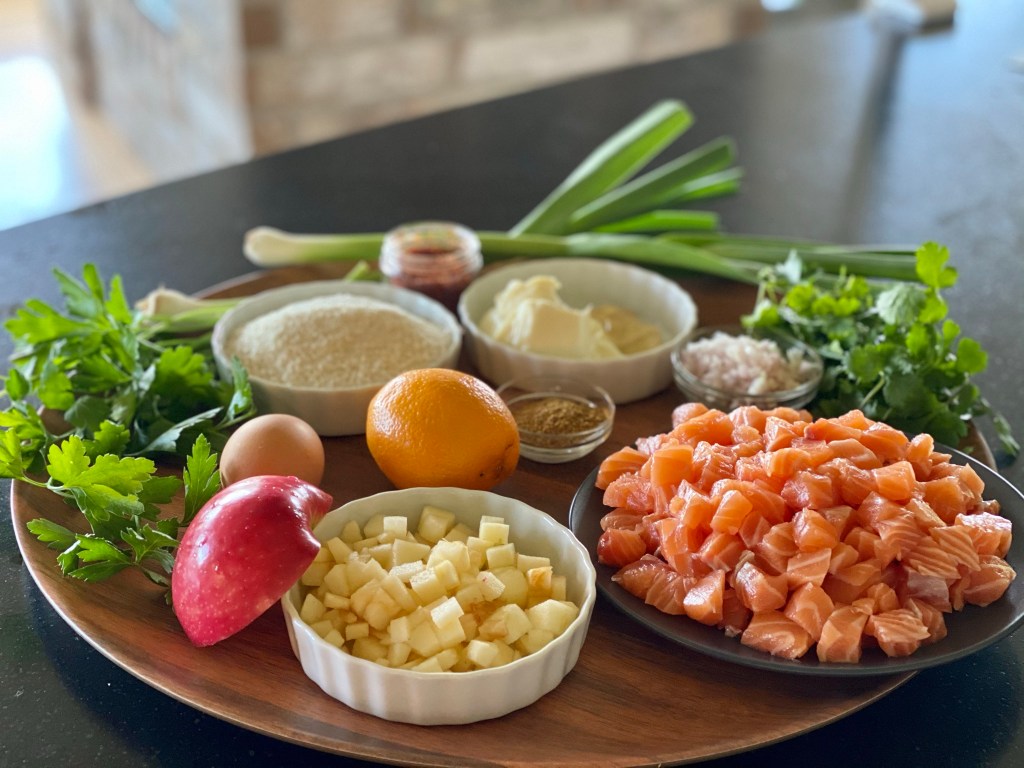
There is nothing technically challenging about producing this meal. I suggest, however, that you plan it on a long afternoon devoted to zenning out in your kitchen, or when you have a pal available to help with the chopping. All three meal components need quite a bit of chopping!
What is your show-stopping signature dish? If you yet don't yet have one, what would you like it to be?
Other Signature Dish-Worthy Recipes You'll Love
Roasted Chicken + Autumn Bread Salad (adaptable to all seasons): Get recipe here. Mediterranean Chicken + Artichokes: Get recipe here. Sweet + Spicy Salmon Bowls: Get recipe here.
An all-season Pacific Northwest/Southern Indian fusion full of tropical flavors. The ingredient list looks long, but this is an easy make-ahead dish that wows family and guests alike. Make your cakes small for a great appetizer version! This recipe pairs perfectly with Oregon Pinot Gris and other dry white wines.
1cuppanko or gluten-free panko crumbs, divided(½ cup for the salmon mixture, the rest to coat the uncooked cakes)
½ - 1tsp.salt to taste
¼cupcanola or olive oil, for cooking
Coconut Rice
1¼cupsBasmati rice
1 13.5 oz. canlight coconut milk
1-2tsp.fresh gingerroot, peeled and minced (optional)
1-2tsp.fresh turmeric, peeled and minced (optional) ORFind this at an Indian or Asian grocer, and at places like Whole Foods in your area.
½tsp.ground turmeric (the dried spice)If fresh turmeric isn't available where you live.
1smallserrano chili, seeded and minced (optional)
Instructions
Start with the Mango Chutney
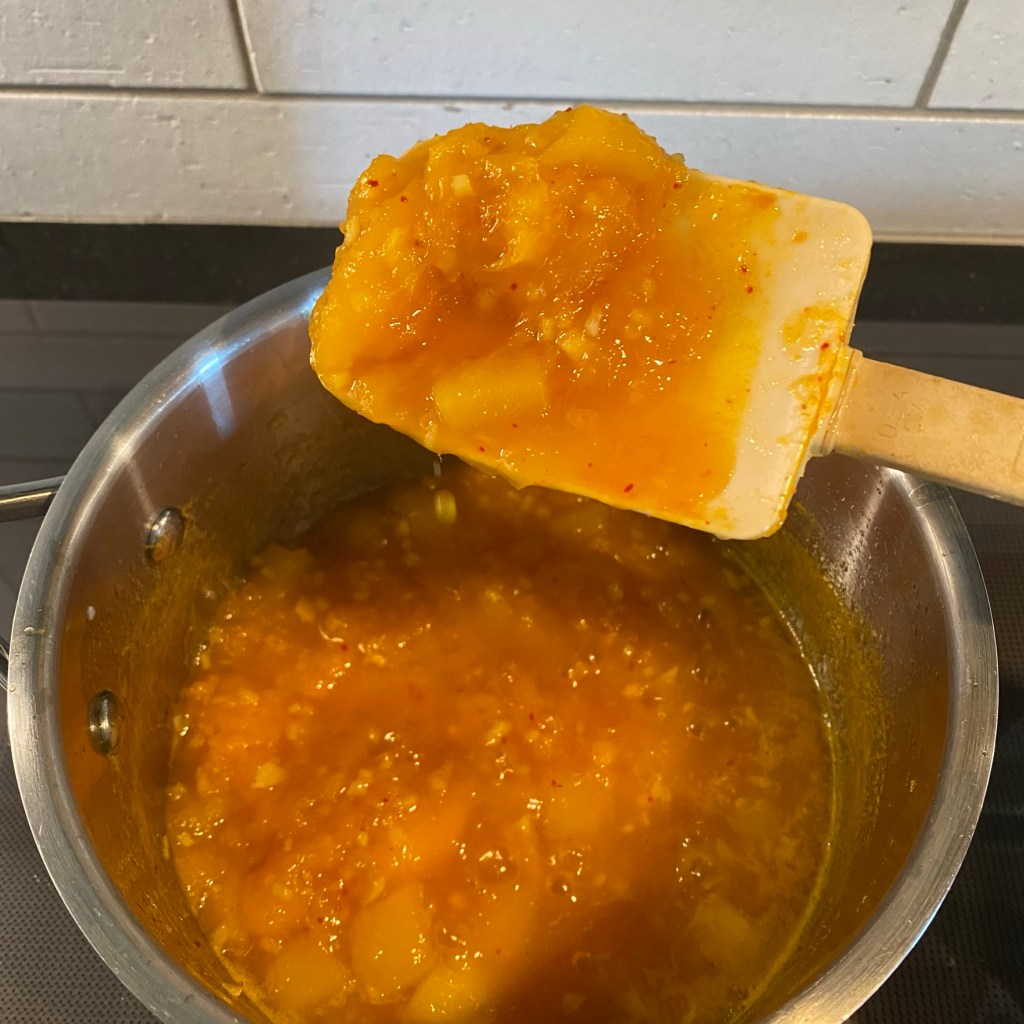
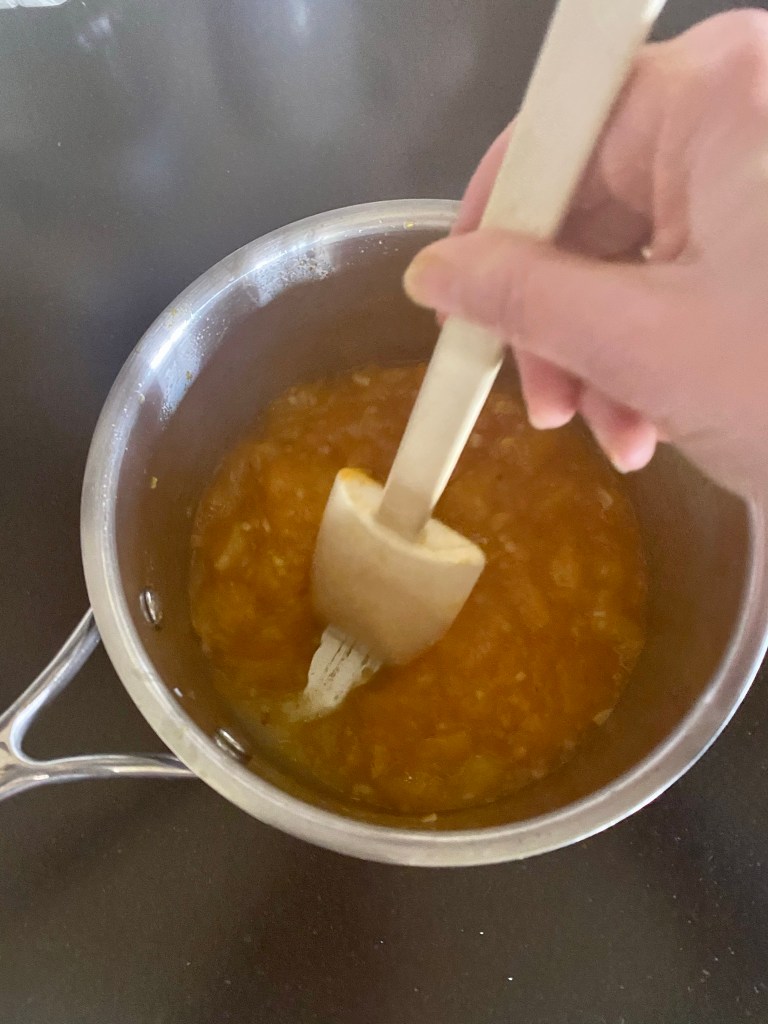
Bring all ingredients to a boil in a non-aluminum saucepan over medium heat. The aroma will be vinegary-pungent at first, then will turn sweet and gingery. Turn the heat down and simmer until the liquid condenses and becomes thick and syrupy, stirring frequently, approximately 30-40 minutes.
The chutney thickens as it cools, and keeps in the refrigerator for 2-3 weeks. Makes 2½ cups.
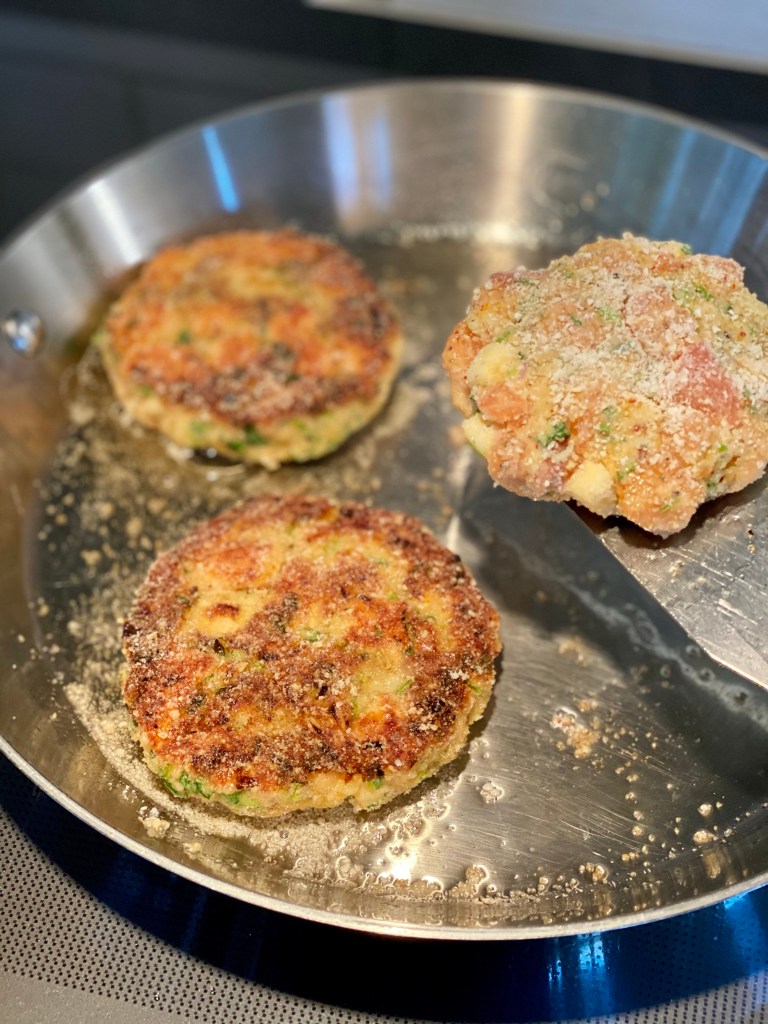
Now the Curried Salmon Cakes
Gently combine all ingredients EXCEPT ½ cup of the panko. Allow mixture to rest five minutes. (While you're waiting, now is a good time to start the rice!)
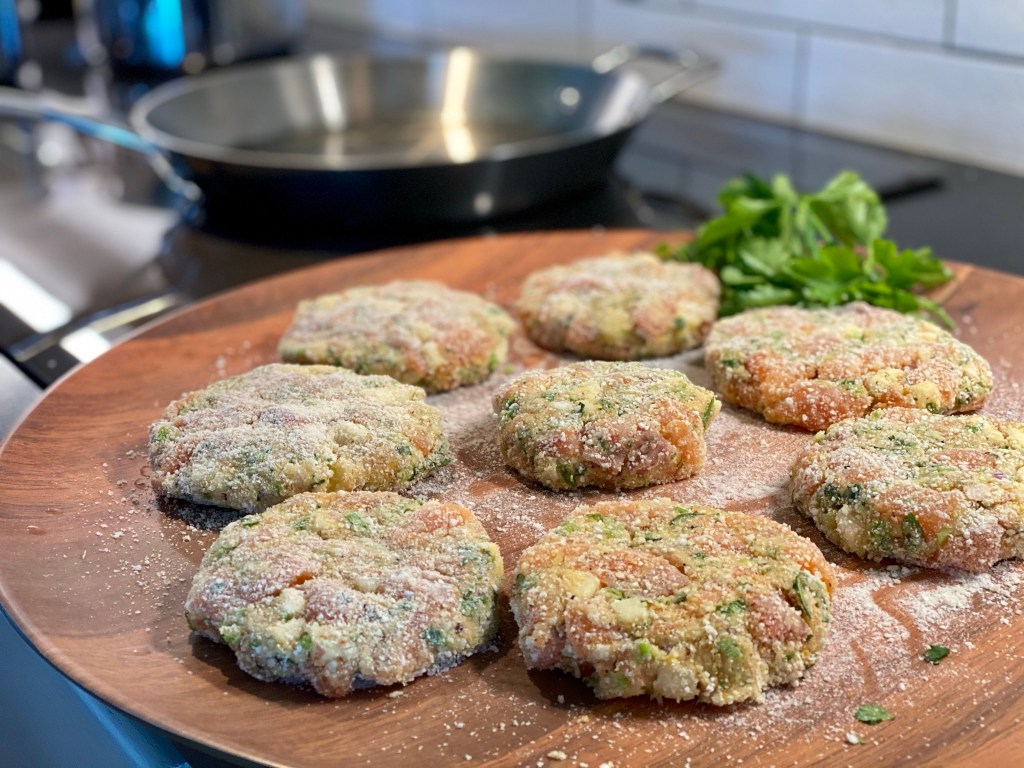
Place the remaining ½ cup panko onto a plate or shallow dish. Scoop up ½ cup of the salmon mixture and form into 3" cakes. Carefully coat each cake in panko crumbs. Allow the cakes to rest another five minutes. (The resting steps help the panko absorb to hold the cakes together/stick to the cakes and make them much easier to handle.)
Heat oil in skillet over medium-high heat until just starting to shimmer. Place salmon cakes, a few at a time to avoid crowding, in the skillet and cook without moving until golden brown, about 3 minutes. Carefully flip cakes and cook without moving until the second side is golden brown, about another 3 minutes. (You should have eight cakes, or enough to serve four people.)
Make the Coconut Rice
Over the sink, rinse the rice in a fine-mesh strainer with cold water, stirring the rice with your fingers until the water runs clear. Put the rice in a medium saucepan.
Add the coconut milk, ginger, turmeric (fresh or dried), and serrano* to the saucepan (if using.) Bring to a full boil over high heat. cover, reduce heat and simmer for 20 minutes. Keep the lid on, and set the rice aside.
To Serve
Lay down a bed of rice in the center of each plate. Place two cakes on the rice. Top with generous spoonsful of warm mango chutney, and garnish with cilantro, if desired.
Notes
The salmon cakes and mango chutney are perfect with Oregon Pinot Gris and other dry white wines, and sparkling whites. All components can be made ahead-- perfect for entertaining. Rewarm the salmon cakes in a hot oven for a few minutes. Warm the rice and the chutney in lidded saucepans over medium-low heat. This, of course, works well for any leftovers, too.Experiment using halibut or other white fish in place of the salmon.*I suggest a pretty wide range of quantity for the ginger, turmeric, and serrano for the rice, as well as an option for dried ground turmeric if you can't find fresh. This rice is stellar with all of these added, but you have the freedom to choose to omit, increase, or reduce the quantity to suit your taste. We like it with its full-flavor, all-in, maxxed out goodness. The rice can be made with full-fat coconut milk, but it will of course have a heavier, oilier feel. If full-fat is what you have, please use it, but to try it once with light coconut milk.
Follow Me
Welcome!
You’re in the right place! I’m Pam Spettel, home cooking expert and guide, and I’m here to show you how to break up with cooking and hospitality anxiety, learn how to use recipes as guides rather than strict rules, and let your cooking intuition and confidence soar.
Superpower: Dreaming up recipes that work, serving them to my friends and family, and writing little stories about how cooking them well is the same as loving well.
Inspiration: Ingredients! The fresh, colorful, fragrant, local, seasonal ingredients found in the Pacific Northwest are my creative medium.
Heroes: Local food and wine producers– the people who keep me, my family, and our community nourished and happy.
We use cookies on our website to give you the most relevant experience by remembering your preferences and repeat visits. By clicking “Accept”, you consent to the use of ALL the cookies.
This website uses cookies to improve your experience while you navigate through the website. Out of these, the cookies that are categorized as necessary are stored on your browser as they are essential for the working of basic functionalities of the website. We also use third-party cookies that help us analyze and understand how you use this website. These cookies will be stored in your browser only with your consent. You also have the option to opt-out of these cookies. But opting out of some of these cookies may affect your browsing experience.
Necessary cookies are absolutely essential for the website to function properly. These cookies ensure basic functionalities and security features of the website, anonymously.
Cookie
Duration
Description
cookielawinfo-checkbox-analytics
11 months
This cookie is set by GDPR Cookie Consent plugin. The cookie is used to store the user consent for the cookies in the category "Analytics".
cookielawinfo-checkbox-functional
11 months
The cookie is set by GDPR cookie consent to record the user consent for the cookies in the category "Functional".
cookielawinfo-checkbox-necessary
11 months
This cookie is set by GDPR Cookie Consent plugin. The cookies is used to store the user consent for the cookies in the category "Necessary".
cookielawinfo-checkbox-others
11 months
This cookie is set by GDPR Cookie Consent plugin. The cookie is used to store the user consent for the cookies in the category "Other.
cookielawinfo-checkbox-performance
11 months
This cookie is set by GDPR Cookie Consent plugin. The cookie is used to store the user consent for the cookies in the category "Performance".
viewed_cookie_policy
11 months
The cookie is set by the GDPR Cookie Consent plugin and is used to store whether or not user has consented to the use of cookies. It does not store any personal data.
Functional cookies help to perform certain functionalities like sharing the content of the website on social media platforms, collect feedbacks, and other third-party features.
Performance cookies are used to understand and analyze the key performance indexes of the website which helps in delivering a better user experience for the visitors.
Analytical cookies are used to understand how visitors interact with the website. These cookies help provide information on metrics the number of visitors, bounce rate, traffic source, etc.
Advertisement cookies are used to provide visitors with relevant ads and marketing campaigns. These cookies track visitors across websites and collect information to provide customized ads.