I had forgotten how much I adored egg foo young. The recipe, "Eggs, Edamame, Bean Sprouts" in Nigel Slater's 2020 book, Greenfeast: Autumn, Winter opened my aroma memory floodgates. I was taken back to very special meals in Chinese restaurants as a child.
That sent me searching the phenomenal "Omnivore's Cookbook," with its hundreds of classic and modern Chinese dishes by Maggie Zhu. Her traditional egg foo young versions include the brown sauce I remember. Approachable recipes and interesting family history fill her beautiful blog.
This recipe is a mash-up of tradition and change. Omnivore's Kitchen for tradition. Greenfeast for the addition of edamame. My own addition of making the brown sauce mushroomy.
Making Egg Foo Young at Home
Maggie Zhu's trick for getting the omelette, as she calls it, thick and puffy is to use a fair amount of vegetable oil in the pan. Her recipes say to use between 2 and 8 tablespoons of vegetable oil. Less oil will give you a flatter, less puffy, less traditionally Chinese omelette, she says, and she is right. I found that 6 Tablespoons in my 8" skillet is perfect for that tall, puffy egg foo young that I remember having in Chinese restaurants. The extra oil helps the Chinese omelette become well-browned, with the slightest crusty crispness that is more traditional.
If mushrooms aren't your thing like they are mine, omit them. Instead of the water, substitute dark vegetable or chicken stock. Here's my recipe for a rich brown roasted vegetable stock.
The edamame is optional, or peas or finely chopped broccoli can be a substitute. Egg foo Young doesn't require animal protein, so leave that out if you'd like. Once you get the hang of it, you'll see that egg foo young is more of a method than a prescription. It can be filled with any number of things, just like a French-style omelette.
The resulting egg foo young is amazingly easy, restaurant take-out fast, and powerfully delicious. I hope you like it.
Egg Foo Young
Course: Breakfast + Brunch, Main Dish, Quick + Easy
Cuisine: Chinese
Season: All Season
Dietary: Dairy-Free, Gluten-Free, Vegetarian
Preparation: Fast + Easy
30 minutesminutes
Total Time: 30 minutesminutes
Servings: 46" egg patties
A Chinese take-out favorite made in a flash at home. Fill your egg foo young with any number of fillings to suit your mood or what you have on hand.
⅓cupedamame, peas, or finely chopped broccoli, optional
3green onions, two finely chopped and one thinly sliced on the diagonal
1cupcooked shrimp, chicken, or ham, finely chopped, optional
salt and black or white pepper to taste
6Tablespoonsvegetable oil*
Instructions
Cook the Sauce
In a small saucepan, use your fingers to break the dried mushrooms into small, irregular pieces and cover them with 1¼ cups hot water. Set aside for 15 minutes. Whisk all the remaining sauce ingredients into the saucepan with the mushrooms and cook over medium heat, whisking occasionally, until the sauce simmers and thickens, about 5-6 minutes. Keep warm.
Cook the Egg Pancakes
In a medium mixing bowl, beat the eggs with a fork until well combined. Add the bell pepper, bean sprouts, chopped green onions, and shrimp, chicken or ham, if using. Season with salt and pepper.
Heat the oil* in a small skillet over medium to medium high heat. Scoop about ½ cup of the egg mixture into the skillet. Fry until golden brown, about 4 minutes per side. Repeat with the remaining egg mixture. This should make about four 6" patties.
Serve with steamed short-grained rice, spooning the mushroom sauce over the top. Garnish with sliced green onion.
Notes
This recipe is adapted from Maggie Zhu at Omnivore's Kitchen. I thank her for her delicious blog and the step-by-step guidance in learning to cook Chinese dishes. *Maggie's recipe for egg foo young says to use between 2 and 8 tablespoons of vegetable oil. Less oil will give you a flatter, less puffy traditional omelette, she says, and she is right. I found that 6 Tablespoons in my 8" kitchen is perfect for that tall, puffy egg that I remember having in Chinese restaurants.
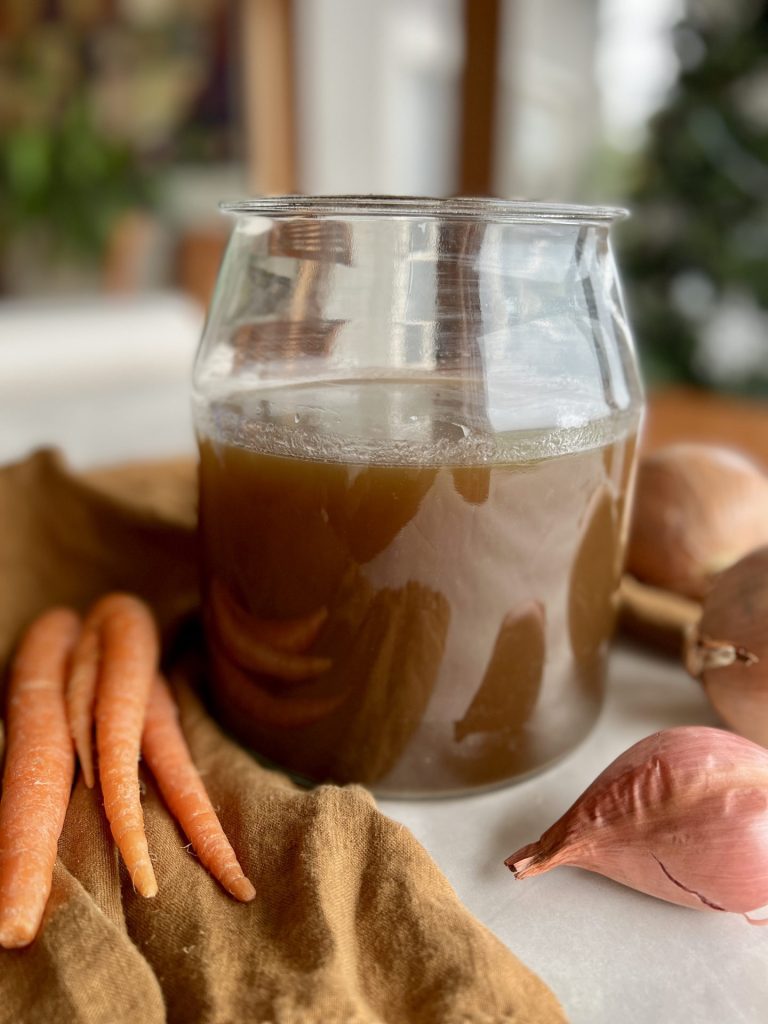
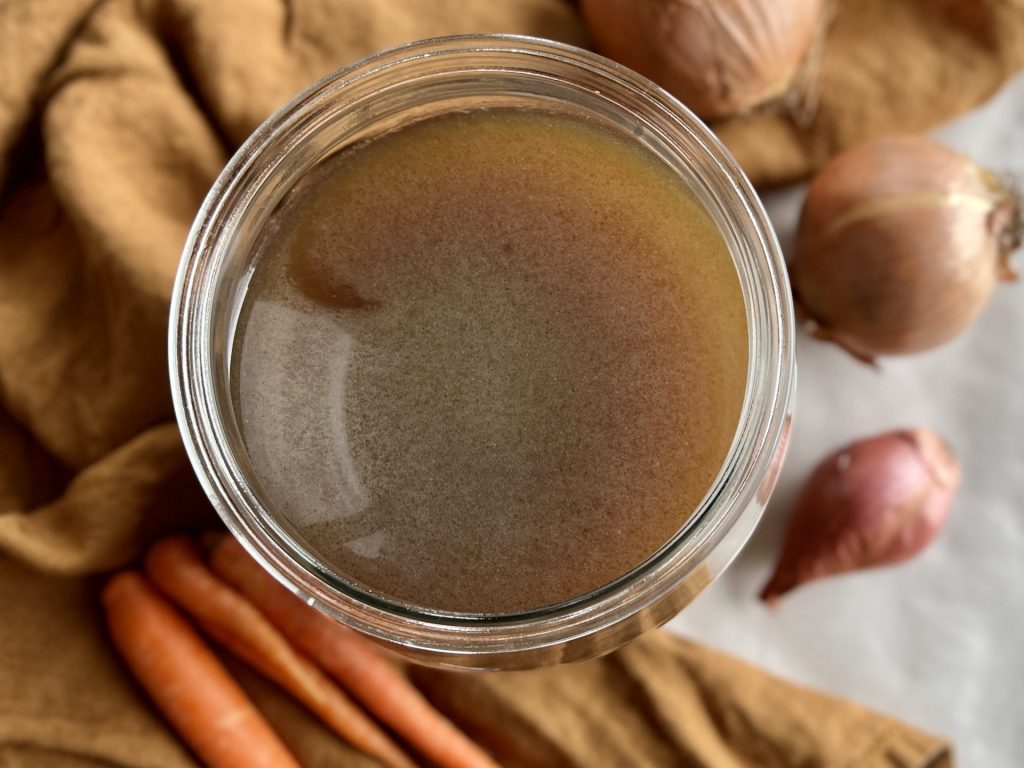
One of the graces of home cooking is that there are no paying customers demanding a dish to be exactly the same visit after visit. Each time you make roasted vegetable stock you use any variety of vegetables, bones, meats, herbs, and spices you happen to have. Each time the stock will have a subtly unique flavor. This may not work well in a restaurant, but is terrific at home.
This post is dedicated to my 1970's junior high school home economics teacher, Mrs. Waetje, who taught that reducing waste is a tenet of home economics-- a wise use of family finances. It is a great feeling to rummage through the fridge for vegetables that may otherwise go to waste and turn them into liquid gold. Thank you, Mrs. Waetje, and if you are still out there, I was paying attention despite my wiggles and perpetual chatter.
Wake up Your Cooking with Aromatic and Delectable Stock
Your roasted vegetable stock will add layers and layers of flavor to the soups and stews you make-- that's a given. Use your liquid gold to make risotto, to cook rice and grains like barley, farro, and buckwheat groats. Use it as a medium in which to simmer your dried beans, and as a base for meaty braises. A ladleful added to just about any ragu or stew will deepen its flavor. And one of my favorite things is to cradle a hot mug of broth first thing in the morning as a gentle winter wake up tonic.
The Difference Between Unroasted and Roasted Vegetable Stock
Roasting the vegetables before the simmer produces a deep, richly flavored stock perfect for supporting heartier cool-weather ingredients and recipes. Save the light golden unroasted vegetable stocks for spring and summer cooking. To make a typical light golden broth, simply do not roast the vegetables first, and omit the mushrooms. Follow the remaining directions as they are written.
So, potayto, potahto. Make some, enjoy it, and call it whatever you want. To me, spring and summer cooking seems to lend itself to light broths, autumn and winter to rich, brown stocks. The cooking community seems to agree that the terms are interchangeable. Whatever rolls out of my mouth is the term I'll use!
Vegetable Stock Do's and Don'ts
The very thrifty among us (like Mrs. Waetje, I'm sure) keep a zip-bag in the freezer and stuff clean, vegetable scraps into it. When it's full it is time to make stock.
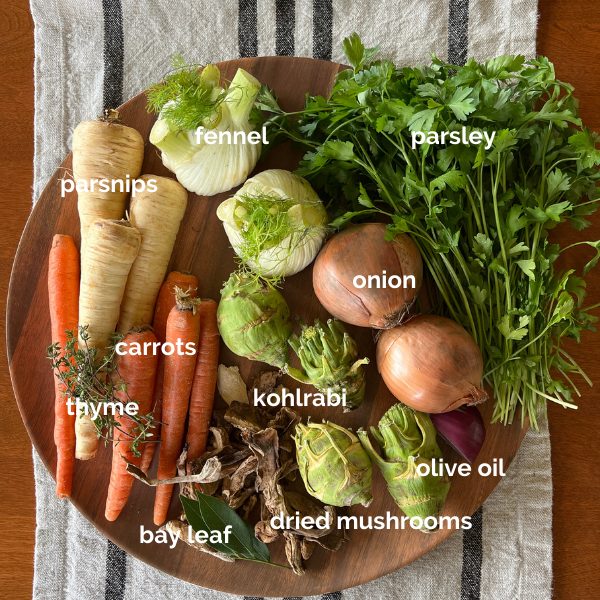
Classic mirepoix-- onion, carrot, and celery are standard issue in stock making. (You will note the absence of celery in the mis en place photo below. I didn't have any, and it is not noticeably missed in the resulting stock.) See the notes section of the recipe for a more comprehensive list of vegetables and optional ingredients that can contribute to great stock.
Most vegetables make a good stock, with a few exceptions; Brussels sprouts, broccoli, cauliflower, asparagus, and artichokes can be overpowering or add off-putting flavor notes, so avoid them for this purpose. Beets, especially red ones, will likely make your stock an odd and unappealing color, so think twice about throwing those into the pot. Potatoes are fine, but I don't use them to keep the stock a little more clear than cloudy, a personal preference.
Mushrooms are lovely in a roasted vegetable stock. Dried mushrooms, even better! Just one ounce of dried mushrooms (don't roast them-- just add them to the pot with the water) intensify the rich flavor and add a deeper color to the stock. They are not required, but do add something nice and grounding.
Limp, wilted, scuffed, and past-their-prime vegetables are all fair game. Just be sure to peel or cut off any parts that have blackened or have signs of mold to keep your broth clean and fresh tasting.
Not pictured in the mis en place photo for this batch of roasted vegetable stock are late additions of icicle turnips, a knob of fresh ginger, two arbol chiles, and the left-over rind of a Meyer lemon.
Use Your Roasted Vegetable Stock in These Recipes
To cook the grain in Roasted Mushroom, Grain, and Spinach Salad. Get the Recipe. In place of the water in Pumpkin Black Bean Soup. Get the recipe.
Last Words
If you like this recipe, please give it rating by clicking into the green stars, and if you have questions about the recipe or other culinary dilemmas, please email me at pam@101milekitchen.com. Your success is important to me. Thank you to each and every one of you who subscribes to 101-Mile Kitchen newsletters. You are appreciated more than you'll ever know!
Roasted Vegetable Stock
Course: Soup + Stew
Season: Mist (November - March)
Dietary: Dairy-Free, Gluten-Free, Vegan
Preparation: Roasting
Total Time: 2 hourshours15 minutesminutes
Servings: 2quarts
Deep, richly flavored roasted vegetable stock provides perfect support to hearty cool-weather ingredients and recipes.
1teaspoonkosher salt, plus more for adjusting at the end
1teaspoonwhole black or mixed peppercorns
1 bunchparsley, flat leaf or curly, stems trimmed
assorted fresh herbs of your choice, about one bunch total, OR dried herbs of your choice, up to 2 teaspoons
1ouncedried mushrooms, any variety, optional
1-2bay leaf
other optional ingredients of your choice. See notes.
2½quartswater
Instructions
Preheat oven to 350°, or 325° convection. Line a 13" x 18" baking sheet with foil.
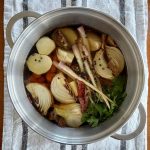
Wash the vegetables and trim away any spoiled parts. Cut the vegetables into evenly sized chunks and place them on the foil-lined baking sheet. Sprinkle lightly with salt and a good drizzle of olive oil, up to 3 Tablespoonsful. Mix gently together with your hands. Place the sheet into the oven and roast for about 40 minutes, or until the onions and other vegetables are beginning to take on some roasted color and are quite fragrant, stirring halfway through.
Place the roasted vegetables and any browned stuck-on parts and oil that remain into an 8 quart stockpot. Add the salt, peppercorns, fresh or dried herbs, dried mushrooms, if using, bay leaves, and water. Bring the pot to a rapid boil, and immediately reduce heat to maintain a simmer. Cover, and cooking for 1-2 hours, stirring often. Remove the lid for the last half of cooking.
Taste the stock and adjust seasoning by adding more salt if necessary. Allow the stock to cook slightly until safe to handle.
Strain the stock first through a colander to remove the larger bits, then strain again through a very fine mesh strainer to remove the tiny bits that make it cloudy. Store in the refrigerator for up to 5 days, or freeze for up to three months.
Notes
Vegetable selection:Classic mirepoix-- onion, carrot, and celery are standard issue. Most vegetables make a good stock. Do use the leaves, peels, skins, and stalks of leeks, garlic, peppers, parsnips, turnips, squashes, fennel, kohlrabi, tomatoes. Corn and corn cobs and celery root, are good additions, too. Think twice about using Brussels sprouts, broccoli, cauliflower, asparagus, and artichokes which can add overpowering off-putting flavor notes. Potatoes are fine, but omitting them will keep the stock from becoming too cloudy.Mushrooms are lovely in a roasted vegetable stock. Dried mushrooms are even better! Just one ounce of dried mushrooms (don't roast them-- just add them to the pot with the water) intensify the rich flavor and deep color to the stock. They are not required, but do add something nice.Optional additions:Rinds (not the juicy flesh) of citrus, especially lemon and orange.Nubs of fresh ginger and/or turmeric.Dried chilis of any variety. I find a couple small arbols add a very subtle warmth. The larger dried chilis will make a marked flavor difference and would be fantastic as a tortilla soup base, for example. Varied fresh herbs. Nearly all herb will make a nice flavor contribution, but do be careful with some of the more overpowering herbs such as rosemary and oregano. A little can go a long way.Dried herbs are much more condensed in flavor than fresh, so a little goes a long way here, too. But do use them!Juniper berries are wonderful in a stock. Add up to 1 teaspoonful, gently crushed to release even more of their wintry flavor.
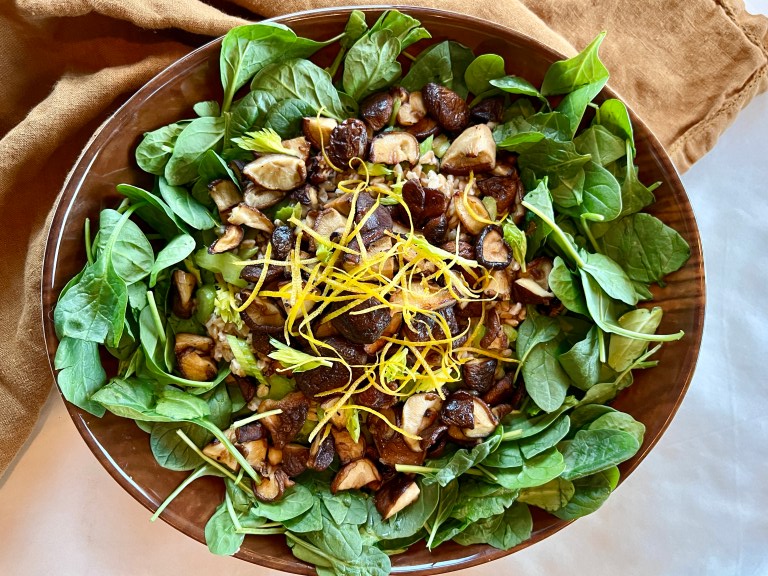
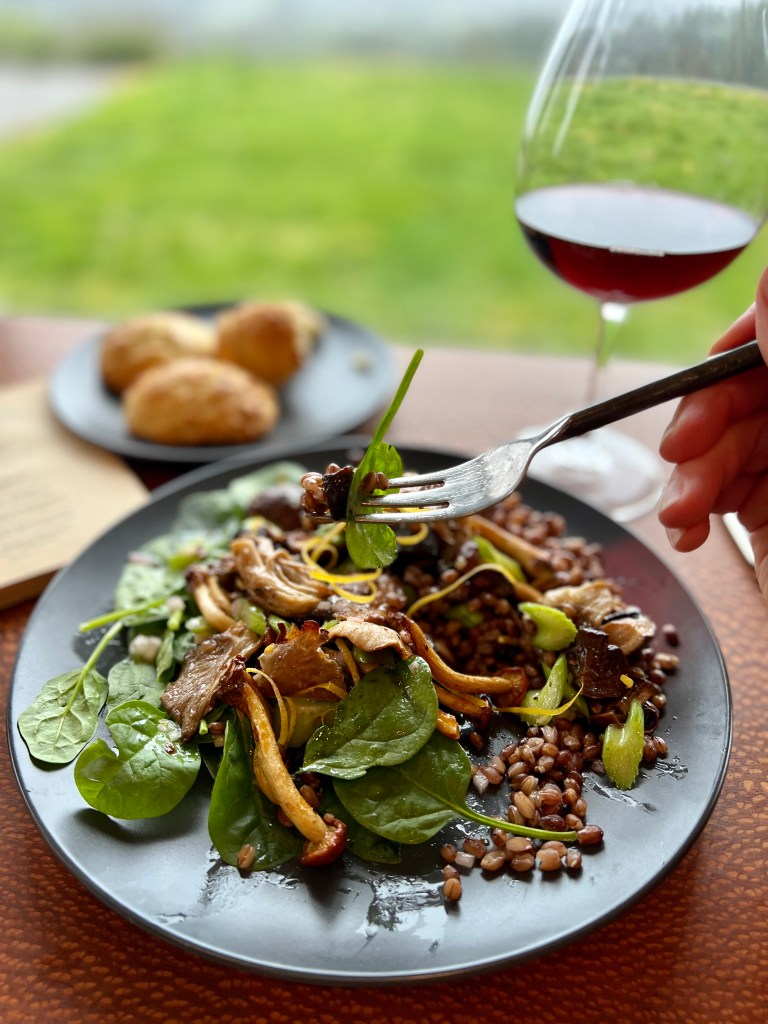
Feasts, cookie platters, cocktail parties, and office holiday goodies, oh my! As fun as it is, it doesn't take long to feel the overwhelm of holiday system overload, just when the mood of the day calls for merry and bright. As a remedy to seasonal splurges, include a salad of roasted mushrooms, warm grains, and baby spinach into your menu this week.
Making the Roasted Mushroom, Grain and Spinach Salad
This quick little main-course salad starts with four easy-to-come by ingredients and a light but flavorful lemon vinaigrette. The vinaigrette is made even better by using Meyer lemons, just coming into peak season.
Here I go on about celery again. Celery adds an essential textural crunch to this dish, and a bit of delicious freshness that you will welcome to your winter plate. I view this as this as a subtle necessity.
In the extraordinary Pacific Northwest food playground we have easy access to an array of cultivated and wild mushrooms. One trial of this recipe I used a shiitake-only approach. Another trial used a melange of chestnut, oyster, shiitake, and crimini mushrooms. I loved it both ways. If you can only access white buttons or brown criminis, please use them! Your dish will be as delicious as ever.
You have a lot of running room when it comes to the grain you use in your roasted mushroom salad. I used Purple Valley Barley, an organic product from my local Lonesome Whistle Farm. Lonesome Whistle also carries wheat berries, emmer (a farro) and oat groats that would be perfect. If you are new to this type of thing and eat gluten, I suggest starting with pearled barley, or just jump right in and try one of the above grains. If you eat gluten-free, give buckwheat groats or brown rice a try.
What Wine Should I Serve with Roasted Mushroom, Grain, and Spinach Salad?
I started off suggesting a mushroom, warm grain, and spinach salad as a detoxifying healthy choice, so maybe through the holidays consider a tonic of pomegranate juice and sparkling water? Or not! I highly suggest the Artisanal Wine Cellars 2015 Dukes Family Vineyard Pinot Noir. Tom and Patty Feller, and their daughter, Mia, are a family operation dedicated to handcrafted expressive wines. The grapes in this bottle were grown by Pat and Jackie Dukes of Dukes Family Vineyard. We view the Artisanal's Pinot Noirs to be beautiful wines at incredible values.
Roasted mushrooms, warm chewy grain, and fresh spinach dressed in the best ever lemon vinaigrette. This fantastic fast and easy layered salad is hearty enough for satisfying cool weather meals, light enough to counterbalance seasonal feasts and spurges.
1½lb.mushrooms of your choice, singularly or in combinationcrimini, shiitake, chestnut, chanterelle, hedgehog, button, etc.
5stalkscelery, and leaves if your head has them
1cupwhole grain of your choice, prepared according to package directions and kept warm*barley; emmer, spelt, or einkorn farro; wheat berries; oat or buckwheat groats; brown, black, purple, red, or wild rice, etc.
8-10oz.fresh baby spinach
lemon vinaigrette, recipe below
zest of 2 lemons, in strips
Best Ever Lemon Vinaigrette
½cuplemon juice, Meyer lemon preferred, zested firstabout 2 large lemons
2clovesgarlic, pressed or very finely minced
1shallot, finely minced
tsp.maple syrup
salt and pepper to taste
Instructions
Preheat the oven to 400° convection. Line a baking sheet with foil and spray it with oil or non-stick spray.
Begin cooking your chosen grain according to package directions. (For example, quick-cooking par cooked farro from Trader Joes takes 10 minutes to cook; unhulled barley takes up to 40 minutes.) Once it is cooked, keep it warm while the other steps come together.
Prepare the Best Ever Lemon Vinaigrette, recipe below.
Wipe mushrooms clean and trim them if necessary. If you are using shiitakes, remove the stems. Leave the small ones whole, cut the medium-sized ones in half, and the largest ones into quarters for similarly sized pieces that will roast at the same rate. Place them in a heap on the prepared baking sheet. Spoon about ¼ of the lemon vinaigrette over the mushrooms. Use your hands to toss the mushrooms in the vinaigrette, coating each piece lightly and evenly. Spread the mushroom pieces out on the pan, and place in the oven. Roast for 12 minutes, remove from the oven and stir. Spread them out again and roast them for another 10 minutes or so until they are deeply colored and their juices have almost evaporated. Don't leave them much longer than this or they will lose their tenderness.
While the mushrooms are roasting, thinly slice the celery and set aside. When the grains are cooked and drained, stir in ¼ of the vinaigrette and continue to keep gently warm. Place the spinach on the platter or individual plates.
When the mushrooms are done roasting, add the sliced celery and give it a good toss. Spoon the dressed grains in the center of the plate, and top with the mushroom/celery mixture. Drizzle a little more of the vinaigrette over the layered salad.** Garnish with strips of lemon zest, which are not only eye-catching, but add a delicious flavor note. Serve while warm.
Make the Best Ever Lemon Vinaigrette
Combine all ingredients on a pint-sized jar with a tight fitting lid. Shake until the salt and maple syrup are dissolved. Shake before each use.
Notes
*I've made this recipe using organic locally-grown barley, with buckwheat groats, and with a package of "10-Minute Farro" sometimes found at Trader Joes. Follow the package directions for any grain you use for both serving size and cooking times. **You will have a little of the vinaigrette left over. Don't be sad about this-- use it on your next kale or lettuce salad, on top of baked or broiled fish, or to dress a pan of roasted vegetables. When Meyer lemons are in season, be sure to use them. The typical Eureka or Lisbon lemons are wonderful, too, but Meyers offer a step up in flavor.I recently found that the water that remains when cooking whole-grain barley is delicious as a sipper. Cook the barley "pasta-style" floating freely in a pot of water, and reserve the water. It's as tasty as any stock, and can be used as a soup base or warming cup. This recipe is easily halved and easily doubled. If you double it, use two sheet pans to roast the larger amount of mushrooms.
I am always surprised at how many people don't enjoy winter vegetables and the glorious things you can make with them, like this simple deconstructed Borscht Bowl. Here is my theory why.
Deconstructed Borscht Bowl
Not all that long ago, people ate whatever the seasons offered. Storage vegetables sustained us into the cold winter. Parsnips, potatoes, carrots, rutabagas, turnips, cabbages, and beets were familiar and welcome.
Then the frozen food explosion of the early 1950s came. Supermarkets full of freezer cases exploded into cities and suburbs. We now have over three generations of people who have had the luxury of eating sweet peas in January as though it is natural. Consequently, we have lost our taste for hearty winter vegetables.
Frozen food technology is great, really. But to allow it to shake us lose from the joys of seasonal eating? To let go of a whole swath of foods designed to provide what we need in cold weather? What a shame. Let's fix that with some borscht-y goodness.
Rustic, Warming, Healing, and Delicious
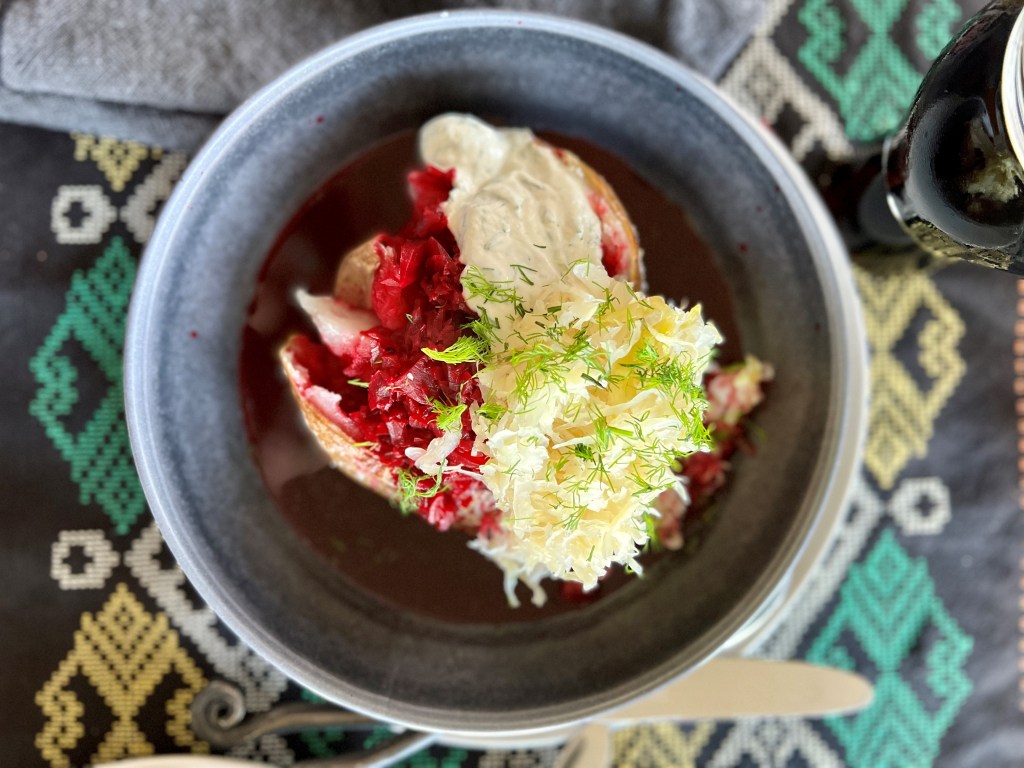
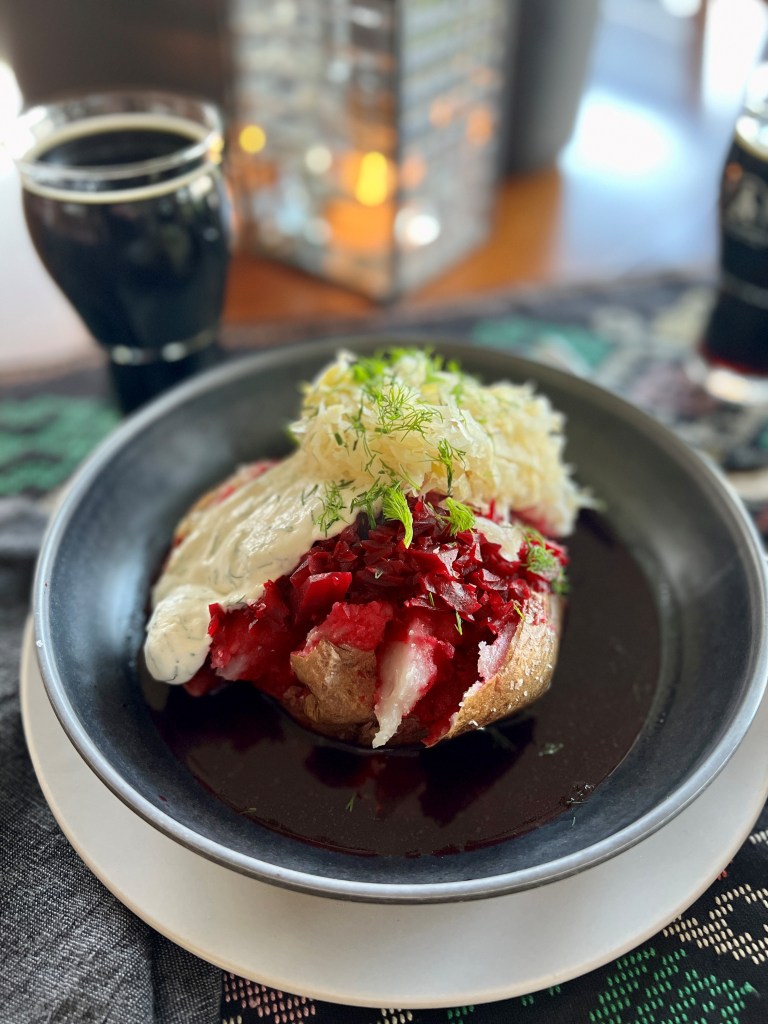
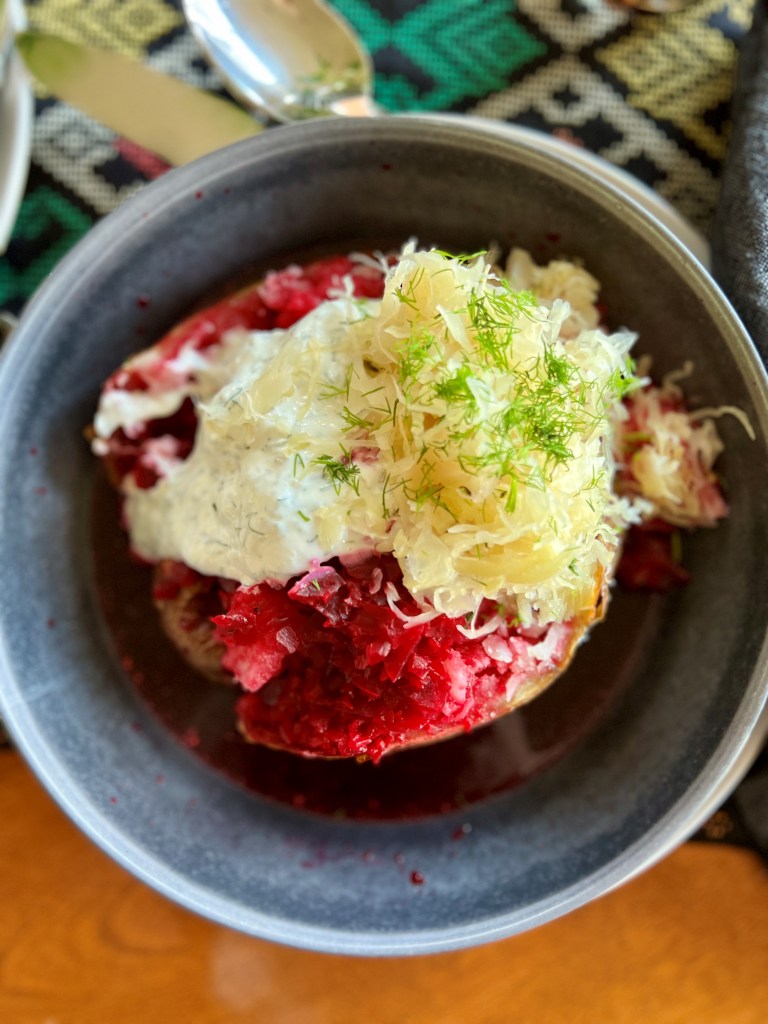
Our deconstructed Borscht Bowl is inspired by Eastern European borscht made of beet, potato, cabbage, sour cream and dill. Here, we just arrange the components a little differently. It is the perfect thing to eat on a dark winter's evening, a chunk of caraway rye black bread and perhaps some browned sausages alongside.
I love the short-day season at the dinner table. Nearly every night we light candles and dim the overhead lights. The glow of candlelight on the face of my beloved dinner companion casts him in his one-and-only kind of charm. Dinner topics move from what happened outdoors today to what it happening in our souls today. These dinners help our roots sink deeper.
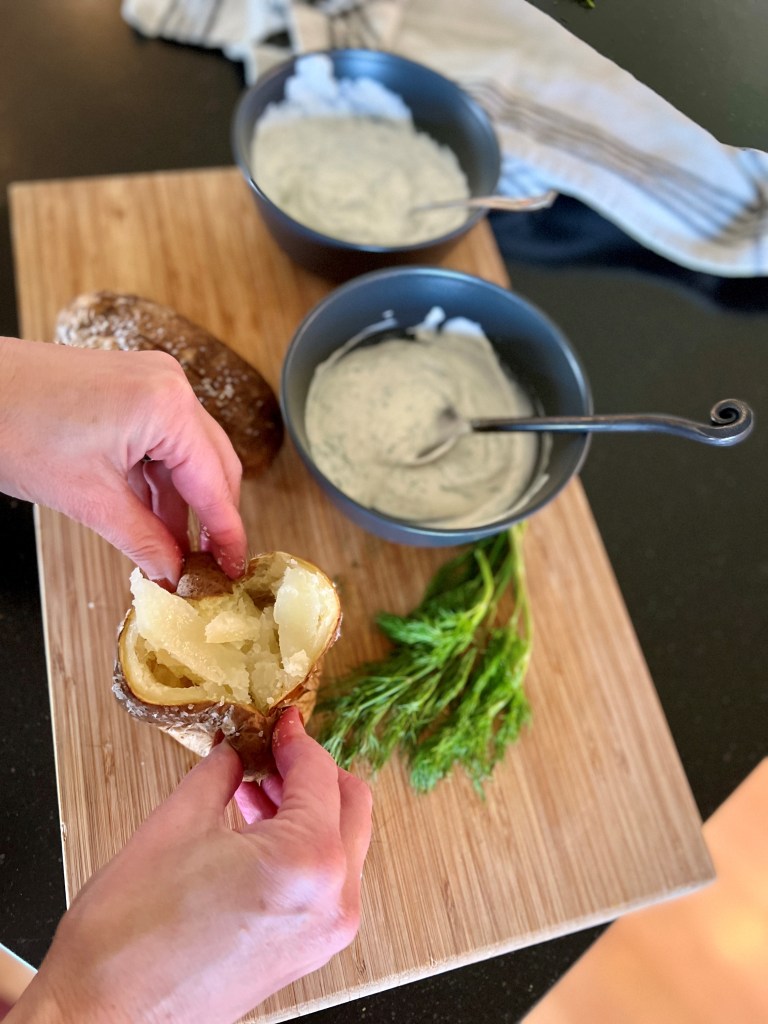
In the same way, one of my favorite things is to wrap my hands around a warm bowl of wintery food. Try filling your bowl with a fluffy, crusty baked potato. Ladle over rosy beets and broth. Pile on store-bought or homemade sauerkraut, full of beneficial immunity-boosting bacteria. Dollop on horseradish-laced sour cream. Embrace eating with the season.
Making the Deconstructed Borscht Bowl
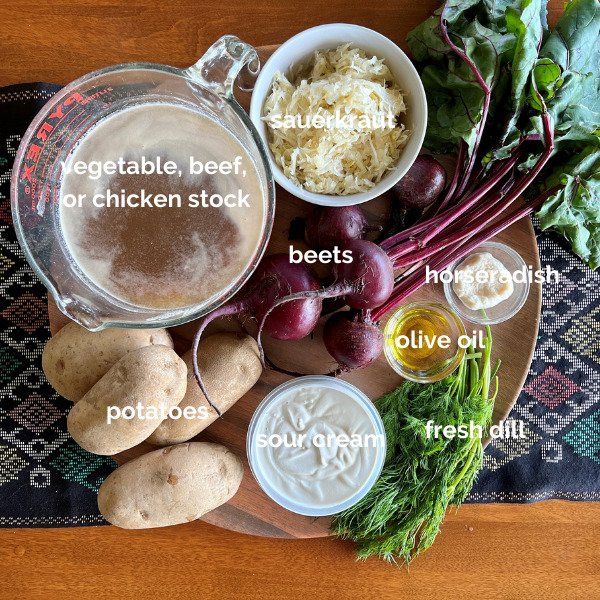
Ingredients you will need.
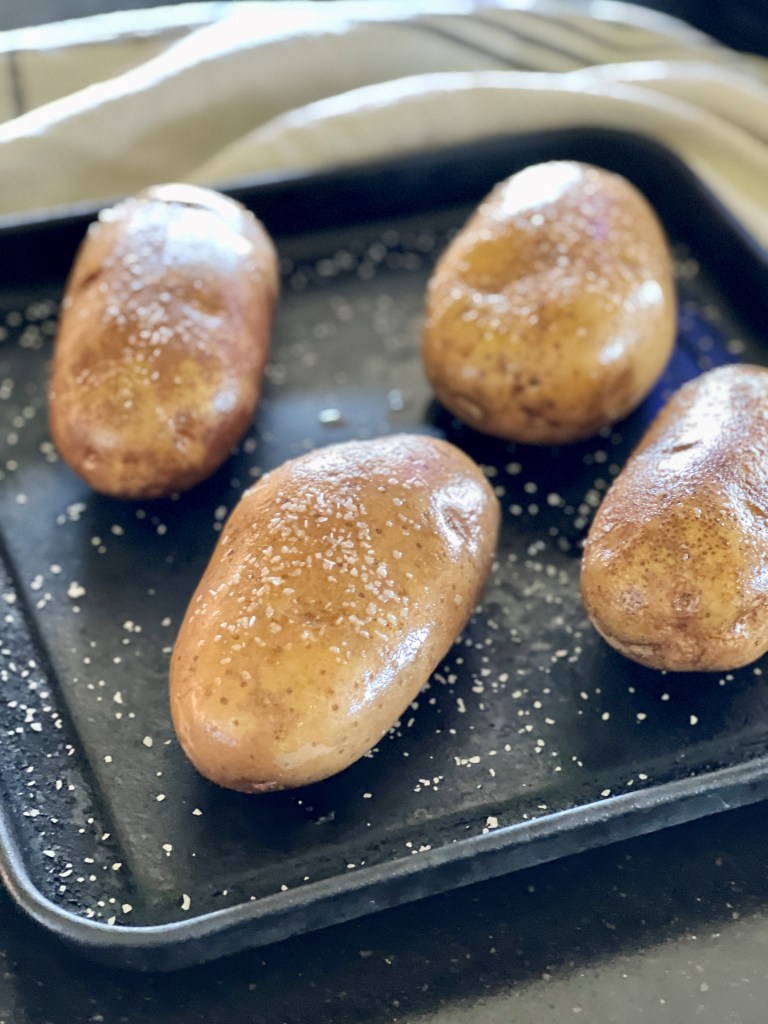
The crackly-skinned, fluff-filled baked potato in the bottom of the bowl adds heft and makes a good excuse to warm your space with the oven. Best of all, it mops up the delicious bright pink broth.
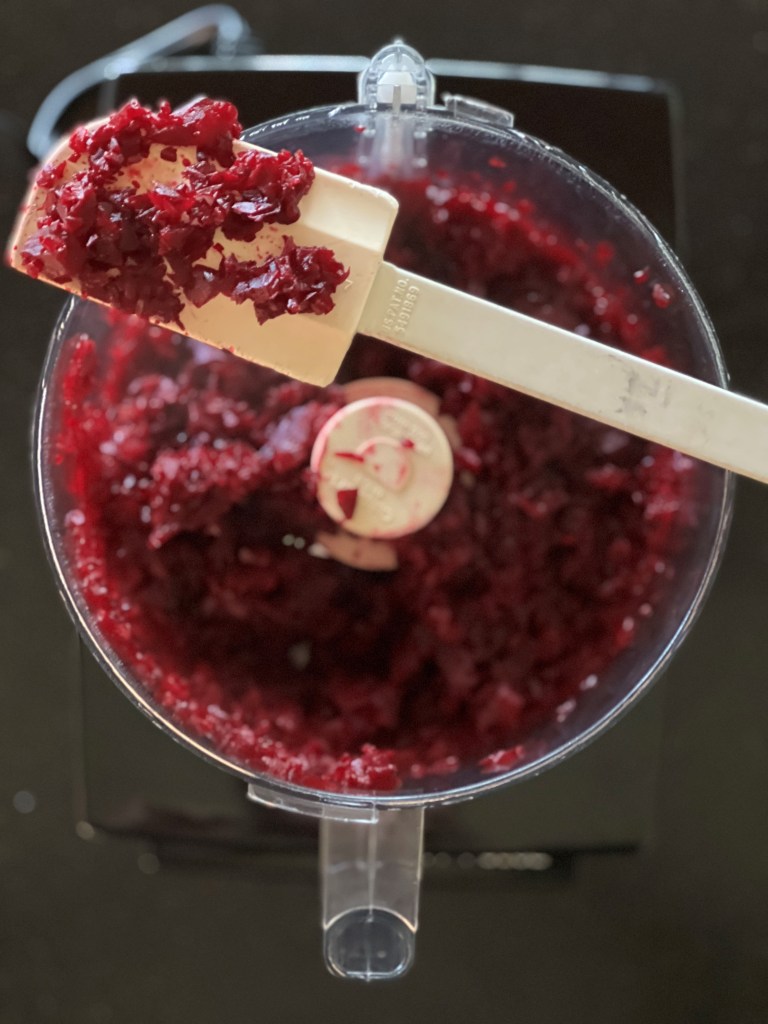
The beets and their broth are made quickly on the stovetop or in a pressure-cooker while the potatoes are baking.
The cabbage in this bowl comes in the form of sauerkraut-- either homemade or store-bought. Fermented foods are so good for us! Pile it on and toast to your health!
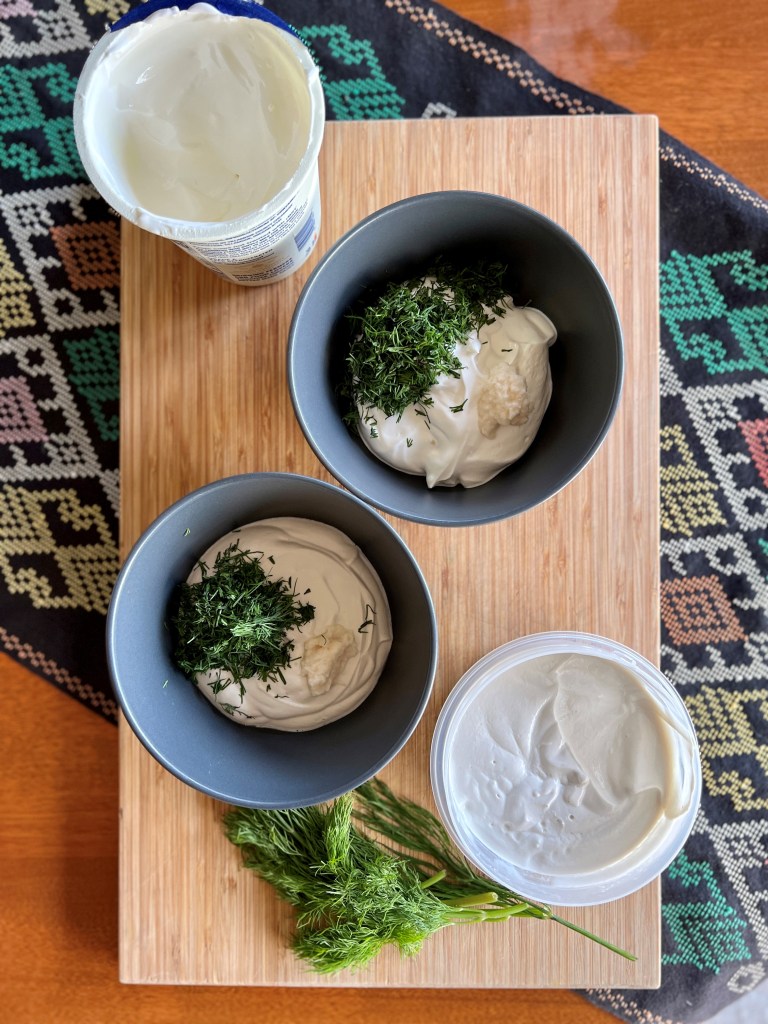
Finally, we stir some horseradish, freshly grated or prepared, into some sour cream along with a lot of fresh dill to dollop over the Borscht Bowl, and give it a snowy dusting of dill over the top. Yes, please.
How the Deconstructed Borscht Bowl comes together: Bake potatoes until crisp outside, fluffy inside; Mince cooked beets to add to simmering broth; House divided! Add horseradish and chopped dill to both dairy and cashew sour creams here!; Pop open potato, put it in bowl, top with ladles of hot beets and broth, top with herbed sour cream and sauerkraut; Viola!
Deconstructed Borscht Bowl is inspired by Eastern European borscht made of beet, potato, cabbage, sour cream and dill. Here, we just arrange the winter vegetable components into a bowl for a hearty warming winter meal.
5cupsvegetable, beef, or chicken stockhomemade, purchased, or made from bouillon
1 ½poundsbeets, cooked and peeled
2cupssauerkraut, homemade or purchased
8ouncessour cream or cashew sour cream (recipe below)for dairy-free/vegan option
2-3teaspoonshorseradish, freshly grated or prepared
1/2 cupchopped fresh dill, packed
salt + pepper to taste
Cashew Sour Cream
1cupraw cashew pieces (no need for the more expensive whole nuts here)Where available, Trader Joe's is a good source for most nuts, including cashews.
½cupwater
2½Tbsp.lemon juice or apple cider vinegar, or a mix of both
½tsp. salt
Instructions
Deconstructed Borscht Bowl
Preheat oven to 400°. Rub the potatoes with olive oil and place them on a baking sheet. Sprinkle them with coarse salt, and with a sharp knife, cut a 2"-3" slit in the top of each potato. Roast until a knife inserted into the center offers no resistance and they give in to a little squeeze. Depending on your oven, this may take 40 minutes to an hour.
Bring the stock to a simmer in a large saucepan. Cut the beets into chunks and pulse them 12-15 times in a food processor to a fine irregular mince. Stir the minced beets into the simmering stock. Taste for salt and add more to the broth if needed, along with some freshly cracked black pepper. Squeeze most of the brine from the sauerkraut and gently warm it in a microwave oven or small saucepan. Stir together the sour cream or cashew sour cream, horseradish to taste, and most of the dill, reserving some dill for garnish.
Place each potato into its own wide bowl, and crack it open along its slit by pinching the potato together and toward the center like a Chinese fortune teller (cootie catcher.) Ladle the hot beets and broth over each potato. Place a big dollop of herbed sour cream on the potato. Pile on the sauerkraut, and garnish with the remaining dill. Serve piping hot.
Cashew Sour Cream
Cover cashews in boiling water and soak at least one hour up to overnight, and drain, OR (my favorite method) place the cashews and cover with water in an electric pressure cooker and cook on high for 8 minutes. Allow to cool, and drain.
Place the drained cashews the lemon juice and/or apple cider vinegar, and salt in a blender. Blend on high until it is completely smooth, scraping down the sides often. Taste for sourness, and add more lemon juice/apple cider vinegar to taste. Store in the refrigerator. Cashew sour cream will thicken as it chills. It will keep in your fridge about one week, and it can also be frozen. Stir well between uses. Makes about 14 ounces.
Are you ready for a true confession?
I rarely cook from a recipe. The first time I made this Pumpkin + Homemade Chicken Sausage Pasta there was no script. I tell you this so you understand my process of getting a recipe from my brain to your screen-- one that I know will work for you at home and that you can trust. A recipe that will hopefully make it onto your table.
How an Idea Becomes a Recipe
A new recipe concept starts with thinking and dreaming about the flavors, colors, scents, and textures of ingredients. This work happens when I'm asleep and when I'm awake-- all the time! All that I have learned in over 50 years of cooking and eating informs how a new recipe idea comes together.
Step One
Intuition led the way when I first made this marigold Pumpkin + Homemade Chicken Sausage Pasta, like with most things I cook. I found it warm and comforting. It was delicious enough to share, and didn't take a fortnight to make, and so on to trial number two.
Step Two
The second run is where I pay keen attention to quantities, timing, and cooking nuances you might want to know that will ensure success. Paper and pen are right next to me noting details as I work it through. At this stage I ask myself some hard questions: Is this really the kind of recipe you might want. Does this recipe create a solution for you? Will it delight you and your family and guests? Is it a thing you might really make at home? How can I instill confidence and cheerlead you through the steps?
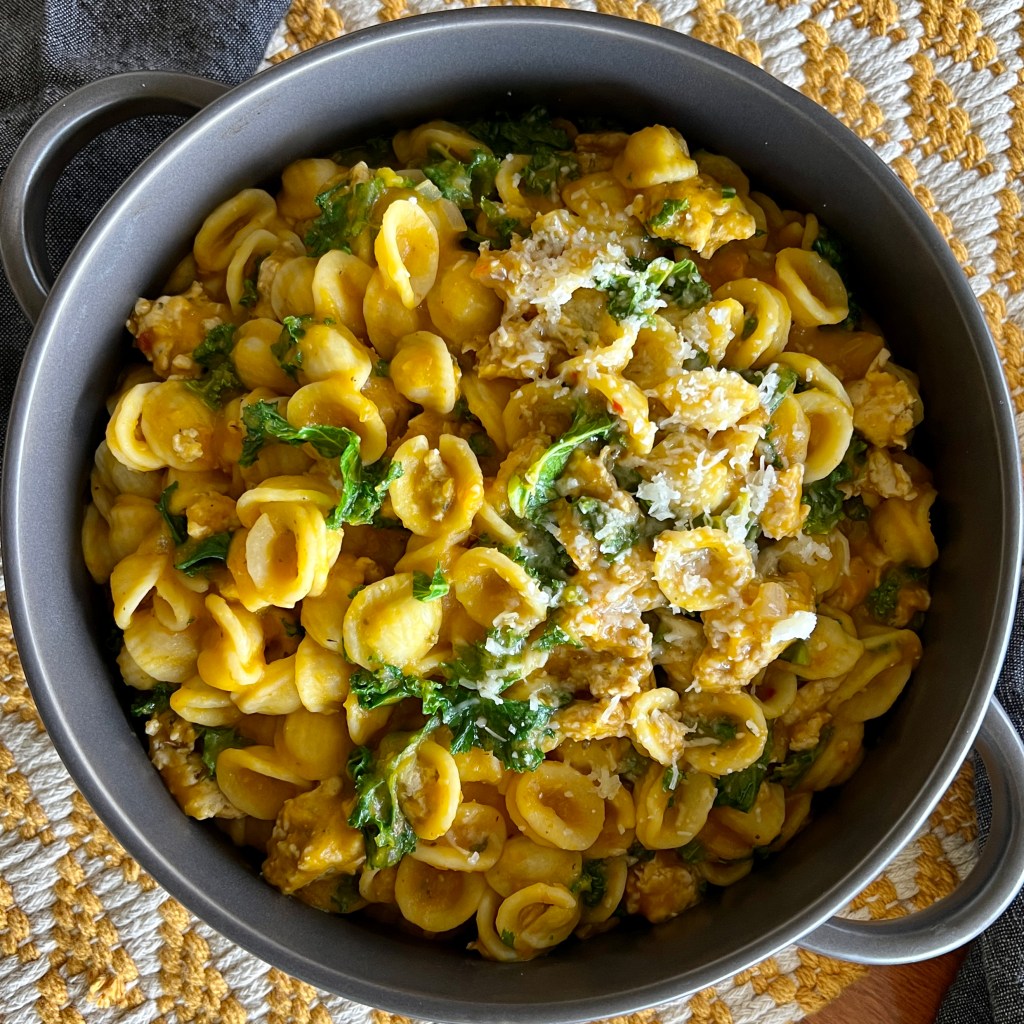
Pumpkin + Homemade Chicken Sausage Orecchiette
Step Three
When I agreed with my initial idea that you might really like this recipe, I moved on to a third Pumpkin + Chicken Sausage Pasta trial. Once again I prepare the recipe again from my notes, writing down any new thoughts or learnings that come. This is the step where I photograph the process using natural light and no filters-- no spin or tricks. Then off I go to write up the recipe in standard format for you.
Lastly and most importantly, I invite your feedback. If a recipe step is unclear, if there is something that you loved or that didn't go right, or if you have an idea that you tried that made it even better, I'm all ears! Please email me at pam@101milekitchen.com. I warmly welcome your comments on the post, too. Every time you leave a star rating on the recipe you help others find it through the Google maze. I value that, as well. In short, you are at the center of my work.
Making the Pumpkin + Homemade Chicken Sausage Pasta
Please don't let the idea of making sausage intimidate you. It is as fast and easy as adding a few herbs and spices to some purchased ground meat. Try it with ground pork or turkey if you prefer. I just happen to like the lightness of the chicken with this ample portion of pasta. Casings or fancy techniques are not called upon. This particular spice blend was borrowed from a recipe I wrote about years ago.
The sausage recipe is versatile. Roll it into meatballs. Brown it and use it on pizza, salad or in other pastas. Form it into patties to snuggle into a bun or next to your breakfast eggs.
Pumpkin puree is easy to do at home. Click here for link to a Facebook Live video of me explaining the easy process of making pumpkin puree from scratch. Laugh along with me at my very first and awkward Facebook Live tutorial! However, feel free to use canned pumpkin puree if that works best for you. The recipe uses two cans of solid-pack pumpkin puree (just one if you want to cut the recipe in half.) Recipes that aren't scaled to use an entire can of something that will otherwise go to waste are simply annoying.
Wine Pairing with Pumpkin + Chicken Sausage Pasta
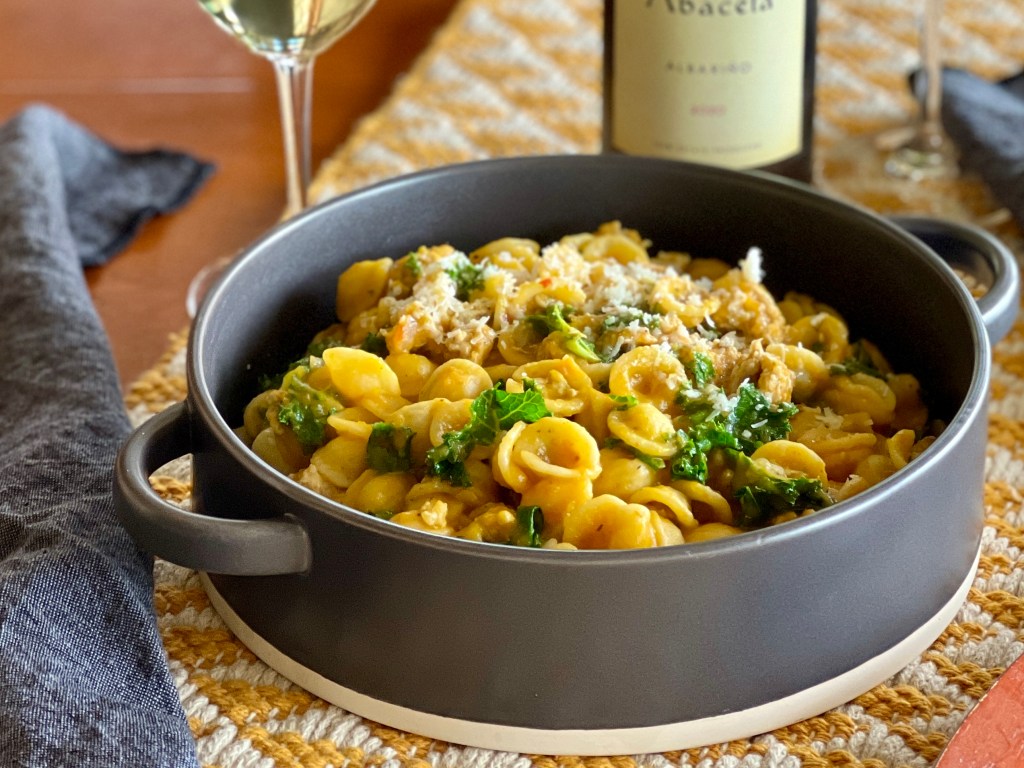
When you are looking for a wine-friendly autumn dish, Pumpkin + Homemade Chicken Sausage is it. A light Italian or Rhone red would be lovely, or any number of dry white wines. Award-winning Abacela Albarino 2020 from Oregon's Umpqua Valley is just lovely with the dish. You'll find this light and dry Albarino with no residual sugar and just 13% alcohol, to be a beautifully complimentary weight for this lighter pasta. Fresh fruit and floral aromas and a nice acidity bring the experience into graceful balance.
1lb.orecchiette or other small pastause gluten free pasta if you choose
2Tbsp.olive oil
1largeshallot, minced
3cupspumpkin puree (two 15 oz. cans)
½cupdry white wine
1bunchcurly or lacinato kale, large ribs removed, chopped into 1" pieces
salt + pepper to taste
Instructions
Make the Sausage
Crumble the ground chicken into a mixing bowl. In a small bowl, mix remaining herbs and spices. Sprinkly the herbs and spices over the ground chicken and drizzle with the olive oil. Rinse your hands in cold water and gently knead the spices into the ground chicken until thoroughly combined. Set aside.
Make the Pasta and Sauce
Put a large pot of generously salted water on to boil for the pasta. While the water comes to a boil, in a wide pan brown the sausage mixture in olive oil-- enough to cover the bottom of the pan. Stir frequently, breaking up the sausage into bite-sized bits. This should take 6-8 minutes. Remove cooked sausage and juices to a plate and set aside.
In the same wide pan heat another swirl of olive oil. Saute the minced shallot in the olive oil until tender and translucent, about 3 minutes. Add the pumpkin, white wine, and salt to taste. Stir together and heat until gently bubbling.
When the water is boiling, add the pasta and cook according to package directions. This may happen before or after the pumpkin mixture has come together.
When the pasta is cooked al dente (it will finish cooking in the sauce, so don't overcook it!) reserve 2 cups of the pasta cooking water and drain the pasta. (Don't forget this step, as it helps make a beautiful silky sauce!) Drain the pasta and return it to its cooking pot.
Add the chopped kale and cooked sausage and its juices back into the pan with the pumpkin mixture and stir in one cup of the pasta water. Scrape the sausage/pumpkin mixture into the cooked pasta and stir. Add enough more of the reserved pasta water to create a smooth, silky sauce that evenly coats the pasta. The pasta will continue to absorb the liquid, so be generous. Adjust salt and pepper. Serve in a large serving dish or in individual pasta bowls.
Notes
It is conceivable to garnish this dish with grated Parmesan or Romano cheese, however my cheese-loving husband says this is the "cheesiest pasta with no cheese" he's ever eaten! Omitting it makes the dish dairy-free. If you'd prefer, you can use store-bought hot Italian chicken sausage, but this is such an easy and delicious sausage recipe I do hope you'll give it a try.
This recipe is designed for a very special group of people who started out as neighbors and became dear friends. Ever since we moved to the 101-Mile Kitchen we gather frequently to relax, shoot the breeze, eat and drink. This recipe is a thank you to these amazing souls who have kept my heart from drooping during the last 20 months of living in an upside down world, and to the universe for putting us in each other's paths.
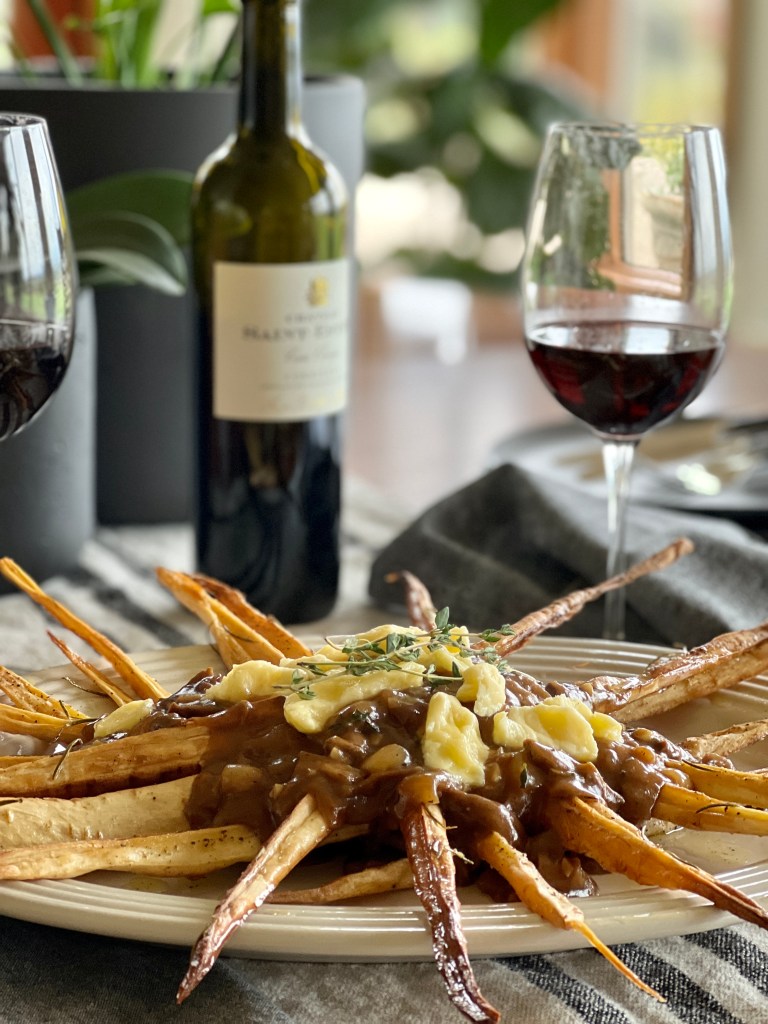
Besides being funny, smart, and caring, our neighbors all enjoy cooking great food and drinking nice wine. (There might be a splash of bourbon here and there, too.) Sometimes we have a full-on meal, but most often we meet over easy noshes, charcuterie, spreads and dips, and casual dishes. I can't wait to make this poutine for them.
What is the Best Pairing?
While it makes a terrific main course at its heart poutine is bar food and doesn't need a precious pairing. I'd suggest a Southern Rhone style blend. This time I served the poutine with a very inexpensive ($13) 2017 Château Saint-Estève Cuvée Classique Corbières Rouge-- a nice old world 60% Grenache- 40% Syrah blend. It is lively, with whispers of herbs and deep fruit that compliment the umami and herbal flavors in the gravy.
Of course most ales and beers are also delightful with poutine.
Making the Poutine + Gravy
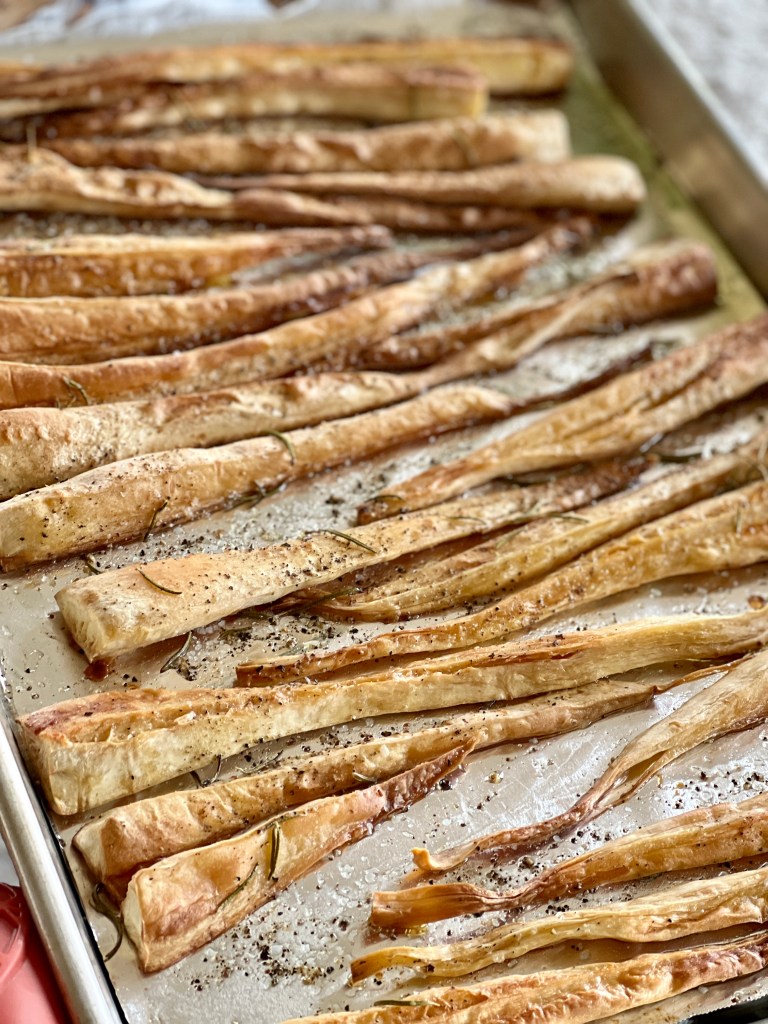
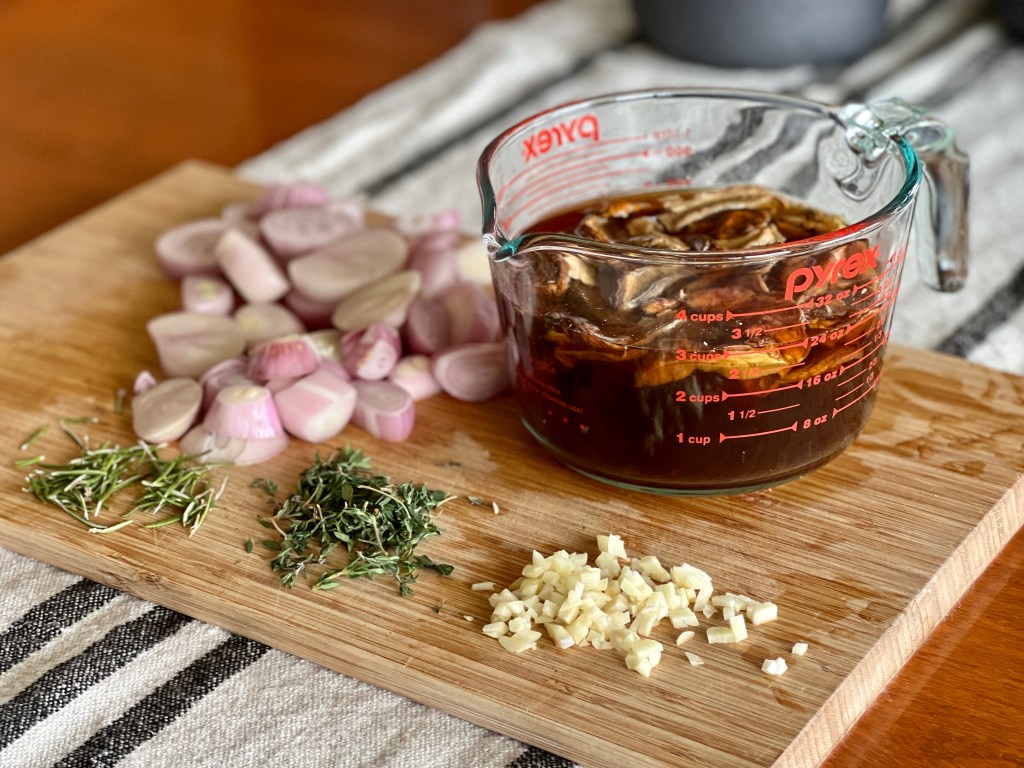
Parsnip Poutine + Rich Mushroom Gravy is another of those one-hour wonders. It takes maybe ten minutes to prep the ingredients, 16 minutes in the oven to get the parsnips on their tender and crunchy way while the mushrooms rehydrate, and another 15 or 20 minutes to make the gravy while the parsnips are finishing off. A foil-lined sheet pan, a large pan, a knife, and a bowl are the only tools used so clean-up is speedy.
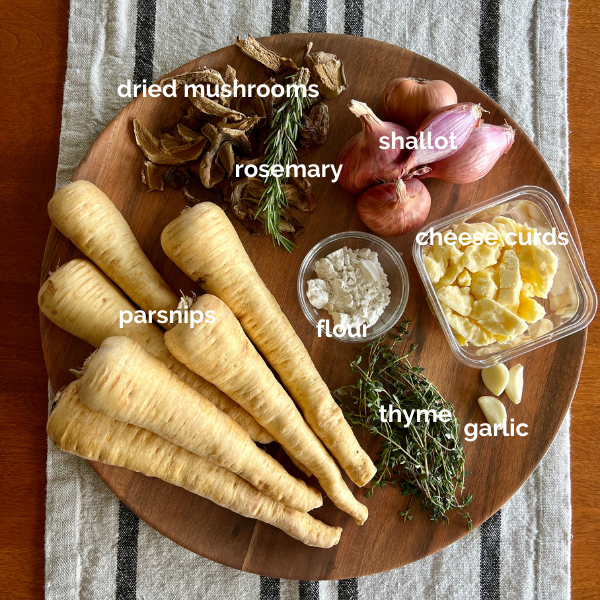
Parsnips and shallots grow just about anywhere, so they should fit in to most people's imaginary 101-mile sourcing radius. You can find dried Porcini mushrooms at many groceries and online. My favorite source is Pistol River Mushroom Farm in Southern Oregon. Dried mushrooms seem expensive until you realize that one ounce of dried mushrooms is equal to 8 ounces of fresh. The dark color of the soaking liquid becomes the intensely flavored broth for the gravy-- something a fresh mushroom just can't do.
As an aside, tuck this mushroom gravy recipe away to use in many other ways. I can't wait to ladle it onto a split and fluffed baked potato one cold winter's day.
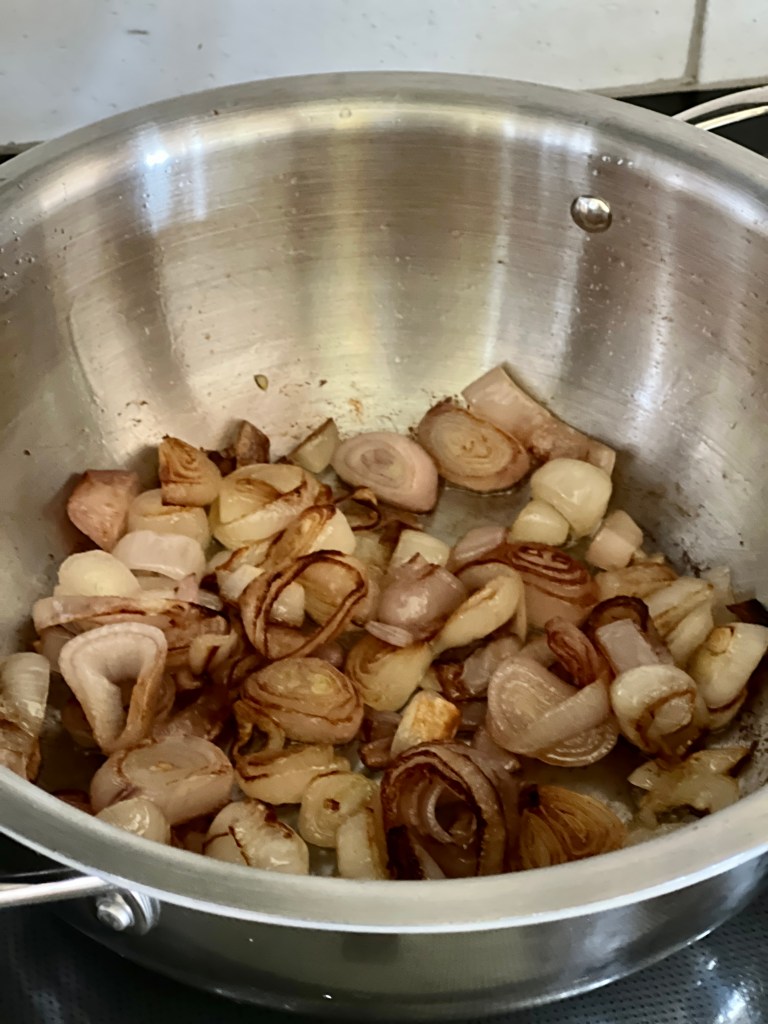
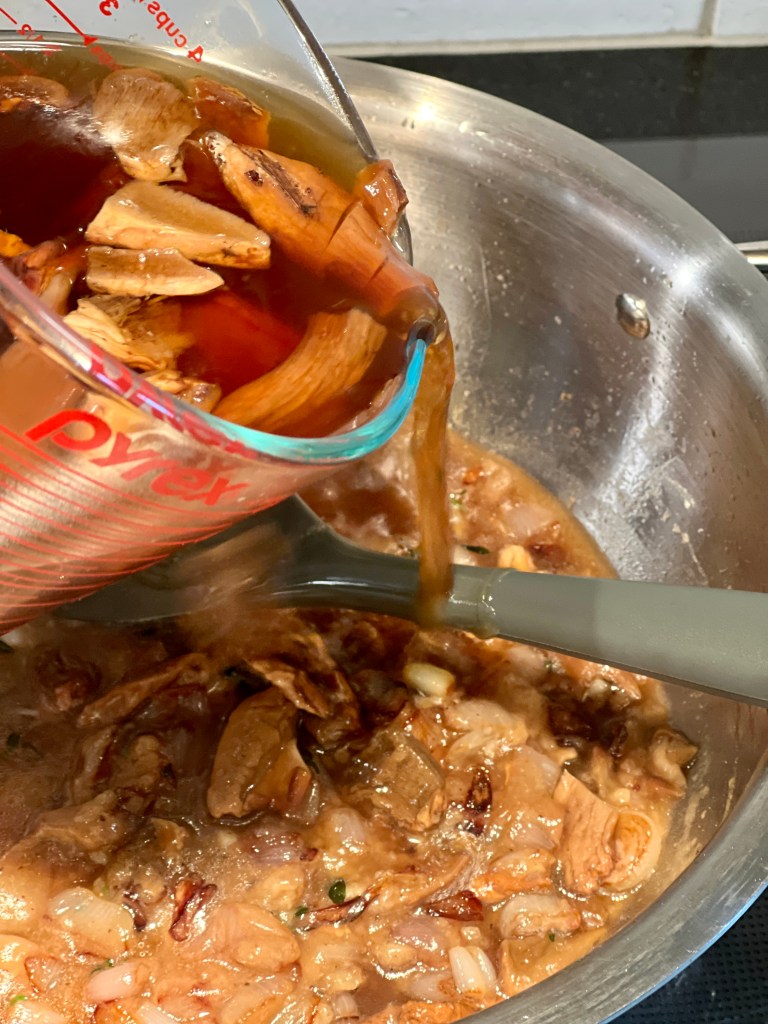
The parsnips roast, the mushrooms soak and the shallots, garlic, and herbs are prepped; caramelizing the shallots; the mushrooms and their soaking water go into the gravy; everything is plated and topped with cheese curds.
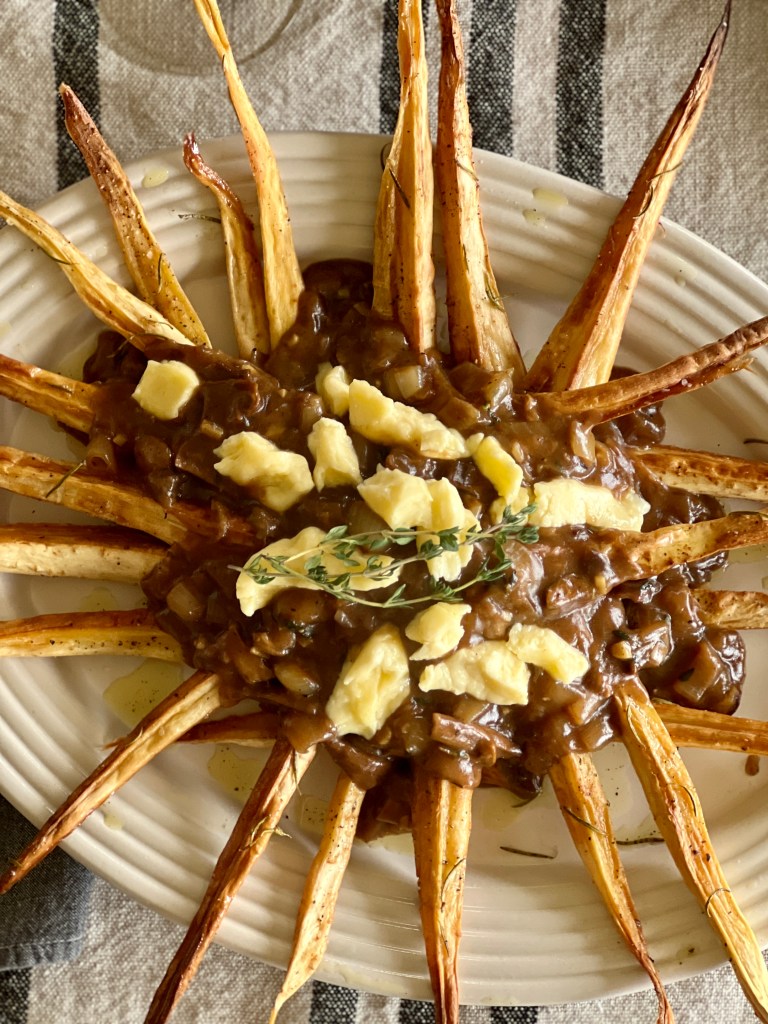
You'd never know there was no meat in this rich silky poutine gravy, and the crunchy, chewy roasted parsnips take it to new but familiar places. A fantastic main or "bar food" course for vegans and omnivores alike.
1 oz.dried porcini mushrooms, or other dried cooking mushroom
12oz.shallot, approximately 4 large peeled and sliced ½" thick
3clovesgarlic, minced
2tablespoonsfresh thyme leaves, plus more for garnish
2½tablespoonsGF One-for-One flour, rice flour, or all-purpose flour
salt and pepper
¼lb.cheese curds, or goat cheese
Instructions
For the Parsnips
Preheat the oven to 400° convection and line a baking sheet with foil.
Trim and peel the parsnips. Quarter them lengthwise, and if they are especially thick, cut them again into eighths. Lay them out on the foil lined baking sheet, and drizzle them generously with olive oil. Toss them with your hands to evenly cover them in the olive oil, and spread them out flat at much as possible. Sprinkle them lightly with salt and black pepper. Bake for 16 minutes, and them flip them over. Reduce the oven heat to 350°. Sprinkle again with salt and pepper, and drizzle olive oil on any parts that look parched. Sprinkle the rosemary leaves over the parsnips and return to the oven for another 16-20 minutes. Check them often for doneness-- the thick tops will be browned and tender, the thin ends will be well browned and somewhat crispy.
For the Mushroom Shallot Gravy
As soon as the parsnips are in the oven, place the dried porcini in a 4-cup measuring cup or bowl, and cover with hot tap water to the 3-cup mark. Set aside.
Heat enough olive oil over medium-high heat to generously cover the bottom of a sauteuse or large pan. Slide in the sliced shallots and leave without turning until the bottoms are browned. Stir, flipping them over, and again allow them to brown. After the first ten minutes add the minced garlic, thyme, and a 4-finger pinch of salt. Continue the browning process until the shallots are completely tender but not mushy, and have a good amount of browned caramelization throughout.
Stir in the flour, and continuously stir until the flour is well incorporated and beginning to stick to the pan. Stir for about three minutes.
Gradually ladle in the soaked mushrooms and their dark brown soaking liquid, stirring between ladlefuls, until it it incorporated. You will see the gravy begin to thicken immediately-- stir throughout this process to avoid any lumps.
Stirring frequently, bring the gravy to a boil, and add some more salt. There should be about one teaspoon total in the gravy, or to taste. Add a very generous amount of black pepper to season. Allow the gravy to bubble and thicken for about 6 minutes.
Bring it All Together
Arrange the roasted parsnips on a large warmed platter in a spiky spoke-like fashion. Ladle the hot gravy in the center. Arrange the cheese curds over the gravy, and top with a bunch of thyme for garnish. Serve while piping hot.
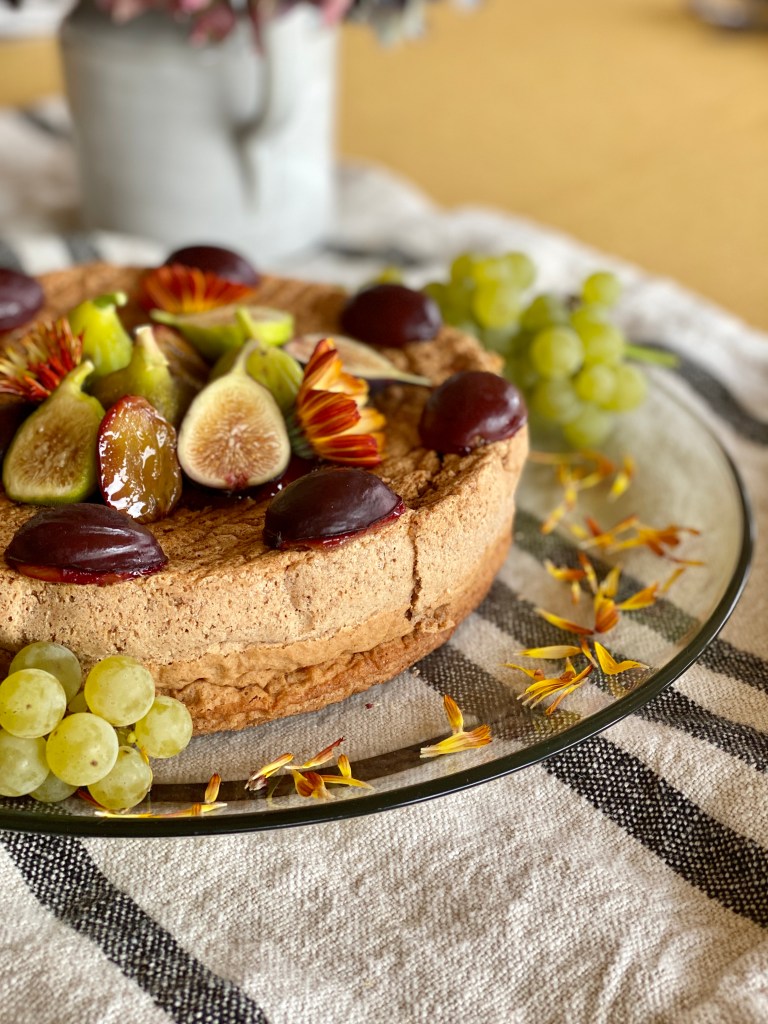
Flourless Walnut Spice Cake with Fall Fruits and Flowers
Rustic Cake at Its Very Best
In my calculus, a rustic cake has a short list of ingredients, an interesting texture, and most importantly is adorned very plainly-- a straightforward glaze, scoop of ice cream or whipped cream, a smatter of nuts or seasonal fruit is all it takes. This Flourless Walnut Cake and its coffee or spice versions deliver on a promise of simplicity.
What a cake like this misses in complexity is made up with a certain honesty. It's like the fresh rosy-cheeked girl in a calico dress that smells of clothesline sunshine.
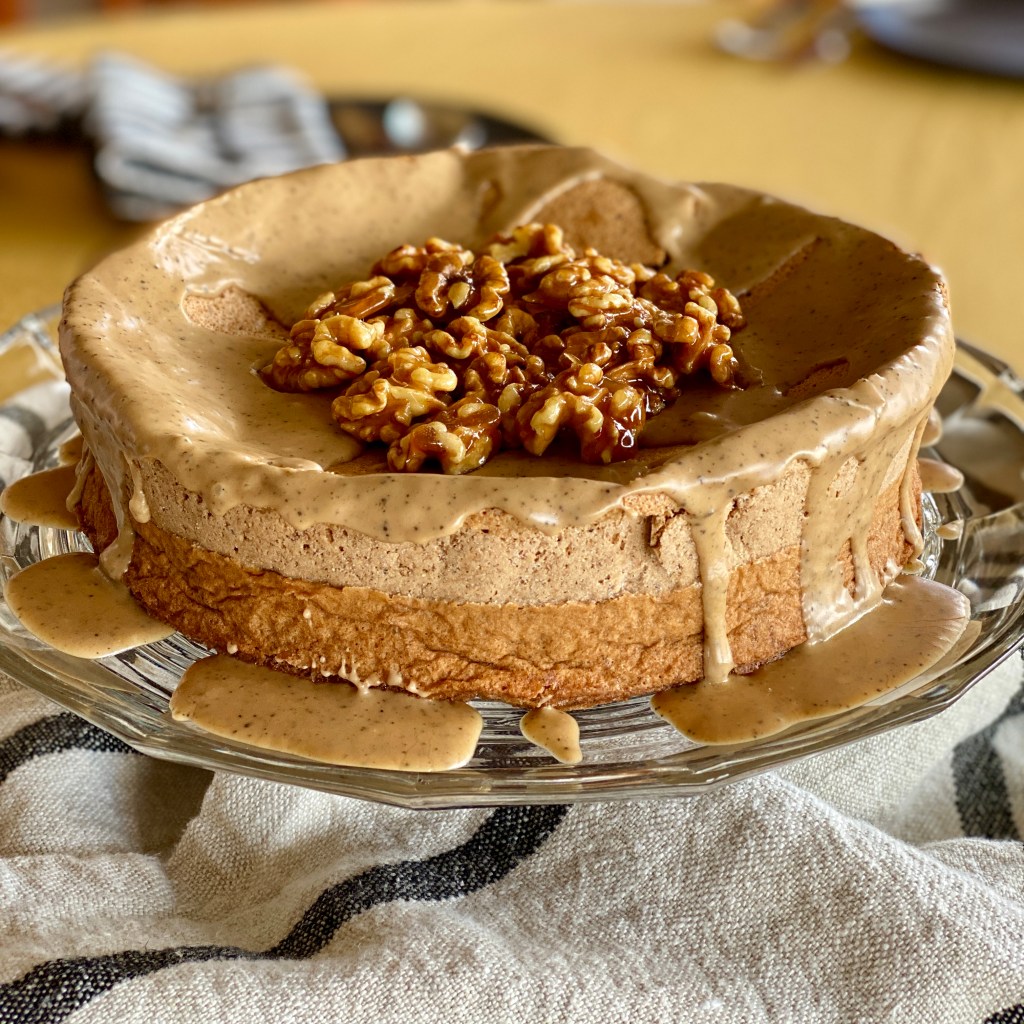
Flourless Coffee-Walnut Cake with Coffee Glaze and Candied Walnuts
Or, our flourless walnut cake is like filtering your way through a crowded party, and meeting a gentle-souled person standing in the corner with whom to while the evening away.
Uncomplicated joy.
Multi-tiered, colorful swooped, swirled, and filagree-frosted cakes sometimes disappoint on the part that really matters-- flavor. With flourless walnut cake or its coffee or spice versions, what you see is what you get. The beauty is natural, not forced.
Making the Flourless Walnut Cake
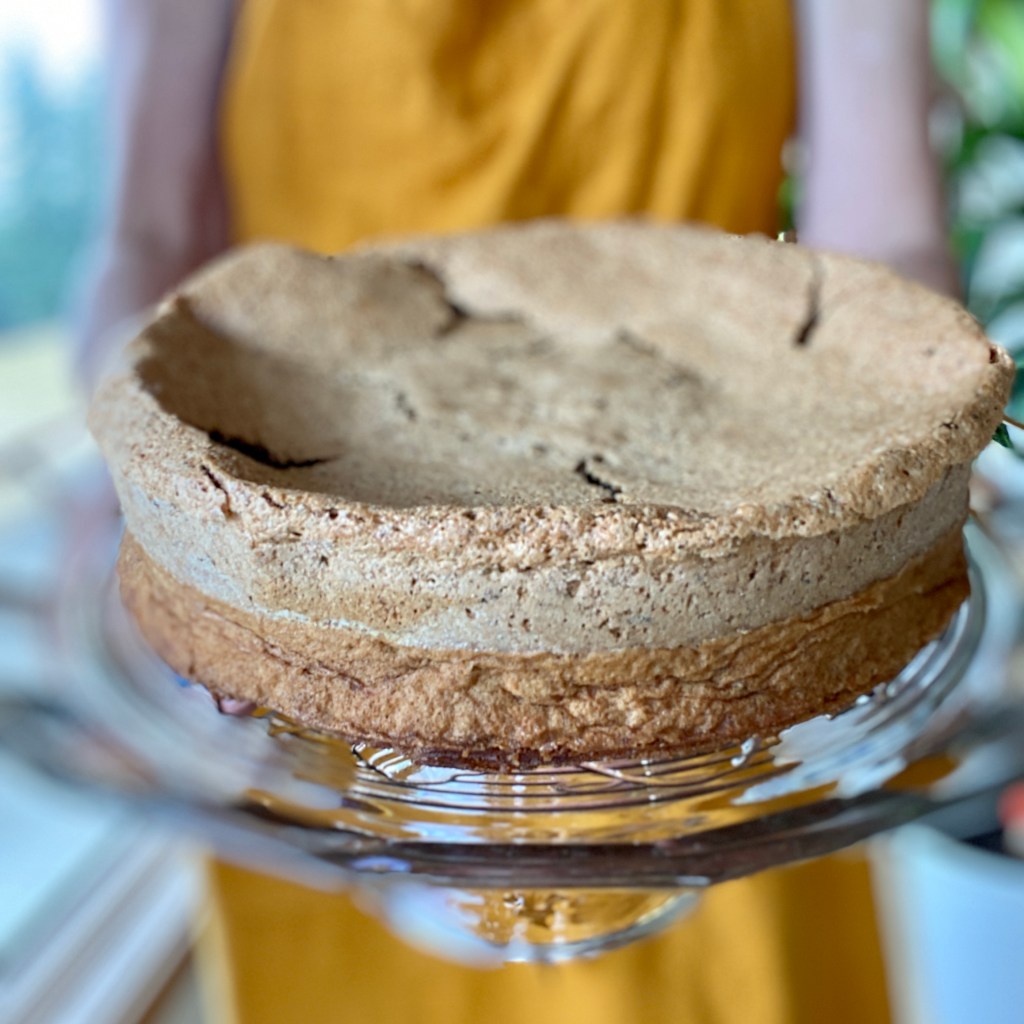
Flourless Coffee-Walnut Cake, fresh from the oven.
Starting with room temperature eggs, like with most baking, is imperative to the success of this recipe. Sugar simply cannot dissolve into cold yolks. Cold whites don't whip to their lofty heights. Here you spend a good deal of time building structure by dissolving sugar into yolks and stiffening the whites, so give yourself a guaranteed win by setting your eggs out in advance. (When I forget, I help the eggs warm up by placing them on a bowl of lukewarm water, changing it for more when it goes cold. Never try this with hot water or you make crack open a semi-cooked egg!)
Traditional recipes for this type of cake ask you to whip all of the whites into firm peaks at once. Here, I have you whip them to medium peaks at first, then add only a third of them to the yolk/sugar/nut mixture to lighten the batter. Then, you'll go back and whip the remaining two-thirds of the whites into firm stand-up-at-attention peaks before gently folding them into the batter. I have found this greatly increases the structure of the cake, resulting in a taller cake with less shrinkage when it comes out of the oven. Even though our dear little flourless walnut cakes are humble, they still like to make a good first impression.
If you chose, top either version with a pile of candied walnut halves, made the same way Sarah at Sustainable Cooks makes her pecans. The only difference is that I add 1 tablespoon water to the skillet along with the sugar. Make extra! Candied walnuts are great in salads or on a cheese platter, too.
Choose plain walnut, walnut spice or coffee-walnut variations with this one simple recipe.
Flourless Walnut cake is tender and delicious just as written, but the addition of coffee or baking spices takes it next level-- One recipe with three variations-- plain, Coffee, or Spice-- to suit your mood. Three primary ingredients, a few simple steps, and you'll have beautiful dessert cakes all winter.
2tablespoonsfinely ground coffee beans, plus 1 teaspoon for optional glaze
Coffee Glaze, Optional
3cupsconfectioners sugar
1teaspoonfinely ground coffee beans
5tablespoonswarm or hot strong brewed coffee
½teaspoonpure vanilla extract
Instructions
Flourless Walnut Cake
Preheat oven to 350°. Generously butter and flour (or use very finely ground walnuts) a 9-inch springform pan. Wrap the bottom of the pan with foil to catch any butter that melts out in the oven.
In a food processor, finely grind the walnuts. This will likely take only 8 -10 pulses. Stop just as they begin to clump. (Any further and you'll make walnut butter, not quite what we are after). Set the ground walnuts aside.
Separate the eggs, placing the yolks in the bowl of a stand mixer with the whip attachment. Beat the yolks with the sugar and salt 6-8 minutes until the mixture is fluffy and pale yellow. (You'll be glad you let your eggs come to room temperature for this-- the sugar more readily dissolves in eggs that are not cold.)
If you are making a plain flourless walnut cake, move on to step five. If you are making either a walnut-spice cake or a coffee flavored cake, add the spice mix or the finely ground coffee beans now and mix in thoroughly.
Remove the mixing bowl from the stand mixer and with a silicone or rubber spatula, fold the ground walnuts into the yolk mixture.
In a separate clean bowl free of any oils or grease, whip the egg whites, cream of tartar, and vanilla to medium peaks. (The cream of tartar helps stabilize the whipped egg whites.) Gently fold about a third of the egg whites into the walnut mixture. Then, whip the remaining egg whites once again until they just reach firm peaks. Fold them gently into the walnut mixture in two batches, folding until no more white streaks remain.
Place the cake batter into the prepared pan. Place the pan on a baking sheet. Bake for 40-50 minutes, or until the cake is puffed, set (not jiggly) in the middle, and a cake tester (I use a bamboo skewer for this) inserted in the middle comes out clean.
Allow the cake to cool in the pan about 20 minutes before removing the springform ring. The cake will have sunk in the center and formed charming cracks and crags, perfectly normal for this rustic meringue-style cake.
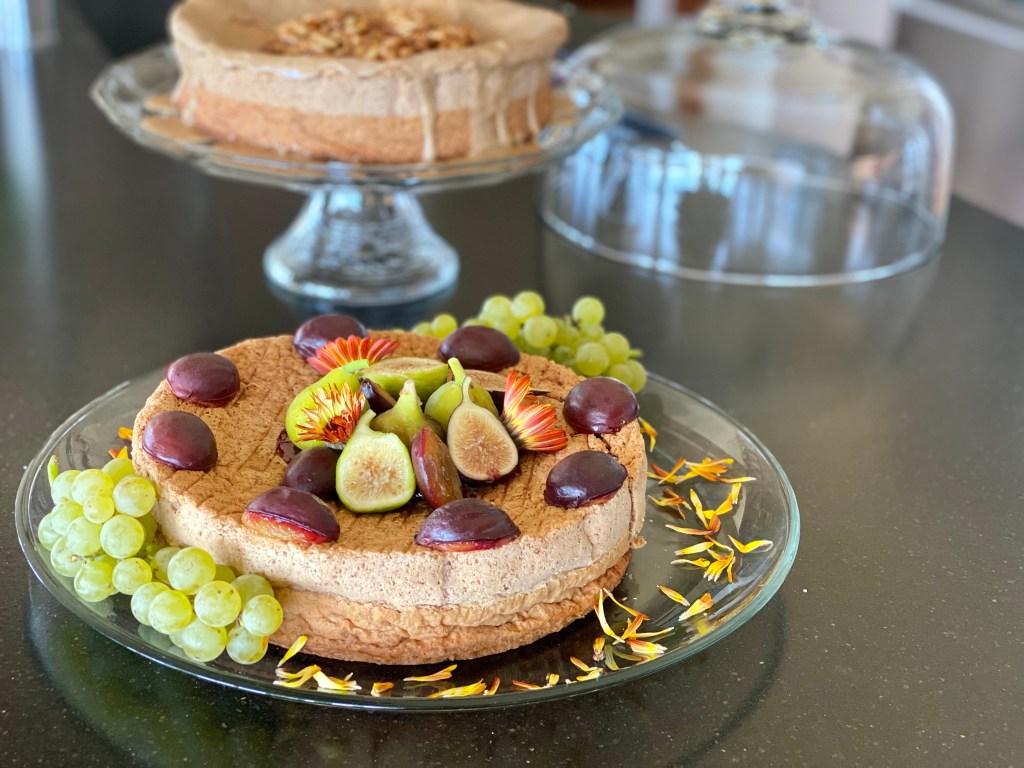
Decorate with seasonal fruits, a dusting a powdered sugar, or the coffee glaze below. Seve with whipped cream.
Coffee Glaze
Place the sugar in a medium mixing bowl. Add the vanilla and coffee, tablespoon at a time, and whisk until a glaze forms. It should cling to the whisk and drip off in thick long ribbons. Adjust by adding more powdered sugar or water to make it thicker or thinner. Drizzle the glaze from the whisk around the edges of the cake, allowing some to flow toward the center of the cake and some to drip off the edges. Allow the glaze to set for an hour before covering or serving.
Notes
To make the Coffee Glaze a Spice Glaze, replace the ground coffee with one teaspoon of the same spice blend you use in the cake, and replace the brewed coffee with warm or hot water.Garnish the spice cake with fresh fig halves, lightly roasted (6 minutes at 350, just to soften) plum prunes, tiny grape clusters, and/or unsprayed organic food-safe flowers or flower petals.
Soup as Your Secret Weapon
In case you haven't noticed, the world really needs us right now. The paradigm-looting pandemic isn't over. Differing points of view are dividing friends and neighbors when we aren't paying attention. It's as though the collective pulse is slow, the heartbeat is going quiet. Bold acts of friendship are as important as they ever were.
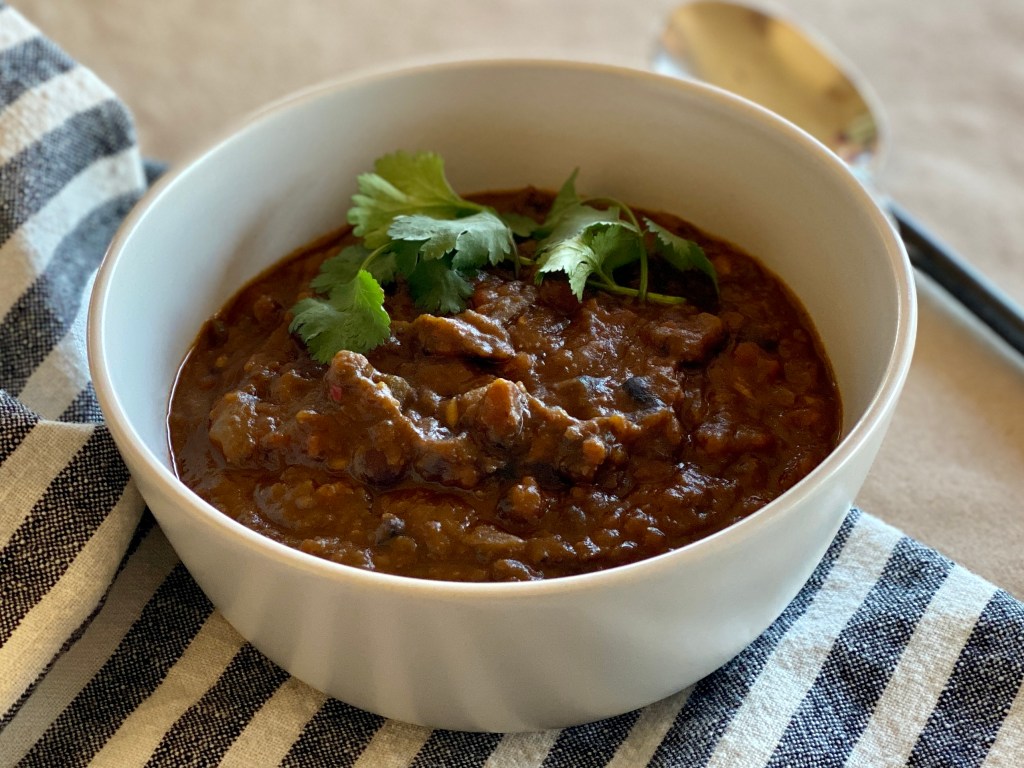
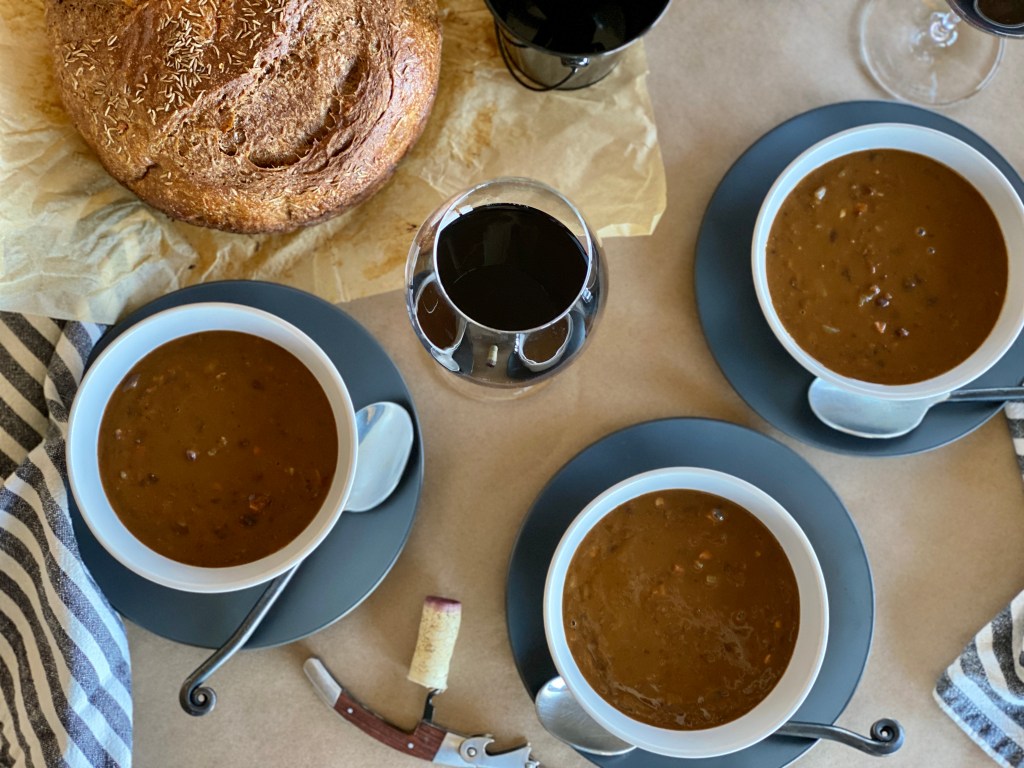
Lean in and let Pumpkin Black Bean Soup be one of your secret weapons in the defense of friendship.
Lean In, Full and Strong
I've found that leaning in to my loved ones and community happens best when I first make my own self full and strong. Now is the time to follow the pilot's directions. "Ladies and gentlemen, should the cabin lose pressure, oxygen masks will drop from the overhead area. Please place the mask over your own mouth and nose before assisting others.”
Simply put, if I run out of oxygen I cannot assist someone else with gaining theirs. If I'm gasping for air I am fairly useless in creating a safer, happier, nourishing place for others.
In this season known for its comfort food, let us remember this for ourselves. Eat reviving foods, feed ourselves well. Warm, spicy, hearty things that nourish not just our bodies, but our eyes and hearts and imaginations. And then share it with others out of our own fullness.
Make More Bean Soup Joy
Pumpkin Black Bean Soup is a stealthy way to make more joy. Make more festivity for Halloween night supper. Make more personal success-- image your game-day touchdown by sharing this big pot of soup with loved ones. Or make this soup as an easy dinner party with whoever it is that makes up your pod these days.
Or in support to yourself, make the whole big pot and parcel out 2-cup portions for your freezer. That way you'll always be fueled for your loving, life-giving actions even when you don't feel like cooking. The joyfully act of making the soup itself is a beautiful life-giver.
More About Pumpkin Black Bean Soup
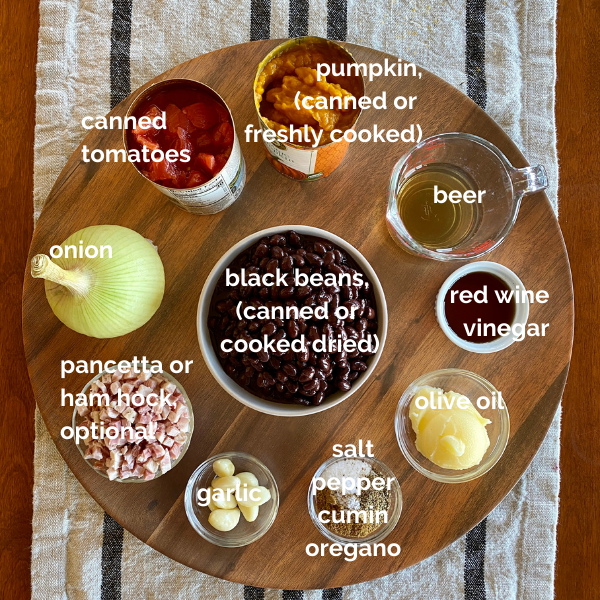
Put together this rich and fragrant rusty-brown soup in a flash with canned ingredients from your pantry, or with dried black beans you cook yourself. (Beans from Rancho Gordo are the best ever, and their Midnight Black Beans are perfect here.) Directions for the easy way and the beans-from-scratch way are included. I love it both ways, depending on the amount of time I've got to give. Click here for link to a Facebook Live video of me explaining the easy process of making pumpkin puree from scratch.
Make it vegan by omitting the ham hock or pancetta for another delicious way to go, even for committed meat-eaters.
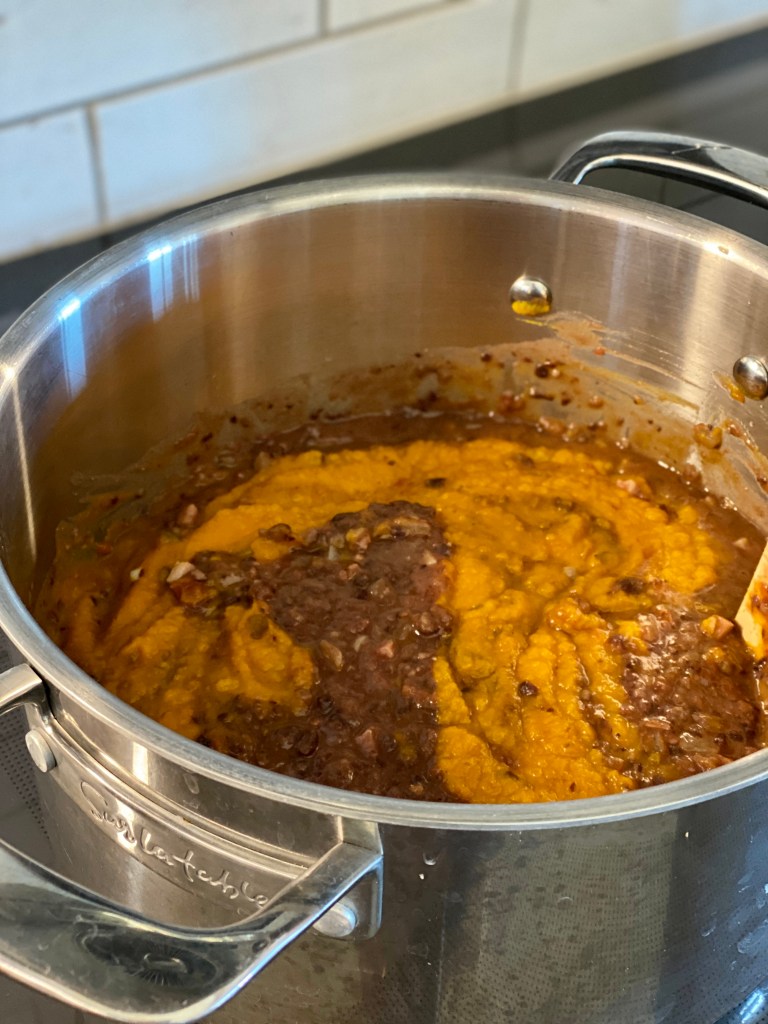
1. Saute onions, poblano, garlic, pancetta (optional,) and spices in olive oil. 2. Blend half the beans with the canned tomatoes until mostly smooth. 3. Stir in the blended beans and tomatoes, pumpkin, and beer. 4. Right before serving, stir in red wine vinegar. Serve topped with a little cilantro, green onion, and sour cream, if desired.
The aroma coming from the pot of this seasonal soup is so inviting and so comforting. Pumpkin gets a well-earned reprieve from its sugar and spice gig, making a happy marriage with the savory black beans and cumin. It really is the perfect thing for the chilly days ahead.
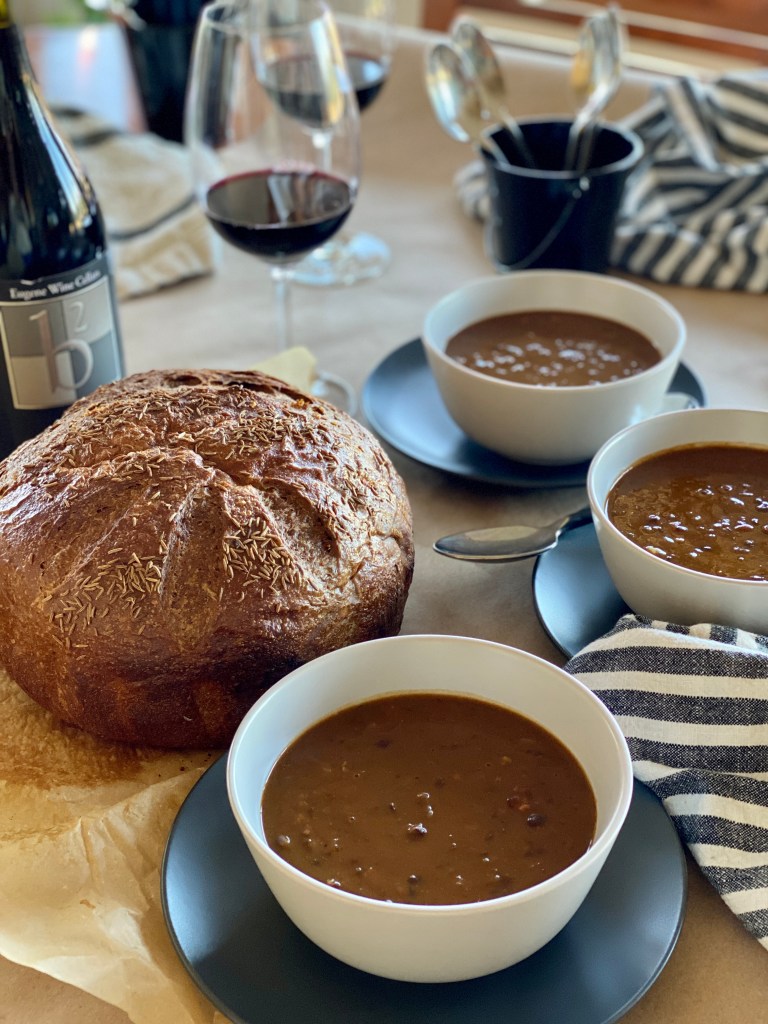
Oh, by the way, a perfect accompaniment to this warming soup is a huge loaf of Caraway Rye Black Bread. Together they make enough to feed a crowd of friends bent on making more joy, no matter what.
Comfort food at its best, let Pumpkin Black Bean Soup be your secret weapon in defense of friendship. Pumpkin gets a reprieve from sugar and spice in this happy marriage of savory black beans and cumin.
2-3 tablespoonsred wine vinegar, or to taste at the table
pumpkin seeds, cilantro, green onion, and/or sour cream as toppings
Instructions
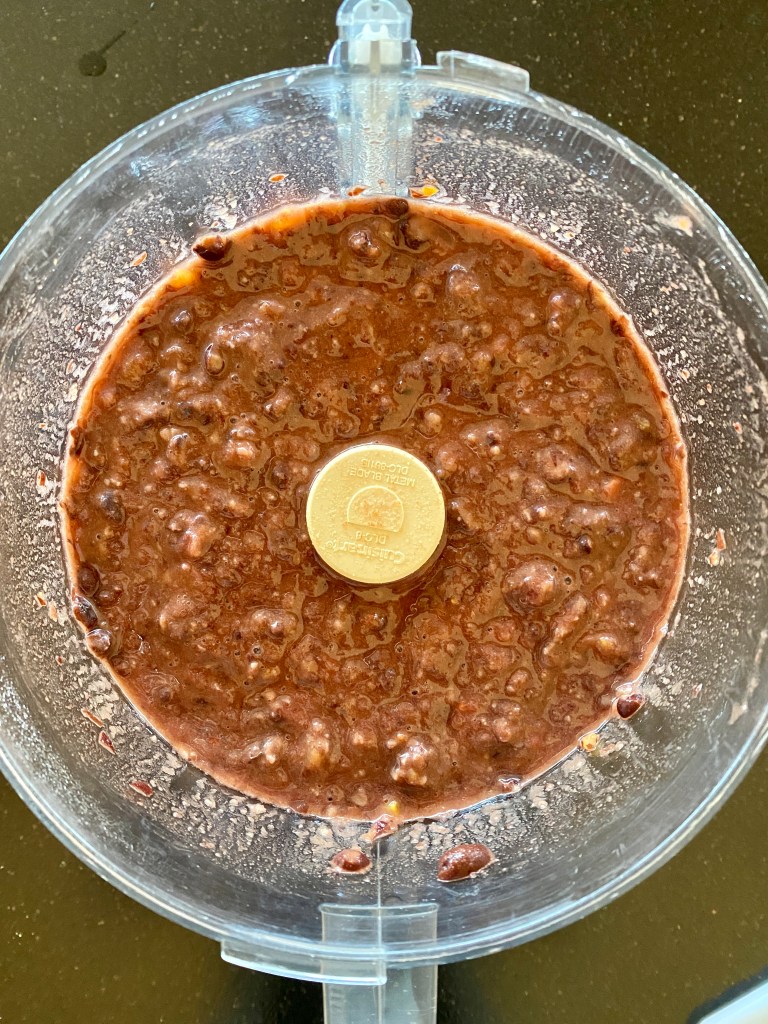
Blend together in a food processor half of the black beans and the canned tomatoes. Process until nearly smooth. Set aside.
Heat the olive oil in a large soup or stock pot to medium-high heat. Add the diced onions, poblano, garlic, pancetta (if using, salt, and pepper. Stir together, and allow the vegetables to thoroughly soften as the pancetta crisps up a bit, stirring frequently and adjusting heat to prevent them from browning, about 7 minutes. Add the cumin and Mexican oregano, stir, and allow to cook another 3 minutes or so.
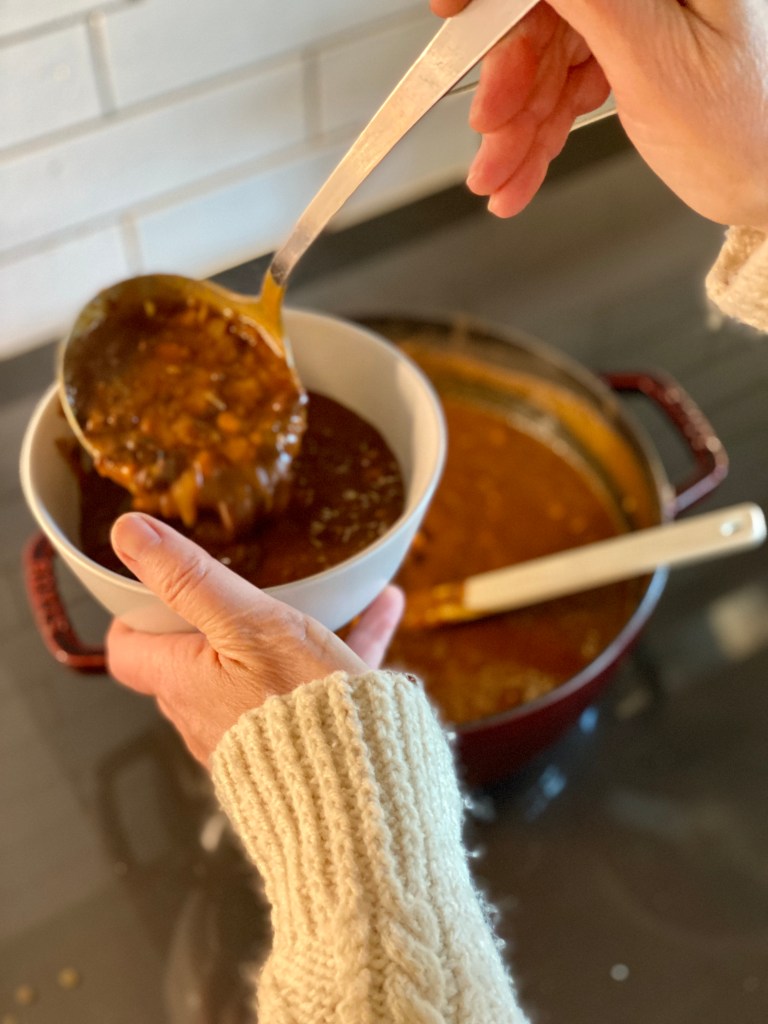
Add the blended bean/tomato mixture to the sauteed vegetables and stir. Stir in the pumpkin, and then stir in the water and stout (if using). Simmer and stir frequently for 20 minutes or so to slightly condense and thicken, and to let the flavors come together. Stir in the remaining whole beans and serve. If you are making this in advance of serving time, add the beans in the last five minutes before serving to they don't overcook and collapse.
Right before serving, stir in the vinegar and taste to adjust seasoning. Ladle into bowls, serve plain, or garnish with your favorite combination of topping ingredients.
Notes
For cooking the black beans from scratch:If you are cooking your black beans from their dried state, you can omit the pancetta and include a ham hock, which adds a lovely smoky flavor and a little smoked pork to the pot. For the vegan option, of course, do not add a hock.You'll need:
Soak the beans 4-6 hours covered by 2" in water. Place the beans and their soaking water (I think this preserves some color, flavor, and nutrients, but you may also drain the beans and start with fresh water) and the ham hocks (if using) in a pot large enough to cover by 2" of water. Bring to a rolling boil for five minutes. Reduce heat to low and simmer for 1-2 hours, with a lid set ajar. Stir every now and then, and begin tasting for doneness at the one-hour mark. Try your best to not overcook the beans-- just cook until they are tender to the tooth, but have retained their shape. Proceed with the recipe as directed in step one. With this method, drain the beans through a colander and use the cooking liquid (pot liquor) to replace some or all of the water. This captures the extra flavor the cooking liquid offers into the soup. After the ham hock cools, pick any meat from it and reserve until step four, adding it back with the whole beans.
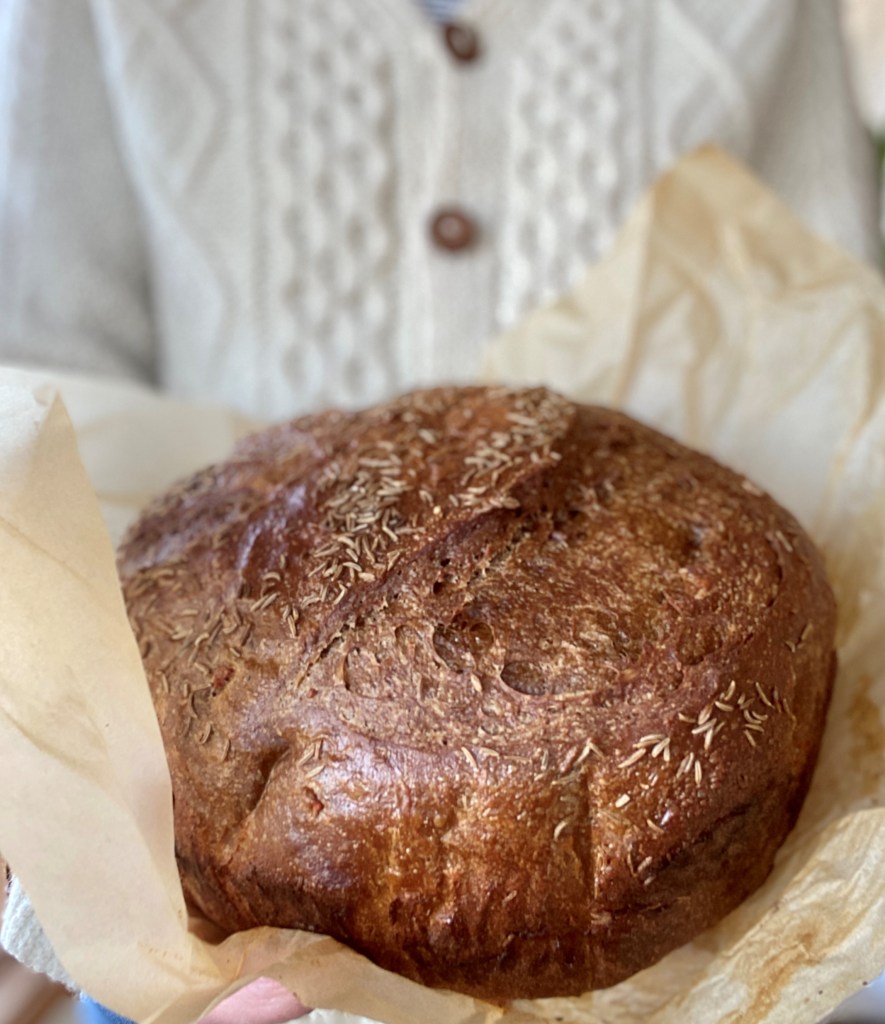
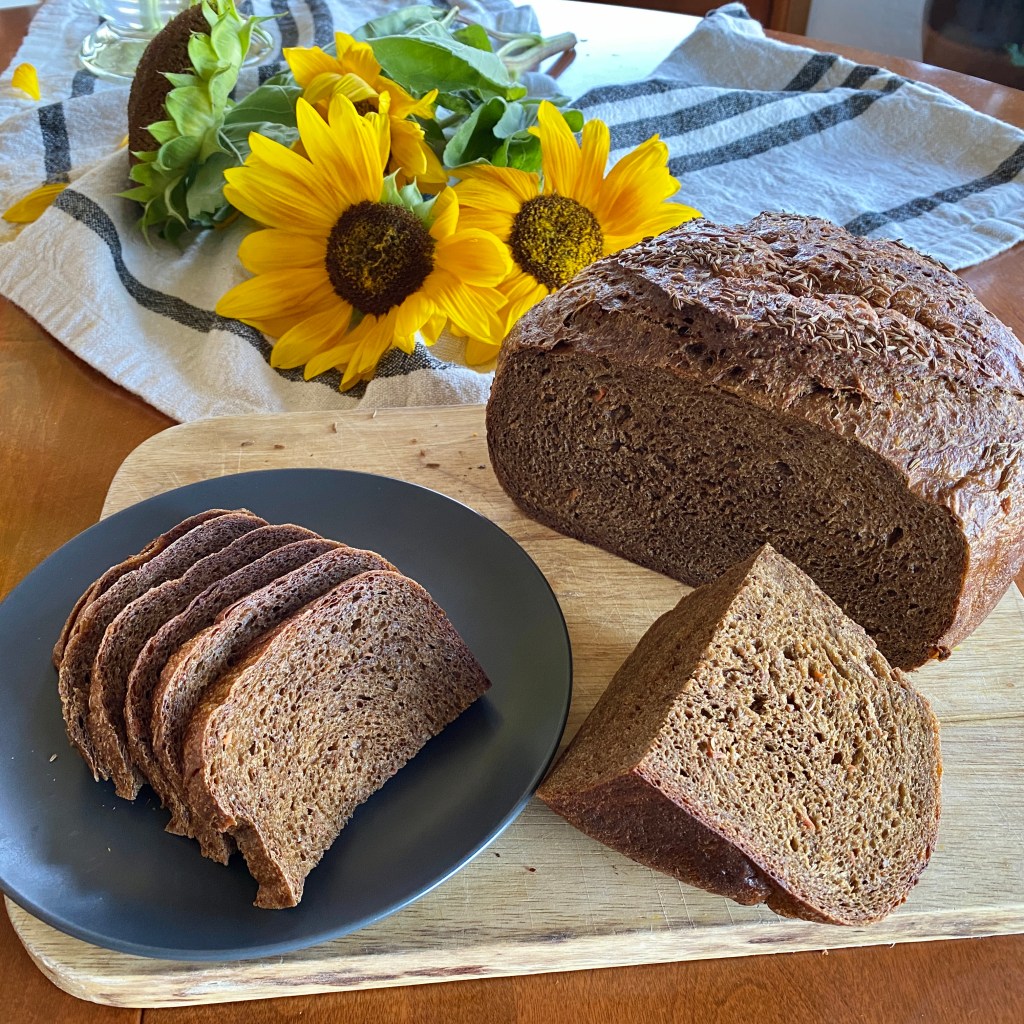
Even though school busses are rolling again, a blanket has been tossed on top of the summer sheets, and my favorite sweater has been brought out against the morning and evening chill, it is my first annual batch of Caraway Rye Black Bread that makes the welcome of autumn official at our house.
This black bread recipe originates with Dan Lepard's phenomenal 2011 cookbook, Short & Sweet. My adaptations reduce a little sugar, simplify the process, and make it completely dairy-free/vegan. But the texture, flavor profile, and proportions are singularly Dan's.
How to Use the Caraway Rye Black Bread
This glorious rye bread is perfect for dunking into a thick bean or vegetable soup like this for Halloween supper. Or try two slices filled with your favorite cheese, thinly sliced apple, and grainy mustard and grilled in a hot skillet or panini maker as an after leaf-raking treat. Or chunked up as a fondue dipper and served with a Grüner Veltliner or Riesling, it wins a lot of points in the stay-at-home romance category.
But here is my personal favorite-- A thick slice toasted, buttered, and with a generous schmear of butter or ghee and orange marmalade alongside a cup of hot coffee sings O Happy Day for breakfast.
About the Bread
Caraway Rye Black Bread is the lovechild of deli rye and pumpernickel. Deep dark richness comes from molasses, cocoa powder, and ground coffee beans or instant espresso powder. The unmistakable sweet warmth comes from a generous amount of caraway seeds typically found in a lighter rye bread.
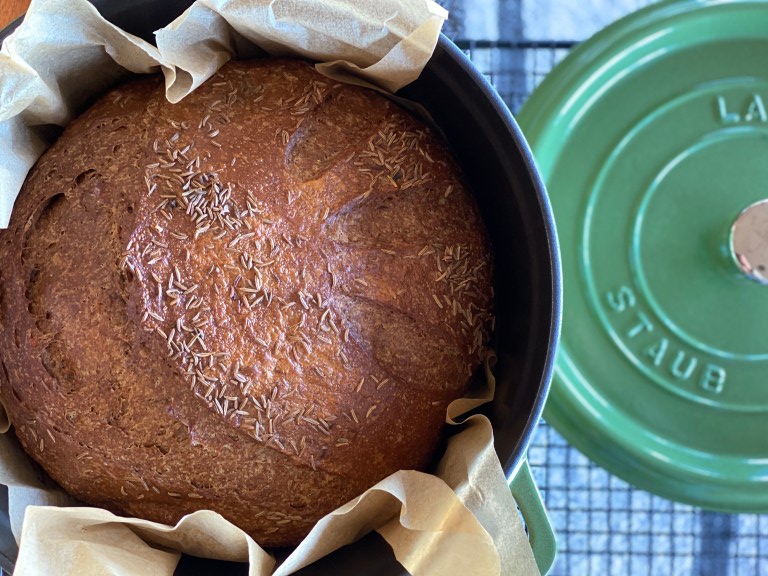
The loaf is gorgeous and huge-- HUGE-- at nearly three pounds. Is that more bread than your household came consume at once? There's the solution for that! The dough is easily divided into two smaller loaves baked either in boules as directed or in standard loaf pans. The dough also makes fantastic dinner or sandwich rolls, so you could make one loaf along with a pan of those. Well wrapped, the baked bread freezes beautifully for up to three months.
The Caraway Rye Black Bread recipe creates a silky dough that bakes up into a springy fine crumb. Its soft moisture comes from grated carrot, which I routinely swap for peeled winter squash such as butternut.
I've worked to simplify the steps, none of which are difficult. The hands-on time is fairly short. As your Saturday or Sunday self-care project, there is plenty of time to relax with a book or watch movies while the dough is rising.
I hope this heavenly bread recipe will become your welcome to autumn tradition.
If a pumpernickel and a deli-style caraway rye had a baby, it would be this loaf. A fine-crumbed pumpernickel-style loaf flecked with carrot and caraway just right for cool weather soup dipping, panini, cheese plates, fondue dipping and good old sandwiches. This vegan/dairy-free version makes one 3-pound loaf, two typically sized loaves, or great dinner rolls.
1 ½cupsrye or dark rye flourCamas Country Schoolhouse Dark Northern Rye is my favorite.
2¼teaspoonsinstant dry yeastSAF brand is my go-to.
2Tablespoonscocoa powder
2Tablespoonsinstant espresso powder or very finely ground coffee or espresso beans
1 - 1½Tablespoonscaraway seeds
2teaspoons kosher or sea salt
1 ½cupswarm water (110°-115°) and more as needed
¼cupmolasses, dark or blackstrap
3Tablespoonsolive, avocado, or safflower oil
2cupscarrot or winter squash such as butternut, peeled and grateda fine grate will make the carrot to disappear into the dough- a course grate will make pretty orange flecks in the dough, your choice.
Instructions
Combine the dry ingredients (all-purpose flour through salt) in the bowl of a stand mixer fitted with the dough hook. Alternatively, do this by hand in a very large mixing bowl.
Measure the warm water into a 2-cup measure. Add molasses and oil, and stir to thoroughly combine.
With the mixer on low speed, add the water mixture gradually to the dry ingredients. Scrape down the sides of the bowl. Add the carrots and increase the speed to medium. Knead for about five minutes, scraping the sides of the bowl occasionally. Aim for a dough that is smooth, moist, and tacky, but pulls away from the bow. leaving just a few moist streaks on the bowl. If your dough is too soft, add additional AP or rye flour a tablespoon at a time. If it is too dry, add water a tablespoon at a time, allowing time for the flour to absorb it before adding more.
Oil a large lowl. With oiled hands, shape the dough into a ball and place it in the bowl. Flip it over a time or two to lightly coat it in oil. Leave it seam side down, covered with a dishcloth, to rest in a warm place for 1 -2 hours until the dough has just doubled in size.
After the first rise, gently press down on the dough. On a lightly oiled surface and with oiled hands, fold the edges of the dough into the center and press down. Do this again (twice total) to shape the dough into a tight, smooth ball. If you are baking it on a baking sheet, lightly oil the baking sheet and place the dough seam side down on the baking sheet. If you are baking your loaf in a Dutch oven (5-6 qt. is best) first place the dough on a sheet of parchment tucked into a small skillet or pan about the width of your Dutch oven, and place your Dutch oven into your oven. (This allows the dough to rise while your Dutch oven is preheating.) With either baking method, cover the dough with a dishcloth for its final rise in a warm place for one hour.
Preheat the oven to 425°/ 220C. Brush the top of the loaf with water and scatter another 1 teaspoon of caraway seed on top, if desired. With a very sharp knife and without deflating the dough, cut an "X", a line down the center, a half moon, or wheat-shaped dashes into the top. Or leave it to make its own fough gash as it expands in the oven. If you are baking the loaf in a Dutch oven, use the parchment corners to gently lift the dough into the hot Dutch oven. If you are baking it on a baking sheet, place the sheet in the oven.
Bake for 20 minutes at 425°/ 220C. Reduce the oven temperature to 350°/ 180C and bake for another 20-25 minutes. (Reduce the time if you've divided the dough into smaller loaves or rolls.) The loaf will be ready when it has a very well browned bottom crust and sounds hollow (like a drum) when you firmly pat it. Don't be afraid to give it more time in 5-minute increments-- you definitely don't want it underdone.
Remove the loaf to a cooling rack. Allow the load to cool to the touch completely before cutting into it. Slicing into a hot loaf of bread turns it into a compressed gooey mess, so be patient for this most excellent reward.
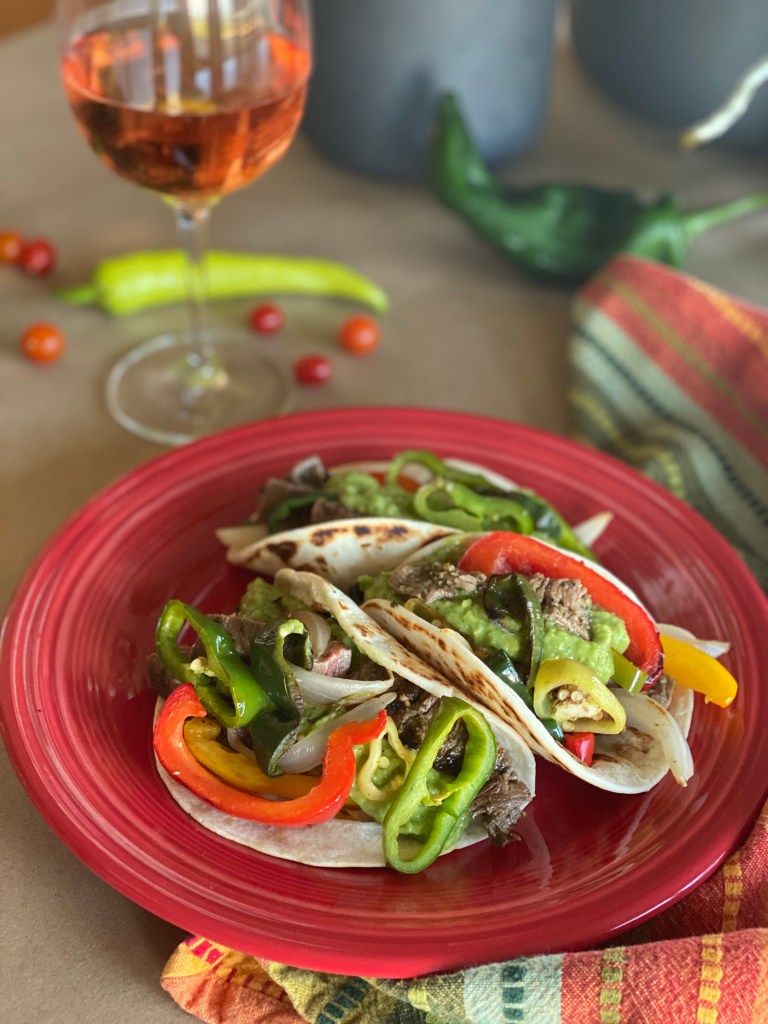
Back in the '80s we thought we were so cool to make fajitas at home. Tex-Mex was a new rage and it became a fun new party food. Back in those days, we made fajitas with a thick London broil, sliced and then marinated, each slice grilled individually. The peppers (only green bells were readily available in those days) and onion were flash-sauted on the stovetop. What did we know?
Thinking of fajitas immediately brings back the scents of onions and peppers cooking, the sounds of laughter with friends, little kids running around everywhere. It's clearly time to revisit fajita making and zhoosh it up a little.
The Marinade and the Meat
Swapping bavette steak (also called sirloin flap) for the London broil is a nice improvement from the way-back machine version. Bavette comes from the bottom of the sirloin section of a beef near the flank and has a texture very similar to flank or skirt steak. Its nice marbling offers a wonderful flavor, and it is infinitely more tender than the good ol' London broil ever hoped to be.
To highlight the texture of the meat and ensure it's tenderness, but sure to slice it thinly and against its grain. The dotted lines in this diagram show the inherent grain of the meat. The knife shows the direction the blade should cut through it to go against the grain. This way, it becomes much more enjoyable to chew.
Bavette lends itself to a good bath in a marinade, absorbing its flavors well which this marinade delivers. Four easy ingredients-- fresh lime juice, a handful of cilantro, garlic, salt, and a quick whiz in a food processor are all you need.
A very hot grill lets you achieve a flavorful sear without overcooking. The wind was blowing hard the day I photographed this and my grill grates just couldn't get hot enough to lay down those gorgeous char lines. Such is the life of a home cook.
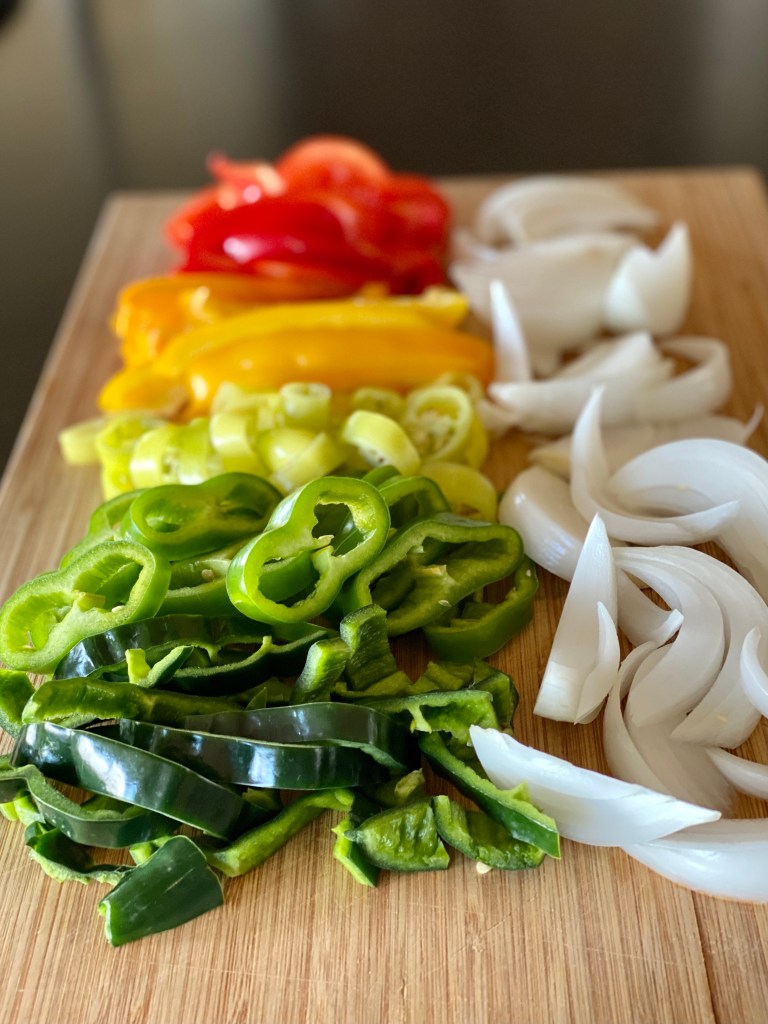
The Peppers and Onion
Use a good mix of peppers for a flavor, texture, and color explosion!
The updated version goes way beyond green bell peppers. The end-of-summer treasure trove of colorful peppers makes it easy to stuff your fajitas with a balance of flavor and color. Use all the colors! Reds, oranges, yellows, chartreuse, grassy greens and deep greens mixes means you'll be including the array of sweet, hot, mild, earthy, bright flavors.
The onions should be white. Period. Clean and crisp is best here.
Now is the time to invest in a grill pan if you don't already have one, as they should be on end-of-season sales. Cut your vegetables to size-- a mix of strips and rings is fun and beautiful-- and toss them into a pre-heated grill pan that has first been sprayed with a cooking oil spray. Blast them with a good amount of heat-- you want them to begin to char without overcooking. Char for flavor, but still with some good crunch for texture.
The Avocado Tomatillo Salsa
Avocado-Tomatillo Salsa
Let's straighten this out right away: This is not guacamole. One bite and you will see the difference. This simple element could easily be the star of the show. Avocado, tomatillo, and little cilantro if you want, garlic, and salt gets quickly pureed in the food processor happens in minutes start to finish. Because the base ingredients are the same, you don't even have to wash the food processor bowl out first.
You'll want to add this four-ingredient salsa to your go-to list. It is so good on everything. Everything. Rice bowls, snacking with chips, tacos, mixed with some chopped cooked chicken and a few crunchy vegetables for a new chicken salad, potatoes, eggs; you name it.
I'm so happy to have rediscovered homemade fajitas. A few ingredient additions, and grilling the peppers and onions fills the air with that unmistakable fajita scent. I'll definitely make this new and improved '20s version for gatherings coming up.
Sizzling grilled beef and the aroma of grilled peppers topped with the best of salsas you will want to add to your repertoire. This zhooshed-up version of the '80s classic is easy to scale for gatherings, family meals, or just yourself.
1½poundsBavette (sirloin flap) steak, or skirt steak
1½poundsmixed peppers (red, yellow and orange bells, Hatch, poblano, Hungarian, banana, etc.)Use what the garden or farmers market is offering!
2mediumwhite onions
12taco-sized flour tortillas
Avocado-Tomatillo Salsa
3avocados, ripe
1 poundtomatillos, papery husks removed and washed
2clovesfresh garlic, peeled
½bunchfresh cilantro (optional)
½-1jalapeno, roughly chopped
salt to taste
Instructions
For the Marinade
Add the first four ingredients to the bowl of a food processor. Whirl, scraping down the sides of the bowl, until well blended and the cilantro is just shy of smooth. Place the Bavette steak in a one-gallon zip-lock bag and pour in the marinade. Place in the refrigerator and allow to marinate at least one and not more than four hours, turning and smooshing the bag occasionally to distribute the marinade.
Prep the peppers and onions and set aside until time to grill.
Heat a gas grill to high (about 500°) and let the grates get very hot. For a charcoal grill, build a bed of charcoal large enough to cook your grill pan of vegetables and the steak over hot direct heat. Place the grill pan on the grates while the grill heats.
Start the vegetables first: Spray your hot grill pan with cooking spray (stand back and be very careful to avoid flames) and scoot all the vegetables into it. Do not disturb the vegetables for 2-3 minutes to allow some charring before turning them. Do this several times throughout the cooking to get a nice char without overcooking the vegetables. depending on the heat of your grill, the size of your grill pan, and the amount of vegetables, this can take 10-20 minutes.
When the vegetables are about 5 minutes from being ready, spray the grates where the meat will cook, and place the meat on the grill. Again, do not disturb the meat to allow for great charring. After 2-3 minutes, check for char and flip. Repeat on the second side. It is very easy to overcook this thinner cut of meat, which may render it tough, so again, err on the side of caution.
While the meat is resting, heat a skillet to medium-high. Toast the tortillas until they are warm, soft, and beginning to blister, flipping once, about a total of 1 minute each. Slice the steak thinly across the grain. Pile peppers and onions and sliced steak into the tortillas and top with the avocado-tomatillo salsa. Serve!
For the Avocado-Tomatillo Salsa
Toss all ingredients into the bowl of your food processor. Pulse at first until the ingredients start moving freely, then whirl until a creamy pureed consistency. Refrigerate until serving. Don't be afraid to make a double batch, as this creamy/tangy salsa is divine on so many things. It keeps well for about three days in your fridge, if it lasts that long.
Follow Me
Welcome!
You’re in the right place! I’m Pam Spettel, home cooking expert and guide, and I’m here to show you how to break up with cooking and hospitality anxiety, learn how to use recipes as guides rather than strict rules, and let your cooking intuition and confidence soar.
Superpower: Dreaming up recipes that work, serving them to my friends and family, and writing little stories about how cooking them well is the same as loving well.
Inspiration: Ingredients! The fresh, colorful, fragrant, local, seasonal ingredients found in the Pacific Northwest are my creative medium.
Heroes: Local food and wine producers– the people who keep me, my family, and our community nourished and happy.
We use cookies on our website to give you the most relevant experience by remembering your preferences and repeat visits. By clicking “Accept”, you consent to the use of ALL the cookies.
This website uses cookies to improve your experience while you navigate through the website. Out of these, the cookies that are categorized as necessary are stored on your browser as they are essential for the working of basic functionalities of the website. We also use third-party cookies that help us analyze and understand how you use this website. These cookies will be stored in your browser only with your consent. You also have the option to opt-out of these cookies. But opting out of some of these cookies may affect your browsing experience.
Necessary cookies are absolutely essential for the website to function properly. These cookies ensure basic functionalities and security features of the website, anonymously.
Cookie
Duration
Description
cookielawinfo-checkbox-analytics
11 months
This cookie is set by GDPR Cookie Consent plugin. The cookie is used to store the user consent for the cookies in the category "Analytics".
cookielawinfo-checkbox-functional
11 months
The cookie is set by GDPR cookie consent to record the user consent for the cookies in the category "Functional".
cookielawinfo-checkbox-necessary
11 months
This cookie is set by GDPR Cookie Consent plugin. The cookies is used to store the user consent for the cookies in the category "Necessary".
cookielawinfo-checkbox-others
11 months
This cookie is set by GDPR Cookie Consent plugin. The cookie is used to store the user consent for the cookies in the category "Other.
cookielawinfo-checkbox-performance
11 months
This cookie is set by GDPR Cookie Consent plugin. The cookie is used to store the user consent for the cookies in the category "Performance".
viewed_cookie_policy
11 months
The cookie is set by the GDPR Cookie Consent plugin and is used to store whether or not user has consented to the use of cookies. It does not store any personal data.
Functional cookies help to perform certain functionalities like sharing the content of the website on social media platforms, collect feedbacks, and other third-party features.
Performance cookies are used to understand and analyze the key performance indexes of the website which helps in delivering a better user experience for the visitors.
Analytical cookies are used to understand how visitors interact with the website. These cookies help provide information on metrics the number of visitors, bounce rate, traffic source, etc.
Advertisement cookies are used to provide visitors with relevant ads and marketing campaigns. These cookies track visitors across websites and collect information to provide customized ads.