I can think of no other food that radiates humble, simple elegance like the bean. Beans are easy to cook, fit into most dietary lifestyles, and are seasonless-- they make a hearty wintertime stew or a chilled summery salad with equal aplomb.
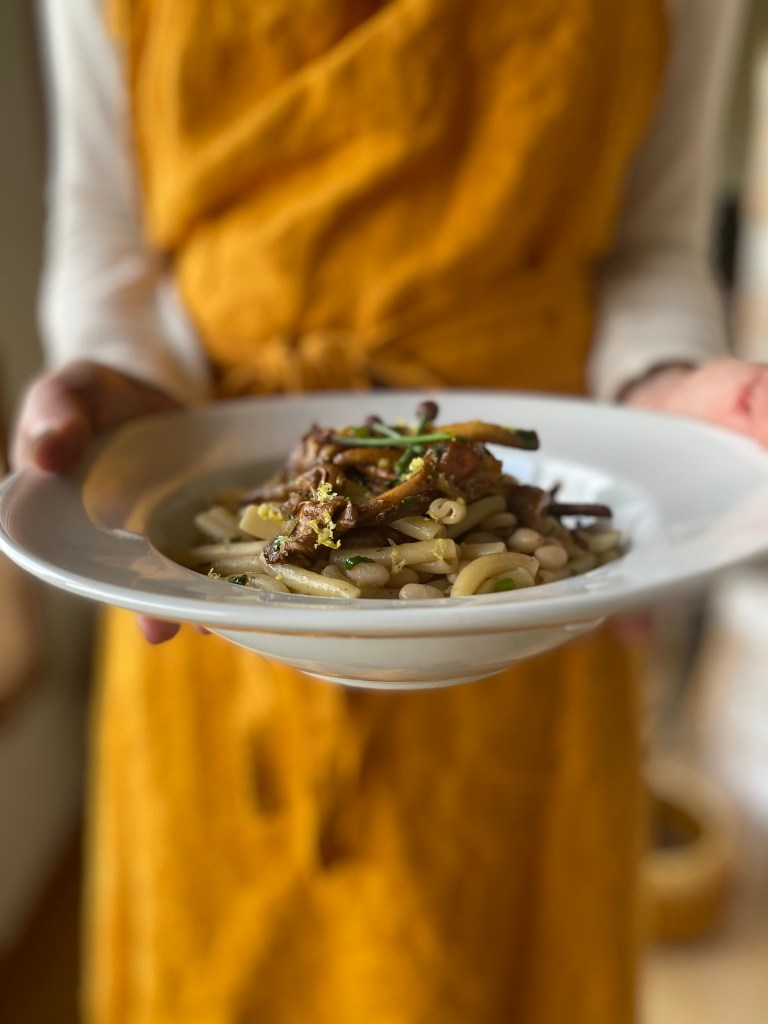
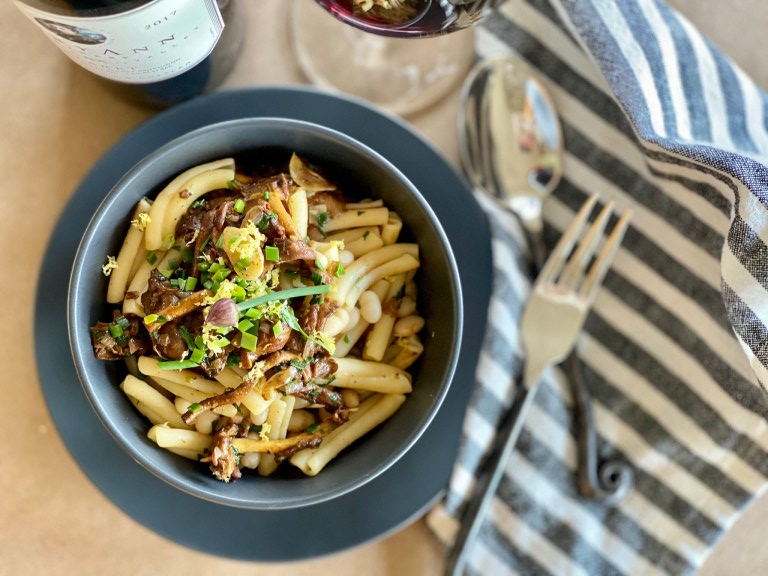
Pasta with Beans and Mushrooms
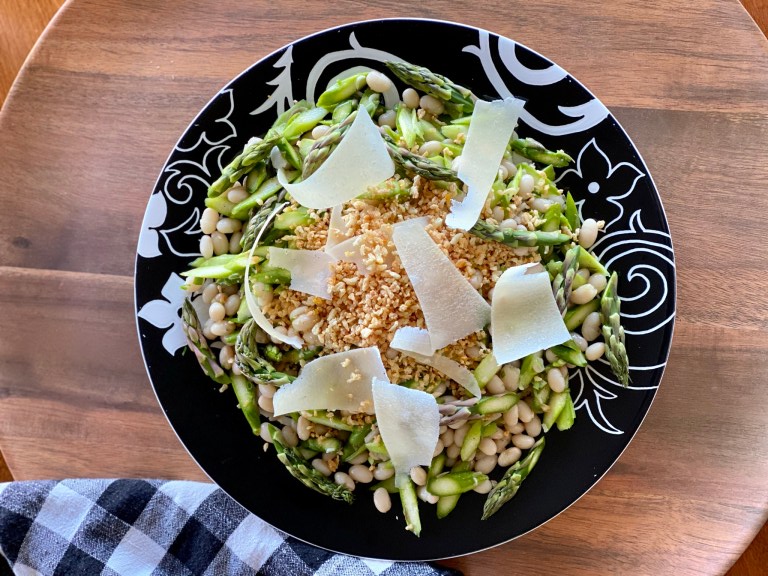
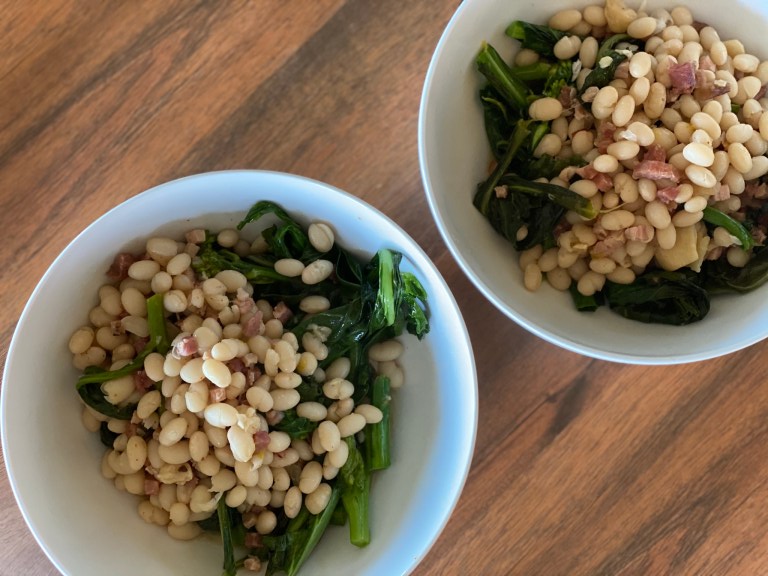
Last week I cooked up one pound of Rancho GordoAlubia Blanca beans, and made a little game of seeing what I could do with them throughout the week that wouldn't grow wearisome. The pasta with beans and mushrooms, lemony asparagus-bean salad, and brothy beans-and-greens bowl were each distinct, and each a success.
The true miracle of it is that only four ounces of meat were used to season just one of the dishes, and yet meat was not missed. Beans are tasty, protein-rich, loaded with fiber, and when used with other flavorful ingredients are totally satisfying.
Lemony Asparagus Bean Salad
This post includes the recipe for the pasta, bean, and mushroom dish. Recipes for the other two dishes will come in quick succession in separate posts. An Ode to the Bean trilogy, if you will.
In the third post, we'll address the elephant in the room-- the Magical Fruit Effect.
Why go to the trouble of cooking dried beans?
Let's talk about the advantage of using dried beans rather than canned, not that there's anything wrong with that! The texture of beans cooked from scratch is more toothsome, less waterlogged, and texturally more interesting. There are nearly infinite varieties of dried beans, each having their own unique flavor, too. Some are clean with an almost mineral slate-like flavor (the Alubia Blanca is an example), some are slightly smoky flavored, some are nutty, and some are meaty.
Some beans are tiny and others are huge. Think of beans like you think of all the different pasta shapes-- each one holds a special charm depending on what it is you want to prepare or serve them with.
Brothy Beans, Greens, and Pancetta
A pound of beans cooks up into ten full-sized servings-- likely more when used with other ingredients-- making them a definite proletariat choice.
In their brilliant display of versatility, beans eagerly accept the flavors of the ingredients they are put with. The humble bean grows in most climates, and people from most cultures use beans in some way in their cooking. There's just so much to love about the unassuming bean.
It's hard to be bored when you have a world of beans to explore.
Grower's + Makers Wine Notes:
With the Pasta, Bean, and Mushrooms dish we served RoxyAnn Winery2017 Claret. This Bordeaux-style blend, grown in warm Southern Oregon, is rich and soft and great with these mushrooms. It's a good value, too.
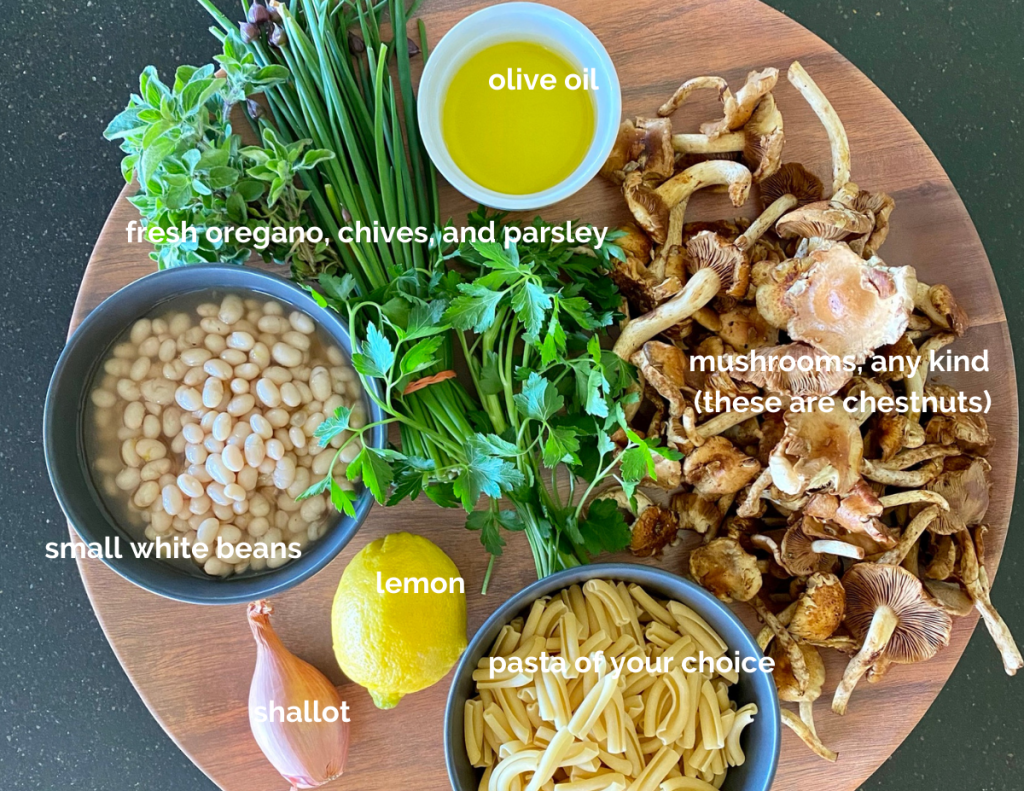
Things you'll need for Pasta with Beans and Mushrooms
To start with, you'll need a cooked pot of beans. No one can describe how to do this easy, basic step better than the folks at Rancho Gordo, so allow me to make that introduction. "Rancho Gordo, meet my friend. Friend. . . Rancho Gordo."
If you like this recipe, please give it a star rating, and leave any comments letting me know what you think!
There are so many fantastic things to do with a pot of freshly cooked beans, and this is one of them! Humble and unintentionally vegan, full of herbs and earthy mushroom and bean flavor, chewy pasta, and loaded with energy-giving protein, it's a dish fit for a queen.
½poundpasta, your choiceorecchiette is nice- it holds the little beans!
¼cupolive oil
1poundmushrooms, any kind (these are chestnut mushrooms)
1shallot, finely diced
2 Tablespoonschopped fresh oregano
2 Tablespoonschopped chives
2 Tablespoonschopped flat-leaf parsley
1 cupbean cooking liquid, or reserved pasta water
1teaspoonsalt, plus more for pasta water
1lemon, zested and squeezed
ground black pepper to taste
Instructions
Put a pot of water with a palmful of salt (about 3 Tablespoons) on to boil. Boil pasta according to package directions until almost al dente. (It will finish cooking later.) If you don't have any reserved bean cooking liquid, reserve a cup of the cooking water and drain. Set the pasta and pasta water aside.
While the water comes to a boil, clean and trim the mushrooms. If using button mushrooms cut them into quarters. Zest the lemon and squeeze it of its juice. Set them aside.
Mix together the chopped oregano, chives, and parsley and set them aside on your cutting board.
Place a large skillet over medium-high heat. Add olive oil, mushrooms, shallot, and ½ teaspoon salt and pepper to taste. Cook, leaving the mushrooms in place to brown a bit before stirring. Repeat, leaving the mushrooms undisturbed for a few minutes before stirring until they are cooked through and have a slight browned color. Adjust your temperature if the shallots are browning too quickly. Remove about ½ of the mushrooms from the pan and reserve for serving.
To the mushrooms in the skillet add the beans, pasta, and bean cooking liquid or pasta water, scraping up any mushroom juices. Stir, and season with remaining salt and pepper. Stir in about half the mixed herbs and the lemon juice. Allow the cooking liquid to reduce about ½, leaving some moisture in the pan.
Spoon the pasta, beans and mushrooms into a a large serving bowl or individual bowls. Spoon any pan juices over the top. Place the reserved mushrooms on top, along with a healthy sprinkling of fresh herbs and lemon zest.
Notes
Make It Your Own:There is no shame in using canned beans- I keep them in my pantry at all times for quick and easy meals. The beans will be mushier, so handle them a little more gently.Experiment with different types of beans, different pasta shapes, whatever mushrooms are seasonal, and whatever fresh herbs you have on hand. If you don't have a lemon on hand, add 2 or 3 teaspoons white or red wine vinegar instead.
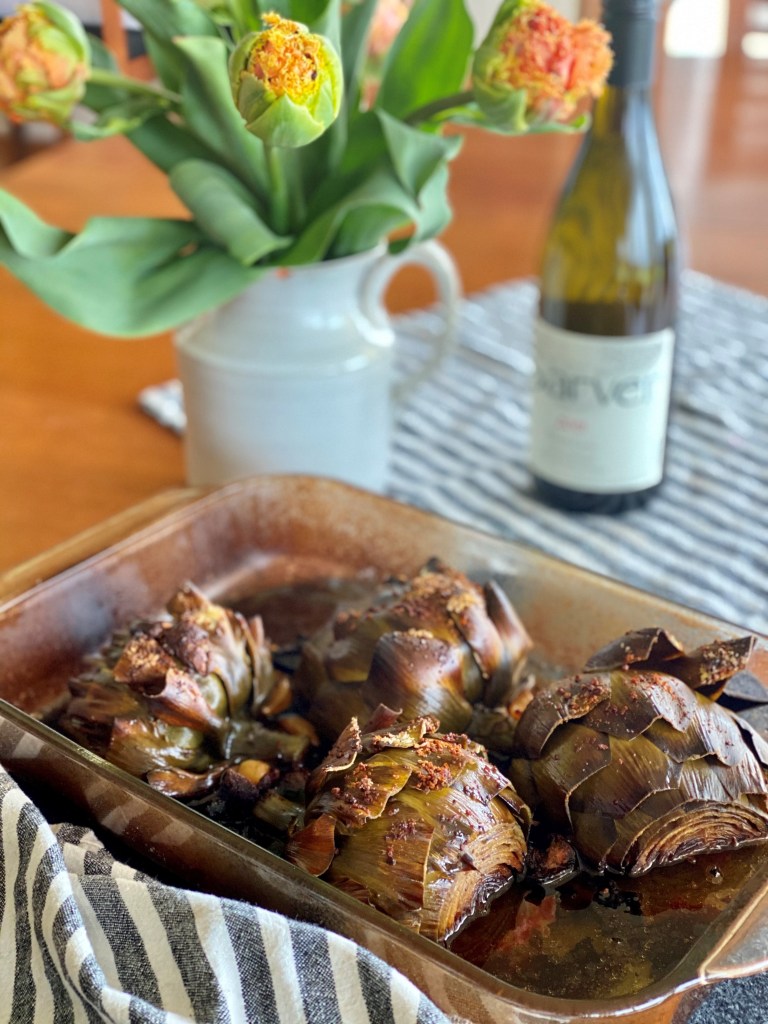
Artichokes are another of the short-season wonders, and we try to eat as many as we can while they are available. This terrific artichoke recipe from Allison Roman's book Nothing Fancy is super easy, and makes the most succulent, juicy, and rich-tasting artichokes ever. It's nice to have a new addition to the 'choke repertoire.
After making this a dozen times or more, I want to encourage you to free yourself from exact measurements, and think instead about ratios. Start with as many artichokes as you plan to serve. I encourage you to make extra while you're at it as they are fantastic cold or warmed up as leftovers.
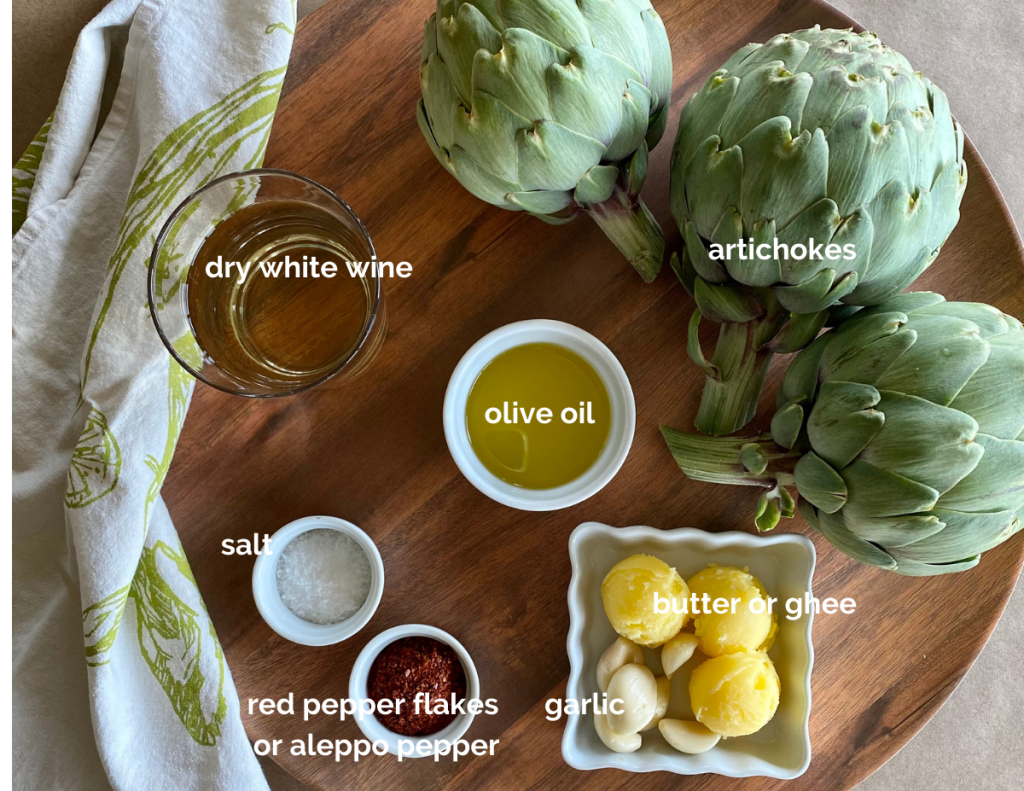
Making the Wine-Roasted Artichoke Recipe
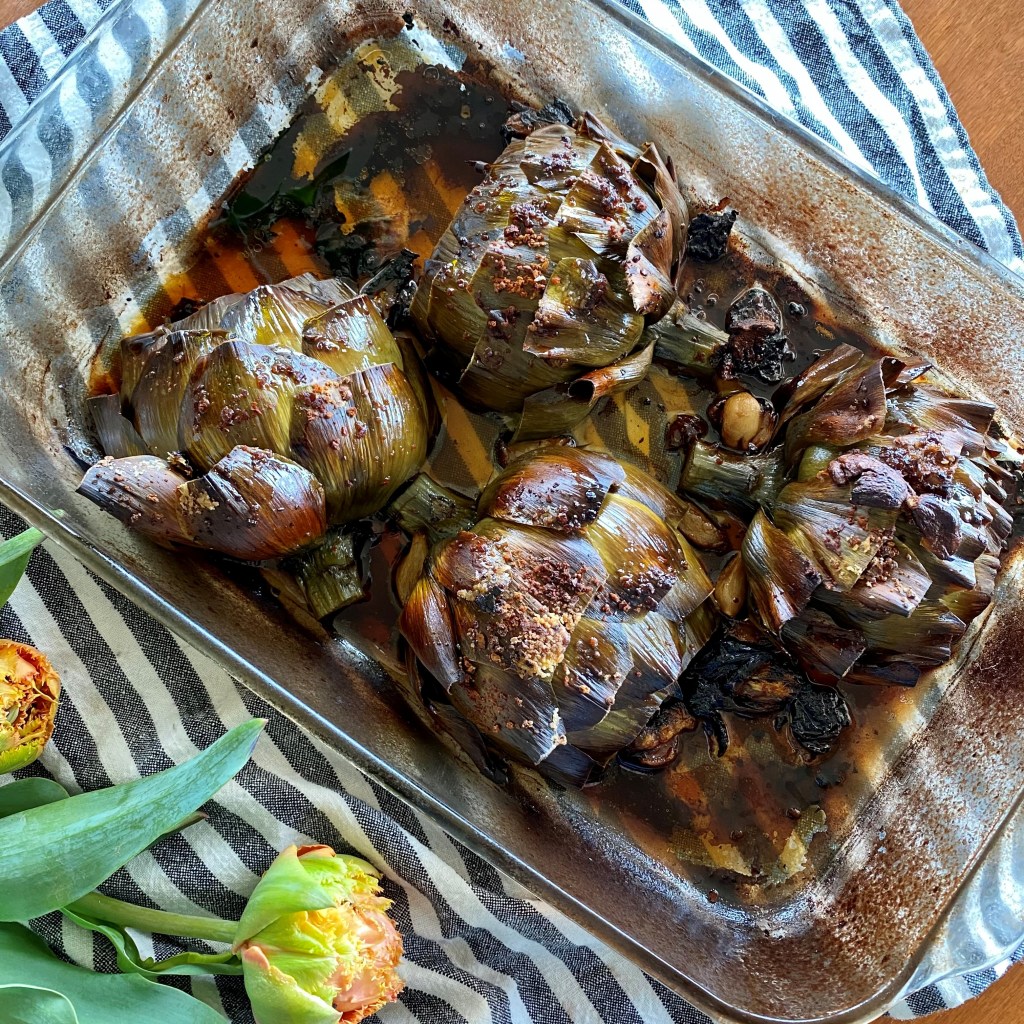
First, think big as far as your baking dish goes. It's surprising how much space the halved artichokes need for their flat surfaces to touch the pan. From there, just think in terms of having about 1/4-inch of wine in the bottom of the pan around the artichokes, to which you'll add another 1/4-inch of water. (I use Sarver Winery Pinot Gris for this-- my favorite from our neighboring winery!) You'll generously drizzle the artichokes with olive oil, and plop in maybe a half-tablespoon or more of butter for each artichoke half in the dish. Crush as many garlic cloves as you like-- we go big on garlic at this house, so perhaps 2 cloves for every artichoke half, and sprinkle the tops of them amply with kosher salt and red pepper flakes, or my favorite Aleppo pepper.
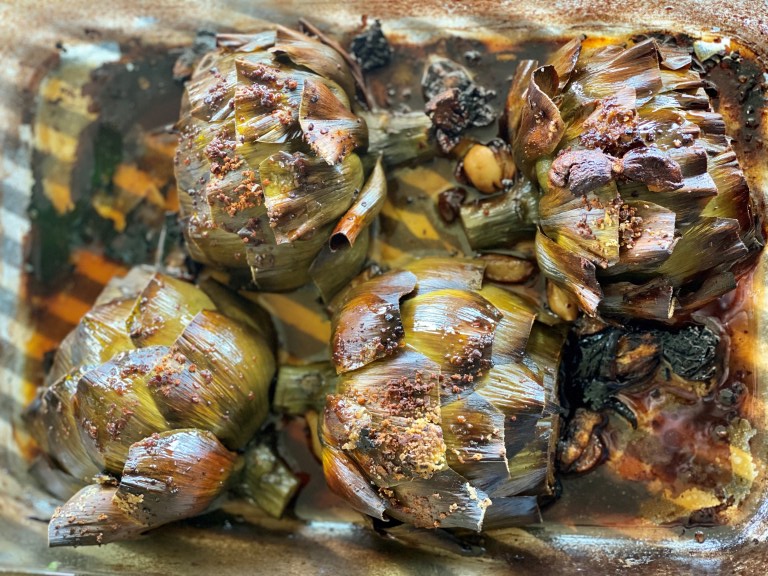
Aside from prepping the artichokes, the hands-on time is just a couple of minutes. Cover it in foil, bake in a 425 degree oven for 45-55 minutes, depending on the size of your artichokes. Remove the foil from the pan, and assess if it needs a little more water-- you don't want the pan to run dry but do want a reduced glaze to form. Then continue to roast them for another 15 minutes until they turn a deep mahogany, and the cooking liquid reduces into a garlicy little sauce you'll want to dip bread into.
This is the Artichoke Recipe Choice for Part Givers
If you're hosting a gathering, this dish is for you! It can be made ahead, either the day of or the day before, and warmed back up at the last minute. The artichokes are equally charming served room temperature for warm-day entertaining. While the artichokes pair perfectly with most white wine varieties, they really shine served with the same Sarver Winery Pinot Gris they are cooked in.
Have you noticed what happens when a crowd of people eat with their fingers? It's a magical way to drop barriers and bring people together. Put a bowl on the table for guests to toss their tooth-scraped outer leaves into.
What shall I serve with Wine-Roasted Artichokes?
This dish makes a lovely first course, if you like stretching the table adventure out for hours like we do. It's also a perfect accompaniment to fish, chicken, or pork tenderloin. It is equally good as part of a vegetarian meal, served with a nutty rice pilaf or lemony pasta.
Guess what?
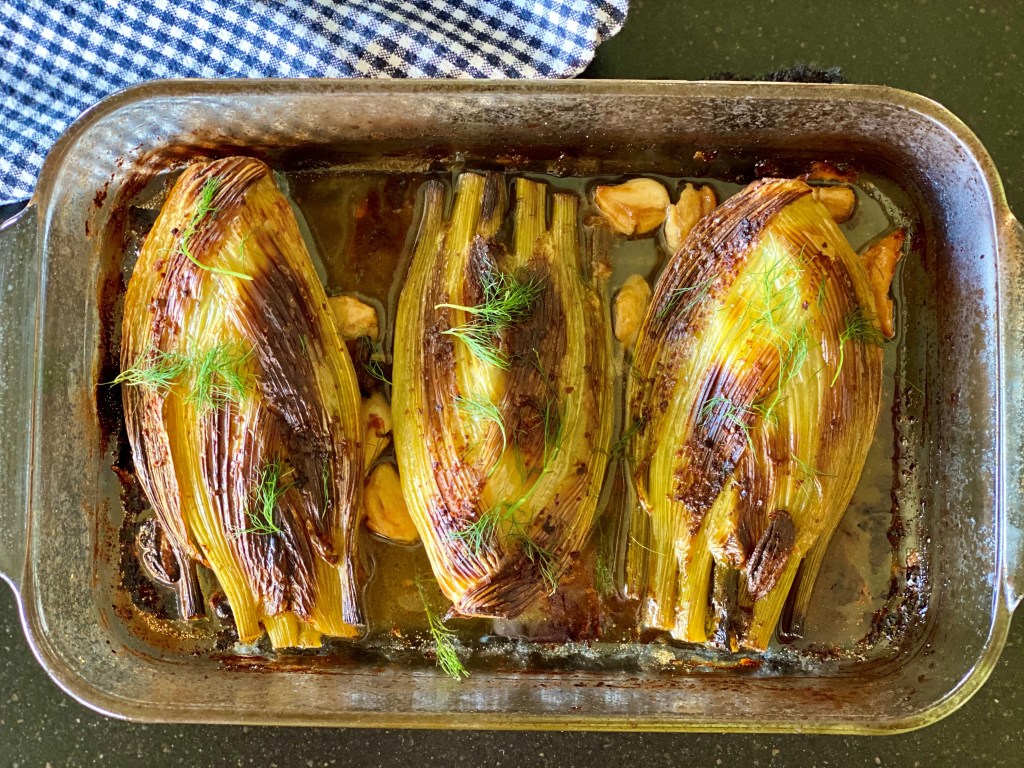
Wine-roasted fennel
This exact technique works to sweeten and juice-up fennel. Give it a try!
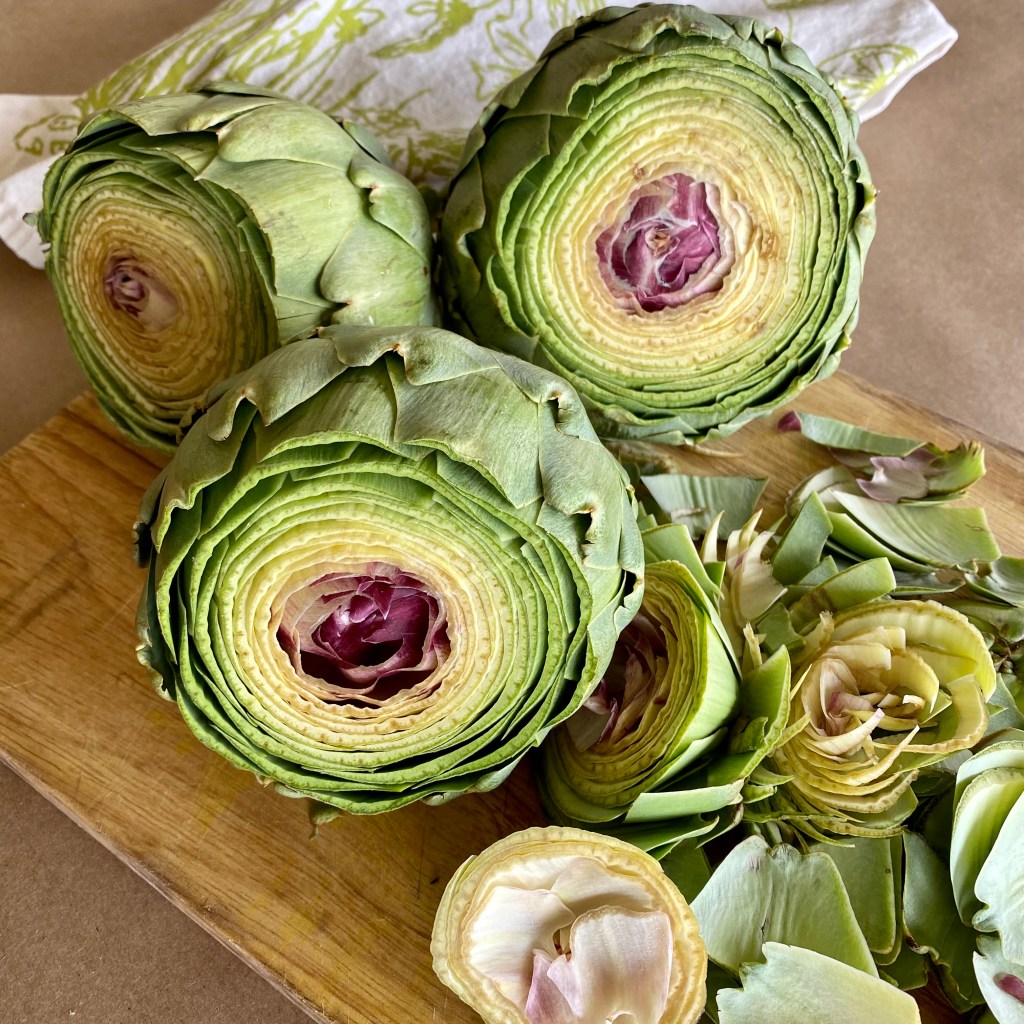
Trim the edible artichoke stem of any woody parts, leaving as much of it as you can. Snap off the bottom one or two layers of tough outer leaves. Use kitchen shears to trim the thorny ends of the remaining leaves, if any. With a serrated or chef's knife, cut about 1 ½" from the crown of the artichoke, exposing the yellowish and rosy interior.
Cut the artichokes in half lengthwise. Using a spoon, dig out the fuzzy choke of each half, removing all fuzzy bits. Some of the purple-tipped center leaves will come out, too. Place the cut side down into a large baking dish (don't underestimate the size of dish you'll need-- the cut artichokes take up a lot of space!)
Pour the wine, water, and olive oil over the artichokes. Add the butter, cut or pinched into pieces, and smashed garlic. Generously sprinkle each half with kosher salt, red pepper flakes or Aleppo pepper, and black pepper. Cover tightly with foil and roast until the artichokes are fork-tender, about 45 minutes, depending on their size.
Remove the foil and continue to roast another 15 minutes or so until the liquid is mostly evaporated and the tops are a mahogany brown. Take care that the liquid doesn't entirely evaporate-- add a little water if needed.
To serve, scrape up the garlicky oil at the bottom of the baking dish to spoon on top of the artichokes.
Notes
Make it Your Own:Use the same exact process for whole fennel bulbs. Very tasty! Perhaps experiment with other vegetables such as carrots, parsnips, and turnips, altering the roasting time depending on their tenderness. Dairy-free option: substitute olive oil for the butter.
Some evenings are just not made for fussing over dinner. After a long work day; kids' sports-music-dance-chess club-art-study group activities; community meetings; and who knows what, all cooks need some go-to quick, hot, hearty, tasty things we can make with our eyes closed.
This recipe got me through the flurry of raising my then-tween and teen-agers, and still is a completely comforting and serviceable years later. Over the years I've done a lot of "Making It My Own" improv riffing, and it's always forgiving and welcome.
A big plus to this recipe guideline is that it easily accommodates a range of dietary needs within a household. It's easy to make a burrito cheesy-gooey for one person and dairy-free for another, and it offers the same flexibility with gluten-free and vegan options.
If you're into left overs, plan to make some. It's a jump-start to a hearty Joe's Special egg scramble the next morning, or a great topping for a plate of Friday night nachos.
A few easy steps and on the table in 20 minutes.
In my real-world life, not every meal is a multi-course beautifully plated affair. Nope, some nights are just about getting it done, and that's good enough, especially when one of my adult sons still asks, "Hey, Mom, can I come over for spinach burritos?" That's a sign of a successful recipe.
1 ¼lb.ground beef, vegan ground meat substitute OR
315 oz. canspinto beans, drained plus 2 Tbsp. olive oil for the pan
6clovesgarlic, or 1/2 tsp. garlic powder
1½tspground cumin
1 tspsalt
1 ¼Cupsstore-bought salsa
14 oz candiced green chilies, or add another ½ cup salsa
8 to 10oz.fresh spinach
1Cupshredded cheddar cheese
8 mediumflour or GF tortillas
canola or other cooking spray
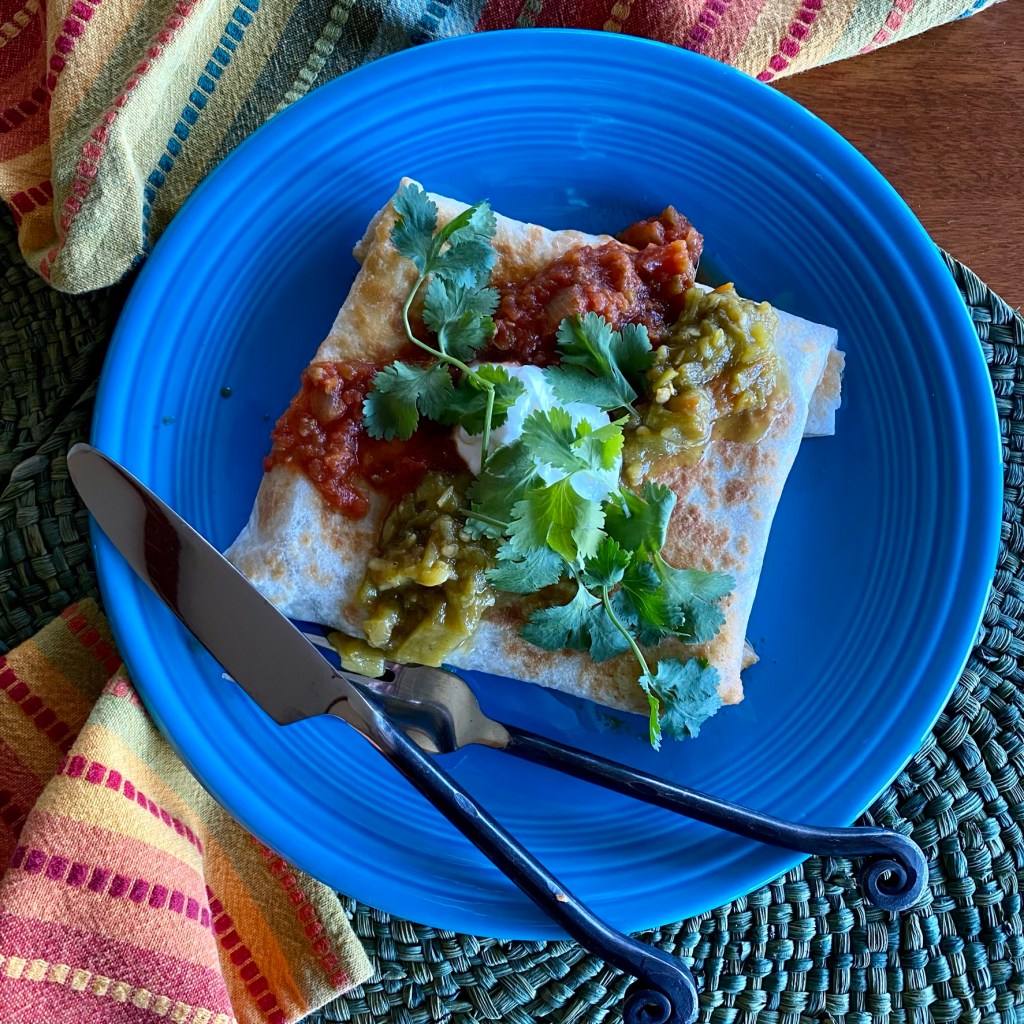
cilantro, additional salsa and sour cream for garnish
Instructions
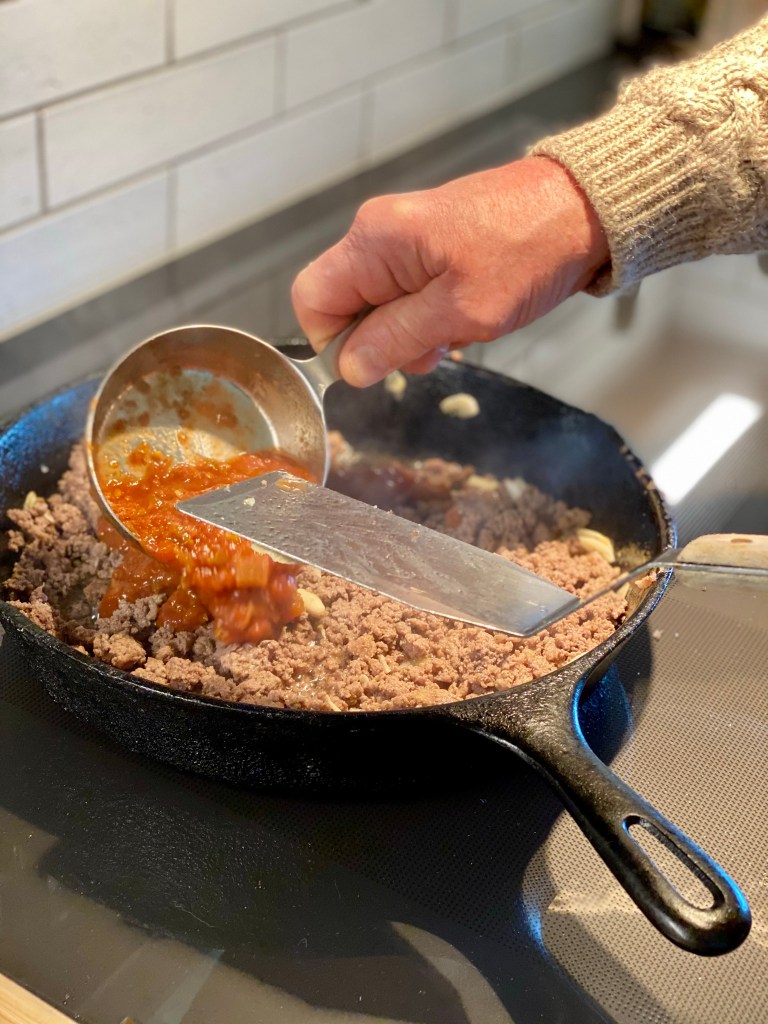
In a 12-inch skillet over medium-high heat, brown the ground beef or meat substitute, garlic, cumin, and salt.
If replacing the meat with canned beans, add 2 Tbsp. olive oil to the pan before adding the beans.
When the meat (or beans) and spices are well-browned, stir in in the salsa and green chilis.
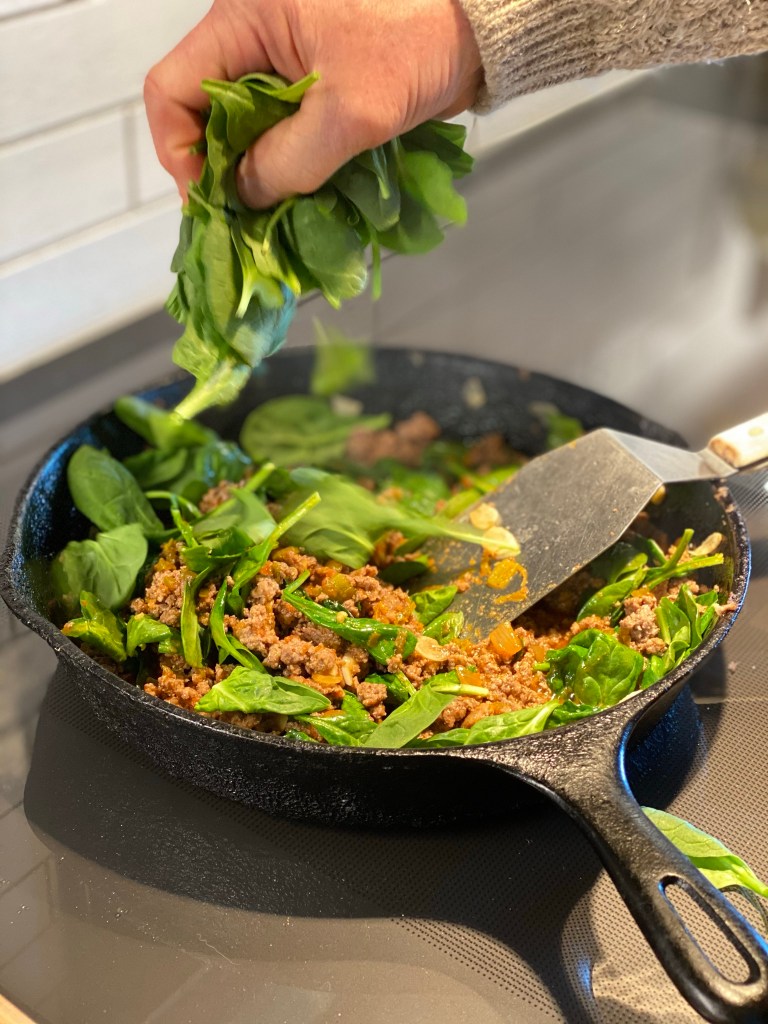
Add the spinach leaves, two or three handfuls at a time, stirring them in until they wilt before adding the next few handfuls, until all the spinach is wilted and mixed through.
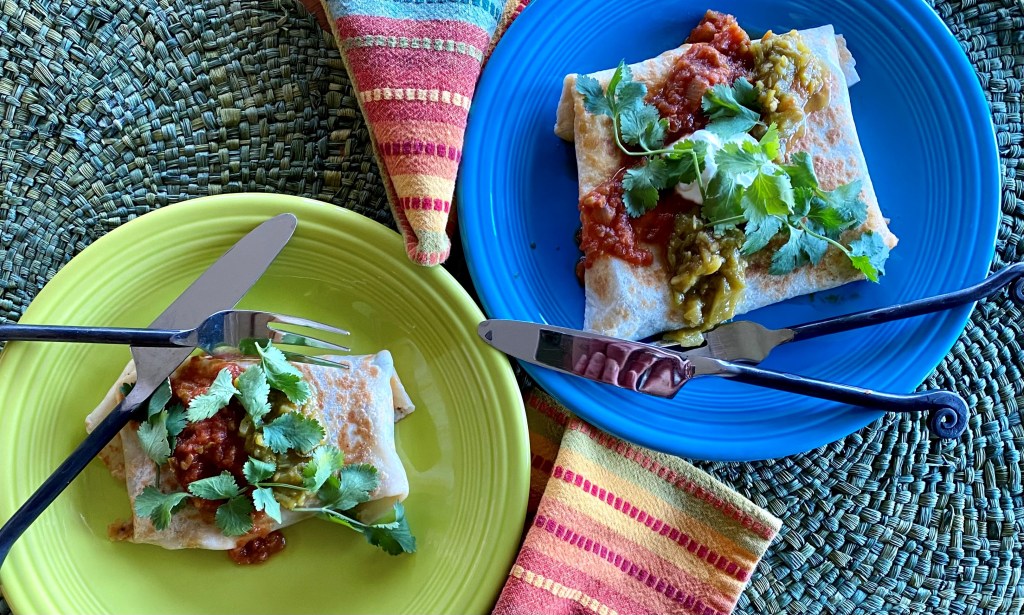
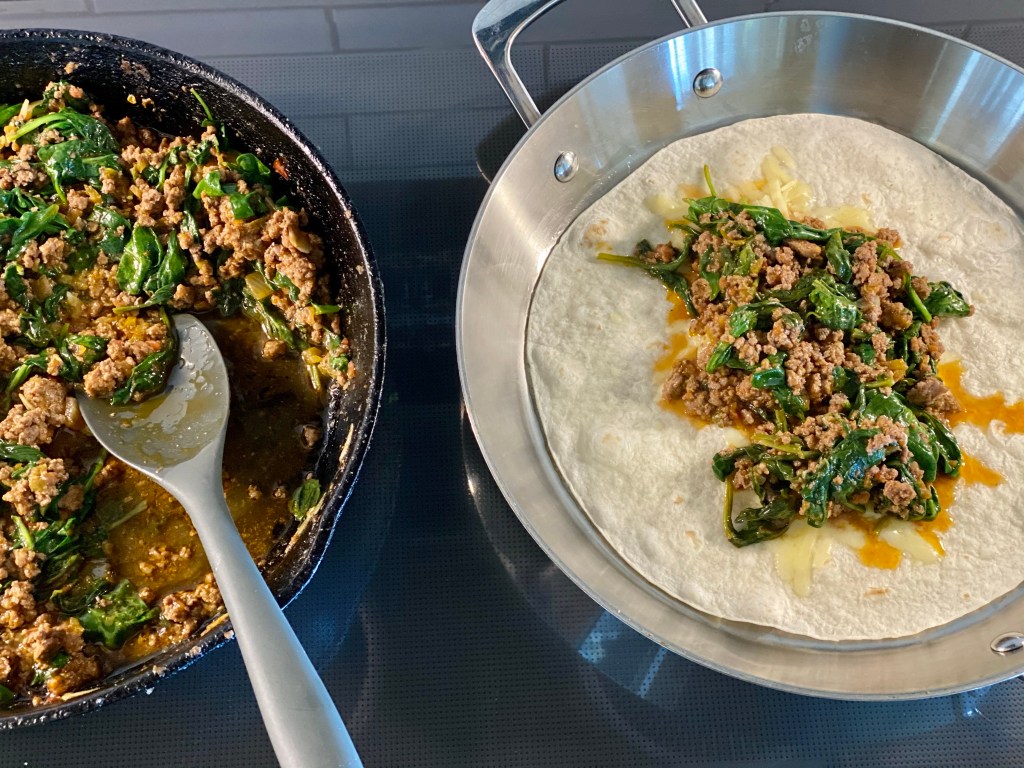
Heat a separate large skillet to medium high. Spray one side of each tortilla with the cooking spray (this will help them crisp up.*) Place the sprayed side down in the heated skillet, and sprinkle a little of the cheese down the center. (Omit the cheese for vegan/dairy-free options.) Spoon the beefy spinach filling down the center of the tortilla. Fold the edges over the filling, burrito-style. When the first side is browned, flip the burrito over to crisp it too.
Place the burritos on serving plates and garnish with additional salsa, green chilis, cilantro, and sour cream (omit for vegan/diary-free versions) as desired.
Notes
Make It Your Own:
add a chopped onion to the skillet when browning the ground beef
try this with ground chicken or turkey
experiment with adding chili powder and/or dried Mexican oregano
add a chopped stems from a bunch of cilantro with the spinach
fancy expensive salsa is not needed in this recipe, but have fun experimenting with different inexpensive ones.
bump up the heat with spicier salsa, or add a chopped jalapeno to the meet as it browns.
*This cooking spray tip is also how I soften corn tortillas for tacos and enchiladas. No need to pour oil into a skillet to do this task, just a simple shot of cooking spray.
The process of preparing and eating citrus makes me happy. I never get tired of the bright cheery colors; the way the skin's oils pop when peeled, exploding the most uplifting scents; and how a little lemon, lime, or orange can enliven an otherwise drab dish.
In my fridge, one veggie bin is dedicated to citrus; two or three orange varieties, one or two lemon varieties, limes, kumquats and limequats, and sometimes grapefruit. Then there's the basket full of easy-peel tangerines on our counter for quick snacking. It isn't unusual for three or four of them to disappear in a day. Citruses are one of my most favorite food flavor families.
April and May wrap up the season for most US-grown citrus varieties, and now is the use-it-or-lose-it window for the freshest citrus.
No, citrus is generally not grown within my 101-mile gathering radius. Some people grow lemon trees in pots, but here on the 44th parallel citrus is not grown as a crop. This is a perfect example of exceptions to my rule.
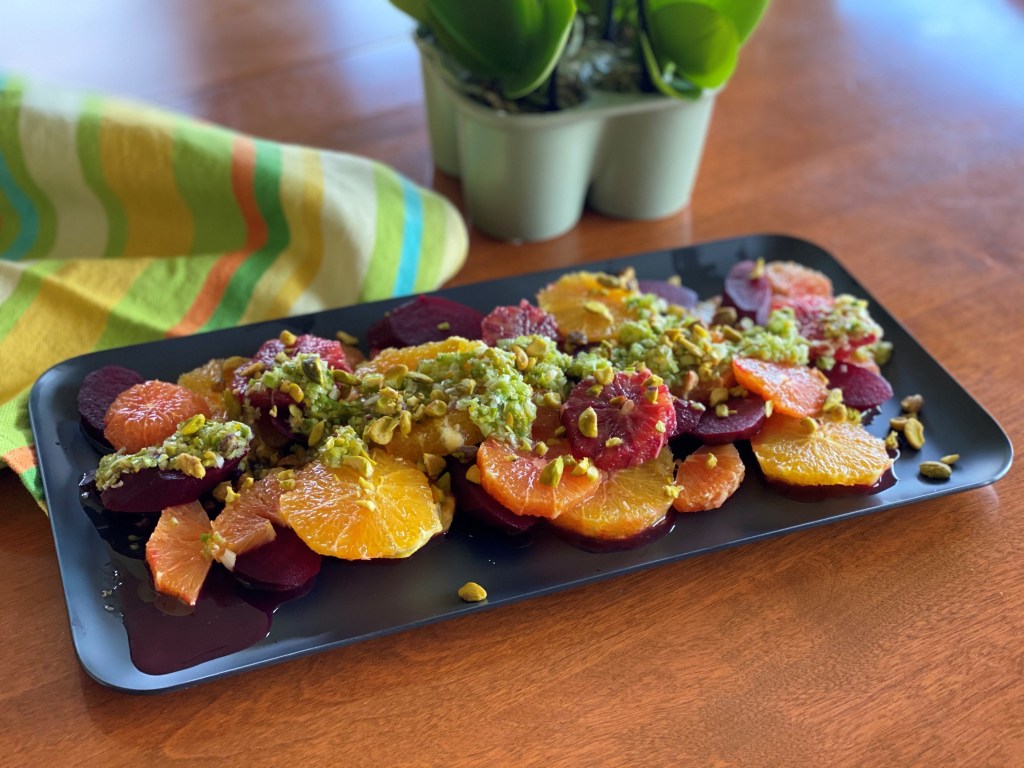
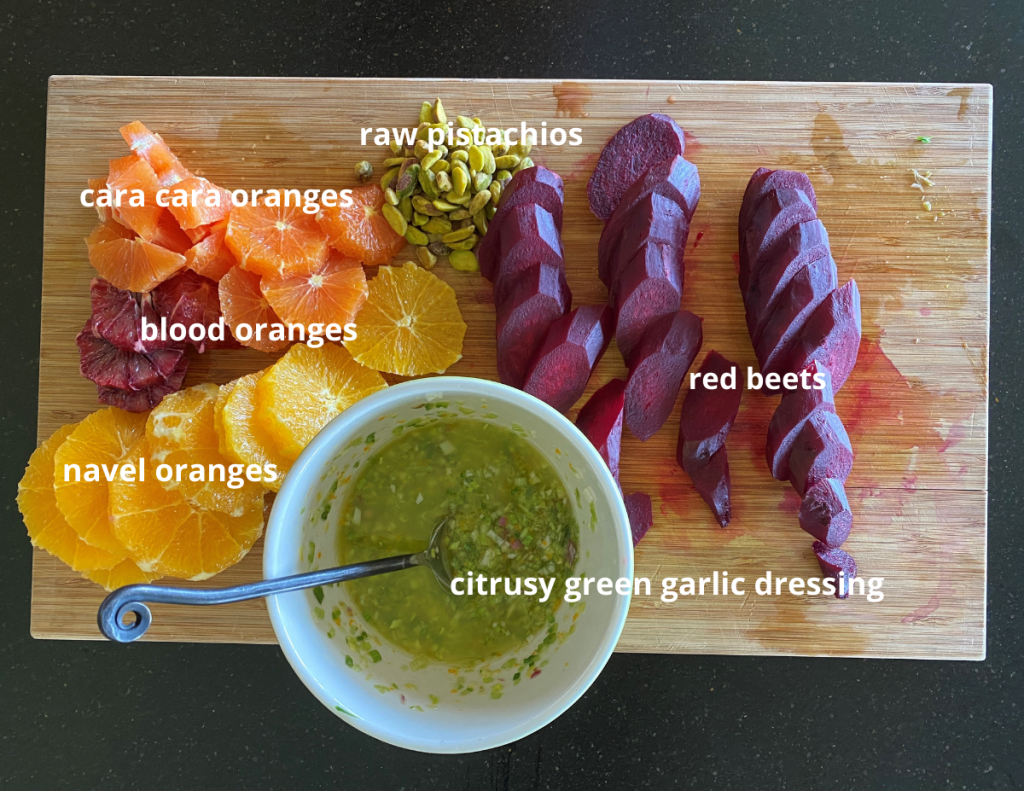
Red beets, also in peak season during these months, give earthy substance to the lively oranges. The dressing for this salad is the same as this three-ingredient sauce, with the addition of the zest and juice of a half orange.
If dairy is a part of your diet, topping this salad off with pieces of creamy burrata would be pretty amazing.
This beet-orange salad works in Oregon's seasons of Mist (November through March) and into the early part of Evergreen season (April-July.) It makes a visually gorgeous platter of color, and is perfect for your spring table.
Place the beets in a small saucepan fitted with a steamer basket if you have one, with ¾ inch of water. Put lid on the saucepan and bring to a boil. Reduce heat and allow beets to simmer until fork-tender, about 20 minutes depending on the size of the beets. Allow to cool until they can be handled.
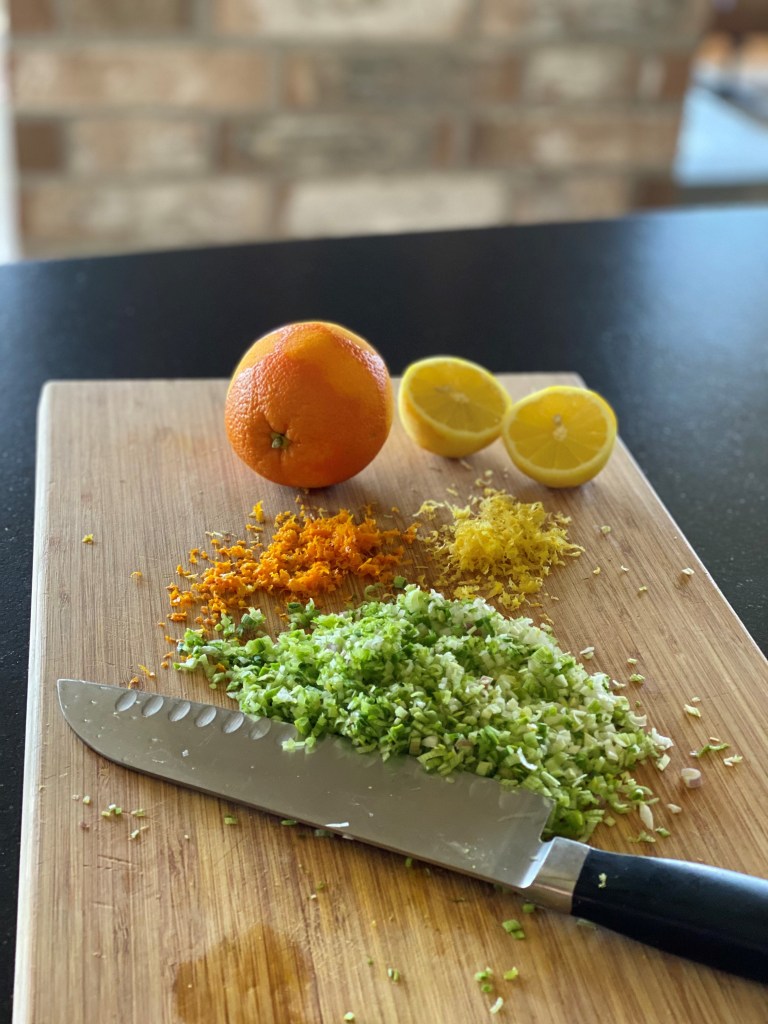
While the beets are cooking, prep the remaining ingredients: Make the citrusy green garlic dressing according to this recipe, adding the juice and zest of the ½ navel orange. Set aside.
Use a knife to peel and slice the citrus: Cut the top and bottom off each one. Stand the orange upright on its flat bottom and with your knife follow the curve of the orange from top to bottom, removing the peel and all the white pith. Cut into 1/4" slices.
When the beets are cool enough to handle, peel them. The skins should slip off rather easily with your fingers, but if they don't gently scrape them away with a paring knife. Cut into ¼" slices.
Arrange the beet and orange slices on a platter, layering them into a pretty color design. Sprinkle the oranges and beets with salt to taste. Spoon the green garlic dressing down the center. If you're using the optional burrata, break it into rough pieces and lay over the top. Scatter the chopped pistachios across the top.
Notes
This salad is good served chilled, but is even better served room-temperature.Make It Your Own:Change the type of nuts you use-- walnuts and hazelnuts are both good options. If you don't have a mix of oranges available, don't let that stop you from making this delicious salad. Experiment with yellow, Chiogga, and other beet varieties, depending on what is available to you. When green garlic isn't in season, substitute flat-leave parsley and/or other herbs such as cilantro, dill and tarragon.
Just when the "Third Places" urban panning concept became the norm the whole world broke. The fantastic little coffee shops, bars, restaurants, and public squares where people meet to exchange ideas, have a good time, and solidify relationships shut down. All the people packed up their backpacks and man bags and retreated home to their first places.
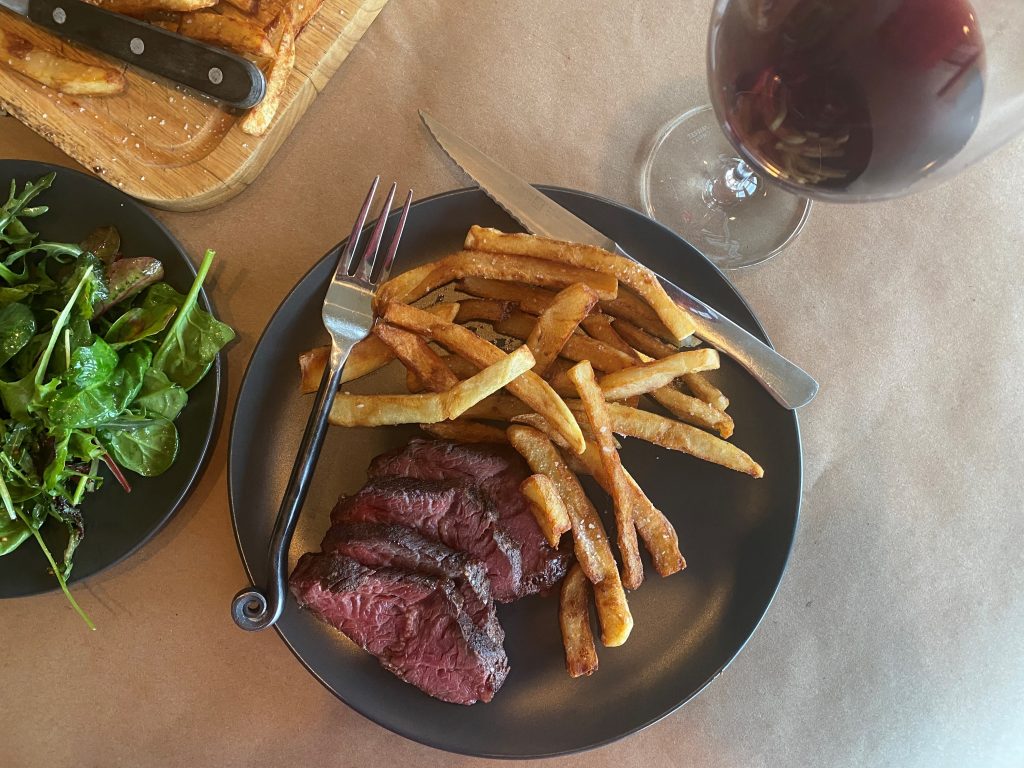
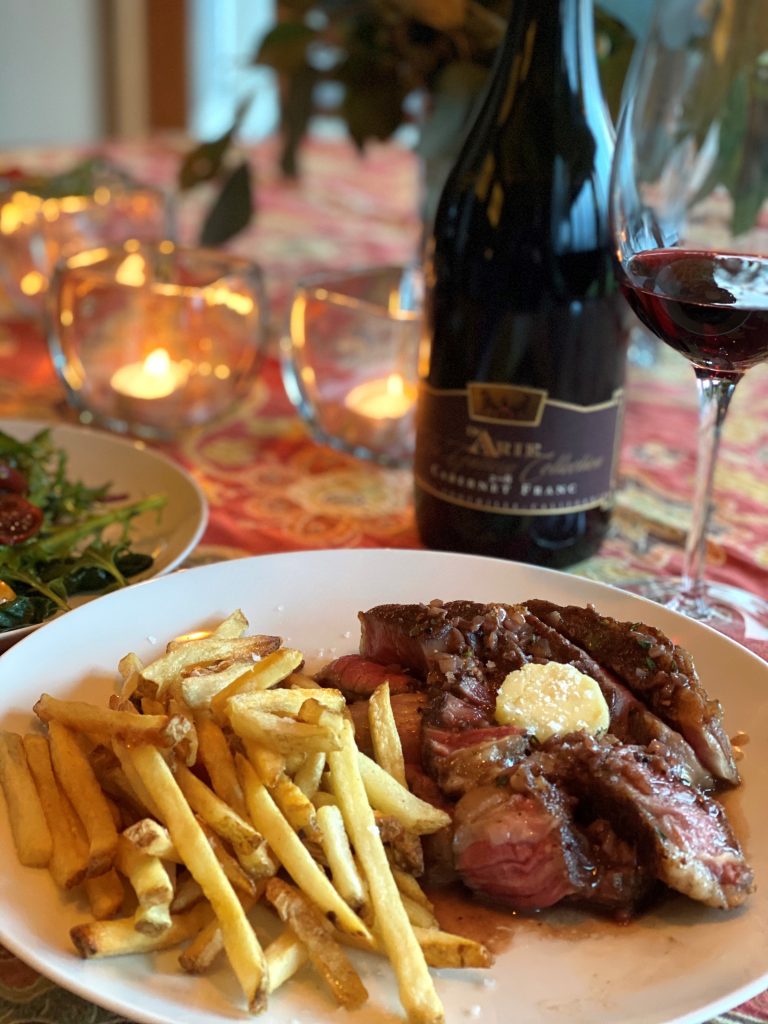
Hanger steak with homemade hand-cut frite-- Perfection!
That was a year ago.
At first it was nice, right? Soft clothes, relaxed grooming habits and timelines, no commutes, more time with the family, pets, and houseplants was all right. With exception of the virtual school part that many of you have endured, there wasn't much to complain about in those first months, especially for us introverts.
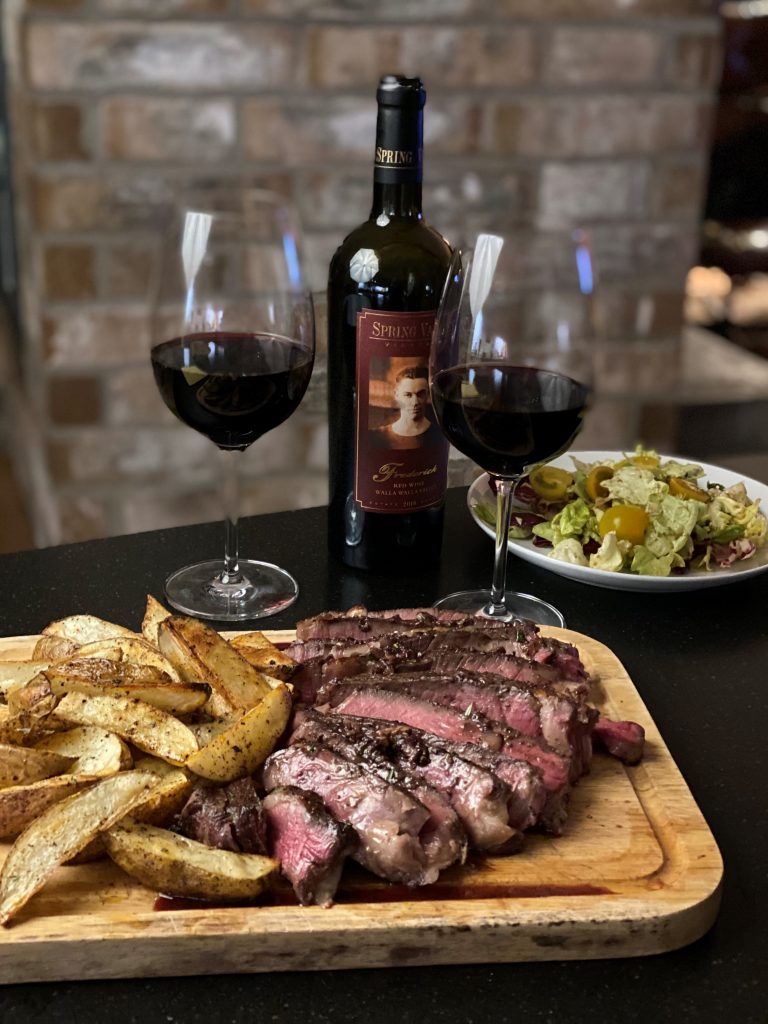
Sous vide ribeye with mediocre frozen French fries.
Don't get me wrong-- my home is very, very nice. But as they say, familiarity breeds contempt. After 12 months of being trapped in it, there's a growing sense of malaise with my first space. So, I say to myself, what am I going to do about it? Whining isn't helping, sister, so get off your tuckus and figure this one out. It is novelty you're missing, I tell myself. If I look around, I might find some variety right here at home without spending any of the dimes that are lost under my sofa cushions.
Sous vide ribeye with just OK hand-cut oven-baked fries.
Here are five no and low-cost ways to inject novelty into our home spaces right now.
Go through your cupboards and pantry and find all the fancy foodstuff you've been hoarding. That jar of homemade fig jam the neighbor gave you, the cute jar of honey with the chunk of honeycomb in it, and the fancy package of crackers? What are you waiting for? Get a nice cheese and give yourself an special little appetizer experience this weekend. That expensive box of Maldon salt hidden on the back of the shelf? Pour some into a pinch bowl and keep it out to fancify your finished dishes. Now is the time to drink the good wine and use the truffle oil, even if it's just on mac and cheese or frozen French fries.
Do the same thing with bath products you've squirreled away. Glitz up your day-to-day routine by digging out these bougie things you've been saving. If a worldwide pandemic isn't a special occasion, I don't know what is. Smell nice. Use a new soap or soak and call it a fake-ation spa experience.
Switch up your bedding. Rustle through your linen closet for stashed sheets, comforters, blankets, and bedspreads and exchange them for your day-to-day ones. What is old is new again. Go crazy mixing patterns and colors. Making things different is what this is all about. For that matter, why not sleep in the guest room for a week, just to shake up the routine? Almost anything divergent is helpful about now. It's only a temporary commitment meant to lift your spirits and see things anew.
Do the spiff-and-swap throughout your space. Channel your inner Leanne Ford and snip some branches from your yard and put them on your table in the biggest jar you can find. If you've got your grandma's china or an unused set of dishes or top-shelf glassware, use them now. Would it make your space more alive to paint those shelves bright blue like you've always wanted? Channel your inner Rayman Boozer and do it. I recently swapped the art pieces around in our house, an easy ennui-busting solution with the cheer-rising effect I'd hoped for.
Now that you've lifted your first space from the doldrums, what is the one aspirational thing you'd like to incorporate into your cooking cred, something that challenges your skills? Clear the deck this weekend, make a shopping list, and get ready to blow your own mind. How about adding the perfect European café steak-frites to your repertoire? Learn to sous vide a steak-- Lana at Lana Under Pressure is a great teacher. I do not typically make fried foods at home, so I also challenged myself to make perfect hand-cut French fries to replace the baked ones I usually do, and I can't wait to do this for friends once we become vaccine-worthy. It was fun, and gave me a new skill.
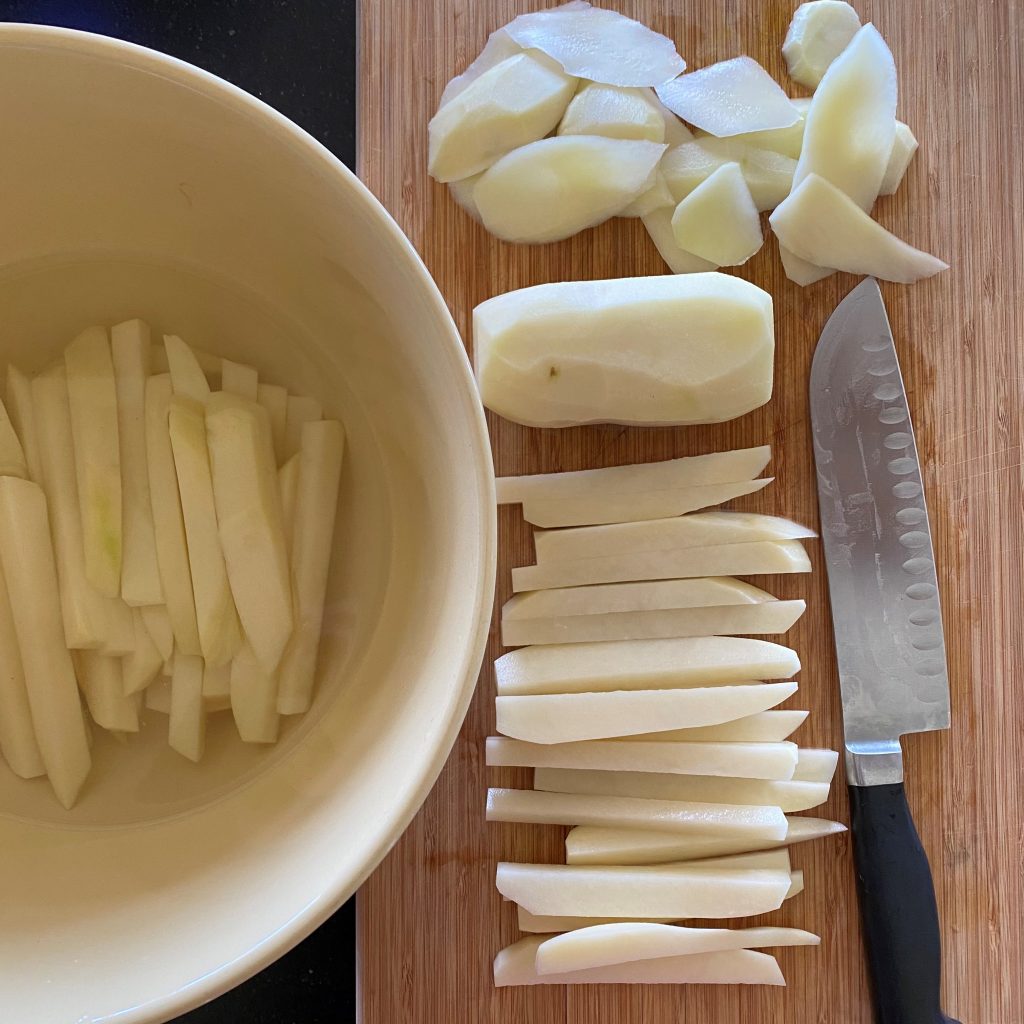
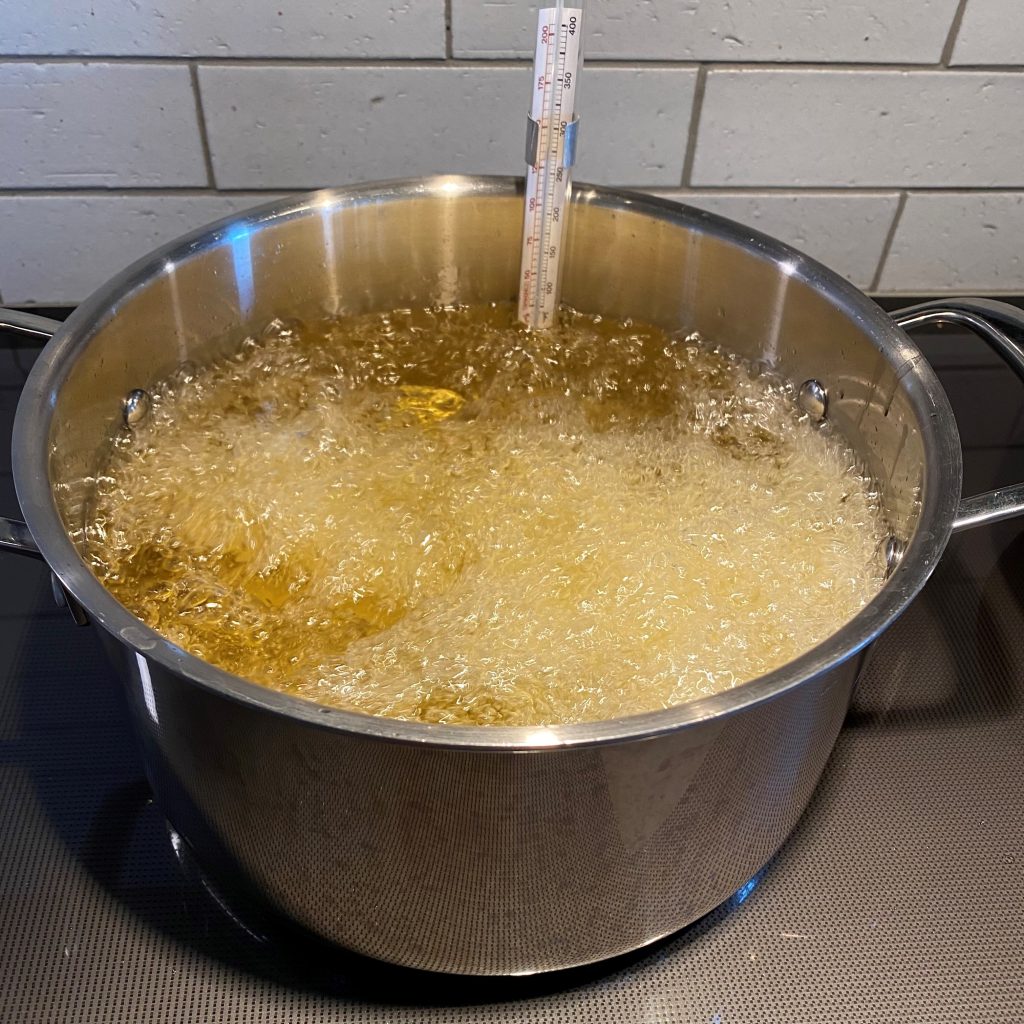
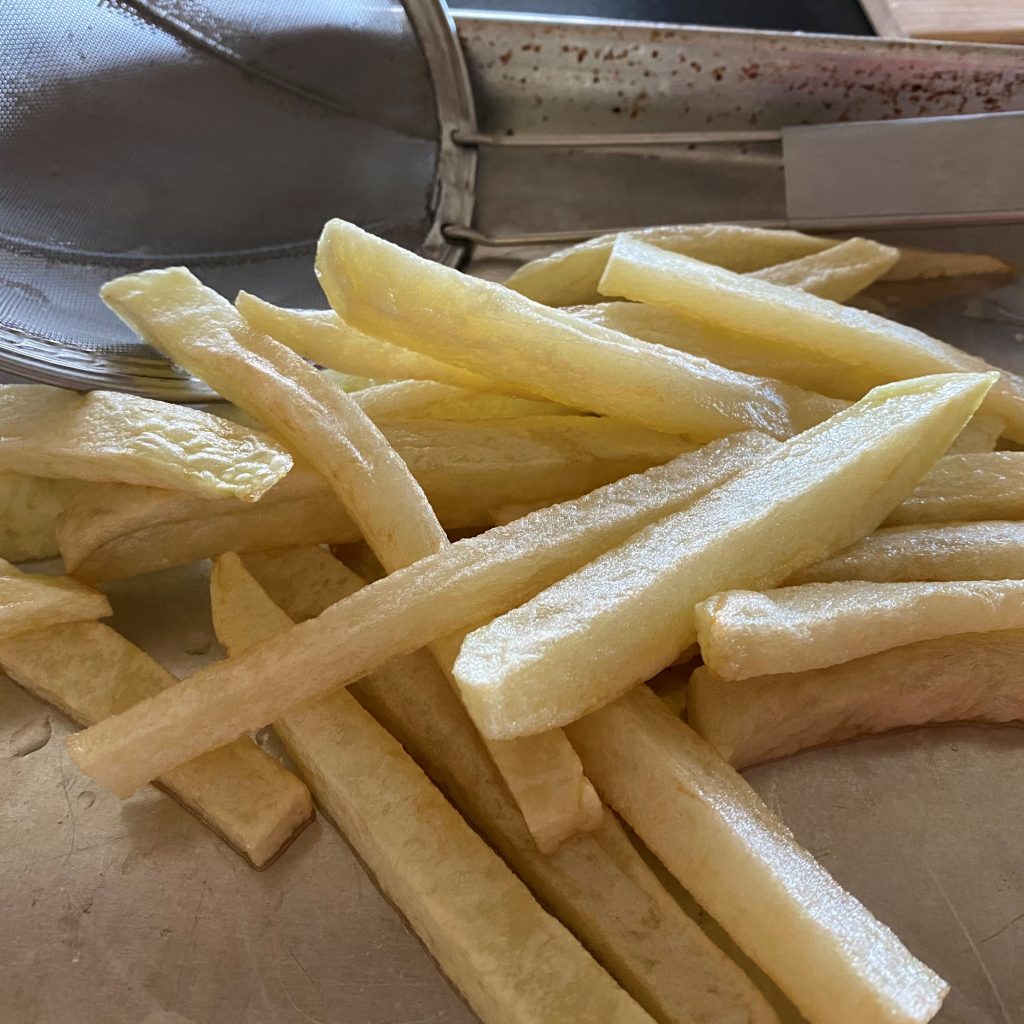
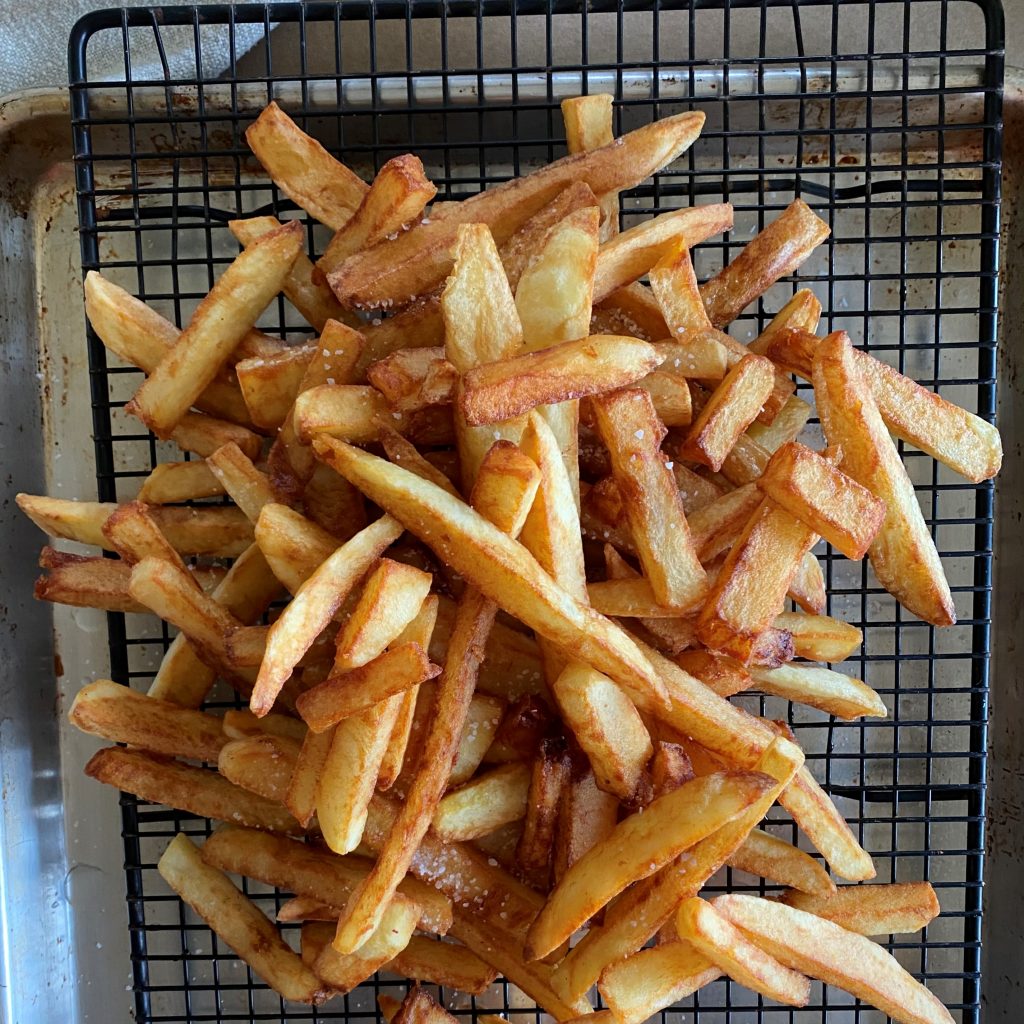
1. Slicing and soaking; 2. Drying; 3. After the first fry cycle; 4. The finishing frying cycle; 5. Viola! Perfection!
Scrub and peel the potatoes. To cut them into perfect French fries, square them up by trimming of the top, bottom and four sides of the potato to start with a block. Then, slice the potatoes into approximate 1/3 inch (less than 1/2 centimeter) slabs, and then cut the slabs into approximate 1/3 inch strips.
Place the cut potatoes into a large bowl of cold water. Leave for 15 minutes. This removes excess starch from the potatoes that would cause them to stick together when cooked, and helps them be extra crispy.
While the potatoes are soaking, pour the oil into a deep pot, at least 5 inches deep. Begin to heat the oil on medium heat.
After 15 minutes, drain and thoroughly rinse the potatoes. Lay them out in a single layer on a clean kitchen towel. Dab them dry with another clean towel to remove all water from all sides of the cut potatoes.
Raise the heat under the pot to medium high. Bring the canola or peanut oil to 270°F (130°C) when measured with an instant-read thermometer.
First fry: Working in batches, place the dried cut potatoes into the hot oil. You may use a fry basket or mesh strainer to lower them into the oil, and to remove them from the oil. Blanch them for 8 minutes. They will look pale and flabby. That's OK! Lay them out on a baking sheet to cool, separating them with tongs.
Second fry: Raise the oil to 350°F (180°C.) Mind your temperature. When the oil is at temperature (use your instant-read thermometer again) place some of the blanched potatoes into the hot oil, being sure not to overcrowd them. You'll be doing this step in batches unless you're only cooking a few potatoes. Cook the potatoes until they are a nice medium-golden color, or to your liking.
Remove the potatoes with a strainer (or fry basket if you're using one) and put them into a large bowl.
Toss with a generous amount of your favorite salt, and serve while hot with excellent ketchup.
Notes
Make It Your Own:Add pepper, red chili flakes or paprika, garlic powder, or minced rosemary to the salt, or any combination of them to suit your tastes.Sprinkle with truffle oil. If you do this, be sure to stand over it and inhale the beautiful scent that will waft up when the oil hits the hot French fries. Tip:Mind your temperature along the way. If you're using a heavy pot as you should be, the temperature will want to climb and drop. You'll likely need to continuously keep an eye and make adjustments throughout the process. This is a hands-on, eyes-on process. To stay focused, don't attempt to multi-task!
The Oregon season of mist is starting to pull back and make way for our evergreen season. It is uplifting to feel how just three more minutes of sunlight a day warms ones bones. The daffodils and crocus, a little late this year, are poking up their cheery heads. Even the dog beginning to shed in never-ending tufts is a welcome sign of spring. The one true sign it is time to shift from winter foods is when the grasses turn intense chlorophyll green.
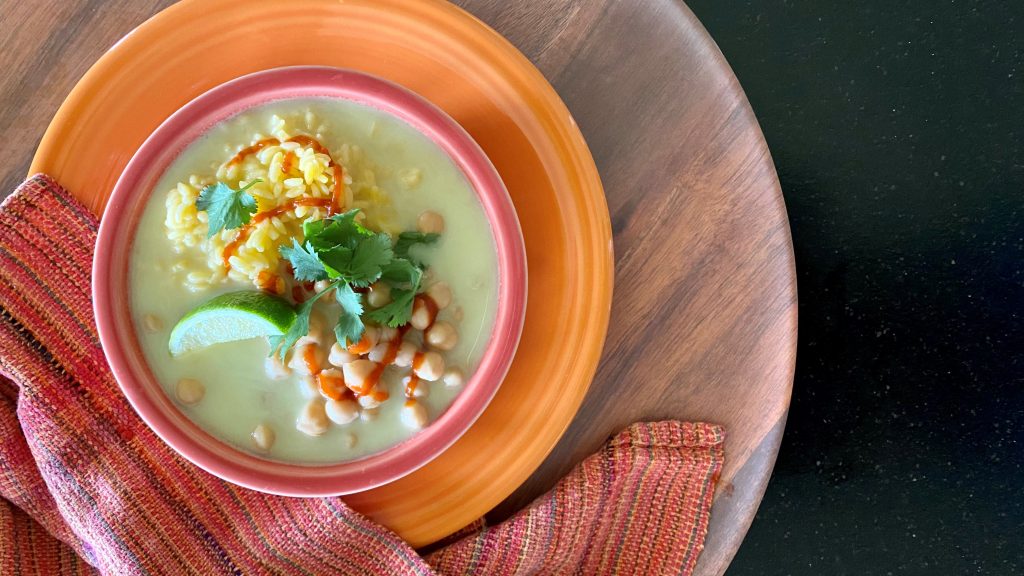
Still, mornings are cold and the mist is more present than not. Something lighter than a dense soup or stew but still hot and nourishing just sounds right. Honor the shift in cravings you may have as the grasses and clover green up brightly. This Healing Chickpea + Orzo Bowl in Ginger Broth couldn't be an easier solution. Be sure to check out the Make It Your Own options in the recipe, as this one has a lot of ways to make it work for whatever it is you need.
When you're feeling under the weather-- be it a little (or worldwide proportioned) virus, heartache or disappointment, this bowl is a perfect year-round healer and cheer-giver. The simple ginger-turmeric tea and coconut milk broth is as easy as boiling water, and would make a nutritious snack all on it's own. The whole thing comes together with zero fuss in under 20 minutes. The gingery goodness and light but complete protein will have you feeling as sprightly as a bright yellow daffodil in no time.
1 ½tspAsian fish saucefor vegan option use coconut aminos
1tspsea salt
215 oz. canschickpeas (garbanzo beans)drained and rinsed
1 lb.GF or traditional orzo, cooked, or see rice Make it Your Own option
½bunchcilantrochopped
Sriracha or spicy Asian chili sauce
Instructions
In a small saucepan, bring water to a boil and add teabags. After they are fully immersed, add coconut milk, put a lid on the pot, and leave to steep for 10 minutes. Remove tea bags.
Stir lime juice, fish sauce, and salt into the tea/coconut milk broth. Keep at a low simmer.
In a blender, blend together one cup of the garbanzos and a few ladlesful of the broth. Once it is blended smooth, add it back to the broth and stir.
Pile garbanzos and orzo into shallow bowls. Ladle broth around them.
Garnish generously with chopped cilantro and Sriracha to taste. Serve with lime wedges.
Notes
Make It Your Own:For a warm restorative to coming in from the cold, forget the garbanzos and orzo. Ladle the hot broth (with or without blended chickpeas) into a cup. Use the cup to warm your hands while the broth warms your soul.Replace the orzo with jasmine rice and replace the garbanzos with tiny cubes of silken tofu.For a non-vegetarian meal, add 4-6 peeled shrimp per person to the broth and simmer 4 minutes until just cooked through. Experiment with various Asian chili sauces to kick up the heat. Add to or substitute thinly sliced spinach whiskers for the cilantro.Makes excellent breakfast or lunch leftovers. Store any remaining broth, garbanzos, and orzo in a jar. Gently simmer to reheat.
Happy New Year 2021 to every living soul on earth. Congratulations for making it through the myriad of 2020 curveballs. Many of us are hurting, have suffered illness, loss, and financial distress, confusion, disenfranchisement, or have waited long generations for justice. Yet here we are. That is something to celebrate.
Today is a good day to renew our courage and strength. Keeping ourselves and others sustained, encouraged, warm, fed and filled with good humor is no small task, but it is ours. Are you up for it?
A hot bowl of soup sends a message: I'm Ok. Are you Ok? I'm here. Together we'll keep our chins up. You are important. I am glad for you in my life. Take nourishment.
Yes, all this in a simple bowl of soup.
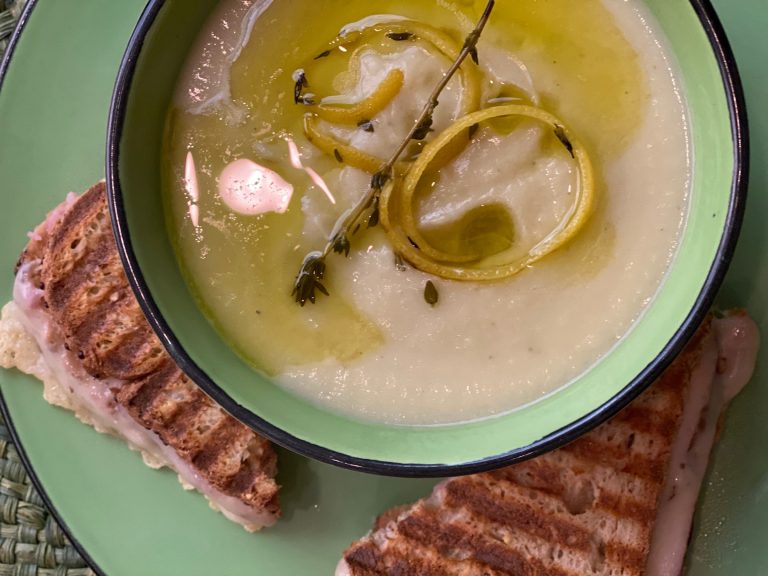
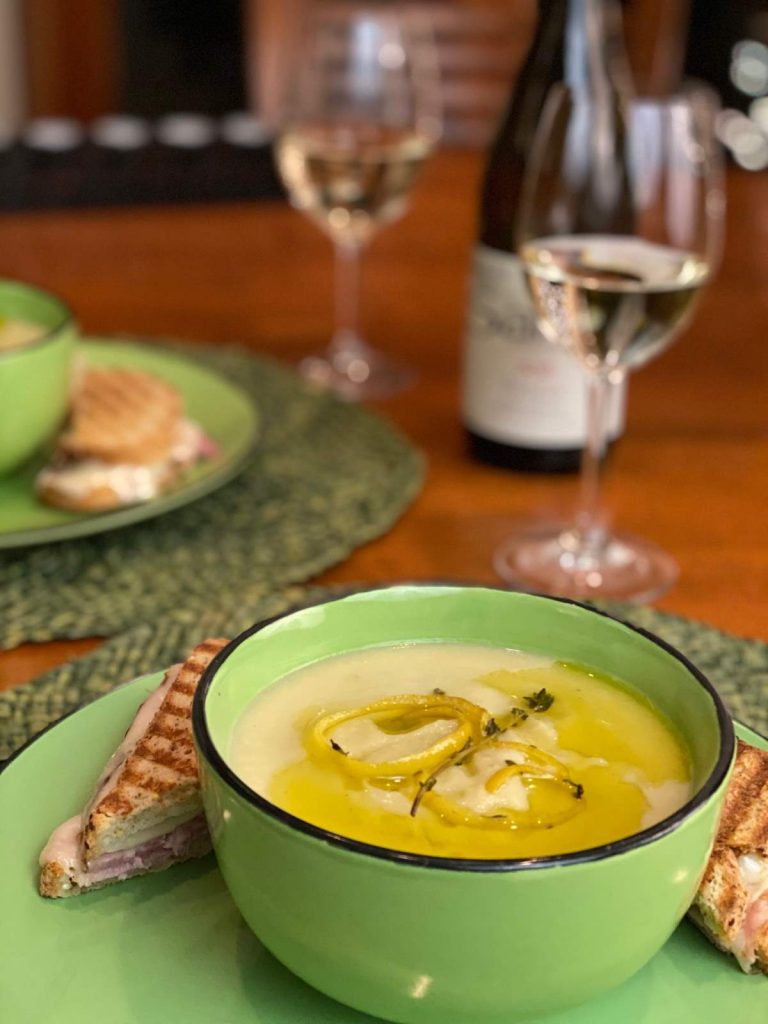
This elegant looking white soup simply used a bunch of white and palest green use-it-or-lose-it vegetables in my fridge. The guidelines you're about to read will work for nearly any vegetable or combination of vegetables for a flood of delicious soup options. Following these simple rules of thumb, you can have a creamy but cream-less pureed soup once a week all winter long and never grow bored. The same goes for the herbal drizzle. This really is a choose-your-own-adventure bowl of goodness.
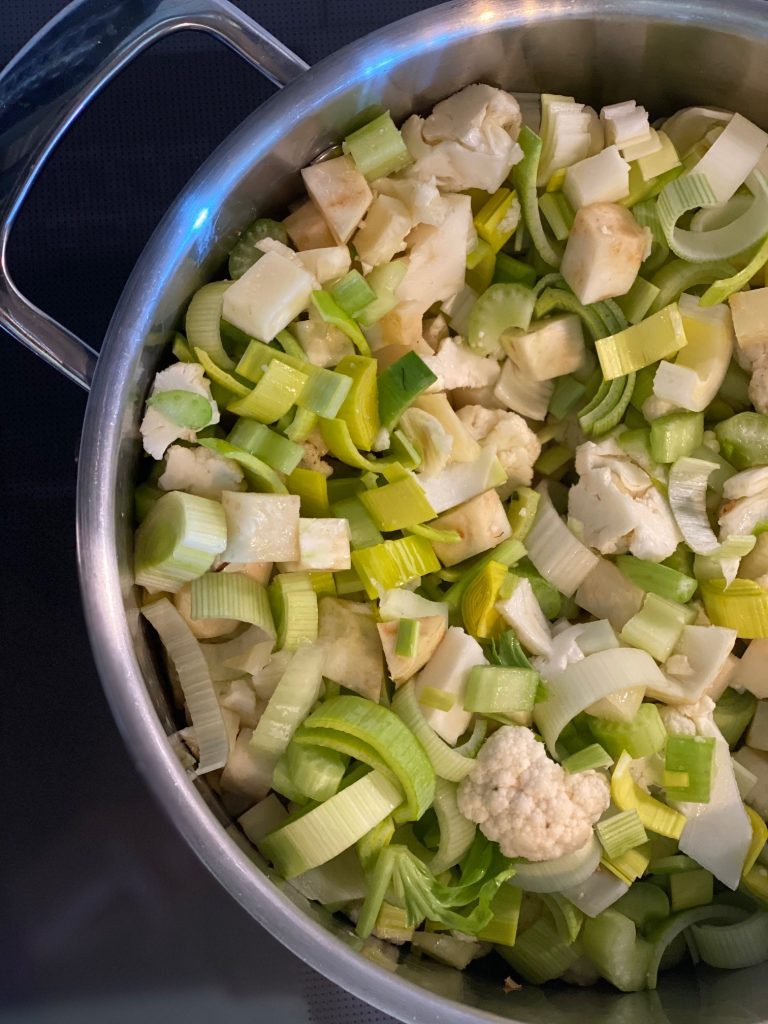
Step One: Gather, clean and roughly chop a bunch of vegetables from your bin. This is a great time to use up those that have been languishing. Choices include, but are not limited too:
roots like carrot, beet, turnip, parsnip, rutabaga, ginger, fresh turmeric
celery, fennel, celeriac (celery root)
onion, leek, shallot, garlic
potato, sweet potato
fresh or frozen peas or corn
peppers
winter squashes, like butternut and pumpkin
summer squashes
greens like kale, chard, mustard, spinach, collards, cress, etc.
fresh or canned tomatoes
brassicas like cauliflower, broccoli, cabbages, Brussels sprouts, kohlrabi, etc.
The featured soup used a small head of cauliflower, one celeriac, one fennel bulb, four stalks of celery with leaves, and about a cup of leftover mashed potatoes added during the simmer.
Your soup can be all one vegetable, a triad (corn, poblanos, and potato is amazing!) or a mélange like this winter white soup-- cauliflower, leek, celeriac, celery, and potato in the form of leftover mashers. Use your imagination and what you have on hand. There are no rules. (Except, purple veggies tend to turn an unappetizing gray when cooked this way. You may want to avoid purple carrots and cabbage.)
Quantity doesn't matter; you're going to be working in loose ratios. If you use a lot of vegetables, you'll make a bigger pot of soup. It's as simple as that.
Step Two: Plop your prepped veggies into a pot and give them a brief sauté in your favorite cooking oil or fat. Some choices are:
OVOO (extra virgin olive oil)
Ghee or butter
Reserved bacon fat (adds a smoky quality to the soup.)
Coconut oil
Add salt as you are sautéing, and pepper too. Layering in salt makes finished dishes so much better than waiting until the end. Vegetables demand salt, so give them what they want!
What size pan? If you have a small amount of vegetables, a three-quart saucepan may be just right. If you're aiming to feed a crowd or to have leftovers for lunches, think in terms of a six or eight quart, or even larger, stockpot. Give yourself some headspace if you'll be blending right in the pot, see below.
How much fat do you want to add? Good question! Don't be shy. Fats are highly maligned yet essential. Fats are what make your vegetable-based soup filling and satisfying. And here's the big secret for this soup-- it's a fair amount of fat that gives your blended soup a creamy texture, mouthfeel, and look.
To get more specific, make sure that the bottom of your pan is well-coated with your choice of oil or fat. An eighth-inch or so will be great. You can always add more for flavor or creaminess later.
How long, and at what heat? Sauté the veggies over medium heat until they are beginning to soften. Since you are using a deep pot, they will actually steam as much as sauté. This is perfect-- steaming begins to break down the cell walls, and the veggies will begin to sweat. Keep at this, stirring occasionally, until they are just beginning to become tender. This will be 10 minutes or so for a small pan; up to 20 minutes for a large one.
Step Three: Barely cover the vegetables with cooking liquid, cover, and simmer. Add liquid to just come to the top of the vegetables. If in doubt, use a little less-- you will adjust the thickness of your soup later. Here are some good choices for cooking liquid:
Water (So many recipes like this call for stock. Nothing wrong with that, but I love the pure vegetable flavor to shine out. I use water 90% of the time when I'm making these pureed soups, and reserve precious stock for other types of soups and stews.)
Stock (see above.)
A can of coconut milk, along with enough water to just cover the vegetables. (This is especially good with winter squashes and a spoonful of Thai curry paste, garam masala, or madras curry powder.)
A little wine, red or white, in addition to one of the above.
With certain vegetable choices, tomato juice will work, too.
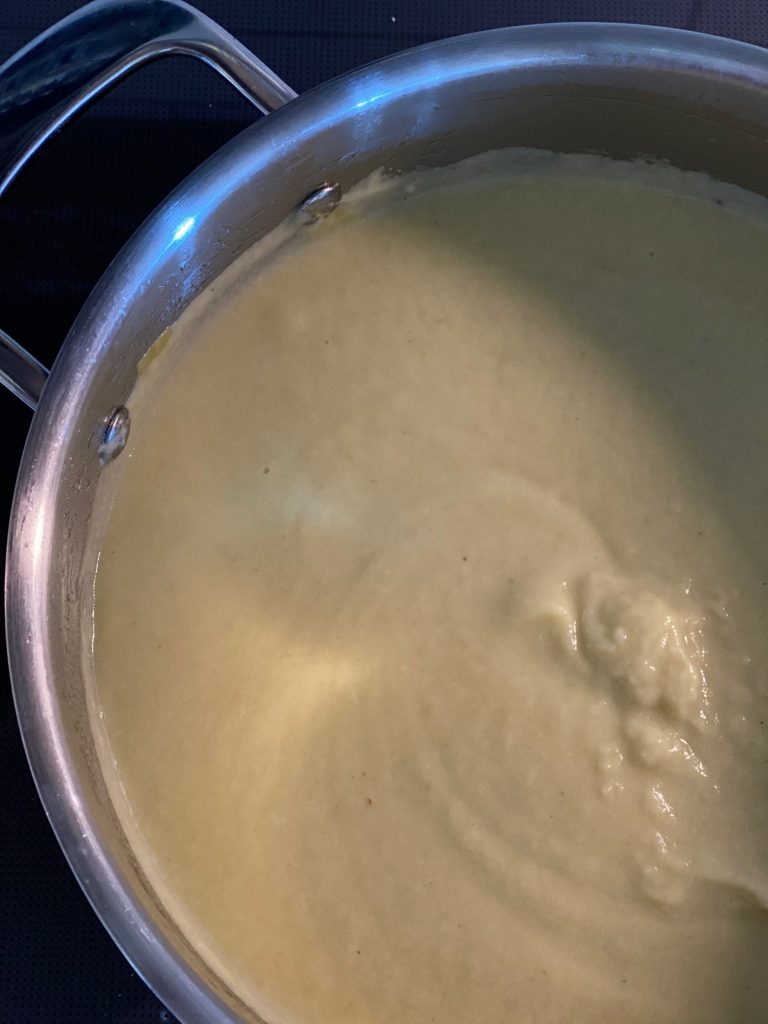
Step Four: Simmer, stirring every five minutes or so, until the vegetables are fully tender and a fork can be somewhat easily inserted. If I'm using hard vegetables like turnips, parsnips, and celeriac I give this up to 30 minutes, less time for the tender ones.
Step Five: Blend the vegetables with an immersion blender (my favorite,) or in a blender or food processor until completely smooth and no lumps remain. An immersion (stick) blender makes this fast, easy, safer, and with less clean up. If you love this type of soup like I do, you will want to get one if you don't already have one.
You’re going for a consistency slightly thicker than heavy cream. Add more of your cooking liquid or water in small amounts until it gets there. Without enough liquid, you'll have difficulty getting your soup smooth and lumpless. On the other hand, if your soup seems too thin let it continue to simmer and reduce at medium-low heat, stirring very often-- the pureed soup spews bubbles all over your stovetop as it heats, so stir ever one minute or so-- until it thickens up.
Now is a good time to taste for salt and pepper and make adjustments.
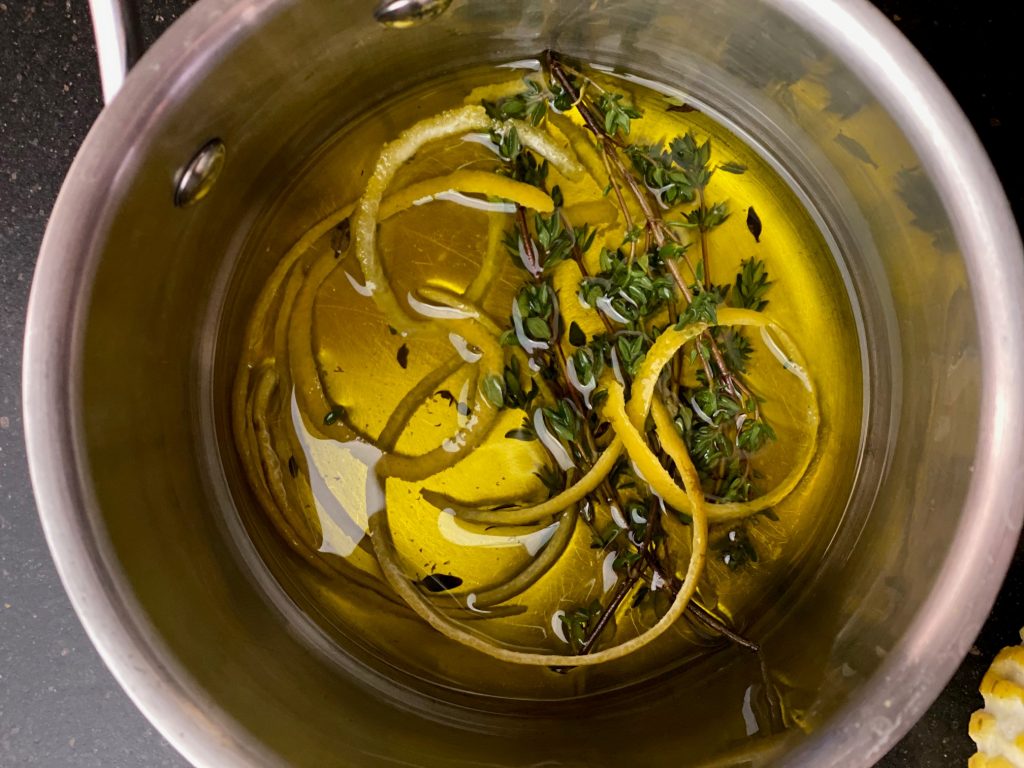
For the Lemon Thyme Drizzle, and other fun ways to jazz up a pureed vegetable soup:
Step One: While your vegetables are sautéing and simmering, in a small saucepan pour 1/4 cup EVOO. Add your choice of fresh herbs. My favorites are:
thyme
rosemary
basil
tarragon
dill
Add some citrus strips or grated zest. Lemon, orange, and lime all are great, depending on the vegetables you use. The citrus adds a bright lift to the finished dish.
Step Two: On very low heat and stirring occasionally, let this gently steep while the soup is coming together. Right before serving, strain it, reserving pieces of zest and any whole herbs that look pretty as a garnish.
Use any leftover fancy oil in salad dressings or sautes. No need to waste a single drop of this flavor booster.
Other great ways to dress up a pureed soup:
A handful of roughly chopped nuts-- hazelnut, almond, walnut are especially good.
A dab of sour cream or creme fraiche.
A handful of croutons made from day-old bread tossed in a little oil and garlic and/or herbs as toasted in the oven for 5-8 minutes.
Or just a scattering of fresh minced herbs and a swirl of olive oil.
Plate up your soup while it is hot, and garnish away. Enjoy experimenting with various vegetables, herbs, oils, and toppings. Trust your intuition!
Blessings on your 2021. Be well, brave, and strong. Get plenty of sleep. Find ways to renew your courage. Take time out. Reach out. Make soup.
Like a warm cashmere blanket. Use these simple guidelines to make an infinite variety of interesting and flavorful pureed soups. Don't let the length scare you-- I just chat you through the steps!
roots like carrot, beet, turnip, parsnip, rutabaga, ginger, fresh turmeric
celery, fennel, celeriac (celery root)
onion, leek, shallot, garlic
potato, sweet potato
fresh or frozen peas or corn
peppers of any kind
winter squashes, like butternut and pumpkin
summer squashes
greens like kale, chard, mustard, spinach, collards, cress, etc.
brassicas like cauliflower, broccoli, cabbages, Brussels sprouts, kohlrabi, etc.
Make It Your Own Cooking Liquid Choices
vegetable, mushroom, chicken or beef stock, or
water
coconut milk +water
Choose Your Own Aromatics Adventure
fresh or dried herbs of your choice
Thai curry paste or curry spice blends, such as Madras or Ras el Hanout
Instructions
Gather, clean and roughly chop a bunch of vegetables from your bin. This is a great time to use up those that have been languishing. Your soup can be all one vegetable, a triad (corn, poblanos, and potato is amazing!) or a mélange like this winter white soup made from cauliflower, leek, celeriac, celery, and potato in the form of leftover mashers. Use your imagination and what you have on hand. There are no rules. (Except, purple veggies tend to turn an unappetizing gray when cooked this way. You may want to avoid purple carrots and cabbage.) Quantity doesn't matter; you're going to be working in loose ratios. If you use a lot of vegetables, you will make a bigger pot of soup. It is as simple as that.
Plop your prepped veggies into a pot and give them a brief sauté in your favorite cooking oil or fat. Add salt as you are sautéing, and grind in some black or white pepper too. Layering in seasoning makes finished dishes so much better than waiting until the end. Vegetables demand salt, so give them what they want!What size pan? If you have a small amount of vegetables, a three-quart saucepan may be just right. If you are aiming to feed a crowd or to have leftovers for lunches, think in terms of a six or eight quart, or even larger, stockpot. Give yourself some headspace if you'll be blending right in the pot, see below.How much fat do you want to add? Good question! Don't be shy. Fats are highly maligned yet essential. Fats are what make your vegetable-based soup filling and satisfying. And here is the big secret for this soup: It is a fair amount of fat that gives your blended soup a creamy texture, mouthfeel, and look. To get more specific, make sure that the bottom of your pan is well-coated with your choice of oil or fat. An eighth-inch or so will be great. You can always add more for flavor or creaminess later.How long, and at what heat? Sauté the veggies over medium heat until they are beginning to soften. Since you are using a deep pot, they will actually steam as much as sauté. This is perfect, as steaming begins to break down the cell walls, and the veggies will begin to sweat. Keep at this, stirring occasionally, until they are just beginning to become tender. This will be 10 minutes or so for a small pan; up to 20 minutes for a large one.
Barely cover the vegetables with your choice of cooking liquid, cover, and simmer. Add liquid to just come to the top of the vegetables. If in doubt, use a little less– you will adjust the thickness of your soup later. Here are some good choices for cooking liquid:Water (So many recipes like this call for stock. Nothing wrong with that, but I love the pure vegetable flavor to shine out. I use water 90% of the time when I’m making these pureed soups, and reserve precious stock for other types of soups and stews.)Stock (see above.)A can of coconut milk, long with enough water to just cover the vegetables is especially good with winter squashes and a spoonful of Thai curry paste, garam masala, or madras curry powder.A little wine, red or white, in addition to one of the above.With certain vegetable choices, tomato juice will work, too.
Simmer, stirring every five minutes or so, until the vegetables are fully tender and a fork can be somewhat easily inserted. If I’m using hard vegetables like turnips, parsnips, and celeriac I give this up to 30 minutes, less time for the tender ones.
Blend the vegetables with an immersion blender (my favorite) or in a blender or food processor until completely smooth and no lumps remain. You are looking for a consistency slightly thicker than heavy cream. Add more of your cooking liquid or water in small amounts until it gets there. Without enough liquid, you will have difficulty getting your soup smooth and lumpless. On the other hand, if your soup seems too thin let it continue to simmer and reduce at medium-low heat, stirring very often. The pureed soup spews bubbles all over your stovetop as it heats, so stir ever one minute or so until it thickens up.Now is a good time to taste for salt and pepper and make adjustments. Plate up your soup while it is hot, and garnish With the following drizzle.
Choose Your Own Adventure Drizzle
While your vegetables are sauteding and simmering, in a small saucepan pour 1/4 cup EVOO. Add your choice of fresh herbs. My favorites are:thymerosemarybasiltarragondillAdd some citrus strips or grated zest. Lemon, orange, and lime all are great, depending on the vegetables you use. The citrus adds a bright lift to the finished dish.
On very low heat and stirring occasionally, let this gently steep while the soup is coming together. Right before serving, strain it, reserving pieces of zest and any whole herbs that look pretty as a garnish.
Notes
If the drizzle is not your style, try garnishing with a bit of chopped fresh herb and a swirl of olive oil.Enjoy experimenting with various vegetables, herbs, oils, and toppings. Trust your intuition!
Follow Me
Welcome!
You’re in the right place! I’m Pam Spettel, home cooking expert and guide, and I’m here to show you how to break up with cooking and hospitality anxiety, learn how to use recipes as guides rather than strict rules, and let your cooking intuition and confidence soar.
Superpower: Dreaming up recipes that work, serving them to my friends and family, and writing little stories about how cooking them well is the same as loving well.
Inspiration: Ingredients! The fresh, colorful, fragrant, local, seasonal ingredients found in the Pacific Northwest are my creative medium.
Heroes: Local food and wine producers– the people who keep me, my family, and our community nourished and happy.
We use cookies on our website to give you the most relevant experience by remembering your preferences and repeat visits. By clicking “Accept”, you consent to the use of ALL the cookies.
This website uses cookies to improve your experience while you navigate through the website. Out of these, the cookies that are categorized as necessary are stored on your browser as they are essential for the working of basic functionalities of the website. We also use third-party cookies that help us analyze and understand how you use this website. These cookies will be stored in your browser only with your consent. You also have the option to opt-out of these cookies. But opting out of some of these cookies may affect your browsing experience.
Necessary cookies are absolutely essential for the website to function properly. These cookies ensure basic functionalities and security features of the website, anonymously.
Cookie
Duration
Description
cookielawinfo-checkbox-analytics
11 months
This cookie is set by GDPR Cookie Consent plugin. The cookie is used to store the user consent for the cookies in the category "Analytics".
cookielawinfo-checkbox-functional
11 months
The cookie is set by GDPR cookie consent to record the user consent for the cookies in the category "Functional".
cookielawinfo-checkbox-necessary
11 months
This cookie is set by GDPR Cookie Consent plugin. The cookies is used to store the user consent for the cookies in the category "Necessary".
cookielawinfo-checkbox-others
11 months
This cookie is set by GDPR Cookie Consent plugin. The cookie is used to store the user consent for the cookies in the category "Other.
cookielawinfo-checkbox-performance
11 months
This cookie is set by GDPR Cookie Consent plugin. The cookie is used to store the user consent for the cookies in the category "Performance".
viewed_cookie_policy
11 months
The cookie is set by the GDPR Cookie Consent plugin and is used to store whether or not user has consented to the use of cookies. It does not store any personal data.
Functional cookies help to perform certain functionalities like sharing the content of the website on social media platforms, collect feedbacks, and other third-party features.
Performance cookies are used to understand and analyze the key performance indexes of the website which helps in delivering a better user experience for the visitors.
Analytical cookies are used to understand how visitors interact with the website. These cookies help provide information on metrics the number of visitors, bounce rate, traffic source, etc.
Advertisement cookies are used to provide visitors with relevant ads and marketing campaigns. These cookies track visitors across websites and collect information to provide customized ads.