101-Mile Kitchen logo- green bar
A top-down photo of a bowl of red tomato soup in a white bowl.

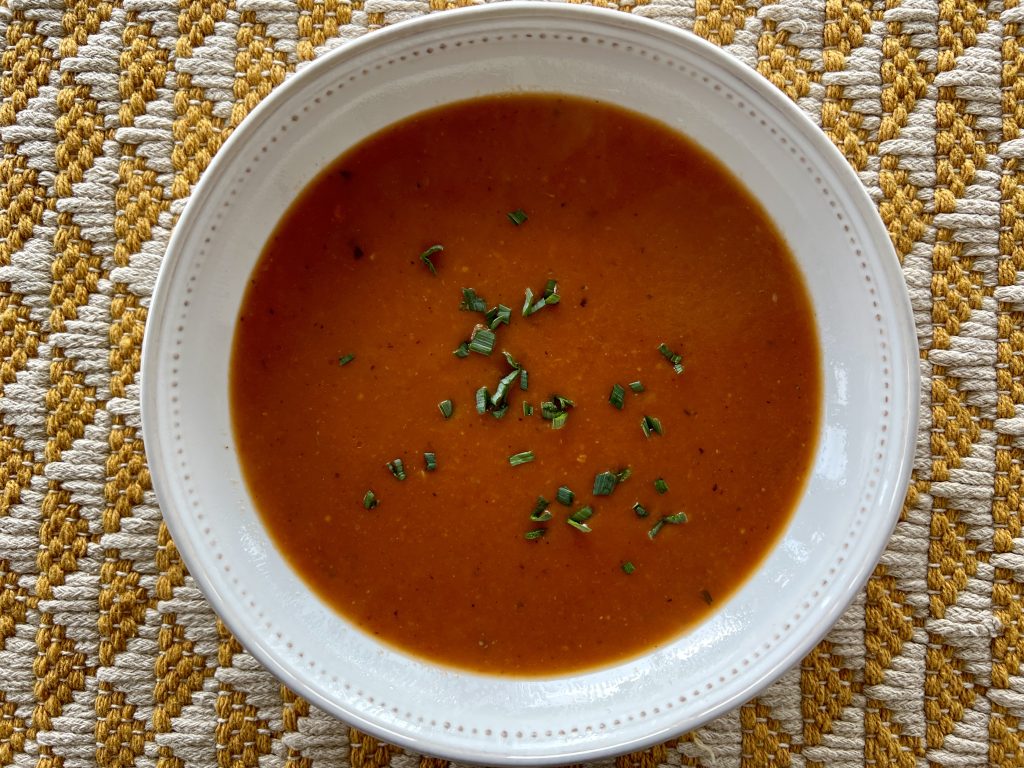
Yesterday I shared with you The World's Best Grilled Cheese Sandwich, made with garlicky greens, caramelized onion, and brie. It's only fitting that you have The World's Best Tomato Soup recipe to go with it. The two are a match made in heaven.

A Word About Canned Tomatoes

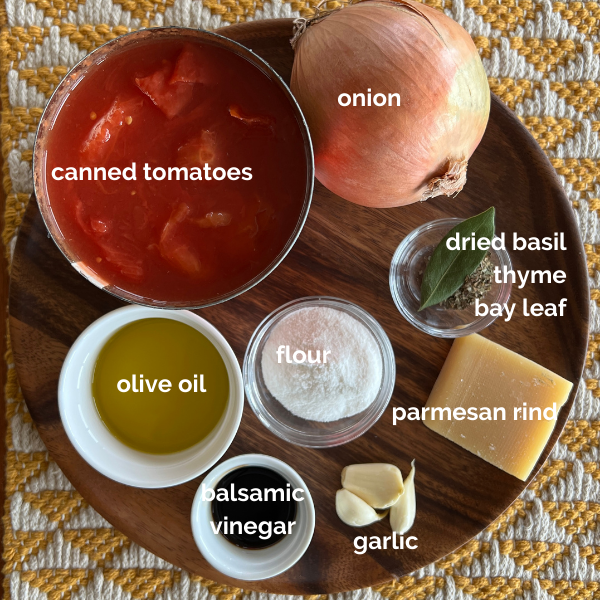
I've driven Interstate Five through California's agricultural regions many times. Enough times to see truckloads of produce pulling off the highway into the many canneries there. May I tell you that not all canned tomatoes are of the same quality? I've observed truckload after truckload of hard pink balls in the truck-trailers. It's not hard to know how they will perform in flavor and texture next to their red, ripe cousins. My practical observation is that you truly get what you pay for in canned tomatoes. Unless you use a lot of canned tomatoes, the price differential is relatively small. It might not make that much difference in a stew with lots of other flavors, but here's my rule of thumb: If the word tomato is in the title of the food I'm making, like tomato sauce, for example or the world's best tomato soup, I spend the extra dollar.

Making the World's Best Tomato Soup

tomato soup with garlicky greens and brie grilled cheese sandwich

First, lets talk equipment. This is a time when an immersion blender is more than handy. Yes, you can blend the soup in batches in either a food processor or blender. However, a stick blender will get the job done and reduce the amount of cleanup you'll have. I've not met a cook yet who would argue with that!

Because it's still late winter I used dried herbs and a bay leaf, which also gets blended into the soup, but in the growing season, trade those herbs out for fresh basil, fresh thyme, or any of the tender, leafy herbs that suit you.

Two other touches make the soup extra special. I save parmesan rinds for times like this. Just throw one in during the short simmering period for an extra flavor boost. The rind will soften and become somewhat gooey looking, but holds together just fine and can easily be fished out prior to blending. If you don't have a parm rind on hand that's just fine. The soup is still lovely so don't let that stop you from making it. The second bit of magic comes with a hearty drizzle of balsamic vinegar as a finishing touch.

The olive oil in here gives it a creamy texture and appearance, but if you love a splash of milk or cream in your tomato soup, by all means use it.

If you like this recipe, please leave it a star rating by clicking on the green stars below the title in the recipe card below. If you like the 101-Mile Kitchen project, I'd be honored if you subscribed to the newsletter!

A platter holding all the ingredients for The World's Best Tomato Soup
a top-down photo of a bowl of red tomato soup in a white bowl.

The World's Best Tomato Soup

Course: Appetizer, Main Dish, Quick + Easy, Soup + Stew
Cuisine: American
Season: All Season
Dietary: Gluten-Free
Preparation: Fast + Easy, One Pot/One Pan
Prep Time: 15 minutes
Cook Time: 30 minutes
Total Time: 45 minutes
Servings: 4
A few special touches make this recipe the only one you need for The World's Best Tomato Soup!
Print Recipe

Ingredients

  • 3 Tbsp. extra virgin olive oil
  • 1 large onion, peeled and diced
  • 3 cloves garlic, minced
  • ½ teaspoon dried thyme
  • ½ teaspoon dried basil
  • 1 bay leaf
  • 2 Tbsp. flour, rice flour, or 1-to-1 GF flour
  • 1 28 oz. can whole tomatoes and their juice
  • 2 cups water
  • 1 parmesan rind, optional
  • 1 teaspoon kosher salt
  • ground black pepper to taste
  • 2 Tbsp. balsamic vinegar

Instructions

  • Heat the olive oil in a large saucepan over medium heat. Add the diced onion and sauté until the onion has softened and is starting to become translucent. Add the garlic, thyme, basil and bay leaf and sauté another 2-3 minutes. Add the flour and sauté, stirring for another 2-3 minutes.
  • Add the tomatoes and their juices, the water, optional parmesan rind, salt, and pepper and bring to a simmer. Cover, and simmer for 30 minutes, stirring occasionally.
  • Remove the parmesan rind and blend the soup using an immersion blender, food processor, or blender. If using a food processor or blender, blend in batches. Blend until the soup is fairly smooth, but still has a slight amount of tomato texture. Remove from the heat and stir in the balsamic vinegar. Serve piping hot.
jar of roasted vegetable stock

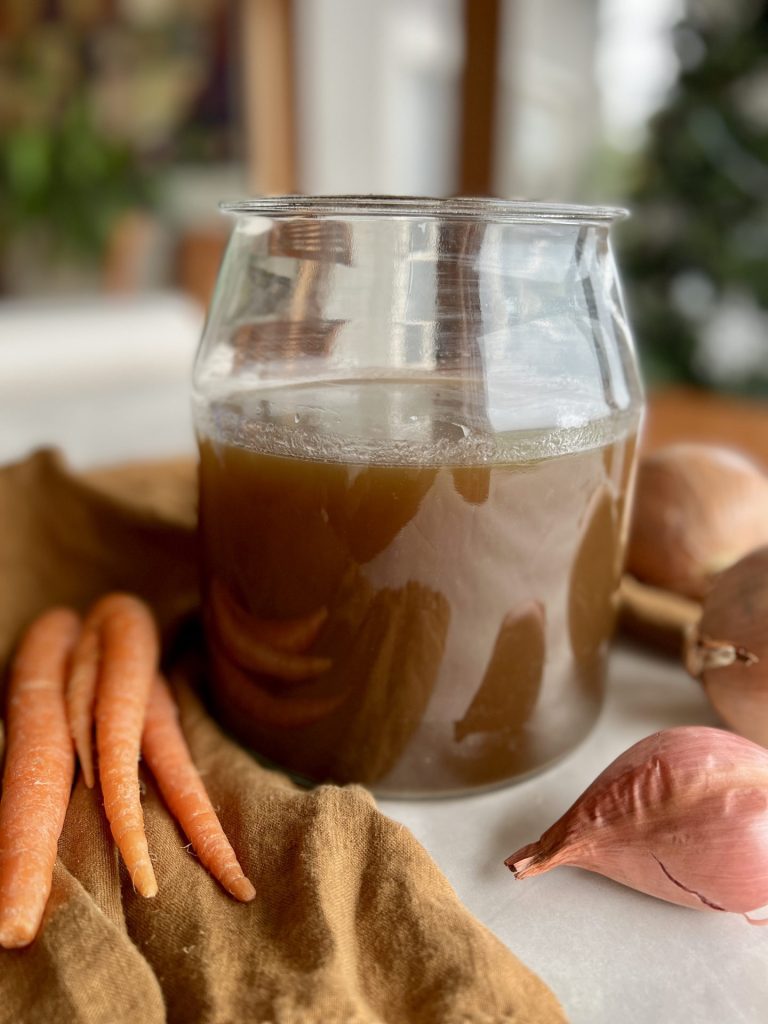
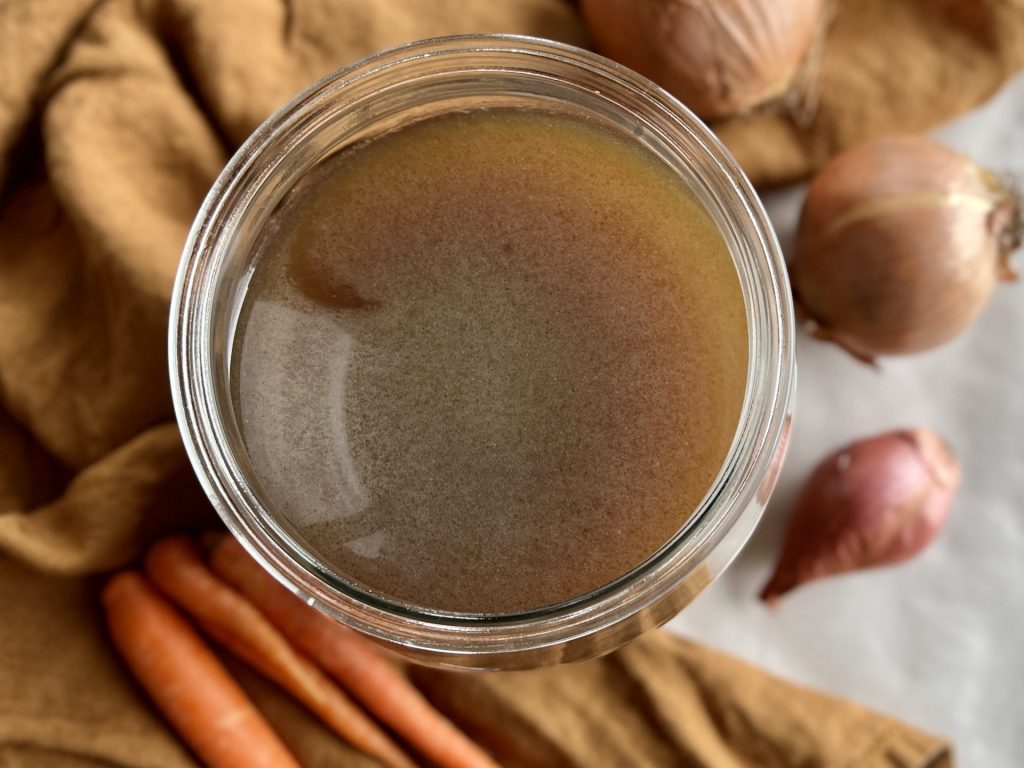
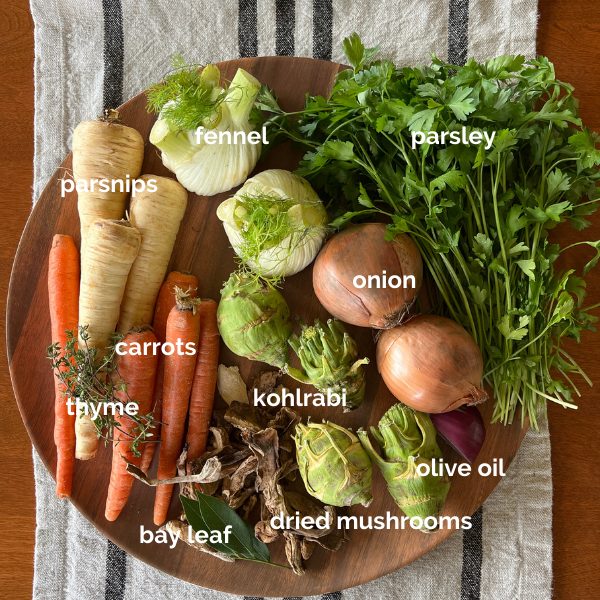
One of the graces of home cooking is that there are no paying customers demanding a dish to be exactly the same visit after visit. Each time you make roasted vegetable stock you use any variety of vegetables, bones, meats, herbs, and spices you happen to have. Each time the stock will have a subtly unique flavor. This may not work well in a restaurant, but is terrific at home.

This post is dedicated to my 1970's junior high school home economics teacher, Mrs. Waetje, who taught that reducing waste is a tenet of home economics-- a wise use of family finances. It is a great feeling to rummage through the fridge for vegetables that may otherwise go to waste and turn them into liquid gold. Thank you, Mrs. Waetje, and if you are still out there, I was paying attention despite my wiggles and perpetual chatter.

Wake up Your Cooking with Aromatic and Delectable Stock

Your roasted vegetable stock will add layers and layers of flavor to the soups and stews you make-- that's a given. Use your liquid gold to make risotto, to cook rice and grains like barley, farro, and buckwheat groats. Use it as a medium in which to simmer your dried beans, and as a base for meaty braises. A ladleful added to just about any ragu or stew will deepen its flavor. And one of my favorite things is to cradle a hot mug of broth first thing in the morning as a gentle winter wake up tonic.

The Difference Between Unroasted and Roasted Vegetable Stock

Roasting the vegetables before the simmer produces a deep, richly flavored stock perfect for supporting heartier cool-weather ingredients and recipes. Save the light golden unroasted vegetable stocks for spring and summer cooking. To make a typical light golden broth, simply do not roast the vegetables first, and omit the mushrooms. Follow the remaining directions as they are written.

overhead picture of a jar of roasted vegetable stock.

The Difference Between Stock and Broth

There seems to be a different answer to this question for every person who asks it. Some say that to be called stock it needs to be made with bones, or that broth is something you sip and stock is something you cook with. Another pundit suggests broth is lighter and more flavorful, while stock is thicker. That is questionable, in my opinion, as light broths can be rather wan and flavorless, and thicker stocks can be full of complex flavor.

So, potayto, potahto. Make some, enjoy it, and call it whatever you want. To me, spring and summer cooking seems to lend itself to light broths, autumn and winter to rich, brown stocks. The cooking community seems to agree that the terms are interchangeable. Whatever rolls out of my mouth is the term I'll use!

Vegetable Stock Do's and Don'ts

The very thrifty among us (like Mrs. Waetje, I'm sure) keep a zip-bag in the freezer and stuff clean, vegetable scraps into it. When it's full it is time to make stock.

Classic mirepoix-- onion, carrot, and celery are standard issue in stock making. (You will note the absence of celery in the mis en place photo below. I didn't have any, and it is not noticeably missed in the resulting stock.) See the notes section of the recipe for a more comprehensive list of vegetables and optional ingredients that can contribute to great stock.

Most vegetables make a good stock, with a few exceptions; Brussels sprouts, broccoli, cauliflower, asparagus, and artichokes can be overpowering or add off-putting flavor notes, so avoid them for this purpose. Beets, especially red ones, will likely make your stock an odd and unappealing color, so think twice about throwing those into the pot. Potatoes are fine, but I don't use them to keep the stock a little more clear than cloudy, a personal preference.

Mushrooms are lovely in a roasted vegetable stock. Dried mushrooms, even better! Just one ounce of dried mushrooms (don't roast them-- just add them to the pot with the water) intensify the rich flavor and add a deeper color to the stock. They are not required, but do add something nice and grounding.

Limp, wilted, scuffed, and past-their-prime vegetables are all fair game. Just be sure to peel or cut off any parts that have blackened or have signs of mold to keep your broth clean and fresh tasting.

Use Your Roasted Vegetable Stock in These Recipes

To cook the grain in Roasted Mushroom, Grain, and Spinach Salad. Get the Recipe.
In place of the water in Pumpkin Black Bean Soup. Get the recipe.

Last Words

If you like this recipe, please give it rating by clicking into the green stars, and if you have questions about the recipe or other culinary dilemmas, please email me at pam@101milekitchen.com. Your success is important to me. Thank you to each and every one of you who subscribes to 101-Mile Kitchen newsletters. You are appreciated more than you'll ever know!

pot of roasted vegetable stock

Roasted Vegetable Stock

Course: Soup + Stew
Season: Mist (November - March)
Dietary: Dairy-Free, Gluten-Free, Vegan
Preparation: Roasting
Total Time: 2 hours 15 minutes
Servings: 2 quarts
Deep, richly flavored roasted vegetable stock provides perfect support to hearty cool-weather ingredients and recipes.
Print Recipe

Ingredients

  • 4-5 pounds mixed vegetables See notes.
  • 4-6 cloves garlic
  • 2-3 Tablespoons olive oil
  • 1 teaspoon kosher salt, plus more for adjusting at the end
  • 1 teaspoon whole black or mixed peppercorns
  • 1 bunch parsley, flat leaf or curly, stems trimmed
  • assorted fresh herbs of your choice, about one bunch total, OR dried herbs of your choice, up to 2 teaspoons
  • 1 ounce dried mushrooms, any variety, optional
  • 1-2 bay leaf
  • other optional ingredients of your choice. See notes.
  • quarts water

Instructions

  • Preheat oven to 350°, or 325° convection. Line a 13" x 18" baking sheet with foil.
  • Wash the vegetables and trim away any spoiled parts. Cut the vegetables into evenly sized chunks and place them on the foil-lined baking sheet. Sprinkle lightly with salt and a good drizzle of olive oil, up to 3 Tablespoonsful. Mix gently together with your hands. Place the sheet into the oven and roast for about 40 minutes, or until the onions and other vegetables are beginning to take on some roasted color and are quite fragrant, stirring halfway through.
  • Place the roasted vegetables and any browned stuck-on parts and oil that remain into an 8 quart stockpot. Add the salt, peppercorns, fresh or dried herbs, dried mushrooms, if using, bay leaves, and water. Bring the pot to a rapid boil, and immediately reduce heat to maintain a simmer. Cover, and cooking for 1-2 hours, stirring often. Remove the lid for the last half of cooking.
  • Taste the stock and adjust seasoning by adding more salt if necessary. Allow the stock to cook slightly until safe to handle.
  • Strain the stock first through a colander to remove the larger bits, then strain again through a very fine mesh strainer to remove the tiny bits that make it cloudy. Store in the refrigerator for up to 5 days, or freeze for up to three months.

Notes

Vegetable selection:
Classic mirepoix-- onion, carrot, and celery are standard issue. Most vegetables make a good stock. Do use the leaves, peels, skins, and stalks of leeks, garlic, peppers, parsnips, turnips, squashes, fennel, kohlrabi, tomatoes. Corn and corn cobs and celery root, are good additions, too. 
Think twice about using Brussels sprouts, broccoli, cauliflower, asparagus, and artichokes which can add overpowering off-putting flavor notes. Potatoes are fine, but omitting them will keep the stock from becoming too cloudy.
Mushrooms are lovely in a roasted vegetable stock. Dried mushrooms are even better! Just one ounce of dried mushrooms (don't roast them-- just add them to the pot with the water) intensify the rich flavor and deep color to the stock. They are not required, but do add something nice.
Optional additions:
Rinds (not the juicy flesh) of citrus, especially lemon and orange.
Nubs of fresh ginger and/or turmeric.
Dried chilis of any variety. I find a couple small arbols add a very subtle warmth. The larger dried chilis will make a marked flavor difference and would be fantastic as a tortilla soup base, for example. 
Varied fresh herbs. Nearly all herb will make a nice flavor contribution, but do be careful with some of the more overpowering herbs such as rosemary and oregano. A little can go a long way.
Dried herbs are much more condensed in flavor than fresh, so a little goes a long way here, too. But do use them!
Juniper berries are wonderful in a stock. Add up to 1 teaspoonful, gently crushed to release even more of their wintry flavor. 

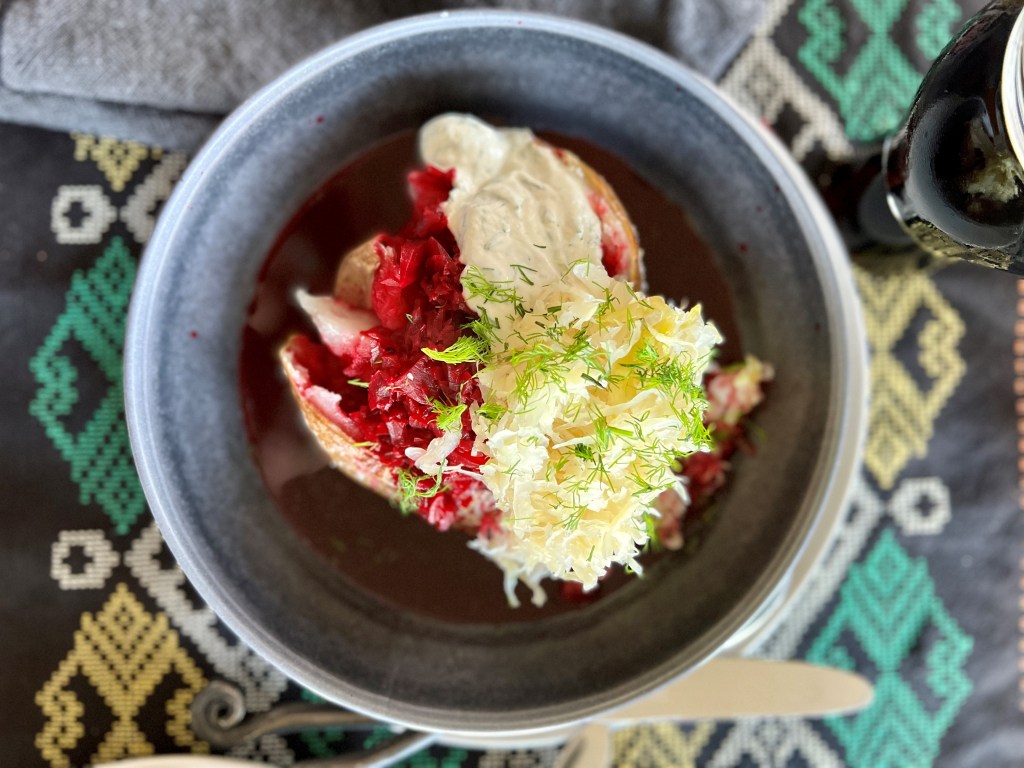
I am always surprised at how many people don't enjoy winter vegetables and the glorious things you can make with them, like this simple deconstructed Borscht Bowl. Here is my theory why.

Overhead image of a bowlful of deconstructed borscht on table.
Deconstructed Borscht Bowl

Not all that long ago, people ate whatever the seasons offered. Storage vegetables sustained us into the cold winter. Parsnips, potatoes, carrots, rutabagas, turnips, cabbages, and beets were familiar and welcome.

Then the frozen food explosion of the early 1950s came. Supermarkets full of freezer cases exploded into cities and suburbs. We now have over three generations of people who have had the luxury of eating sweet peas in January as though it is natural. Consequently, we have lost our taste for hearty winter vegetables.

Frozen food technology is great, really. But to allow it to shake us lose from the joys of seasonal eating? To let go of a whole swath of foods designed to provide what we need in cold weather? What a shame. Let's fix that with some borscht-y goodness.

Rustic, Warming, Healing, and Delicious

Deconstructed Borscht Bowl in a bowl on the table.

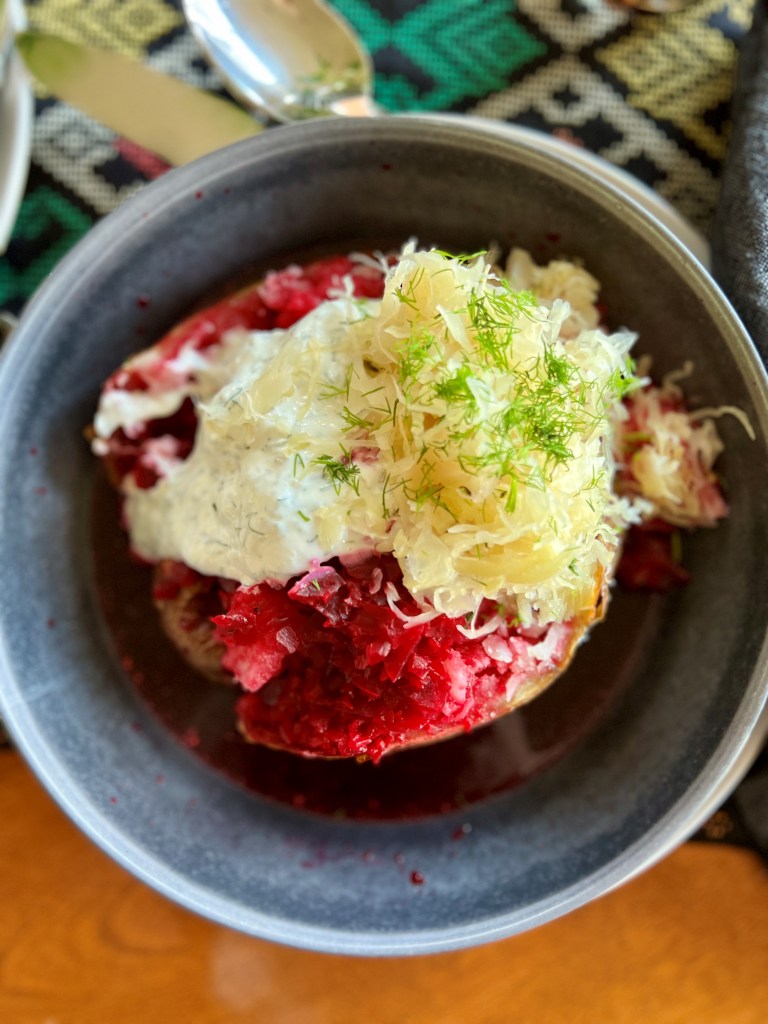
Our deconstructed Borscht Bowl is inspired by Eastern European borscht made of beet, potato, cabbage, sour cream and dill. Here, we just arrange the components a little differently. It is the perfect thing to eat on a dark winter's evening, a chunk of caraway rye black bread and perhaps some browned sausages alongside.

I love the short-day season at the dinner table. Nearly every night we light candles and dim the overhead lights. The glow of candlelight on the face of my beloved dinner companion casts him in his one-and-only kind of charm. Dinner topics move from what happened outdoors today to what it happening in our souls today. These dinners help our roots sink deeper.

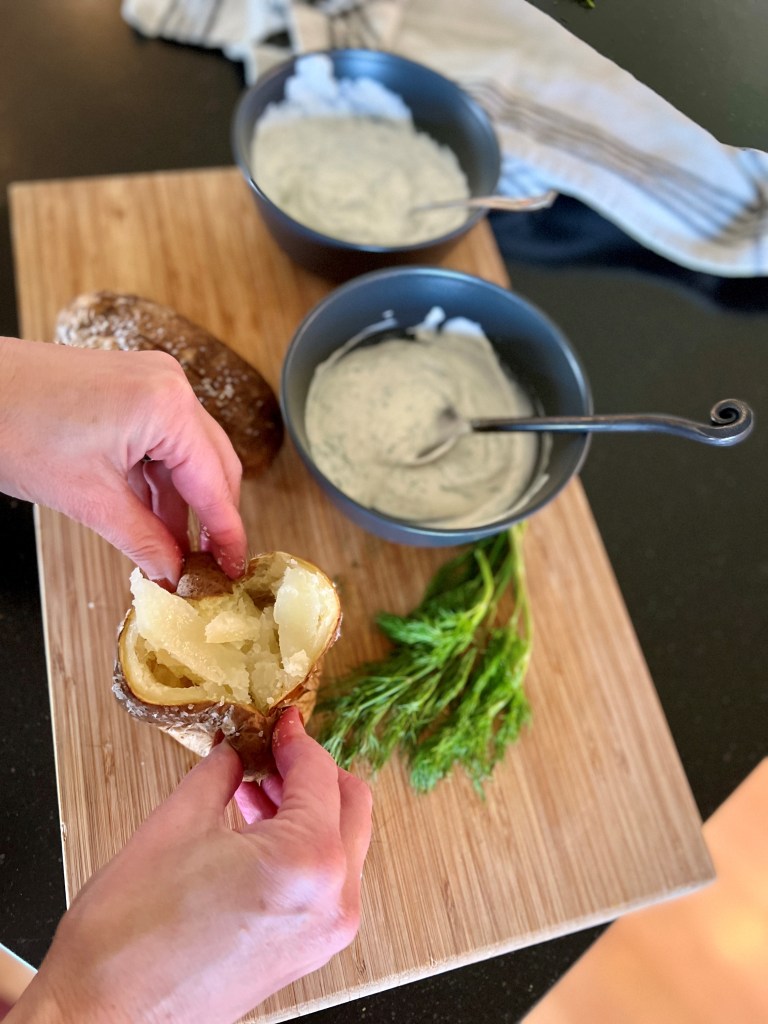
In the same way, one of my favorite things is to wrap my hands around a warm bowl of wintery food. Try filling your bowl with a fluffy, crusty baked potato. Ladle over rosy beets and broth. Pile on store-bought or homemade sauerkraut, full of beneficial immunity-boosting bacteria. Dollop on horseradish-laced sour cream. Embrace eating with the season.

Making the Deconstructed Borscht Bowl

Image of the ingredients you'll need: stock, sauerkraut, beets, horseradish, olive oil, fresh dill, sour cream, and potatoes.
Ingredients you will need.

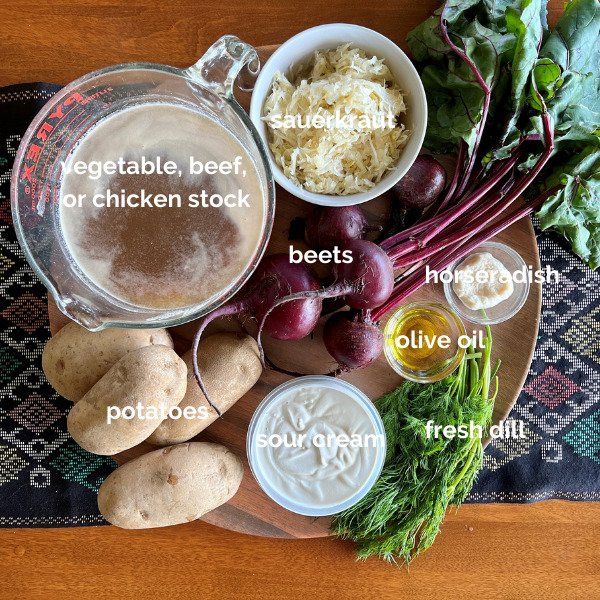
The crackly-skinned, fluff-filled baked potato in the bottom of the bowl adds heft and makes a good excuse to warm your space with the oven. Best of all, it mops up the delicious bright pink broth.

The beets and their broth are made quickly on the stovetop or in a pressure-cooker while the potatoes are baking.

The cabbage in this bowl comes in the form of sauerkraut-- either homemade or store-bought. Fermented foods are so good for us! Pile it on and toast to your health!

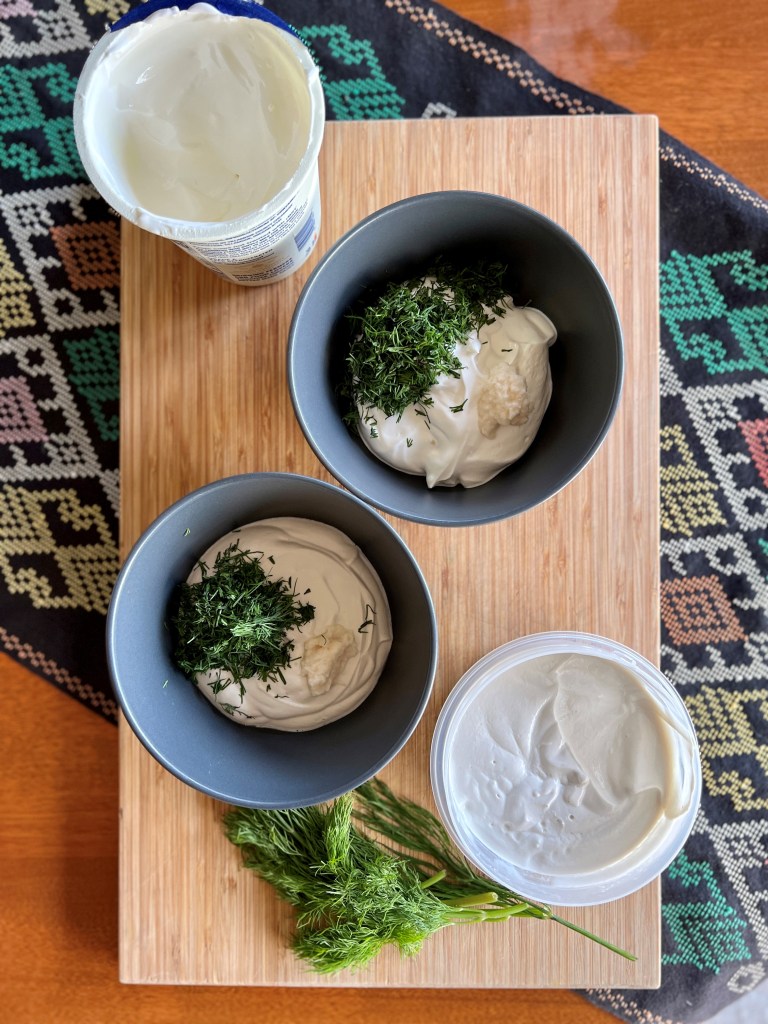
Finally, we stir some horseradish, freshly grated or prepared, into some sour cream along with a lot of fresh dill to dollop over the Borscht Bowl, and give it a snowy dusting of dill over the top. Yes, please.

Other Wintery Ways to Dress a Baked Potato:

Use the rich mushroom gravy component of this recipe over a baked potato for another easy and wonderful winter dinner!

Deconstructed Borscht Bowl

Course: Main Dish, Soup + Stew
Season: Mist (November - March)
Dietary: Dairy-Free, Gluten-Free, Vegan, Vegetarian
Prep Time: 1 hour
Total Time: 1 hour
Servings: 4
Deconstructed Borscht Bowl is inspired by Eastern European borscht made of beet, potato, cabbage, sour cream and dill. Here, we just arrange the winter vegetable components into a bowl for a hearty warming winter meal.
Print Recipe

Ingredients

  • 4 Russett potatoes, scrubbed
  • 1 Tbsp. olive oil
  • 5 cups vegetable, beef, or chicken stock homemade, purchased, or made from bouillon
  • 1 ½ pounds beets, cooked and peeled
  • 2 cups sauerkraut, homemade or purchased
  • 8 ounces sour cream or cashew sour cream (recipe below) for dairy-free/vegan option
  • 2-3 teaspoons horseradish, freshly grated or prepared
  • 1/2 cup chopped fresh dill, packed
  • salt + pepper to taste

Cashew Sour Cream

  • 1 cup raw cashew pieces (no need for the more expensive whole nuts here) Where available, Trader Joe's is a good source for most nuts, including cashews.
  • ½ cup water
  • Tbsp. lemon juice or apple cider vinegar, or a mix of both
  • ½ tsp. salt

Instructions

Deconstructed Borscht Bowl

  • Preheat oven to 400°. Rub the potatoes with olive oil and place them on a baking sheet. Sprinkle them with coarse salt, and with a sharp knife, cut a 2"-3" slit in the top of each potato. Roast until a knife inserted into the center offers no resistance and they give in to a little squeeze. Depending on your oven, this may take 40 minutes to an hour.
  • Bring the stock to a simmer in a large saucepan. Cut the beets into chunks and pulse them 12-15 times in a food processor to a fine irregular mince. Stir the minced beets into the simmering stock. Taste for salt and add more to the broth if needed, along with some freshly cracked black pepper. Squeeze most of the brine from the sauerkraut and gently warm it in a microwave oven or small saucepan. Stir together the sour cream or cashew sour cream, horseradish to taste, and most of the dill, reserving some dill for garnish.
  • Place each potato into its own wide bowl, and crack it open along its slit by pinching the potato together and toward the center like a Chinese fortune teller (cootie catcher.) Ladle the hot beets and broth over each potato. Place a big dollop of herbed sour cream on the potato. Pile on the sauerkraut, and garnish with the remaining dill. Serve piping hot.

Cashew Sour Cream

  • Cover cashews in boiling water and soak at least one hour up to overnight, and drain, OR (my favorite method) place the cashews and cover with water in an electric pressure cooker and cook on high for 8 minutes. Allow to cool, and drain.
  • Place the drained cashews the lemon juice and/or apple cider vinegar, and salt in a blender. Blend on high until it is completely smooth, scraping down the sides often. Taste for sourness, and add more lemon juice/apple cider vinegar to taste. Store in the refrigerator. Cashew sour cream will thicken as it chills. It will keep in your fridge about one week, and it can also be frozen. Stir well between uses. Makes about 14 ounces.

Bowls of Pumpkin Black Bean Soup, a loaf of bread, and wine on a table ready for a party.

Soup as Your Secret Weapon

In case you haven't noticed, the world really needs us right now. The paradigm-looting pandemic isn't over. Differing points of view are dividing friends and neighbors when we aren't paying attention. It's as though the collective pulse is slow, the heartbeat is going quiet. Bold acts of friendship are as important as they ever were.

Lean in and let Pumpkin Black Bean Soup be one of your secret weapons in the defense of friendship.

Closeup of a bowl of pumpkin black bean soup.

Lean In, Full and Strong

I've found that leaning in to my loved ones and community happens best when I first make my own self full and strong. Now is the time to follow the pilot's directions. "Ladies and gentlemen, should the cabin lose pressure, oxygen masks will drop from the overhead area. Please place the mask over your own mouth and nose before assisting others.”

Simply put, if I run out of oxygen I cannot assist someone else with gaining theirs. If I'm gasping for air I am fairly useless in creating a safer, happier, nourishing place for others.

In this season known for its comfort food, let us remember this for ourselves. Eat reviving foods, feed ourselves well. Warm, spicy, hearty things that nourish not just our bodies, but our eyes and hearts and imaginations. And then share it with others out of our own fullness.

Overhead photo of bowls of pumpkin black bean soup, bread loaf, and wine glasses.

Make More Bean Soup Joy

Pumpkin Black Bean Soup is a stealthy way to make more joy. Make more festivity for Halloween night supper. Make more personal success-- image your game-day touchdown by sharing this big pot of soup with loved ones. Or make this soup as an easy dinner party with whoever it is that makes up your pod these days.

Or in support to yourself, make the whole big pot and parcel out 2-cup portions for your freezer. That way you'll always be fueled for your loving, life-giving actions even when you don't feel like cooking. The joyfully act of making the soup itself is a beautiful life-giver.

More About Pumpkin Black Bean Soup

A wooden platter with the recipe ingredients mis en place.

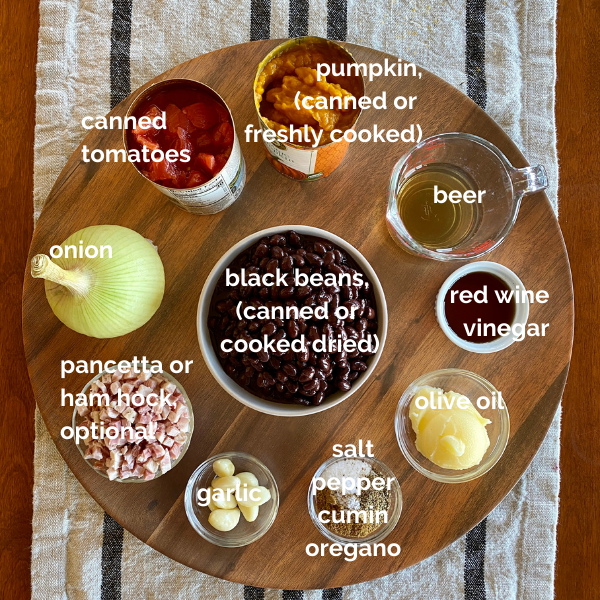
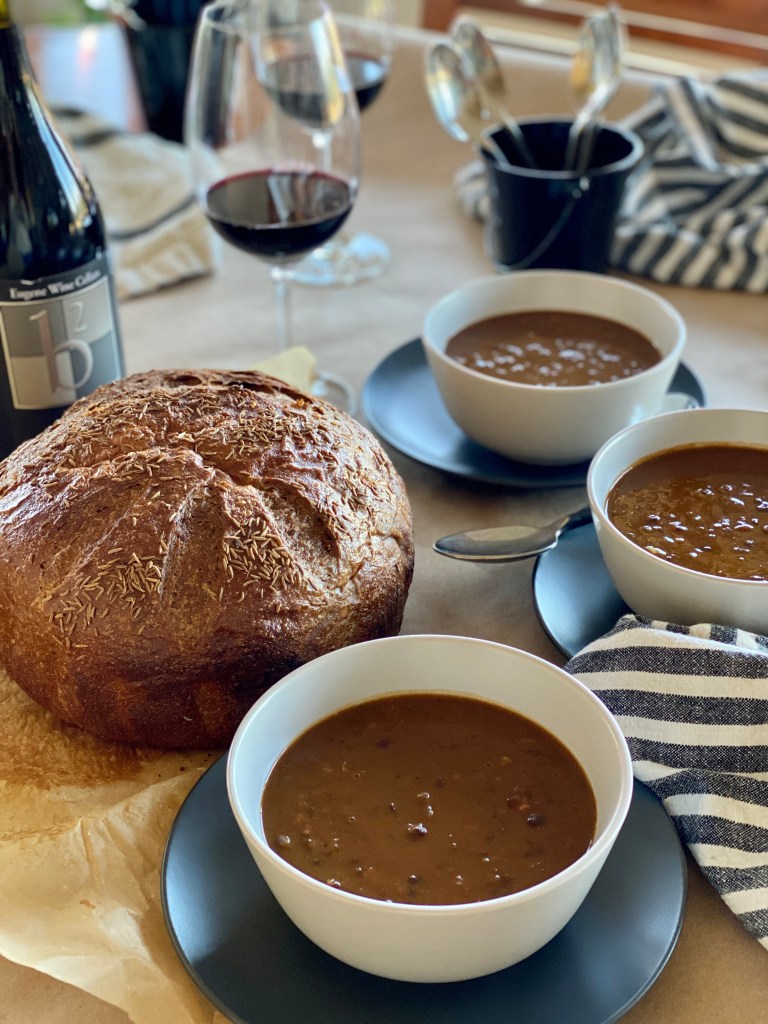
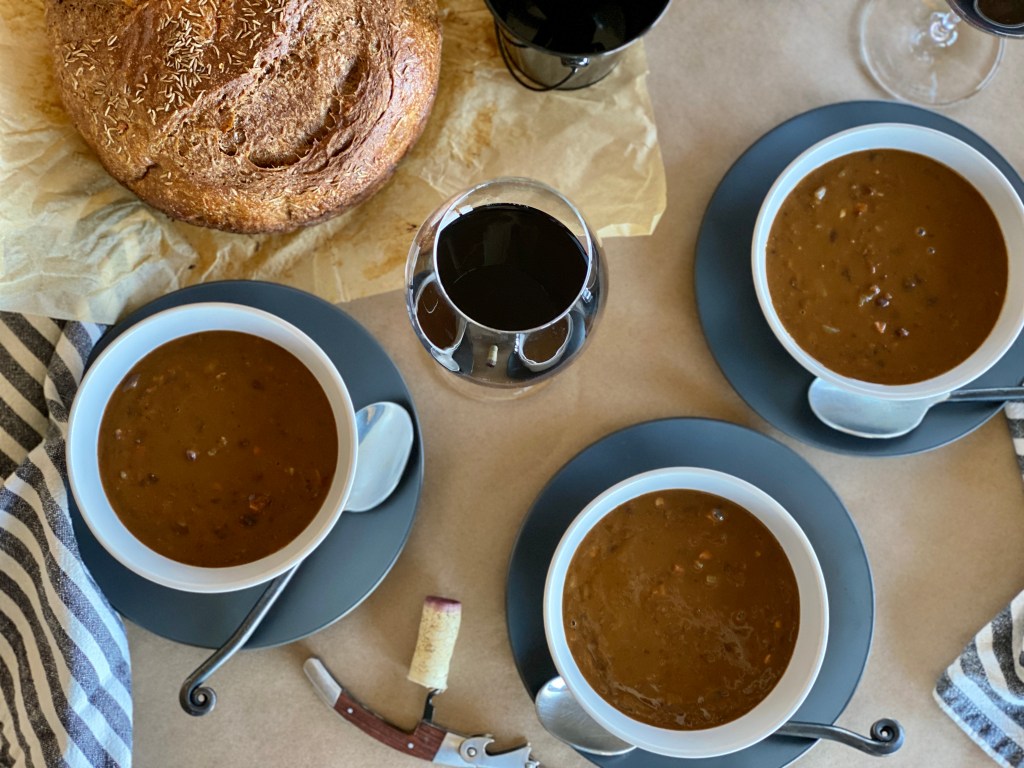
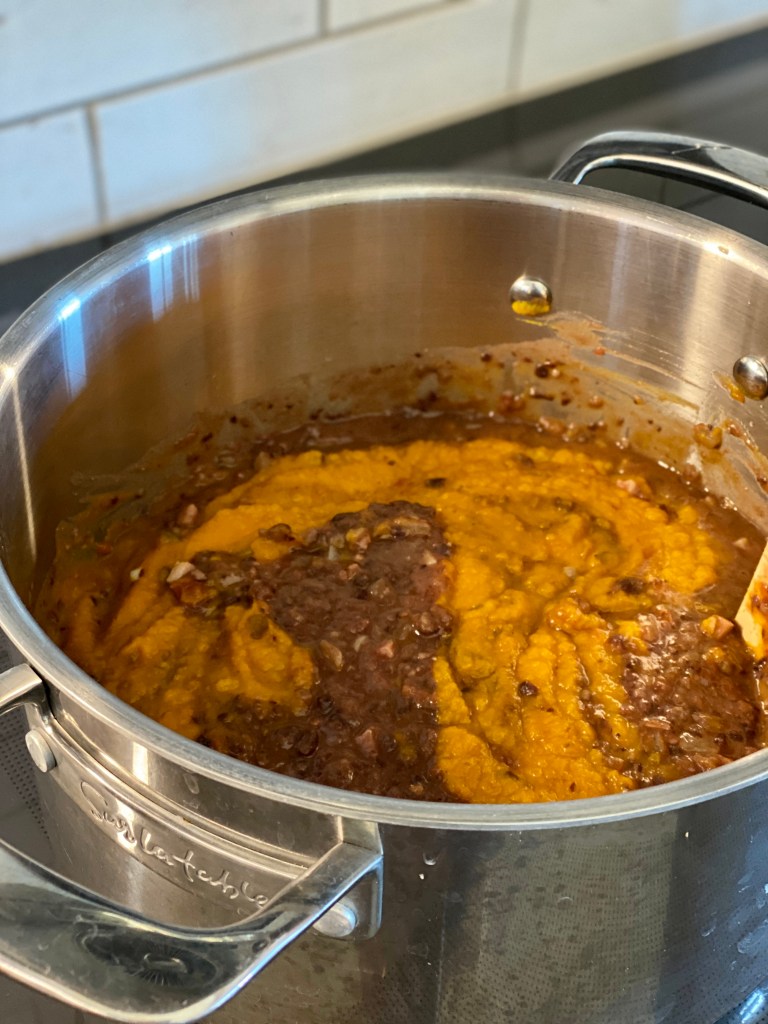
Put together this rich and fragrant rusty-brown soup in a flash with canned ingredients from your pantry, or with dried black beans you cook yourself. (Beans from Rancho Gordo are the best ever, and their Midnight Black Beans are perfect here.) Directions for the easy way and the beans-from-scratch way are included. I love it both ways, depending on the amount of time I've got to give. Click here for link to a Facebook Live video of me explaining the easy process of making pumpkin puree from scratch.

Make it vegan by omitting the ham hock or pancetta for another delicious way to go, even for committed meat-eaters.

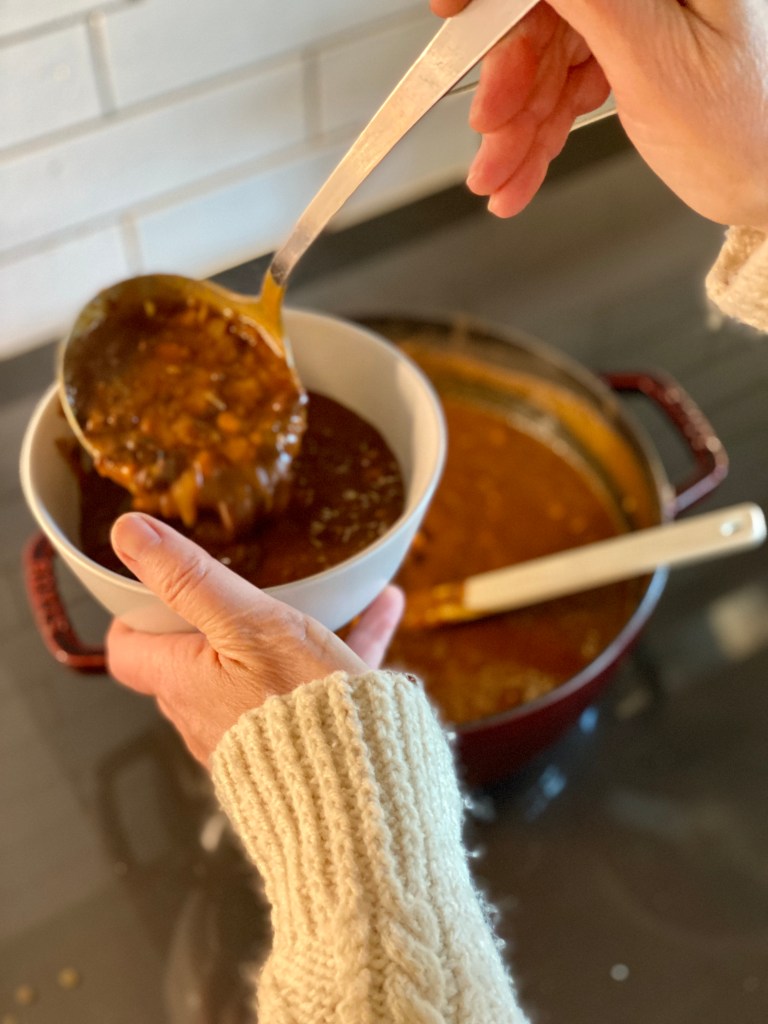
The aroma coming from the pot of this seasonal soup is so inviting and so comforting. Pumpkin gets a well-earned reprieve from its sugar and spice gig, making a happy marriage with the savory black beans and cumin. It really is the perfect thing for the chilly days ahead.

Oh, by the way, a perfect accompaniment to this warming soup is a huge loaf of Caraway Rye Black Bread. Together they make enough to feed a crowd of friends bent on making more joy, no matter what.

One bowl of Pumpkin Black Bean Soup with spoon.

Pumpkin Black Bean Soup

Course: Main Dish, Soup + Stew
Season: Bounty (August - October), Mist (November - March)
Dietary: Dairy-Free, Gluten-Free
Preparation: One Pot/One Pan
40 minutes
Total Time: 40 minutes
Servings: 2 quarts
Comfort food at its best, let Pumpkin Black Bean Soup be your secret weapon in defense of friendship. Pumpkin gets a reprieve from sugar and spice in this happy marriage of savory black beans and cumin.
Print Recipe

Ingredients

  • 4 15 oz. cans whole black beans, drained See Notes section for cooking beans from scratch.
  • 1 15 oz. can whole or diced tomatoes
  • 4 tablespoons olive oil
  • 2 cups onion, diced (about 2 large onions)
  • 2 poblano chilis, diced
  • 8 cloves garlic, minced
  • 8 oz. pancetta or bacon, diced (optional) Omit for vegan option.
  • 3 tablespoons ground cumin
  • 2 teaspoons Mexican oregano
  • 1 tablespoon Kosher salt
  • teaspoons ground black pepper
  • 2 15 oz cans pure pumpkin Or one 28 oz. can.
  • 4 cups water
  • 1 can Stout or other favorite beer (optional) I love Athletic Brewing Company's non-alcoholic All Out Stout for this.
  • 2-3 tablespoons red wine vinegar, or to taste at the table
  • pumpkin seeds, cilantro, green onion, and/or sour cream as toppings

Instructions

  • Blend together in a food processor half of the black beans and the canned tomatoes. Process until nearly smooth. Set aside.
  • Heat the olive oil in a large soup or stock pot to medium-high heat. Add the diced onions, poblano, garlic, pancetta (if using, salt, and pepper. Stir together, and allow the vegetables to thoroughly soften as the pancetta crisps up a bit, stirring frequently and adjusting heat to prevent them from browning, about 7 minutes. Add the cumin and Mexican oregano, stir, and allow to cook another 3 minutes or so.
  • Add the blended bean/tomato mixture to the sauteed vegetables and stir. Stir in the pumpkin, and then stir in the water and stout (if using). Simmer and stir frequently for 20 minutes or so to slightly condense and thicken, and to let the flavors come together. Stir in the remaining whole beans and serve. If you are making this in advance of serving time, add the beans in the last five minutes before serving to they don't overcook and collapse.
  • Right before serving, stir in the vinegar and taste to adjust seasoning. Ladle into bowls, serve plain, or garnish with your favorite combination of topping ingredients.

Notes

For cooking the black beans from scratch:
If you are cooking your black beans from their dried state, you can omit the pancetta and include a ham hock, which adds a lovely smoky flavor and a little smoked pork to the pot. For the vegan option, of course, do not add a hock.
You'll need:
Soak the beans 4-6 hours covered by 2" in water. Place the beans and their soaking water (I think this preserves some color, flavor, and nutrients, but you may also drain the beans and start with fresh water) and the ham hocks (if using) in a pot large enough to cover by 2" of water. Bring to a rolling boil for five minutes. Reduce heat to low and simmer for 1-2 hours, with a lid set ajar. Stir every now and then, and begin tasting for doneness at the one-hour mark. Try your best to not overcook the beans-- just cook until they are tender to the tooth, but have retained their shape. 
Proceed with the recipe as directed in step one. 
With this method, drain the beans through a colander and use the cooking liquid (pot liquor) to replace some or all of the water. This captures the extra flavor the cooking liquid offers into the soup. After the ham hock cools, pick any meat from it and reserve until step four, adding it back with the whole beans. 
Healing Chickpea + Orzo Bowl in Ginger Broth

The Oregon season of mist is starting to pull back and make way for our evergreen season. It is uplifting to feel how just three more minutes of sunlight a day warms ones bones. The daffodils and crocus, a little late this year, are poking up their cheery heads. Even the dog beginning to shed in never-ending tufts is a welcome sign of spring. The one true sign it is time to shift from winter foods is when the grasses turn intense chlorophyll green.

overhead view of soup on bowl

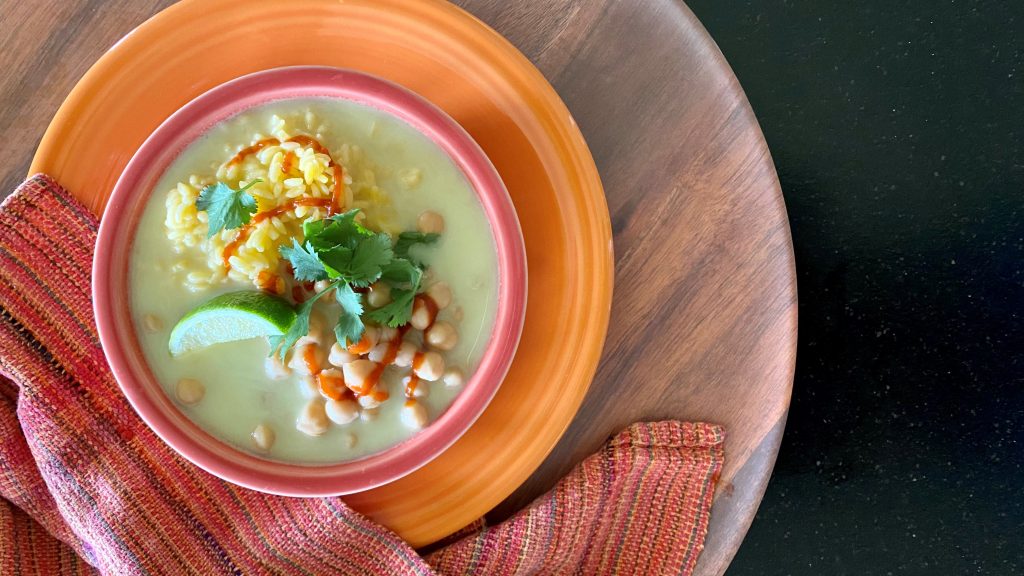
Still, mornings are cold and the mist is more present than not. Something lighter than a dense soup or stew but still hot and nourishing just sounds right. Honor the shift in cravings you may have as the grasses and clover green up brightly. This Healing Chickpea + Orzo Bowl in Ginger Broth couldn't be an easier solution. Be sure to check out the Make It Your Own options in the recipe, as this one has a lot of ways to make it work for whatever it is you need.

When you're feeling under the weather-- be it a little (or worldwide proportioned) virus, heartache or disappointment, this bowl is a perfect year-round healer and cheer-giver. The simple ginger-turmeric tea and coconut milk broth is as easy as boiling water, and would make a nutritious snack all on it's own. The whole thing comes together with zero fuss in under 20 minutes. The gingery goodness and light but complete protein will have you feeling as sprightly as a bright yellow daffodil in no time.

recipe ingredients orzo, chickpeas, coconut milk, lime juice, fish sauce, ginger-turmeric tea bags, and cilantro
overhead view of soup on bowl

Healing Chickpea + Orzo Bowl in Ginger Broth

Course: Quick + Easy, Soup + Stew
Cuisine: Fusion
Season: Bounty (August - October), Evergreen (April - July), Mist (November - March)
Dietary: Dairy-Free, Gluten-Free, Vegan
Preparation: One Pot/One Pan
Prep Time: 12 minutes
Cook Time: 10 minutes
Servings: 6
Author: Pam Spettel
Made with tea broth and light yet hearty ingredients, this bowl will revive all forms of sorrows and ills. As uplifting a daffodils in the spring.
Print Recipe

Ingredients

  • 5 cups water boiled
  • 5 ginger turmeric tea bags
  • 1 13.5 oz. can full fat coconut milk
  • 3 limes juiced
  • 1 lime cut in six wedges
  • 1 ½ tsp Asian fish sauce for vegan option use coconut aminos
  • 1 tsp sea salt
  • 2 15 oz. cans chickpeas (garbanzo beans) drained and rinsed
  • 1 lb. GF or traditional orzo, cooked, or see rice Make it Your Own option
  • ½ bunch cilantro chopped
  • Sriracha or spicy Asian chili sauce

Instructions

  • In a small saucepan, bring water to a boil and add teabags. After they are fully immersed, add coconut milk, put a lid on the pot, and leave to steep for 10 minutes. Remove tea bags.
  • Stir lime juice, fish sauce, and salt into the tea/coconut milk broth. Keep at a low simmer.
  • In a blender, blend together one cup of the garbanzos and a few ladlesful of the broth. Once it is blended smooth, add it back to the broth and stir.
  • Pile garbanzos and orzo into shallow bowls. Ladle broth around them.
  • Garnish generously with chopped cilantro and Sriracha to taste. Serve with lime wedges.

Notes

Make It Your Own:
For a warm restorative to coming in from the cold, forget the garbanzos and orzo. Ladle the hot broth (with or without blended chickpeas) into a cup. Use the cup to warm your hands while the broth warms your soul.
Replace the orzo with jasmine rice and replace the garbanzos with tiny cubes of silken tofu.
For a non-vegetarian meal, add 4-6 peeled shrimp per person to the broth and simmer 4 minutes until just cooked through. 
Experiment with various Asian chili sauces to kick up the heat. 
Add to or substitute thinly sliced spinach whiskers for the cilantro.
Makes excellent breakfast or lunch leftovers. Store any remaining broth, garbanzos, and orzo in a jar. Gently simmer to reheat.

Happy New Year 2021 to every living soul on earth. Congratulations for making it through the myriad of 2020 curveballs. Many of us are hurting, have suffered illness, loss, and financial distress, confusion, disenfranchisement, or have waited long generations for justice. Yet here we are. That is something to celebrate.

Today is a good day to renew our courage and strength. Keeping ourselves and others sustained, encouraged, warm, fed and filled with good humor is no small task, but it is ours. Are you up for it? 

A hot bowl of soup sends a message: I'm Ok. Are you Ok? I'm here. Together we'll keep our chins up. You are important. I am glad for you in my life. Take nourishment.

Yes, all this in a simple bowl of soup. 

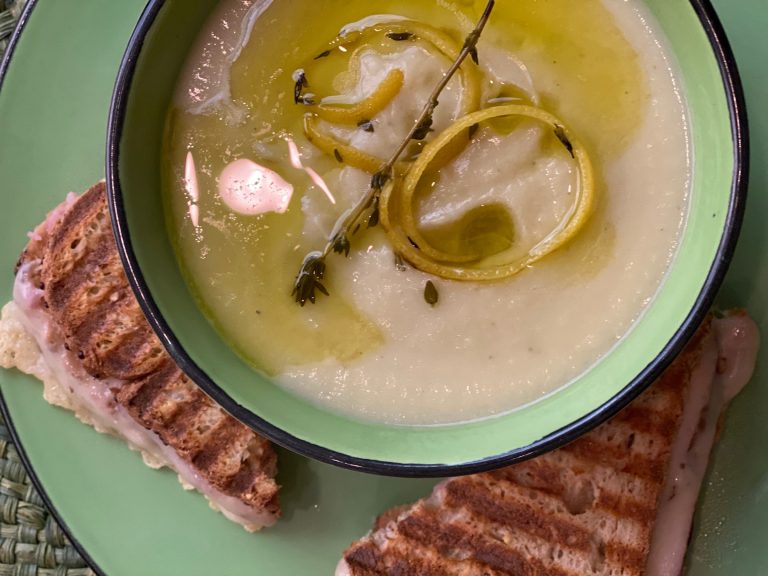
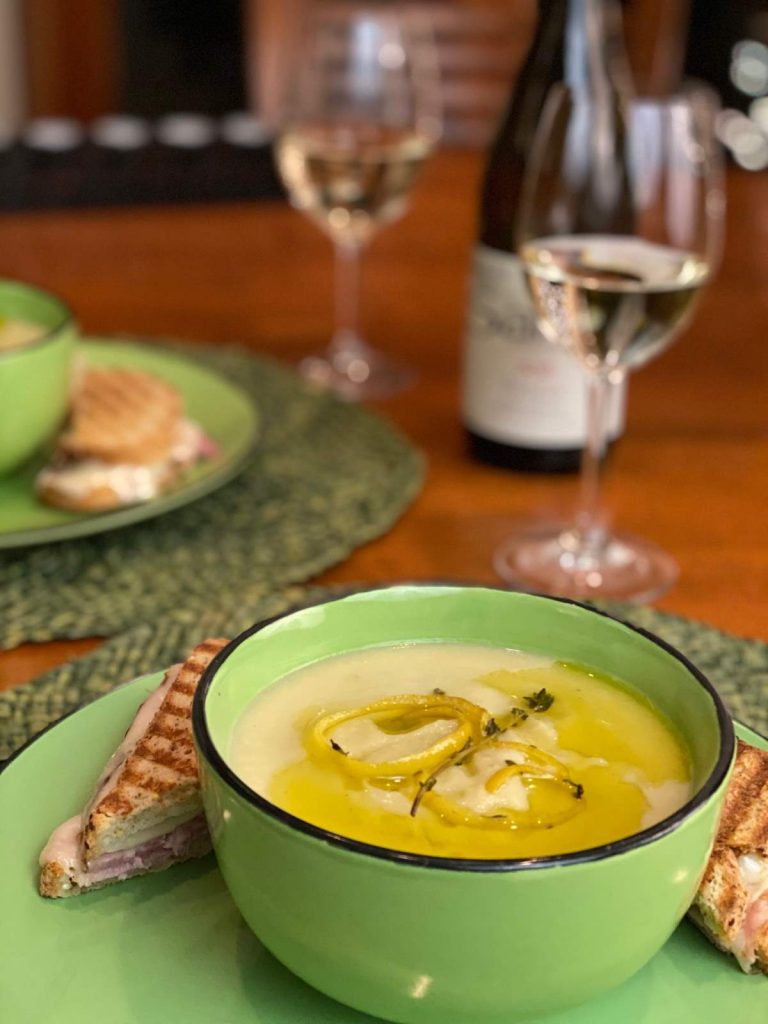
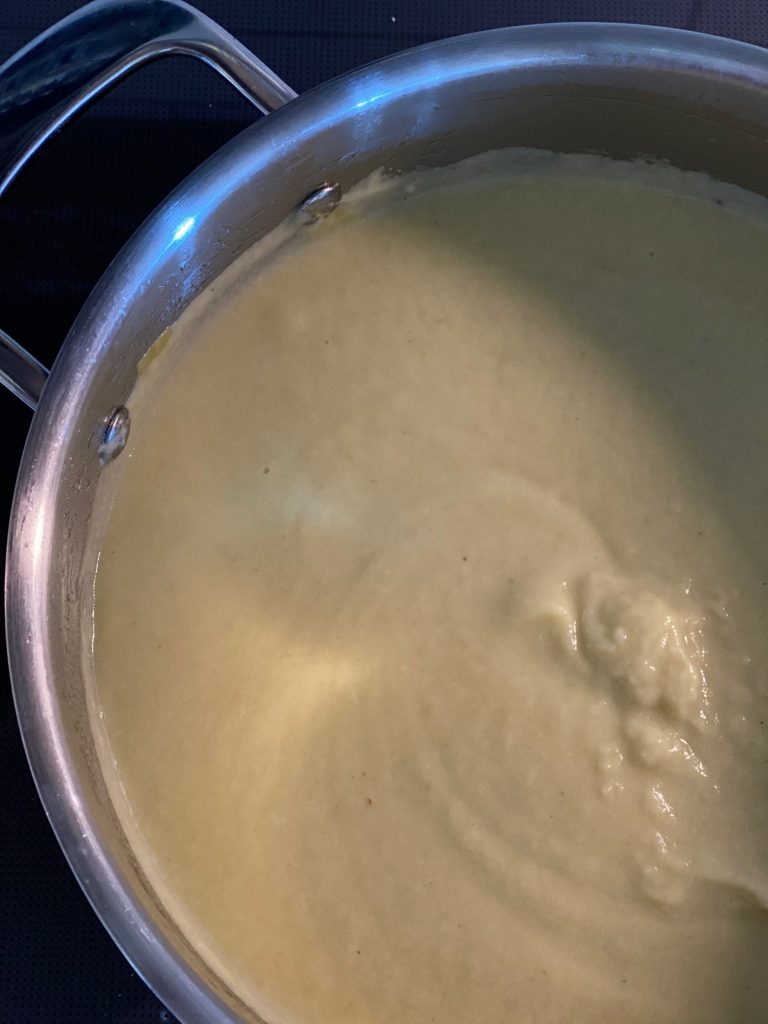
This elegant looking white soup simply used a bunch of white and palest green use-it-or-lose-it vegetables in my fridge. The guidelines you're about to read will work for nearly any vegetable or combination of vegetables for a flood of delicious soup options. Following these simple rules of thumb, you can have a creamy but cream-less pureed soup once a week all winter long and never grow bored. The same goes for the herbal drizzle. This really is a choose-your-own-adventure bowl of goodness.

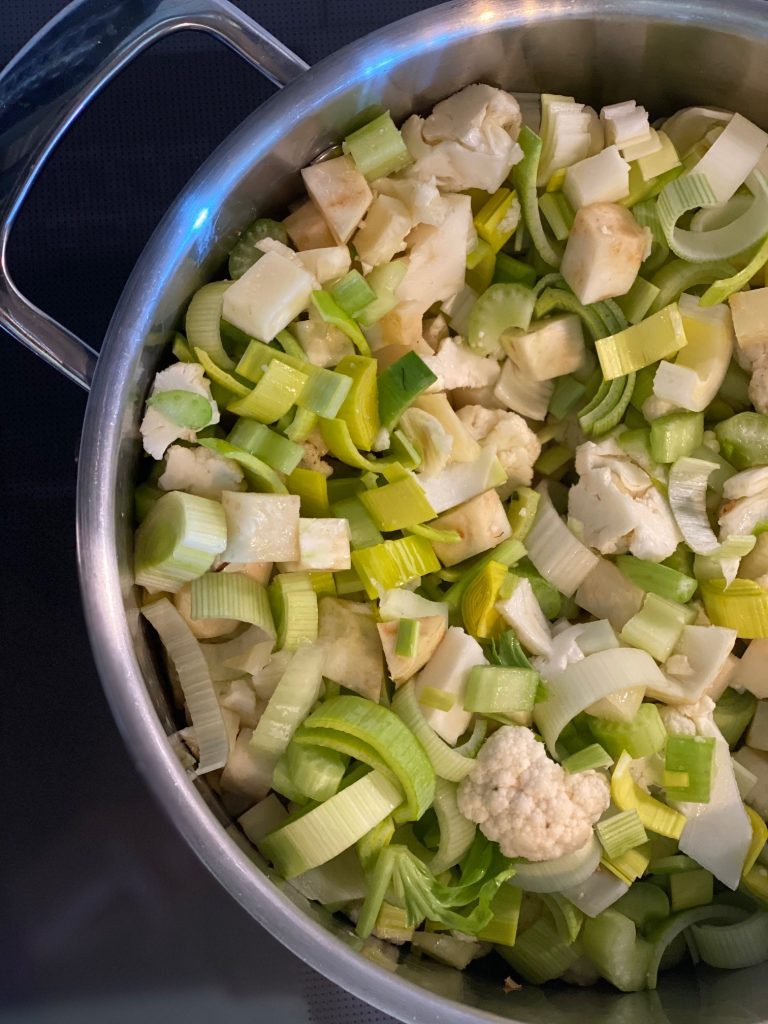
Step One: Gather, clean and roughly chop a bunch of vegetables from your bin. This is a great time to use up those that have been languishing. Choices include, but are not limited too: 

roots like carrot, beet, turnip, parsnip, rutabaga, ginger, fresh turmeric

celery, fennel, celeriac (celery root)

onion, leek, shallot, garlic

potato, sweet potato

fresh or frozen peas or corn

peppers 

winter squashes, like butternut and pumpkin

summer squashes

greens like kale, chard, mustard, spinach, collards, cress, etc.

fresh or canned tomatoes

brassicas like cauliflower, broccoli, cabbages, Brussels sprouts, kohlrabi, etc.

The featured soup used a small head of cauliflower, one celeriac, one fennel bulb, four stalks of celery with leaves, and about a cup of leftover mashed potatoes added during the simmer.

Your soup can be all one vegetable, a triad (corn, poblanos, and potato is amazing!) or a mélange like this winter white soup-- cauliflower, leek, celeriac, celery, and potato in the form of leftover mashers. Use your imagination and what you have on hand. There are no rules. (Except, purple veggies tend to turn an unappetizing gray when cooked this way. You may want to avoid purple carrots and cabbage.) 

Quantity doesn't matter; you're going to be working in loose ratios. If you use a lot of vegetables, you'll make a bigger pot of soup. It's as simple as that. 

Step Two: Plop your prepped veggies into a pot and give them a brief sauté in your favorite cooking oil or fat. Some choices are:

OVOO (extra virgin olive oil)

Ghee or butter

Reserved bacon fat (adds a smoky quality to the soup.)

Coconut oil

Add salt as you are sautéing, and pepper too. Layering in salt makes finished dishes so much better than waiting until the end. Vegetables demand salt, so give them what they want!

What size pan? If you have a small amount of vegetables, a three-quart saucepan may be just right. If you're aiming to feed a crowd or to have leftovers for lunches, think in terms of a six or eight quart, or even larger, stockpot. Give yourself some headspace if you'll be blending right in the pot, see below.

How much fat do you want to add? Good question! Don't be shy. Fats are highly maligned yet essential. Fats are what make your vegetable-based soup filling and satisfying. And here's the big secret for this soup-- it's a fair amount of fat that gives your blended soup a creamy texture, mouthfeel, and look. 

To get more specific, make sure that the bottom of your pan is well-coated with your choice of oil or fat. An eighth-inch or so will be great. You can always add more for flavor or creaminess later.

How long, and at what heat? Sauté the veggies over medium heat until they are beginning to soften. Since you are using a deep pot, they will actually steam as much as sauté. This is perfect-- steaming begins to break down the cell walls, and the veggies will begin to sweat. Keep at this, stirring occasionally, until they are just beginning to become tender. This will be 10 minutes or so for a small pan; up to 20 minutes for a large one.   

Step Three: Barely cover the vegetables with cooking liquid, cover, and simmer. Add liquid to just come to the top of the vegetables. If in doubt, use a little less-- you will adjust the thickness of your soup later. Here are some good choices for cooking liquid:

Water (So many recipes like this call for stock. Nothing wrong with that, but I love the pure vegetable flavor to shine out. I use water 90% of the time when I'm making these pureed soups, and reserve precious stock for other types of soups and stews.)

Stock (see above.)

A can of coconut milk, along with enough water to just cover the vegetables. (This is especially good with winter squashes and a spoonful of Thai curry paste, garam masala, or madras curry powder.)

A little wine, red or white, in addition to one of the above.

With certain vegetable choices, tomato juice will work, too.

Step Four: Simmer, stirring every five minutes or so, until the vegetables are fully tender and a fork can be somewhat easily inserted. If I'm using hard vegetables like turnips, parsnips, and celeriac I give this up to 30 minutes, less time for the tender ones.

Step Five: Blend the vegetables with an immersion blender (my favorite,) or in a blender or food processor until completely smooth and no lumps remain. An immersion (stick) blender makes this fast, easy, safer, and with less clean up. If you love this type of soup like I do, you will want to get one if you don't already have one. 

You’re going for a consistency slightly thicker than heavy cream. Add more of your cooking liquid or water in small amounts until it gets there. Without enough liquid, you'll have difficulty getting your soup smooth and lumpless. On the other hand, if your soup seems too thin let it continue to simmer and reduce at medium-low heat, stirring very often-- the pureed soup spews bubbles all over your stovetop as it heats, so stir ever one minute or so-- until it thickens up.

Now is a good time to taste for salt and pepper and make adjustments. 

For the Lemon Thyme Drizzle, and other fun ways to jazz up a pureed vegetable soup:

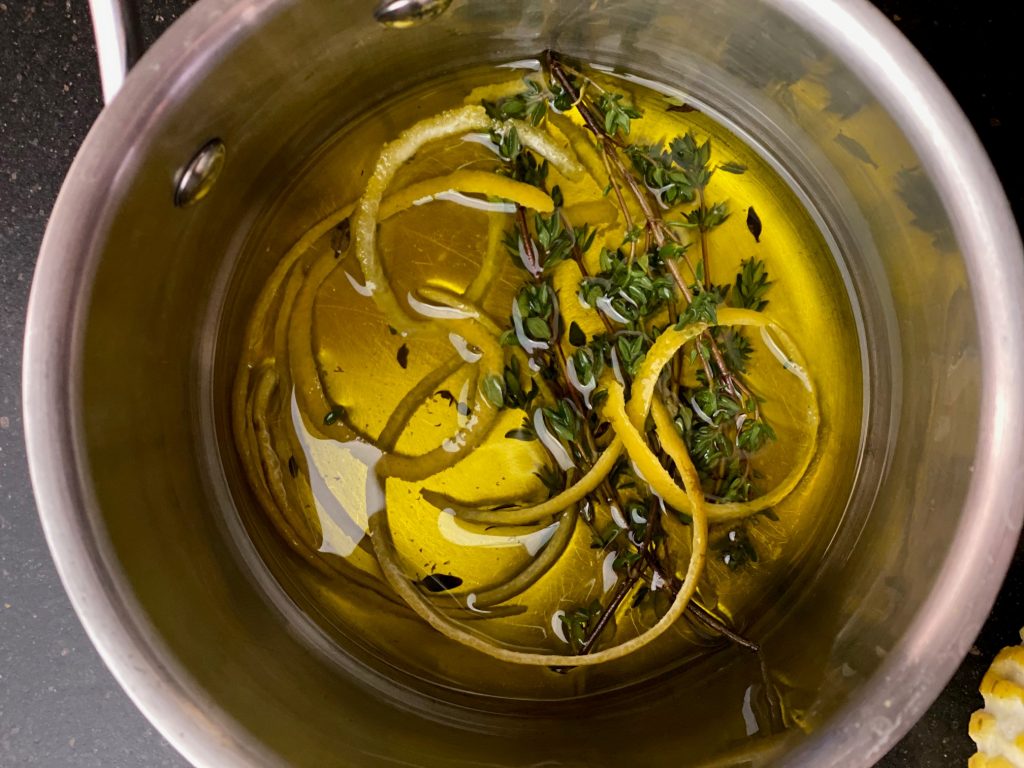
Step One: While your vegetables are sautéing and simmering, in a small saucepan pour 1/4 cup EVOO. Add your choice of fresh herbs. My favorites are:

thyme

rosemary

basil

tarragon

dill

Add some citrus strips or grated zest. Lemon, orange, and lime all are great, depending on the vegetables you use. The citrus adds a bright lift to the finished dish.

Step Two: On very low heat and stirring occasionally, let this gently steep while the soup is coming together. Right before serving, strain it, reserving pieces of zest and any whole herbs that look pretty as a garnish.

Use any leftover fancy oil in salad dressings or sautes. No need to waste a single drop of this flavor booster.

Other great ways to dress up a pureed soup:

A handful of roughly chopped nuts-- hazelnut, almond, walnut are especially good.

A dab of sour cream or creme fraiche.

A handful of croutons made from day-old bread tossed in a little oil and garlic and/or herbs as toasted in the oven for 5-8 minutes.

Or just a scattering of fresh minced herbs and a swirl of olive oil. 

Plate up your soup while it is hot, and garnish away. Enjoy experimenting with various vegetables, herbs, oils, and toppings. Trust your intuition!

Blessings on your 2021. Be well, brave, and strong. Get plenty of sleep. Find ways to renew your courage. Take time out. Reach out. Make soup. 

Winter White Vegetable Soup, Easy and Flexible

Course: Quick + Easy, Soup + Stew
Cuisine: French
Season: Evergreen (April - July), Mist (November - March)
Dietary: Dairy-Free, Gluten-Free, Vegan, Vegetarian
Preparation: One Pot/One Pan
Prep Time: 10 minutes
Cook Time: 30 minutes
Servings: 6 varies
Author: Pam Spettel
Like a warm cashmere blanket. Use these simple guidelines to make an infinite variety of interesting and flavorful pureed soups. Don't let the length scare you-- I just chat you through the steps!
Print Recipe

Equipment

  • Soup pot
  • Immersion blender or standard blender

Ingredients

Make It Your Own Fat/Oil Choices

  • olive oil, butter, ghee, or bacon fat

Make It Your Own Vegetable Choices

  • roots like carrot, beet, turnip, parsnip, rutabaga, ginger, fresh turmeric
  • celery, fennel, celeriac (celery root)
  • onion, leek, shallot, garlic
  • potato, sweet potato
  • fresh or frozen peas or corn
  • peppers of any kind
  • winter squashes, like butternut and pumpkin
  • summer squashes
  • greens like kale, chard, mustard, spinach, collards, cress, etc.
  • brassicas like cauliflower, broccoli, cabbages, Brussels sprouts, kohlrabi, etc.

Make It Your Own Cooking Liquid Choices

  • vegetable, mushroom, chicken or beef stock, or
  • water
  • coconut milk +water

Choose Your Own Aromatics Adventure

  • fresh or dried herbs of your choice
  • Thai curry paste or curry spice blends, such as Madras or Ras el Hanout

Instructions

  • Gather, clean and roughly chop a bunch of vegetables from your bin. This is a great time to use up those that have been languishing.
    Your soup can be all one vegetable, a triad (corn, poblanos, and potato is amazing!) or a mélange like this winter white soup made from cauliflower, leek, celeriac, celery, and potato in the form of leftover mashers. Use your imagination and what you have on hand. There are no rules. (Except, purple veggies tend to turn an unappetizing gray when cooked this way. You may want to avoid purple carrots and cabbage.) 
    Quantity doesn't matter; you're going to be working in loose ratios. If you use a lot of vegetables, you will make a bigger pot of soup. It is as simple as that. 
  • Plop your prepped veggies into a pot and give them a brief sauté in your favorite cooking oil or fat.
    Add salt as you are sautéing, and grind in some black or white pepper too. Layering in seasoning makes finished dishes so much better than waiting until the end. Vegetables demand salt, so give them what they want!
    What size pan? If you have a small amount of vegetables, a three-quart saucepan may be just right. If you are aiming to feed a crowd or to have leftovers for lunches, think in terms of a six or eight quart, or even larger, stockpot. Give yourself some headspace if you'll be blending right in the pot, see below.
    How much fat do you want to add? Good question! Don't be shy. Fats are highly maligned yet essential. Fats are what make your vegetable-based soup filling and satisfying. And here is the big secret for this soup: It is a fair amount of fat that gives your blended soup a creamy texture, mouthfeel, and look. 
    To get more specific, make sure that the bottom of your pan is well-coated with your choice of oil or fat. An eighth-inch or so will be great. You can always add more for flavor or creaminess later.
    How long, and at what heat? Sauté the veggies over medium heat until they are beginning to soften. Since you are using a deep pot, they will actually steam as much as sauté. This is perfect, as steaming begins to break down the cell walls, and the veggies will begin to sweat. Keep at this, stirring occasionally, until they are just beginning to become tender. This will be 10 minutes or so for a small pan; up to 20 minutes for a large one.   
  • Barely cover the vegetables with your choice of cooking liquid, cover, and simmer. Add liquid to just come to the top of the vegetables. If in doubt, use a little less– you will adjust the thickness of your soup later. Here are some good choices for cooking liquid:
    Water (So many recipes like this call for stock. Nothing wrong with that, but I love the pure vegetable flavor to shine out. I use water 90% of the time when I’m making these pureed soups, and reserve precious stock for other types of soups and stews.)
    Stock (see above.)
    A can of coconut milk, long with enough water to just cover the vegetables is especially good with winter squashes and a spoonful of Thai curry paste, garam masala, or madras curry powder.
    A little wine, red or white, in addition to one of the above.
    With certain vegetable choices, tomato juice will work, too.
  • Simmer, stirring every five minutes or so, until the vegetables are fully tender and a fork can be somewhat easily inserted. If I’m using hard vegetables like turnips, parsnips, and celeriac I give this up to 30 minutes, less time for the tender ones.
  • Blend the vegetables with an immersion blender (my favorite) or in a blender or food processor until completely smooth and no lumps remain.
    You are looking for a consistency slightly thicker than heavy cream. Add more of your cooking liquid or water in small amounts until it gets there. Without enough liquid, you will have difficulty getting your soup smooth and lumpless. On the other hand, if your soup seems too thin let it continue to simmer and reduce at medium-low heat, stirring very often. The pureed soup spews bubbles all over your stovetop as it heats, so stir ever one minute or so until it thickens up.
    Now is a good time to taste for salt and pepper and make adjustments. Plate up your soup while it is hot, and garnish With the following drizzle.

Choose Your Own Adventure Drizzle

  • While your vegetables are sauteding and simmering, in a small saucepan pour 1/4 cup EVOO. Add your choice of fresh herbs. My favorites are:
    thyme
    rosemary
    basil
    tarragon
    dill
    Add some citrus strips or grated zest. Lemon, orange, and lime all are great, depending on the vegetables you use. The citrus adds a bright lift to the finished dish.
  • On very low heat and stirring occasionally, let this gently steep while the soup is coming together. Right before serving, strain it, reserving pieces of zest and any whole herbs that look pretty as a garnish.

Notes

If the drizzle is not your style, try garnishing with a bit of chopped fresh herb and a swirl of olive oil.
Enjoy experimenting with various vegetables, herbs, oils, and toppings. Trust your intuition!

Follow Me

Welcome!

Photo of 101-Mile Kitchen blog owner.

You’re in the right place!  I’m Pam Spettel, home cooking expert and guide, and I’m here to show you how to break up with cooking and hospitality anxiety, learn how to use recipes as guides rather than strict rules, and let your cooking intuition and confidence soar.

Superpower: Dreaming up recipes that work, serving them to my friends and family, and writing little stories about how cooking them well is the same as loving well.

Inspiration: Ingredients! The fresh, colorful, fragrant, local, seasonal ingredients found in the Pacific Northwest are my creative medium.

Heroes: Local food and wine producers– the people who keep me, my family, and our community nourished and happy.

More . . .

Top