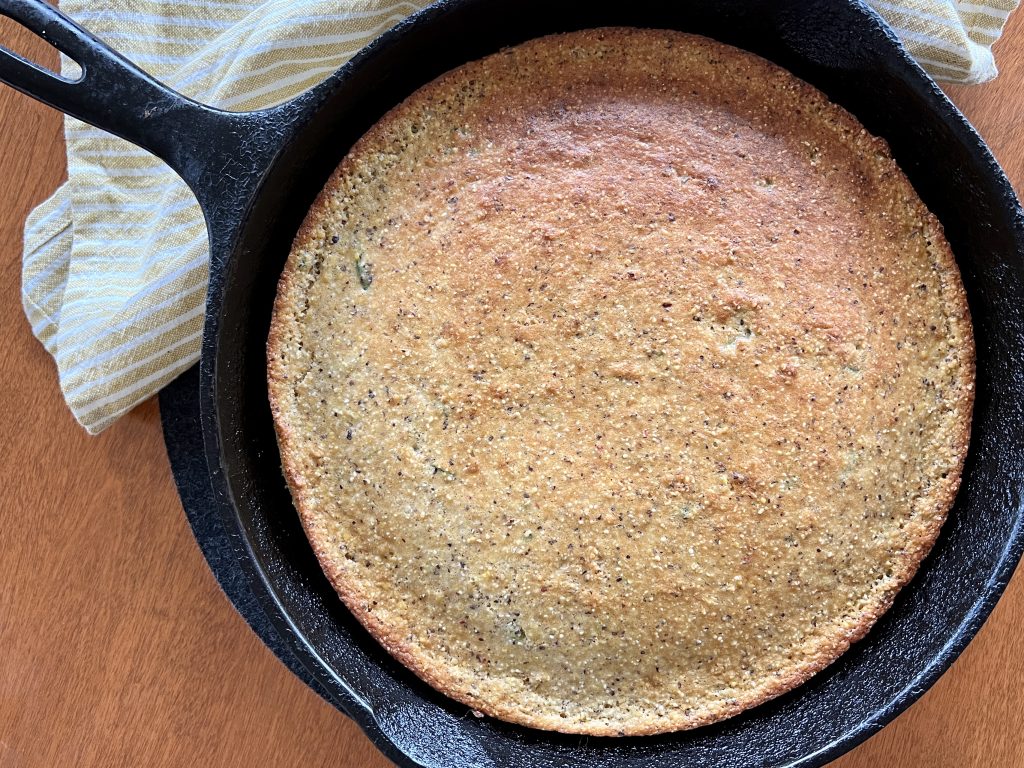
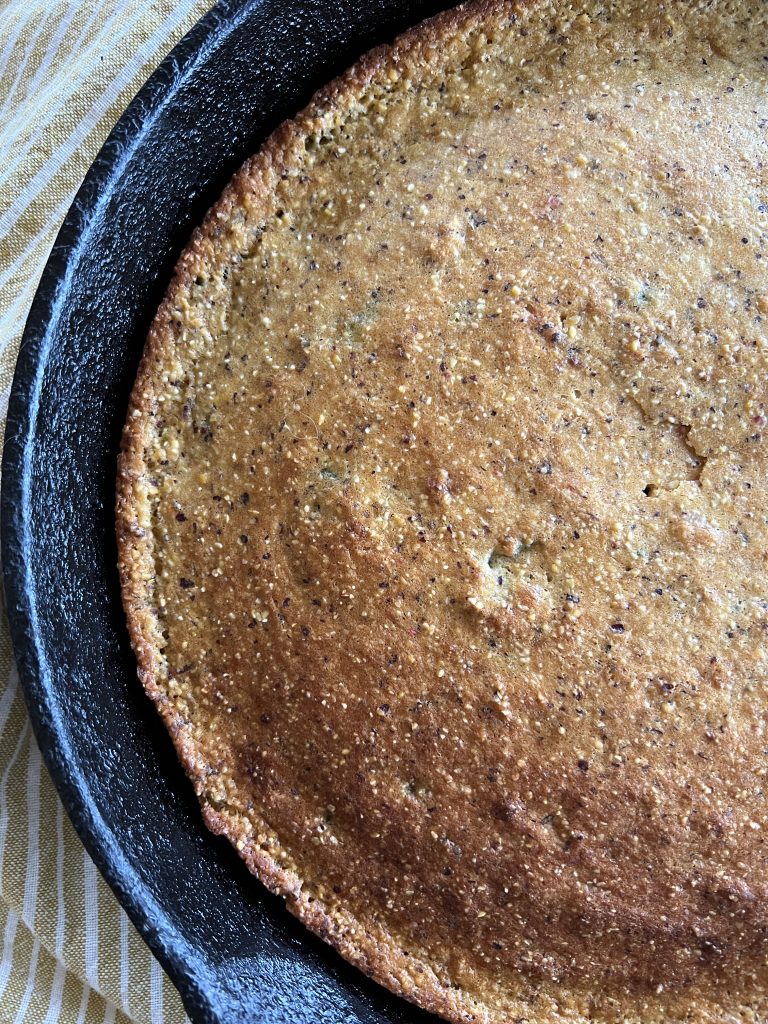
Can we admit that soup night goes from good to great when some tasty nosh cozies up to the bowl? Maple Jalapeno Cornbread is often that certain something here at the 101-Mile Kitchen. The tiniest hint of heat with mapley sweetness, a tender moist crumb, and the pleasant crunch of cornmeal is so very satisfying.
Cornbread and maple make a surprisingly good pair. Add the unique green flavor and subtle heat of jalapeno, and WOW!
Don't miss the maple butter! Whip some up while the cornbread is baking to slather on the warm bread.
Making Maple Jalapeno Cornbread
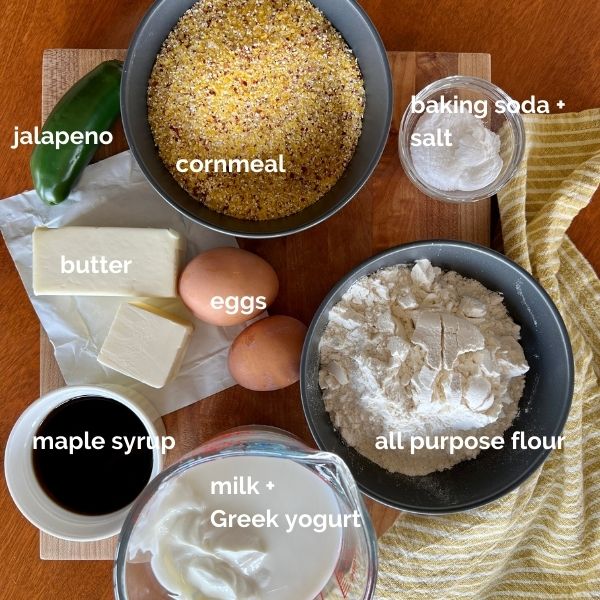
Most cornbread recipes call for buttermilk, which is an ingredient I rarely have on hand. My instincts tell me that more households may keep yogurt around than a carton of buttermilk, so I experimented with that swap with great success. The tang is still present, but the batter holds more moisture and has more spring with the use of yogurt.
I use the multi-colored heritage Abenaki corn polenta from Lonesome Whistle Farm or the Red Flint Floriani cornmeal from Camas Country Mill for this cornbread. Both are outstanding products from local companies near me, and I love the red flint flecks in both. However, any medium to coarse cornmeal will work wonderfully. Do not use fine corn flour in this recipe or you'll end up with a heavy, dense cornbread.
What Soups Are Best with Maple Jalapeno Cornbread?
Frankly, very few soups would not happily sidle up to this cornbread! My first choices would be bean-based soups and chilis. This recipe made with potatoes, corn, and poblano chiles is fantastic. Potato chowders, meaty chilis, and blended butternut, broccoli, or cauliflower soups would also be delicious with the cornbread. Really, you just can't go wrong!
This post contains affiliate links. When you use these links to buy something I may earn a commission at no cost to you. Product affiliation helps me to keep this site ad-free while providing you with the content you enjoy. I only promote items that I use, like, and trust, or would invest in myself.
Have you joined the 101-Mile Kitchen community? If not, we'd love to have you. You can take care of that right here, and when you do I'll send you my free Top Five Cool-Weather Cooking Guide downloadable as a thank you!
Maple Jalapeño Corn Bread
Course: Bread + Rolls
Cuisine: American
Season: All Season
Preparation: Baking
Prep Time: 15 minutesminutes
Cook Time: 40 minutesminutes
Total Time: 55 minutesminutes
Servings: 12
Author: Pam Spettel
Like a little heat with your sweet? Maple jalapeño cornbread (baked in either muffin form or in a skillet) is the perfect accompaniment to seasonal soups, stews, salads, and roasts. It has buttermilk tang without the buttermilk, and bakes like a dream.
Preheat oven to 400°. Generously grease the cups of a standard muffin pan, or a 12" skillet with butter or cooking spray.
In a large mixing bowl, whisk the dry ingredients: flour, cornmeal, baking powder, baking soda, and salt. Grate the jalapeño into the flour mixture and whisk again. Set aside.
In a medium mixing bowl whisk the Greek yogurt to loosen it. Whisk in the milk. When the milk is fully incorporated whisk in the eggs. When the eggs are incorporated whisk in the butter and maple syrup.
Tip the wet ingredients into the large mixing bowl with the dry ingredients. Use a silicone spatula to combine them together, scraping down to the bottom of the bowl. Stir the ingredients together only until no flour remains.
Use a 3-tablespoon scoop or a large spoon to fill the greased muffin cups about 3/4 full with batter, or scrape the batter into the greased skillet. Place into the hot oven and lower the temperature to 375°. For muffins, bake 12 - 15 minutes or until the tops are burnished golden brown. For skillet cornbread, bake for 18-22 minutes, until the top is burnished golden brown.
If using a muffin pan, allow the muffins to cool in the pan for 5-7 minutes. Remove the muffins from the muffin pan and allow them to finish cooling on a cooling rack. If you are using a skillet, allow the skillet to cool on the cooling rack at least 20 minutes to allow them to set up before cutting and serving them.
Maple butter
In a medium mixing bowl, whisk together the soft butter and maple syrup until light and fluffy. (This may take a few minutes to completely incorporate the two.) Spoon the maple butter into a small serving bowl and sprinkle with flaky salt and serve alongside the maple jalapeno cornbread.
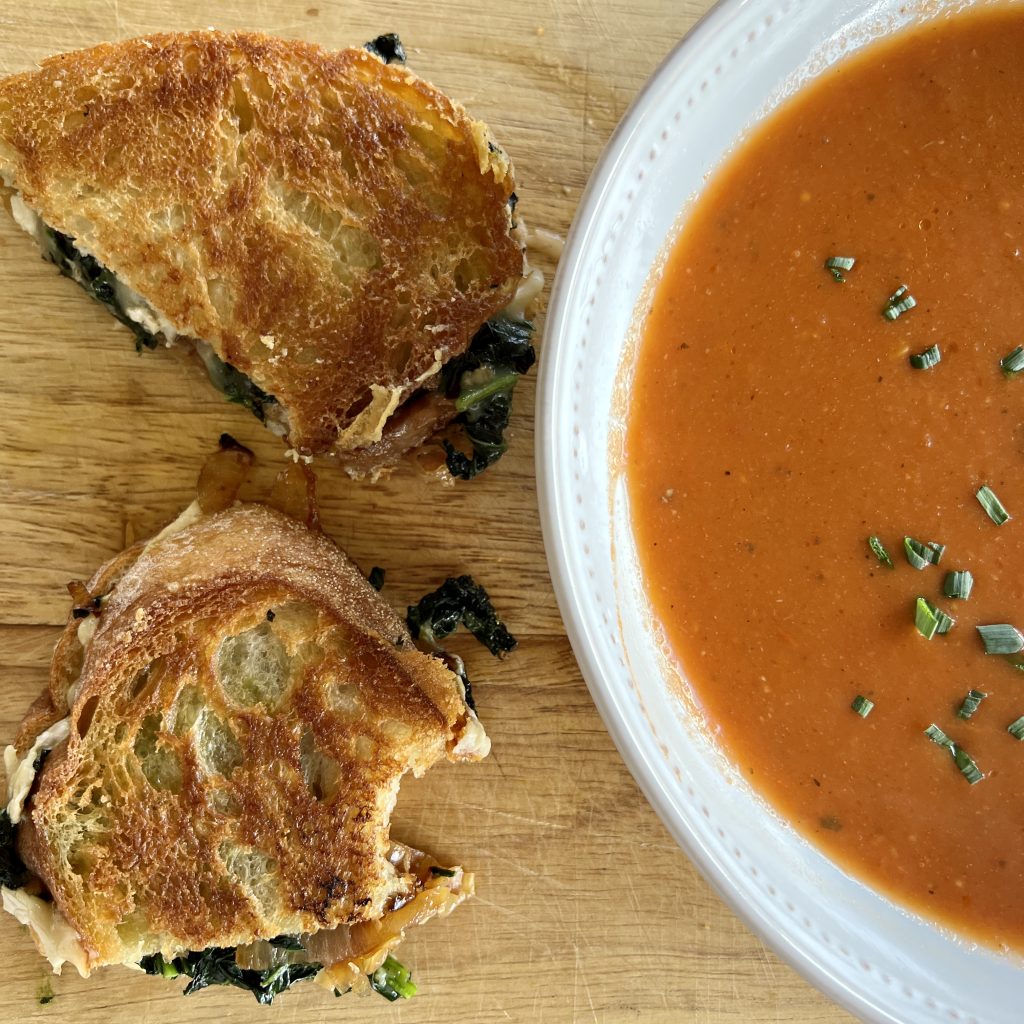
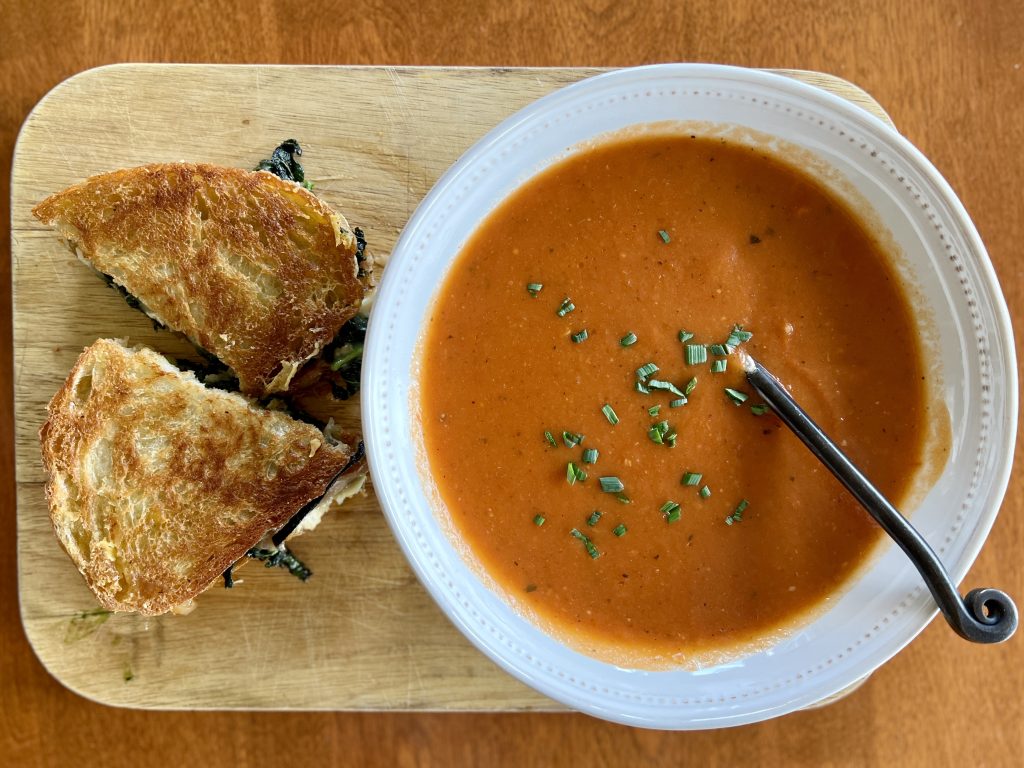
I often make soup and some kind of grilled sandwich or panini for supper in the cool weather months, and this week's sandwich was a true hit. Garlicky greens and caramelized onion grilled cheese made with creamy brie is a rather fancy sandwich. I'm going so far to say this is the world's best grilled cheese to date.
Inspiration for Special Grilled Cheese
In my town there is one special spot that adds so much to my experience of living here. Provisions Market Hall is a beautiful place full of gastronomical goodness and so much more. Inside is a gorgeous florist, a wine shop, a beautiful kitchen and gift shop, a specialty foods grocery complete with lovely cheeses and charcuterie, freshly baked breads and pastries, wood oven baked pizzas with bubbly crusts, a coffee shop, and delicious lunch items. Provisions is a place of visual wonder, yes, but also offers practical support to the entire spectrum of us who cook and offer hospitality at home. When you visit Eugene, you just must visit Provisions.
Flowers greet you at the door of Provisions Market Hall
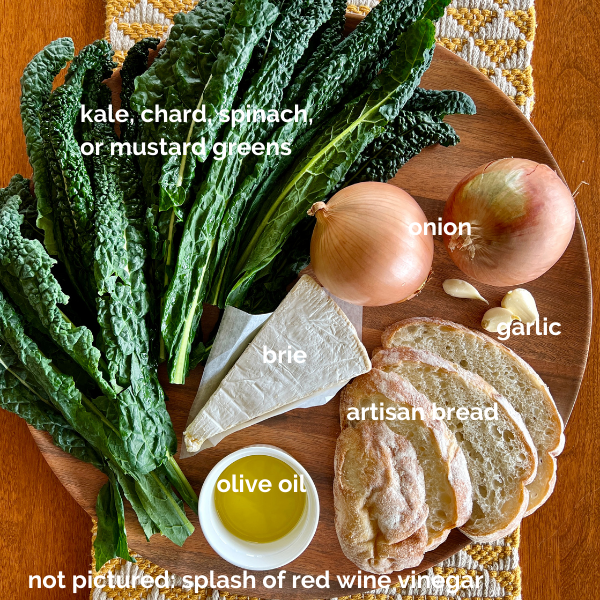
I met a friend for lunch there last week ordered their chard and brie grilled sandwich special. It was so delicious I couldn't wait to try making it at home. I used kale because that's what I had on hand. Chard, kale, or even spicy mustard greens would each be gladly received in this glorious sandwich.
If you're a fan of the classic tomato soup and grilled cheese combination, this is the sandwich you'll want going forward. The slightly bitter greens, sweet earthy caramelized onion, and bloomy brie are the perfect foil to tomato soup. Tomorrow I'll share my recipe for the best tomato soup so you'll have the matched set.
Making the Garlicky Greens and Caramelized Onion Grilled Cheese
There is nothing tricky here. Caramelize a few onions, cook some greens, and layer them on top of brie. Using a really good bread will also make a difference, so try for that, too.
Other Soups to Serve with Garlicky Greens and Caramelized Onion Grilled Cheese
1bunchchard, kale, or mustard greensribs removed, chopped into about 1" pieces
3cloves garlicminced
salt + pepper to taste
1½teaspoonsred wine vinegar
sliced pain de mie or artisan bread, 2 per person
5-6ouncesbrie, sliced ¼" thick
Instructions
In a large skillet heat 2 Tbsp. olive oil over medium high heat. Place the sliced onions in the skillet, sprinkle on several pinches of salt, and allow them to sit undisturbed for several minutes. When the bottom is beginning to brown, turn them, and once again allow them to brown undisturbed for several minutes. Continue this for about 15 minutes until the onions are soft and golden brown throughout.
While the onions are caramelizing, in another large skillet heat another 2 Tbsp. olive oil over medium high heat. Place the chopped greens in the skillet, and sprinkle with a few pinches of salt and pepper. Add the minced garlic. Sauté, stirring occasionally, until the greens have cooked down about 1/3, or are beginning to soften, about 5-6 minutes. Stir in the vinegar.
Lay the bread out on a work surface, and lay slices of brie on one side. Divide the sautéed greens among the sandwiches over the brie, then divide the caramelized onions over the brie. Cover each sandwich with its remaining bread slice.
Wipe out the skillet that the greens were cooked in with a paper towel, and heat the remaining Tbsp. olive oil in it over medium heat. Place the sandwiches in the skillet and cook each side until golden brown and crispy. Cut sandwiches in half and serve with tomato soup or simple salad or fruit.
Notes
Left over cooked greens and caramelized onions store well for 3-4 days in the refrigerator.
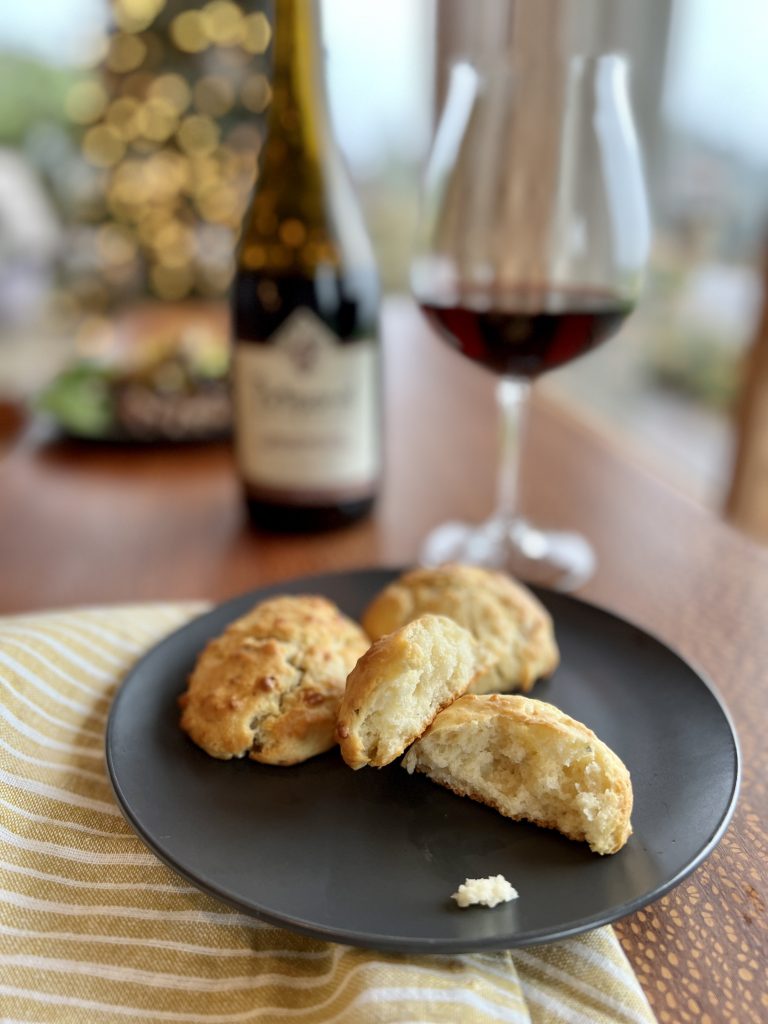
For every aspirational, time-consuming, detail-laden recipe in a cook's repertoire, she needs ten like this one in her bag of tricks. These 20-minute, one bowl Quickie Olive Oil Drop Biscuits have elevated so many meals in my lifetime. They are a perfect last-minute additional to all the soups and stews of the season. The biscuits also compliment any main-dish salad, and are a great way to stretch a meal when guests pop in (like back in the BC days.) Really, they are perfect wherever a dinner roll or biscuit would fit.
A fun trick is to make the biscuits small, dropped from a dinner spoon instead of a soup spoon, and serve them as an appetizer or snack with a glass of wine, an American version of gougères.
What is to love about these golden mounds of goodness?
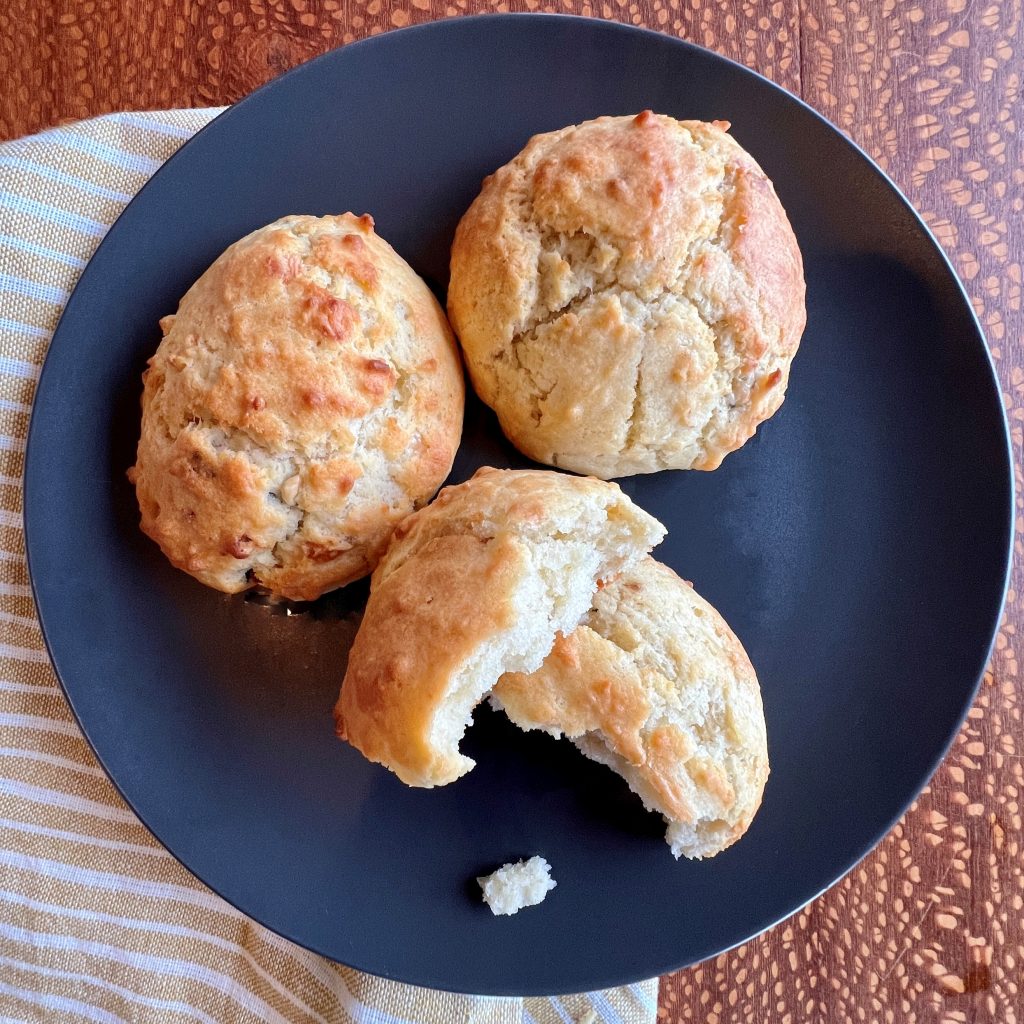
Olive Oil Drop Biscuits are a bit crispy on the outside, tender + fluffy on the inside.
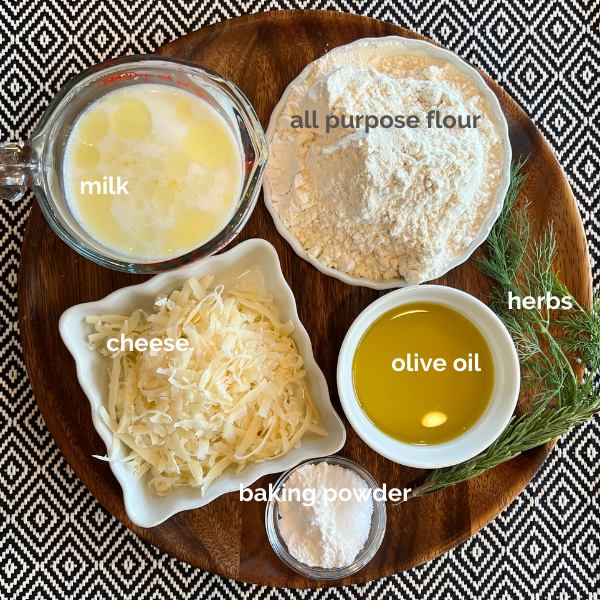
Selling point number one-- quickie olive oil drop biscuits are made in lightening speed. As in, begin preheating your oven now, and your biscuits will be mixed and formed before the oven is up to heat. There are only four primary ingredients to gather and measure here. Using olive oil eliminates the step of cutting in butter. Without the need to roll out and cut the dough like a typical biscuit you save that time, and a lot of cleanup by keeping everything contained in one bowl and not spread all over the counter.
Next, you'll fall head-over-heels for them because they are highly customizable. Olive oil drop biscuits without any of the optional add-ins are deliciously simple, and they become even more remarkable with the addition of some cheese, fresh or dried herbs, or better yet, both cheese and herbs. Any cheese that can be crumbled with your fingers or grated works here, and I often use a combination of cheeses just to use up the left-over nubbins.
Lastly, I love this recipe for olive oil droppers because it makes a relatively small batch. Did you know that in 2020, 53% of American households has one or two members? Most of us can't use a dozen biscuits. This fact is something I'm taking note of more and more when developing recipes, and you should see a change in the recipe sizes on these pages.
Serve your quickie olive oil biscuits alongside these recipes:
Any of the variations of Winter White Vegetable Soup: Get recipe here. Healing Chickpea Orzo Bowl in Ginger Broth: Get recipe here. Roasted Mushroom, Grain, + Spinach Salad. Get recipe here. Roasted Peppers, White Beans, Feta + Simple Herb Sauce, made sheet-pan-style instead of grilled. Get recipe here.
So few ingredients for so much quick and easy goodness!
Quickie Olive Oil Biscuits
Course: Appetizer, Bread + Rolls, Quick + Easy
Season: All Season
Dietary: Egg-Free, Nut-Free, Vegan
Preparation: Baking, Fast + Easy
Prep Time: 8 minutesminutes
Cook Time: 12 minutesminutes
Total Time: 20 minutesminutes
Servings: 8biscuits
These lightning fast, crispy on the outside, tender on the inside drop biscuits are the perfect "little something" to round out a meal. Delicious plain, or with the cheese and herb add-ins. You'll have them mixed up before your oven preheats!
6 tablespoonsextra virgin olive oil (equal to ⅓ cup + 1 tablespoon)
Optional Add-Ins
⅓cupcrumbly or grated cheeseParmesan, cheddar, gruyere, blue, fontina, gouda, etc.
fresh or dried herbs of your choicethyme, chives, rosemary, Italian seasoning, oregano, basil, cumin, etc.
Instructions
Preheat oven to 425°. Line a baking sheet with parchment of a silicone baking mat. In a medium mixing bowl whisk together the dry ingredients. If you are using any cheese or herbs, stir them into the dry ingredients.
Pour the milk and olive oil over the dry ingredients at the same time, and quickly and gently stir until the dry ingredients are incorporated. This will leave a somewhat shaggy dough. Don't overmix.
Drop the biscuits by spoonful onto the parchment or mat. Sprinkle the tops with a little more cheese, if you'd like. Bake for 10-12 minutes until the biscuits are golden brown and the tops bounce back up when lightly pressed. Cool on a rack, and serve.
Notes
These speedy drop biscuits are best eaten right out of the oven. If you have any leftover, rewarm them for a few minutes on an oven or toaster for best texture. Leftovers are also good for breakfast, toasted with butter and jam.
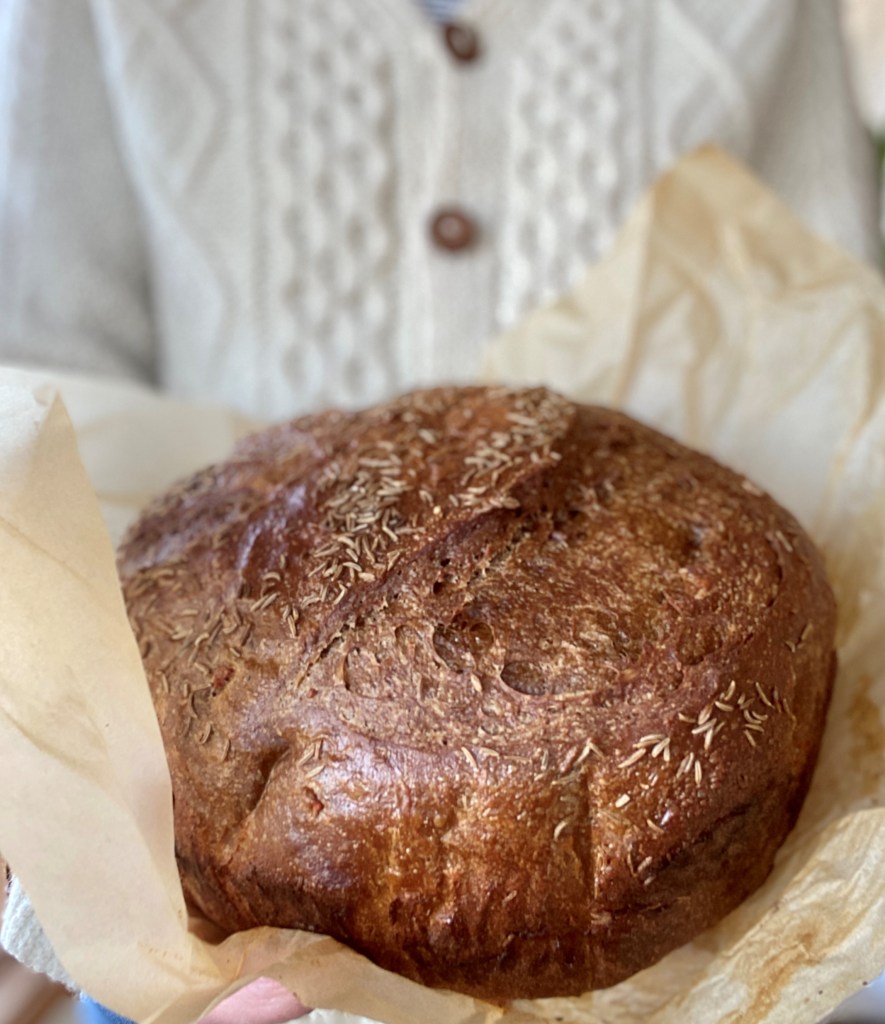
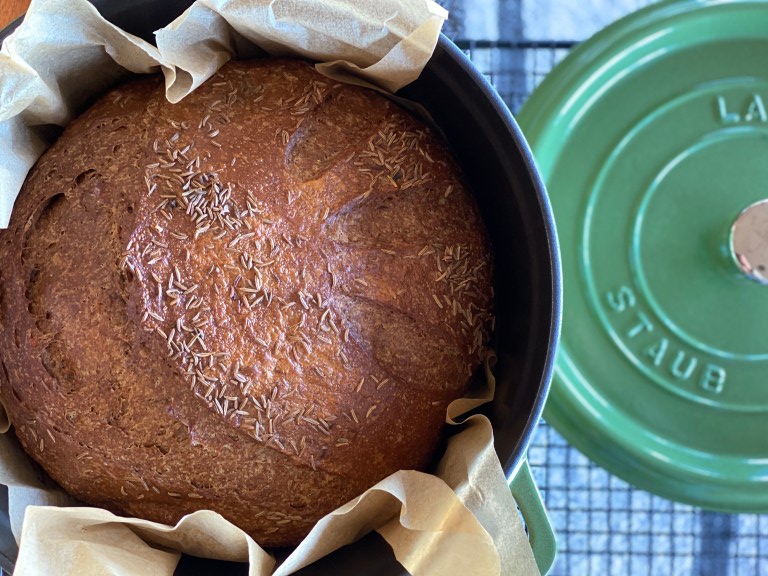
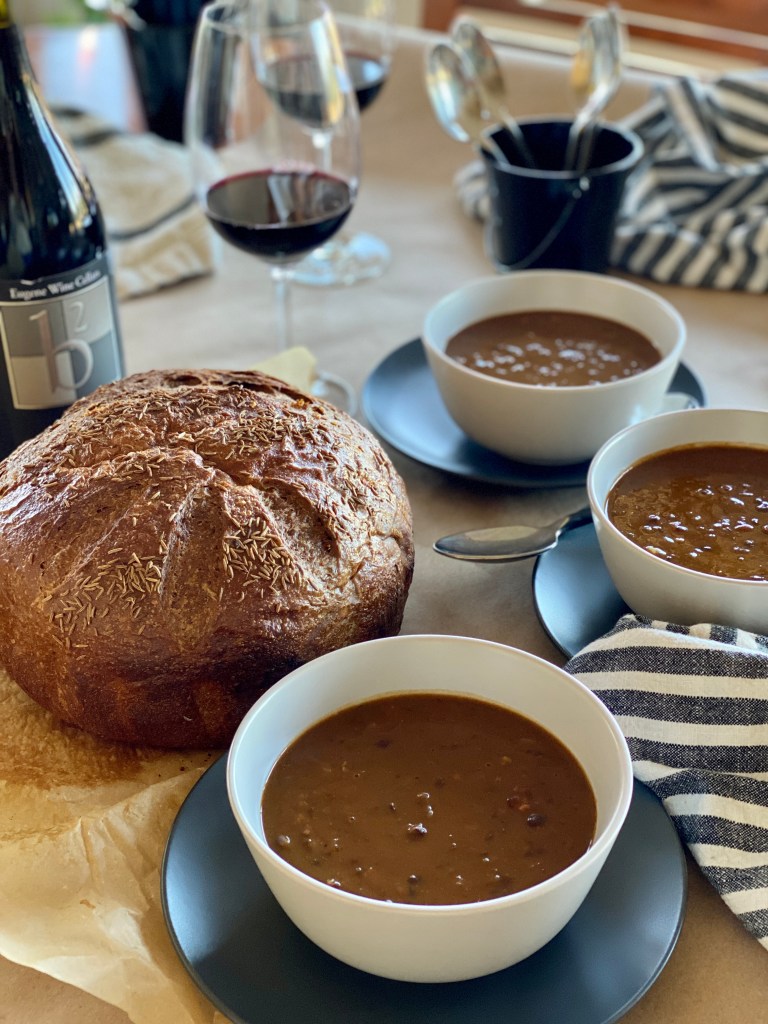
Even though school busses are rolling again, a blanket has been tossed on top of the summer sheets, and my favorite sweater has been brought out against the morning and evening chill, it is my first annual batch of Caraway Rye Black Bread that makes the welcome of autumn official at our house.
This black bread recipe originates with Dan Lepard's phenomenal 2011 cookbook, Short & Sweet. My adaptations reduce a little sugar, simplify the process, and make it completely dairy-free/vegan. But the texture, flavor profile, and proportions are singularly Dan's.
How to Use the Caraway Rye Black Bread
This glorious rye bread is perfect for dunking into a thick bean or vegetable soup like this for Halloween supper. Or try two slices filled with your favorite cheese, thinly sliced apple, and grainy mustard and grilled in a hot skillet or panini maker as an after leaf-raking treat. Or chunked up as a fondue dipper and served with a Grüner Veltliner or Riesling, it wins a lot of points in the stay-at-home romance category.
But here is my personal favorite-- A thick slice toasted, buttered, and with a generous schmear of butter or ghee and orange marmalade alongside a cup of hot coffee sings O Happy Day for breakfast.
About the Bread
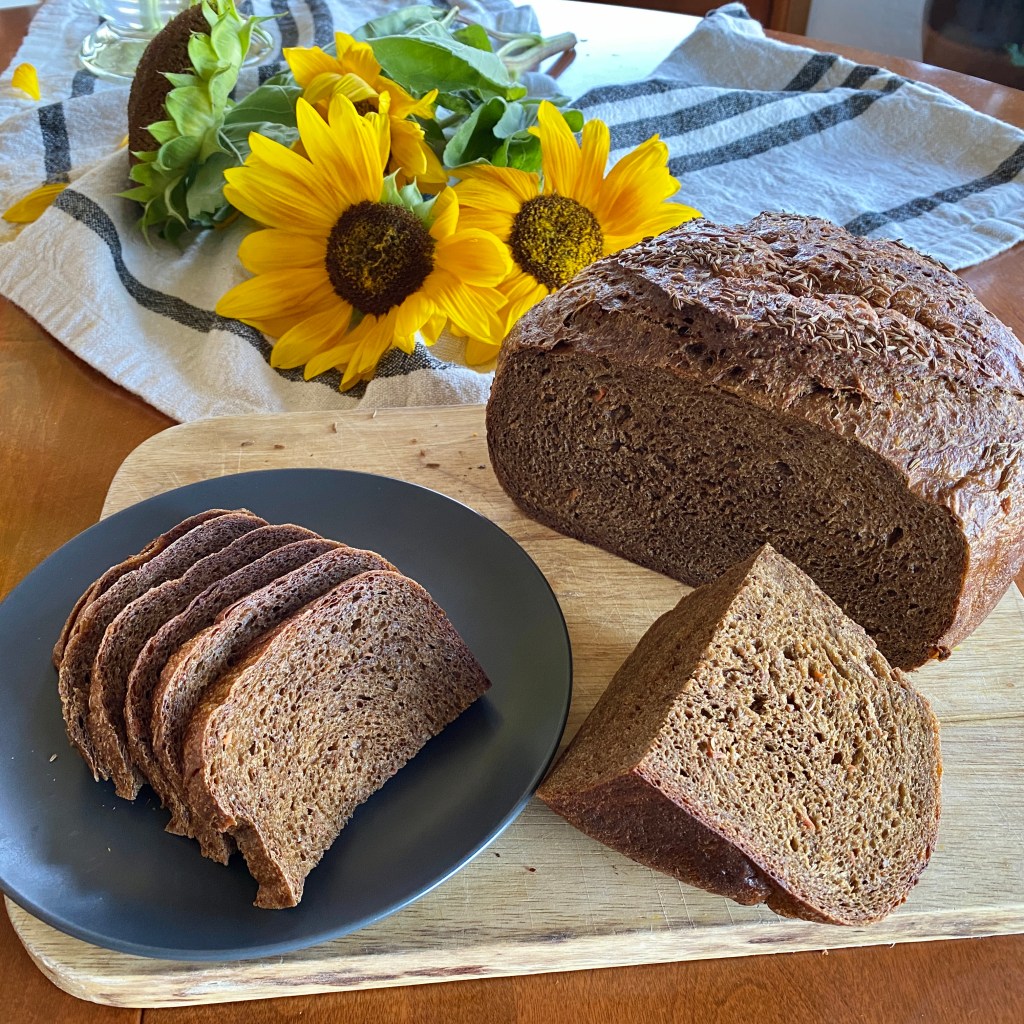
Caraway Rye Black Bread is the lovechild of deli rye and pumpernickel. Deep dark richness comes from molasses, cocoa powder, and ground coffee beans or instant espresso powder. The unmistakable sweet warmth comes from a generous amount of caraway seeds typically found in a lighter rye bread.
The loaf is gorgeous and huge-- HUGE-- at nearly three pounds. Is that more bread than your household came consume at once? There's the solution for that! The dough is easily divided into two smaller loaves baked either in boules as directed or in standard loaf pans. The dough also makes fantastic dinner or sandwich rolls, so you could make one loaf along with a pan of those. Well wrapped, the baked bread freezes beautifully for up to three months.
The Caraway Rye Black Bread recipe creates a silky dough that bakes up into a springy fine crumb. Its soft moisture comes from grated carrot, which I routinely swap for peeled winter squash such as butternut.
I've worked to simplify the steps, none of which are difficult. The hands-on time is fairly short. As your Saturday or Sunday self-care project, there is plenty of time to relax with a book or watch movies while the dough is rising.
I hope this heavenly bread recipe will become your welcome to autumn tradition.
If a pumpernickel and a deli-style caraway rye had a baby, it would be this loaf. A fine-crumbed pumpernickel-style loaf flecked with carrot and caraway just right for cool weather soup dipping, panini, cheese plates, fondue dipping and good old sandwiches. This vegan/dairy-free version makes one 3-pound loaf, two typically sized loaves, or great dinner rolls.
1 ½cupsrye or dark rye flourCamas Country Schoolhouse Dark Northern Rye is my favorite.
2¼teaspoonsinstant dry yeastSAF brand is my go-to.
2Tablespoonscocoa powder
2Tablespoonsinstant espresso powder or very finely ground coffee or espresso beans
1 - 1½Tablespoonscaraway seeds
2teaspoons kosher or sea salt
1 ½cupswarm water (110°-115°) and more as needed
¼cupmolasses, dark or blackstrap
3Tablespoonsolive, avocado, or safflower oil
2cupscarrot or winter squash such as butternut, peeled and grateda fine grate will make the carrot to disappear into the dough- a course grate will make pretty orange flecks in the dough, your choice.
Instructions
Combine the dry ingredients (all-purpose flour through salt) in the bowl of a stand mixer fitted with the dough hook. Alternatively, do this by hand in a very large mixing bowl.
Measure the warm water into a 2-cup measure. Add molasses and oil, and stir to thoroughly combine.
With the mixer on low speed, add the water mixture gradually to the dry ingredients. Scrape down the sides of the bowl. Add the carrots and increase the speed to medium. Knead for about five minutes, scraping the sides of the bowl occasionally. Aim for a dough that is smooth, moist, and tacky, but pulls away from the bow. leaving just a few moist streaks on the bowl. If your dough is too soft, add additional AP or rye flour a tablespoon at a time. If it is too dry, add water a tablespoon at a time, allowing time for the flour to absorb it before adding more.
Oil a large lowl. With oiled hands, shape the dough into a ball and place it in the bowl. Flip it over a time or two to lightly coat it in oil. Leave it seam side down, covered with a dishcloth, to rest in a warm place for 1 -2 hours until the dough has just doubled in size.
After the first rise, gently press down on the dough. On a lightly oiled surface and with oiled hands, fold the edges of the dough into the center and press down. Do this again (twice total) to shape the dough into a tight, smooth ball. If you are baking it on a baking sheet, lightly oil the baking sheet and place the dough seam side down on the baking sheet. If you are baking your loaf in a Dutch oven (5-6 qt. is best) first place the dough on a sheet of parchment tucked into a small skillet or pan about the width of your Dutch oven, and place your Dutch oven into your oven. (This allows the dough to rise while your Dutch oven is preheating.) With either baking method, cover the dough with a dishcloth for its final rise in a warm place for one hour.
Preheat the oven to 425°/ 220C. Brush the top of the loaf with water and scatter another 1 teaspoon of caraway seed on top, if desired. With a very sharp knife and without deflating the dough, cut an "X", a line down the center, a half moon, or wheat-shaped dashes into the top. Or leave it to make its own fough gash as it expands in the oven. If you are baking the loaf in a Dutch oven, use the parchment corners to gently lift the dough into the hot Dutch oven. If you are baking it on a baking sheet, place the sheet in the oven.
Bake for 20 minutes at 425°/ 220C. Reduce the oven temperature to 350°/ 180C and bake for another 20-25 minutes. (Reduce the time if you've divided the dough into smaller loaves or rolls.) The loaf will be ready when it has a very well browned bottom crust and sounds hollow (like a drum) when you firmly pat it. Don't be afraid to give it more time in 5-minute increments-- you definitely don't want it underdone.
Remove the loaf to a cooling rack. Allow the load to cool to the touch completely before cutting into it. Slicing into a hot loaf of bread turns it into a compressed gooey mess, so be patient for this most excellent reward.
Follow Me
Welcome!
You’re in the right place! I’m Pam Spettel, home cooking expert and guide, and I’m here to show you how to break up with cooking and hospitality anxiety, learn how to use recipes as guides rather than strict rules, and let your cooking intuition and confidence soar.
Superpower: Dreaming up recipes that work, serving them to my friends and family, and writing little stories about how cooking them well is the same as loving well.
Inspiration: Ingredients! The fresh, colorful, fragrant, local, seasonal ingredients found in the Pacific Northwest are my creative medium.
Heroes: Local food and wine producers– the people who keep me, my family, and our community nourished and happy.
We use cookies on our website to give you the most relevant experience by remembering your preferences and repeat visits. By clicking “Accept”, you consent to the use of ALL the cookies.
This website uses cookies to improve your experience while you navigate through the website. Out of these, the cookies that are categorized as necessary are stored on your browser as they are essential for the working of basic functionalities of the website. We also use third-party cookies that help us analyze and understand how you use this website. These cookies will be stored in your browser only with your consent. You also have the option to opt-out of these cookies. But opting out of some of these cookies may affect your browsing experience.
Necessary cookies are absolutely essential for the website to function properly. These cookies ensure basic functionalities and security features of the website, anonymously.
Cookie
Duration
Description
cookielawinfo-checkbox-analytics
11 months
This cookie is set by GDPR Cookie Consent plugin. The cookie is used to store the user consent for the cookies in the category "Analytics".
cookielawinfo-checkbox-functional
11 months
The cookie is set by GDPR cookie consent to record the user consent for the cookies in the category "Functional".
cookielawinfo-checkbox-necessary
11 months
This cookie is set by GDPR Cookie Consent plugin. The cookies is used to store the user consent for the cookies in the category "Necessary".
cookielawinfo-checkbox-others
11 months
This cookie is set by GDPR Cookie Consent plugin. The cookie is used to store the user consent for the cookies in the category "Other.
cookielawinfo-checkbox-performance
11 months
This cookie is set by GDPR Cookie Consent plugin. The cookie is used to store the user consent for the cookies in the category "Performance".
viewed_cookie_policy
11 months
The cookie is set by the GDPR Cookie Consent plugin and is used to store whether or not user has consented to the use of cookies. It does not store any personal data.
Functional cookies help to perform certain functionalities like sharing the content of the website on social media platforms, collect feedbacks, and other third-party features.
Performance cookies are used to understand and analyze the key performance indexes of the website which helps in delivering a better user experience for the visitors.
Analytical cookies are used to understand how visitors interact with the website. These cookies help provide information on metrics the number of visitors, bounce rate, traffic source, etc.
Advertisement cookies are used to provide visitors with relevant ads and marketing campaigns. These cookies track visitors across websites and collect information to provide customized ads.