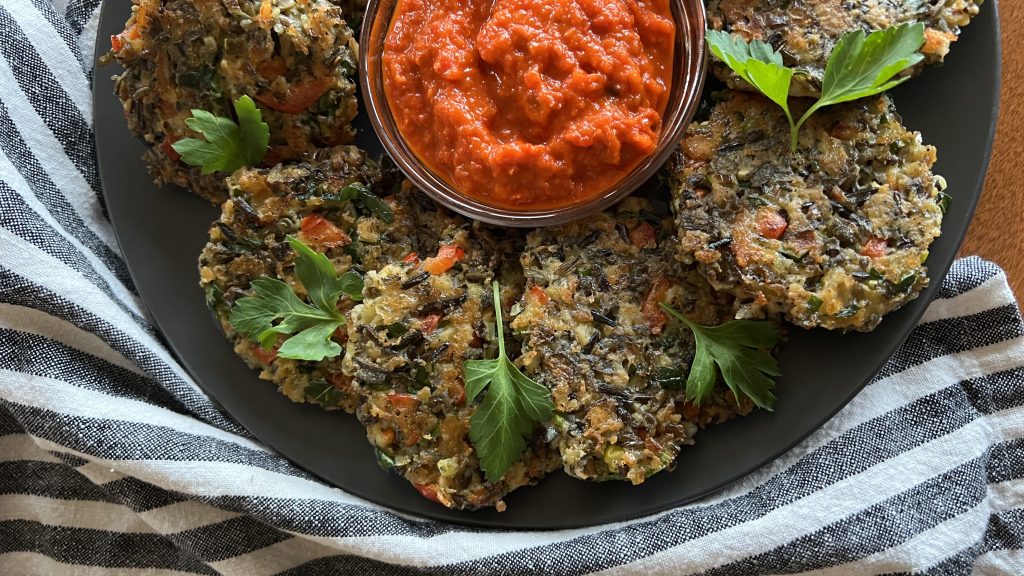
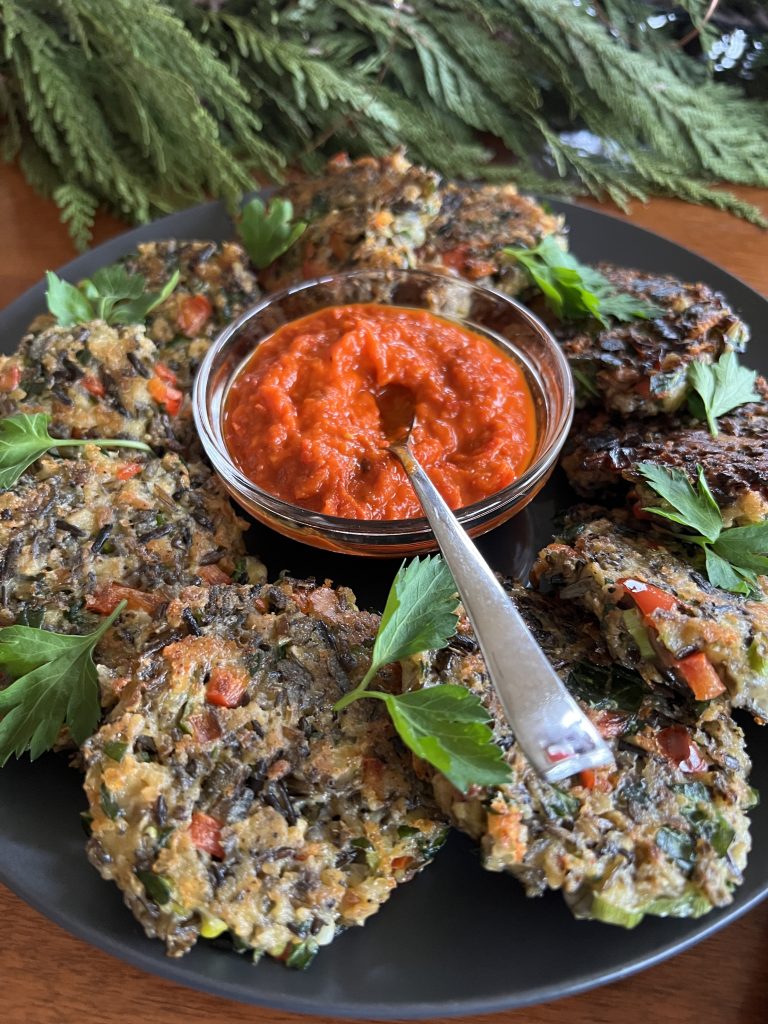
I've been dreaming of developing a recipe for Wild Rice Fritters and Red Pepper Dip for months, and it finally took shape in this last puff of space of the year.
I love this span of time. The old year is essentially over. The new year is drawing its own deep breath readying for its debut. In this liminal vacuum, dreaming and realigning with nature happen without much effort. I begin celebrating the quieter side of winter.
Christmas is over and we’re supposed to be hauling trees out of the house, but I couldn’t resist hanging this windfall fir branch from my kitchen rafters, and lighting it up to extend my celebration of winter.
Wild Rice Fritters, Perfect for the Season
The 101-Mile Kitchen spirit emphasizes eating seasonally, but along with that comes living seasonally. Like a bear in its wintery den, my digestion slows this time of year. Eating smaller meals that feature storage ingredients like dried beans and wild rice, squashes, and root vegetables makes the best sense when I'm listening to my body.
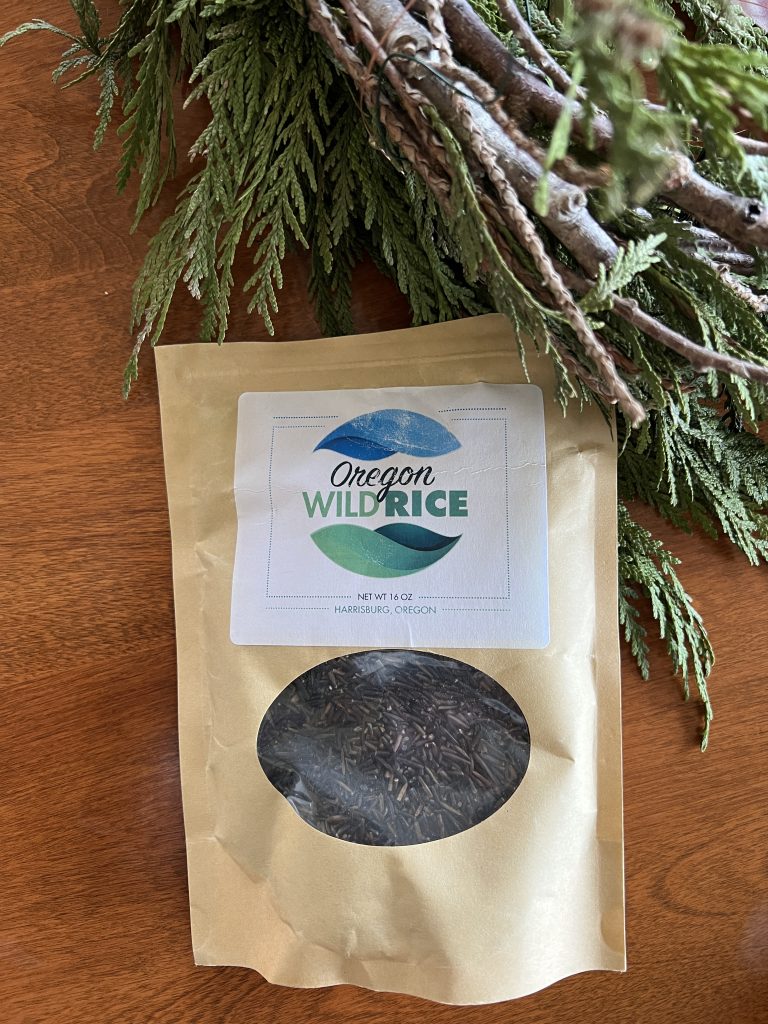
Wild rice fritters make a satisfying small meal or appetizer, or a great side dish to a larger winter meal. I use Oregon's very own Oregon Wild Rice, about 20 miles as the crow flies from our 101-Mile Kitchen hillside. The Langdon family stopped draining their fields of the autumn rains to convert their former grass-seed operation to wild rice in 2016, bringing their farmer practices in better line with nature. We've become the beneficiaries by enjoying their flavorful wild rice more often.
Versatile and Simple Red Pepper Dip
When it comes to injecting bright color to our meals this time of year, this red pepper dip really delivers. The beautiful bright red-orange dip is also delightful along with roasted Brussels sprouts halves, as sandwich spread, (do try it on grilled cheese sandwiches), and as a pizza sauce.
Other Light But Satisfying Wintery Meals You Might Like:
1cupwild rice, raw(You will have about one cup of rice left over for another use.)
3 largeeggs
3green onions, thinly sliced
½red or yellow bell pepper
1oz.spinach leaves, thinly sliced and then chopped (about 1 cup)
2cloves garlic, minced or pressed
1tablespooncapers, minced
4 oz.fontina, gruyere, or cheddar cheese, grated
1teaspoonsea salt
1/2teaspoonfreshly ground black pepper
1cupplain cracker crumbs, finely crushed
1tablespoonbutter
1 tablespoon olive oil, plus 1 teaspoon for rice
For the Red Pepper Dip
12 oz.jarroasted red peppers
1tablespoonolive oil
1 clovegarlic, smashed
½teaspoonsalt
2teaspoonsbalsamic vinegar or blackstrap vinegar
Instructions
Make the Fritters
Place the rice in a small saucepan and rinse with cold water. Carefully drain and add one teaspoon olive oil and 2½ cups water. Stir. Bring to a boil, then cover and drop the temperature to low. Cook until the rice is tender and the grains are beginning to unfurl. Drain through a fine mesh strainer and allow to cool while you carry on.
In a large mixing bowl, whisk the eggs. Add the green onions, red or yellow bell pepper, spinach, garlic, capers, cheese, salt and pepper, and stir.
Add two cups of the cooled wild rice and the cracker crumbs. Stir together thoroughly.
Heat a large stainless steel or cast iron skillet over medium high heat. Heat the butter and olive oil to the pan until bubbly. Using a ¼ cup scoop or measuring cup for consistent size, form patties with your hands, and drop them into the hot skillet. Press down on them gently to flatten them in the skillet. Cook for about 4-5 minutes per side until well-browned and crispy, adjusting temperature as necessary to keep them from burning. You will do this in two batches. Remove cooked fritters to a paper-towel-lined cutting board or plate.
Place the cooked fritters on a serving plate along with a small bowl of Trader Joe's Roasted Red Pepper Spread for dipping. Enjoy these hot or room temperature. Freeze leftovers for up to two weeks. Rewarm in a 350° oven.
Make the Red Pepper Dip
Drain the roasted red peppers well, and lay them out on a double layer of paper towels, or more sustainably, on a double layer of cotton dish cloth. Press the peppers firmly to release as much moisture as possible. Dry them off.
Add all ingredients except the peppers to a food processor and process until the garlic is finely minced. Add the peppers, and process until the peppers are not quite smooth and the dip is homogenous. Store in a recycled jar with tight-fitting lid for up to five days. Serve at room temperature.
Notes
The beautiful bright red dip is also delightful with roasted Brussels sprouts halves, as a spread on ham, turkey, roast beef, or stacked vegetable sandwiches, grilled cheese sandwiches, and as a pizza sauce.
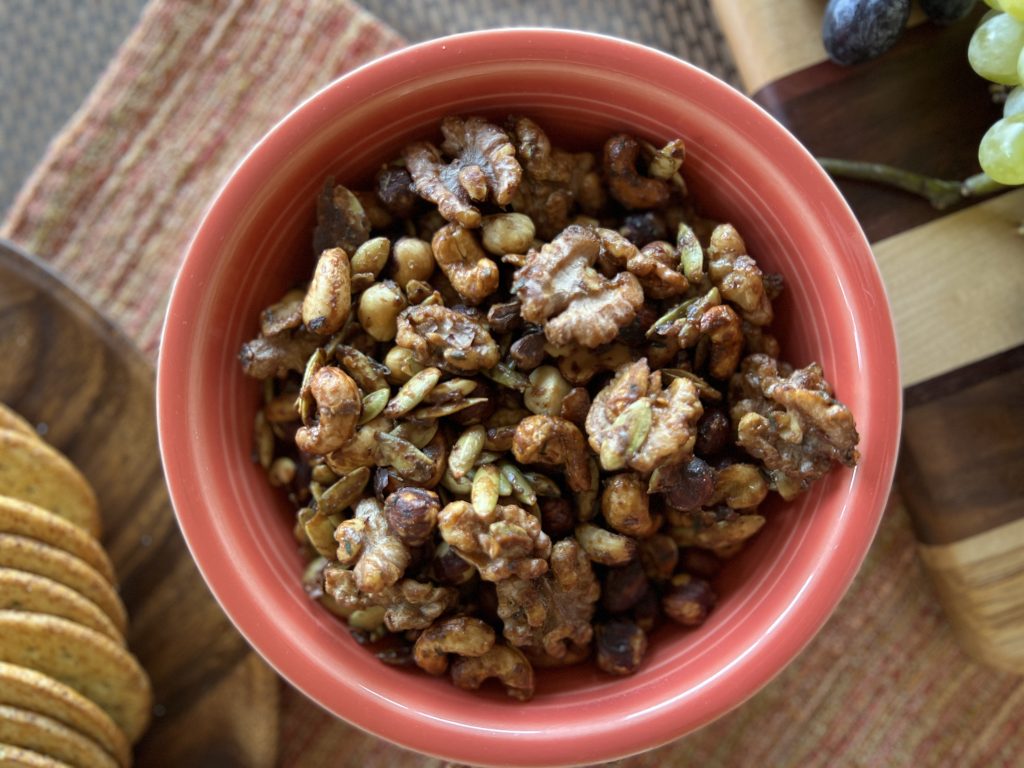
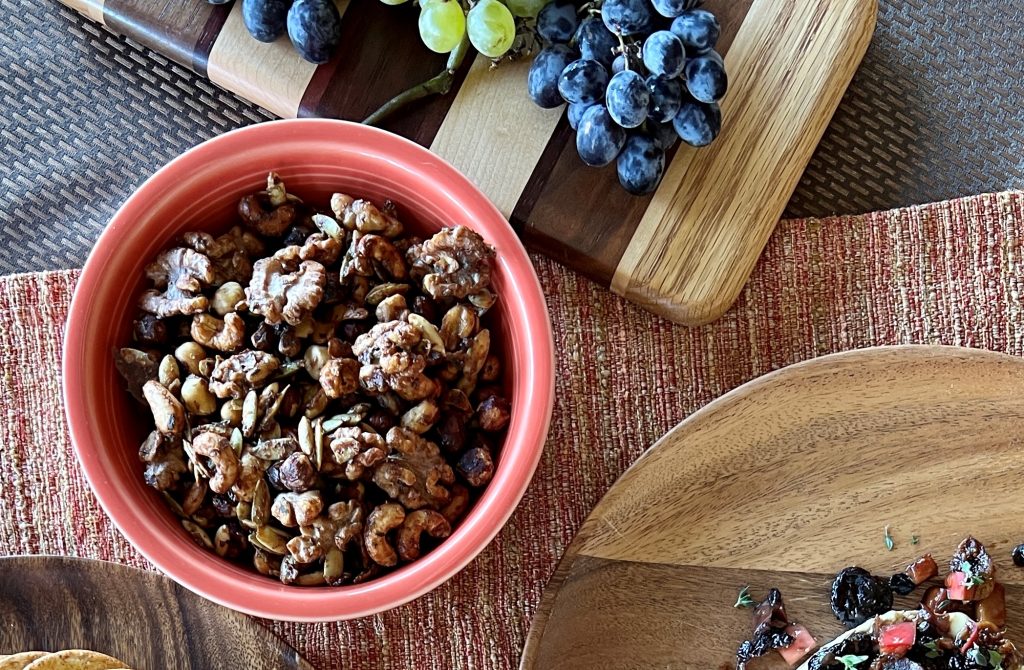
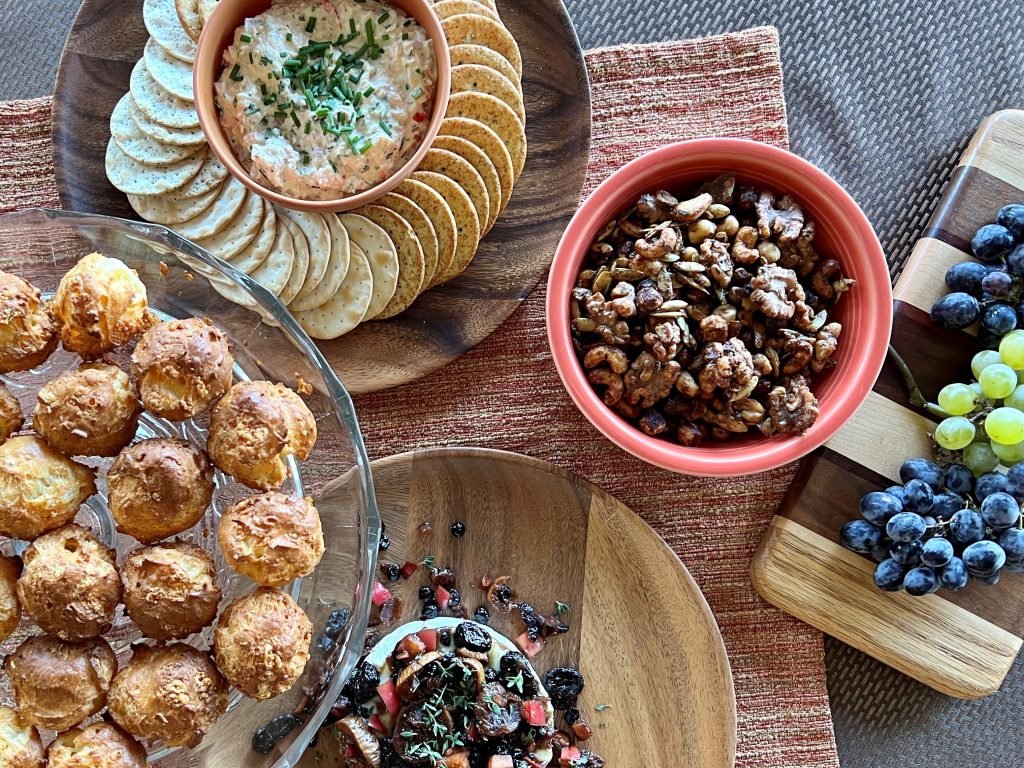
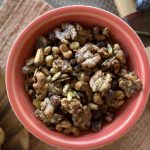
Since forever some form of sugared and spiced nut seems to come out of hiding the first weekend of December, right in time for the first holiday gatherings. I've made a lot of them over time, and now heartily endorse the talented and adorable Dorie Greenspan's Candied Cocktail Nuts from her book Everyday Dorie as the very best option.
Candied cocktail nuts are the most pleasant way to start a party or celebration that I can think of. In under 15 minutes you'll have a big bowl of crispy flavored nuts that is perfect with most any libation. Season them sweet or savory.
Candied Cocktail Nuts also make perfect gifts for the holidays. Think of the neighbors, co-workers and hosts you can delight with such few ingredients and such a short time in the kitchen!
These spiced candied cocktail nuts make a perfect partner on a cheese or charcuterie platter. A handful of them also make a great salad topper. Don't forget that!
Candied Cocktail Nuts are a nice additional to an array of appetizers.
What Makes This Spiced Candied Cocktail Nut Special?
What I like about Dorie's candied cocktail nuts recipe is that the sugars are light (just one tablespoon maple syrup and one teaspoon brown sugar.) The sugars are cooked smooth into a glaze which evenly coats each nut. The glaze is meant only as a carrier delivery system to wrap each nutty nook and cranny with the spice flavor. The result is a just-right sweetness, not over the top sugaryness.
I've made room to change Dorie's cinnamon spice profile. Suit your mood or compliment the rest of your menu with whatever spices you have in your cupboard. I have found that curry blends (madras, ras el hanout, Persian lime curry) end up being my favorite spiced cocktail nuts. However, plain old cinnamon is pretty wonderful, too.
This post contains affiliate links, including but not limited to Amazon. As an Amazon Associate I earn from qualifying purchases. When you use these links to buy something I may earn a commission at no cost to you. Product affiliation helps me to keep this site ad-free while providing you with the content you enjoy. I only promote items that I use, like, and trust, or would invest in myself.
Spiced Candied Cocktail Nuts
Course: Appetizer
Season: Mist (November - March)
Dietary: Egg-Free, Gluten-Free, Vegan
Preparation: Baking, Fast + Easy
Total Time: 15 minutesminutes
Servings: 8
Author: Adapted from Dorie Greenspan's Everyday Dorie!
The quickest, easiest, most pleasant way to start a party or celebration that I can think of. In under 15 minutes you'll have a big bowl of crispy flavored nuts that is perfect with most any libation. Season them sweet or savory. Perfect gifts for the holidays, too!
8ounces untoasted shelled nutsUse a single variety, or any combination of hazelnuts, almonds, walnuts, cashews, pecans, macadamias, and/or raw pumpkin seeds.
1 tablespoonunsalted butter
1tablespoonmaple syrup
1teaspoonpacked brown sugar, light or dark
1teaspoonfleur de sel or flaky salt, or 1/2 teaspoon fine sea salt, plus more for sprinkling
¾teaspooncinnamon, or curry powder, or pumpkin spice(play around-- French quatre espice, smoked paprika, cardamom, cumin blends all would be fantastic)
¼ to ½teaspooncayenne pepper or piment d'Espelette
Instructions
Preheat the oven to 350°. Arrange the oven rack in the middle of the oven. Line a rimmed baking sheet with parchment paper or a silicone baking mat. Add the nuts. Roast for 5 minutes.
Meanwhile, place 1 tablespoon unsalted butter, 1 tablespoon maple syrup, 1 teaspoon packed brown sugar, 1 teaspoon fleur de sel or flaky salt (or 1/2 teaspoon fine salt), 3/4 teaspoon ground cinnamon, and 1/4 to 1/2 teaspoon piment d’Espelette or cayenne pepper in a medium saucepan. Cook over medium heat, stirring, until the butter melts and the mixture is smooth. You won’t have much liquid, but it will be all that you need.
Add the warm nuts to the saucepan and cook, stirring, until they are coated with the mix, 2 to 3 minutes. Return the nuts and thyme to the baking sheet and spread them out — they won’t bake well if they’re in clumps.
Bake for 5 minutes. Stir and turn the nuts and bake until fragrant and deepened in color, 4 to 5 minutes more. Place the baking sheet on a rack and discard the thyme. Sprinkle with more fleur de sel (or fine salt), and let the nuts cool completely (they will initially be sticky but will crisp up).
Notes
Tip: This recipe is so delicious and easy, you'll want to double it! If you decide to make a batch with more than 1 pound of nuts, bake them on two baking sheets.Storage: The nuts can be kept for at least 1 week in a tightly sealed container. They may get a bit sticky; to refresh them, pop them back into a 350ºF oven for 5 minutes.Sourcing nuts: You know me, I advise to use nuts that are grown in your area when you can. However Trader Joe's is a wonderful place to stock up on nuts. They are always fresh, have a great variety all in one place, and are always the best value around.
Here is a small collection of my holiday favorite recipes that will take you from Thanksgiving into New Years. Like most everything I present to you, these highlight seasonal ingredients, and are typically full of love but not labor. As a person predisposed to the holiday scaries brought about by being a solo planner, cook, and hostess for far too many years, I no longer have time or energy for the complicated.
I grew up in a small family who lived far away from any relatives, so Thanksgivings included the complete standards but on a small scale, always prepared beautifully by my mom. I also raised my own family far away from any relatives, so that pattern repeated. If I were hosting Thanksgiving this year, it would the 38th time in the last 41 years. That's a lot of holiday cooking!
Now, my sweetheart and I have a combined seven grown kids, and ten amazing grandkids. This year we are visiting a daughter in Texas and her beautiful family. I get to relax a bit and be the assistant!
Here are some recipes that work for smaller groups, or perhaps step out of tradition a wee bit if your weary of the classic standards.
Holiday Recipe Starters
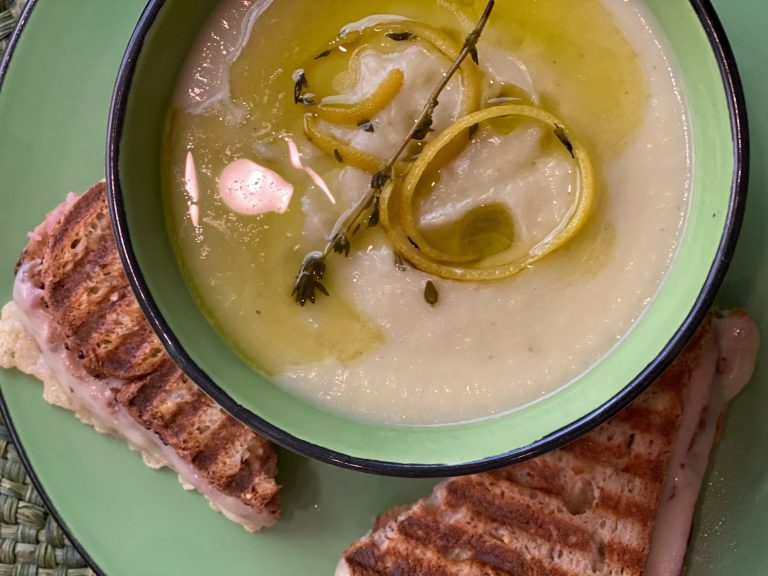
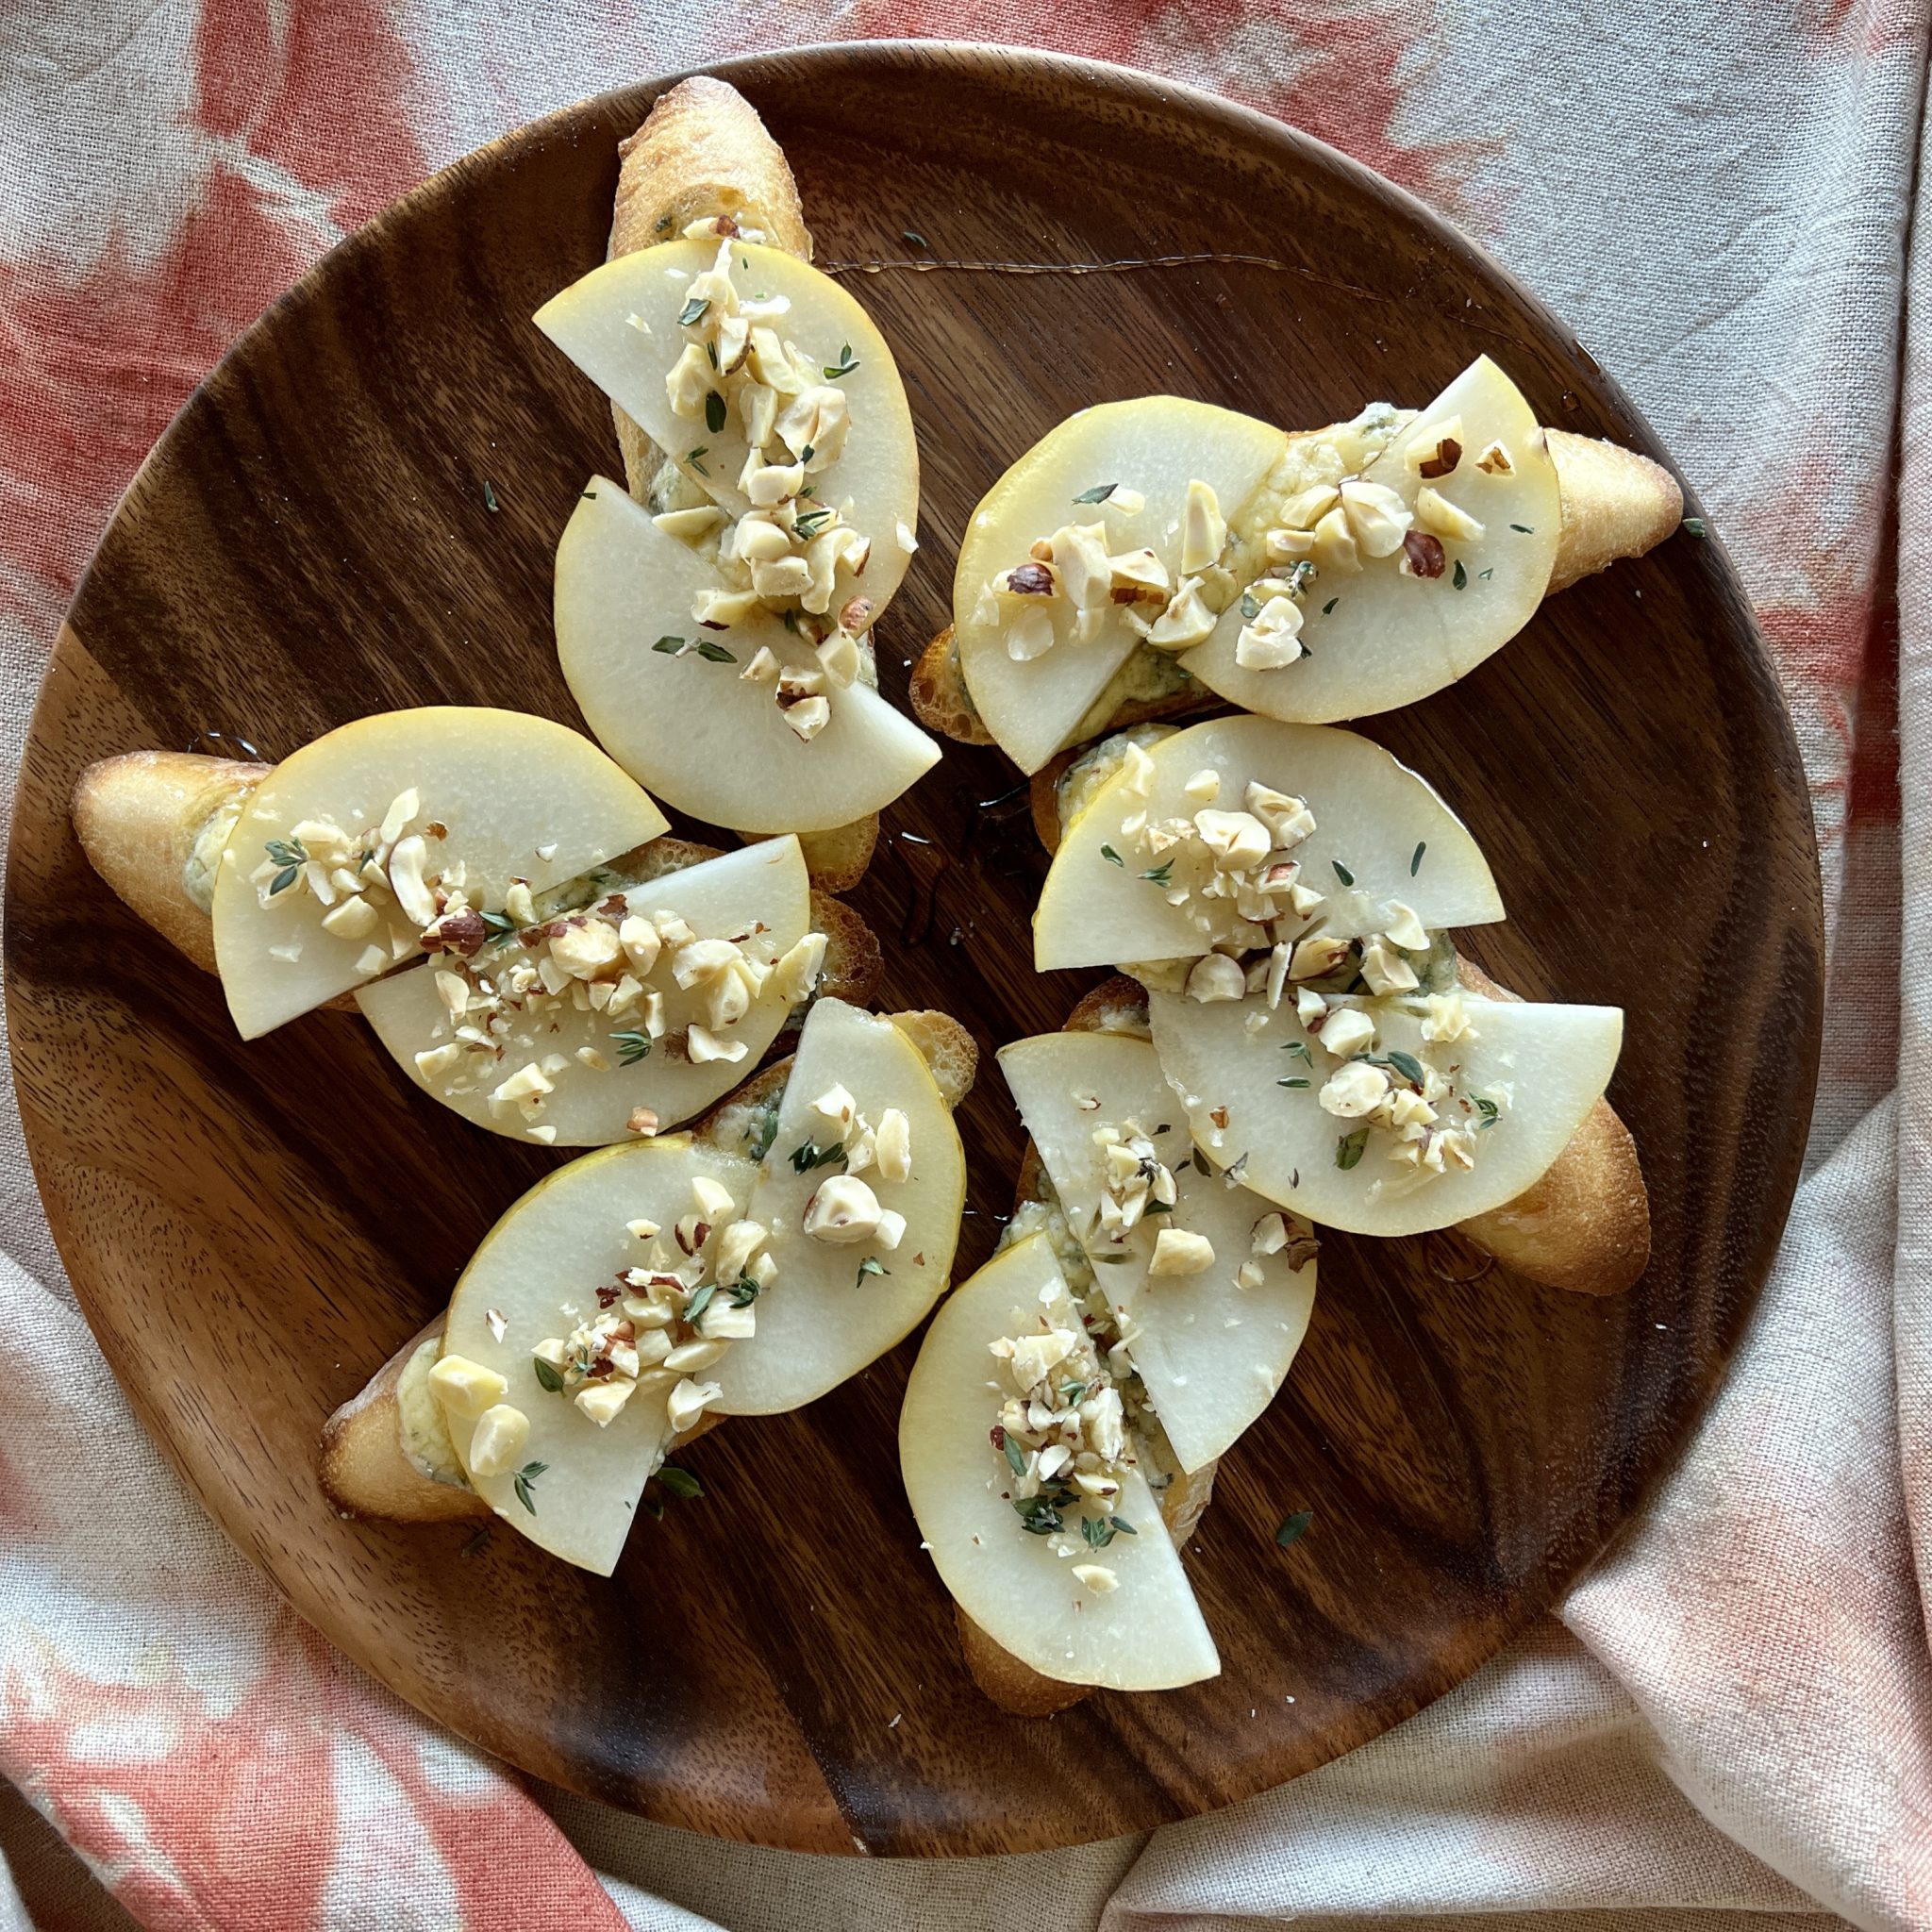
Winter White Vegetable SoupBlue Cheese + Pear Tartine
I love handing guests a cup of soup as they arrive this time of year. A cup or small mug of soup, like this Winter White Vegetable Soup, or its winter squash version (also within this recipe), is portable as guests mingle and makes a nice handwarmer coming in from the cold. This recipe has enough body and flavor to make it delicious and noteworthy, but it light enough to keep from spoiling anyone's appetite. This pureed soup requires using an immersion blender, so if you don't have one, now is the time. (This is the one I have and love.) An immersion blender is also a truly fantastic Christmas or Chanukah gift for budding cooks, or anyone who doesn't have one. Another big plus-- this soup can be made two or three days ahead and rewarmed at the last minute.
Blue Cheese and Pear Tartine (like a crostata or bruschetta) are frankly amazing. The favors sing. Use this throughout the holiday season, whether its a quiet night at home, or if you are hosting or taking food to a party.
Beautiful Sides, Salads, and Cranberries
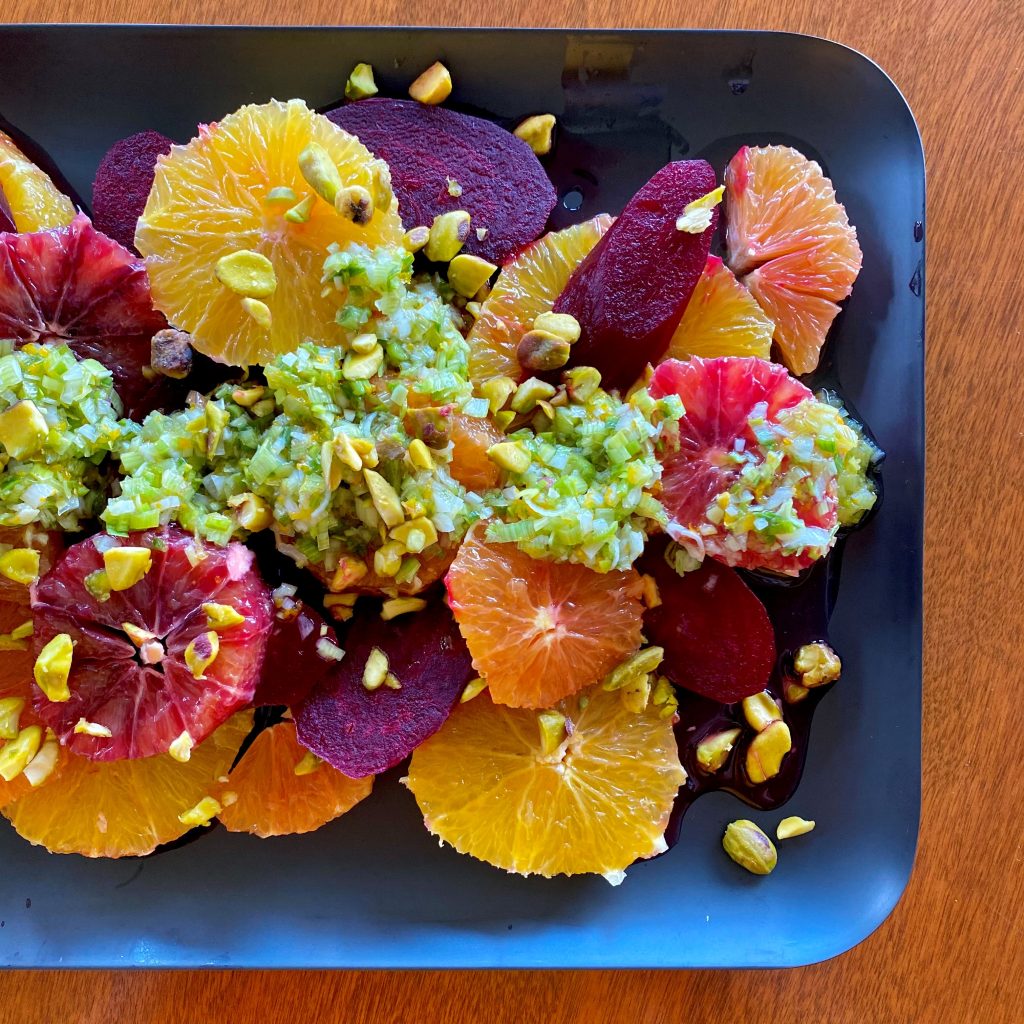
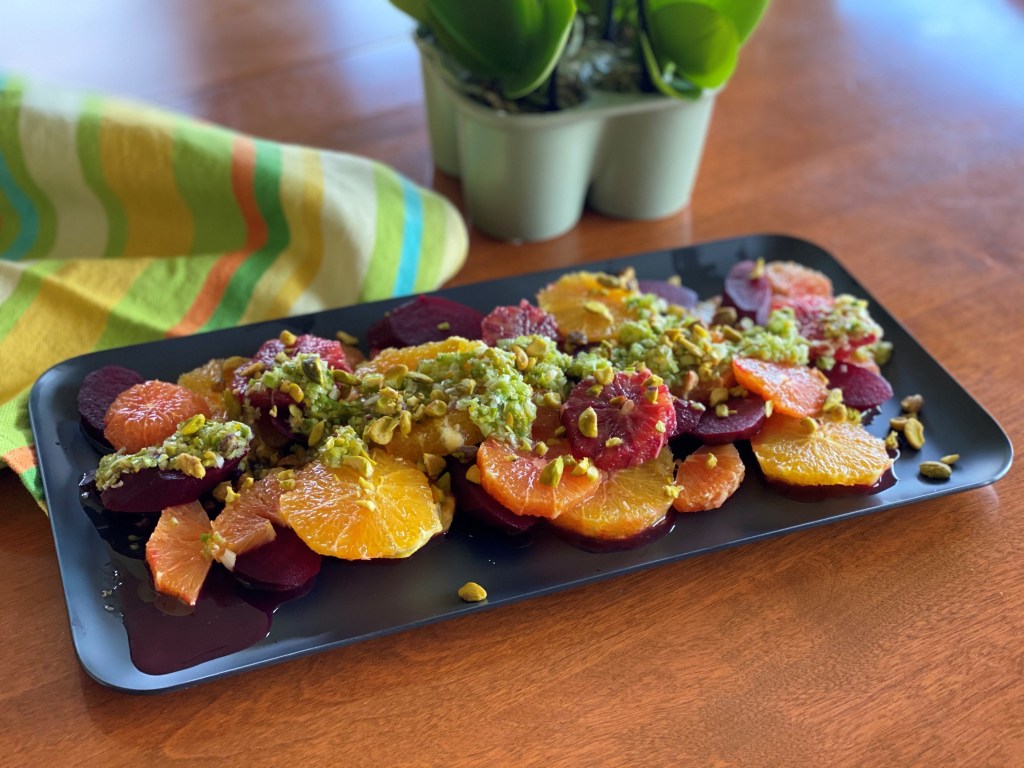
Some of my favorite holiday recipes include Citrus Rush Beet Orange Salad. I love this one for it's pop of gently acidity that seems to be very welcome with all of the other buttery dishes. It is so pretty, and the components can be made ahead.
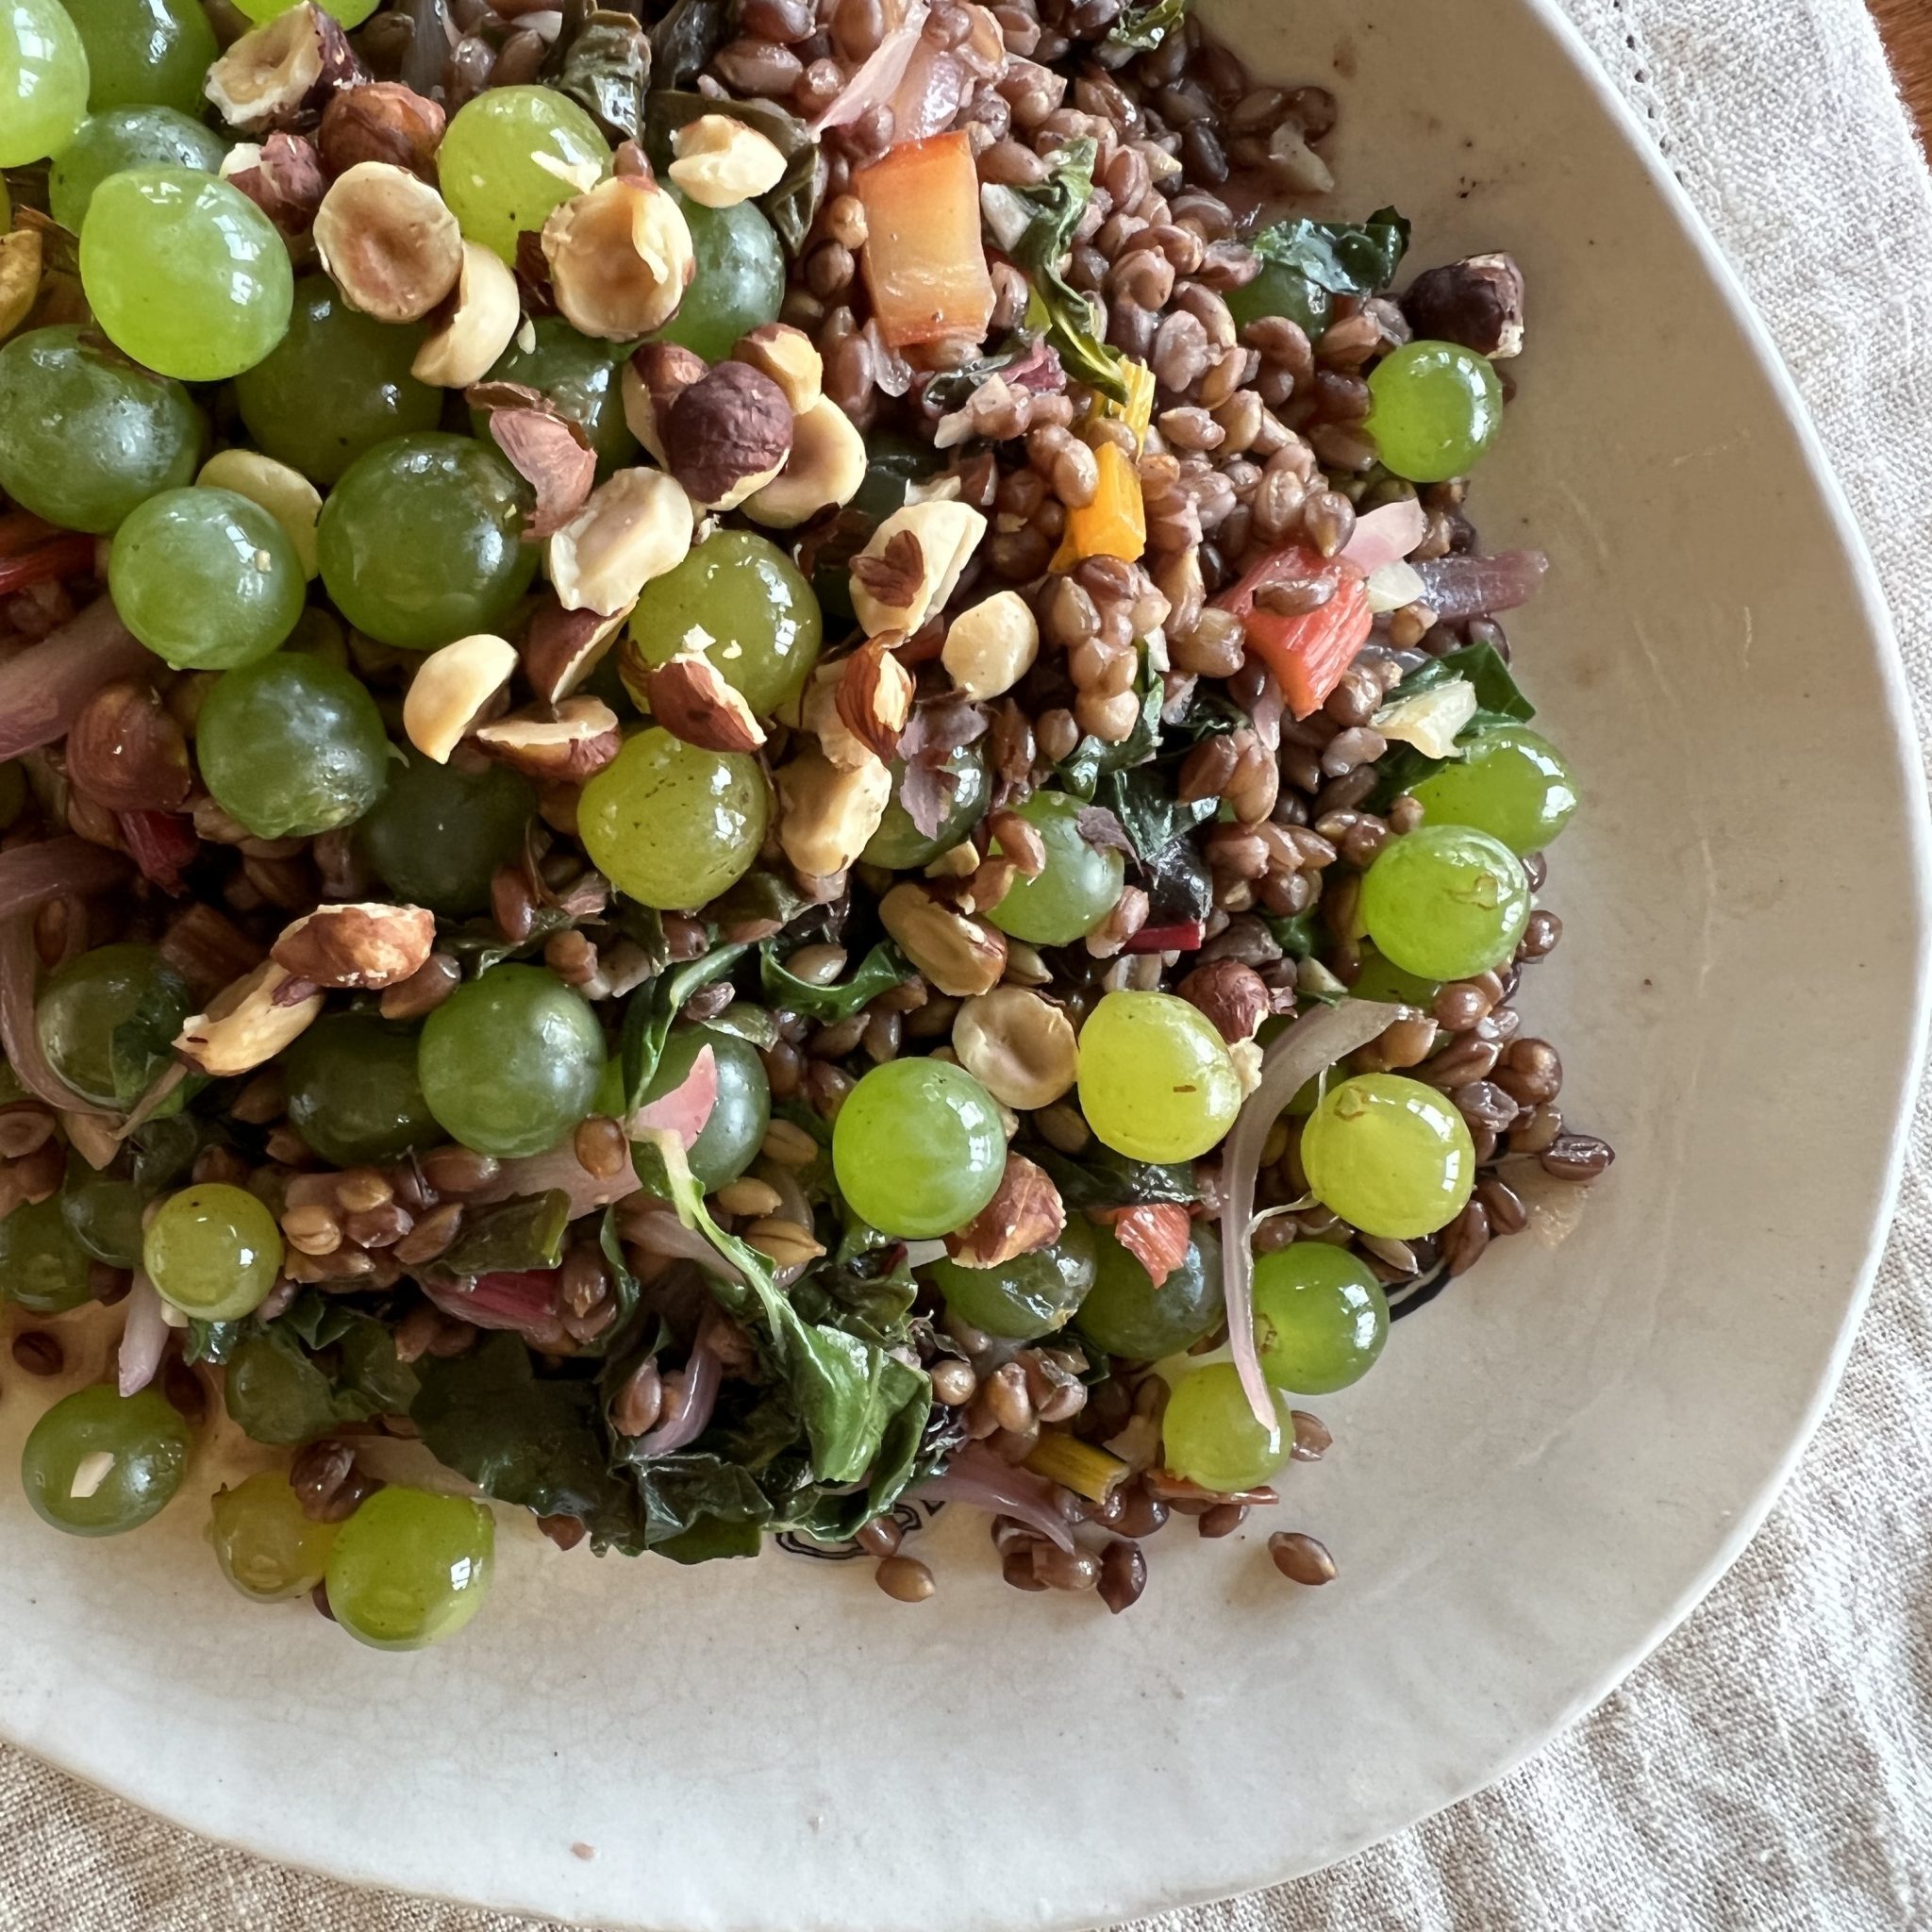
Autumn Grains, Grapes, and Greens is beautiful, and blurs the line between side dish and salad. With it's grain base, it is also wonderful to serve when vegans and vegetarians are at your table. They will truly know you love them!
Beet Orange SaladGrains, Grapes, and Greens Salad
As for cranberry sauce, I love hearing about everyone's favorite recipe. There are so many ways to enjoy cranberries, and it seems that once we hit on our favorite there's no room for change. This is the recipe I've used since the early '90s, and my daughter makes it every year now, too. Cranberry Sauce with Raspberry Vinegar was originally from Bon Appetit magazine, and you can find it here. I've used several blueberry and blackberry vinegars in it with equal deliciousness (P.S.-- don't be tempted to scrimp on the raspberry vinegar. That's where the magic is. And if you can get your hands on it, this blueberry or blackberry vinegar is glorious.)
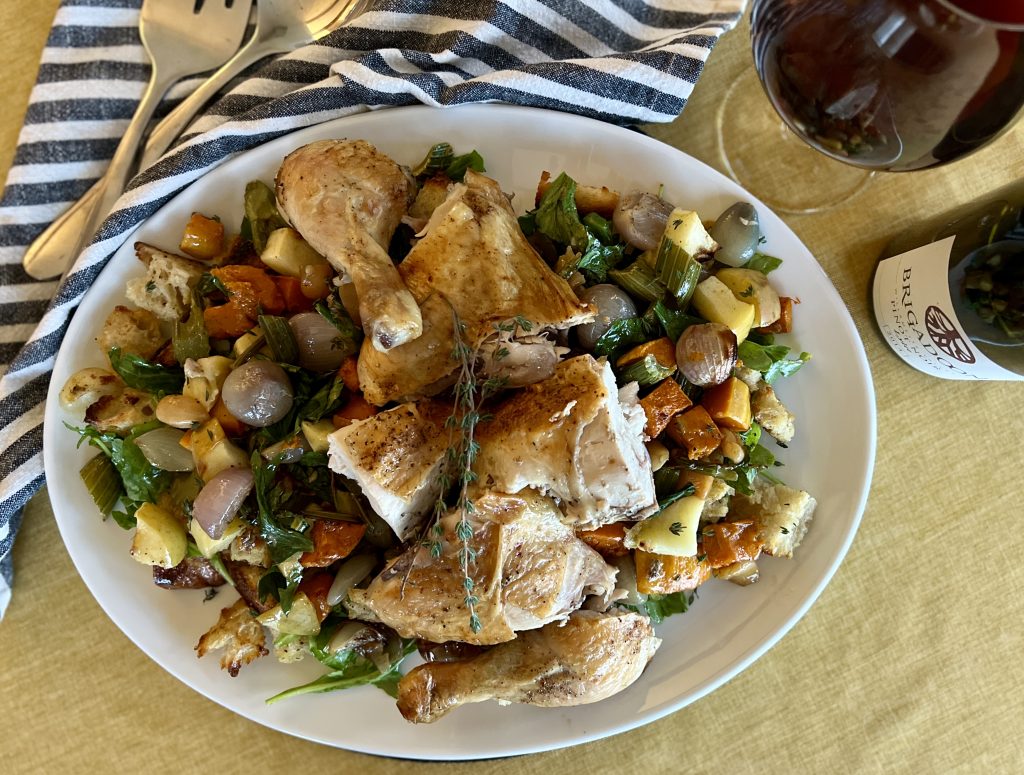
Alternate Main Course
So maybe there's just two or three of you, and a big bird doesn't sound like fun. You still want something seasonal and special, but don't want to be at it all day. Another holiday favorite recipe is my Roasted Chicken + Autumn Bread Salad is really all the glory with a fraction of the time and work. Hey, it's still poultry, right? The bread salad takes the place of stuffing, vegetable sides, and refreshing salad all at once. It truly is Thanksgiving or Christmas dinner worthy.
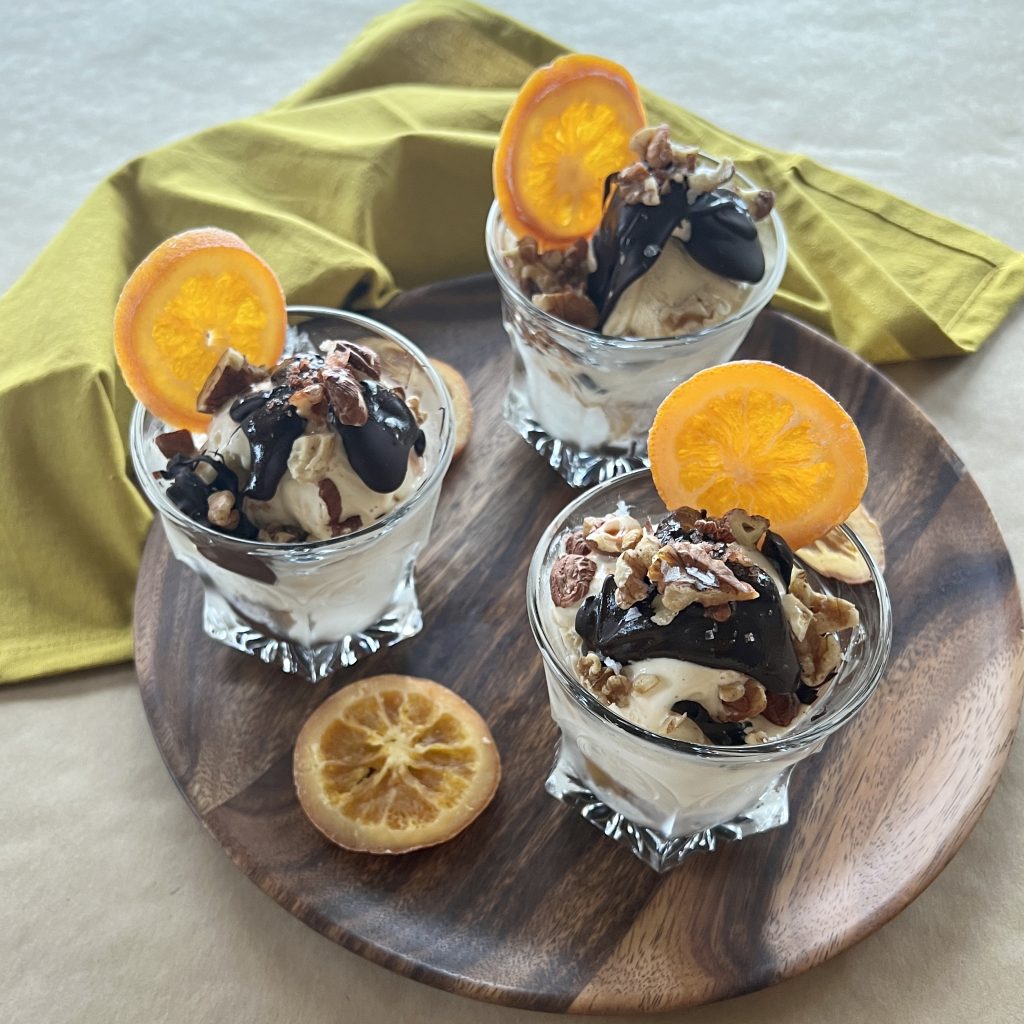
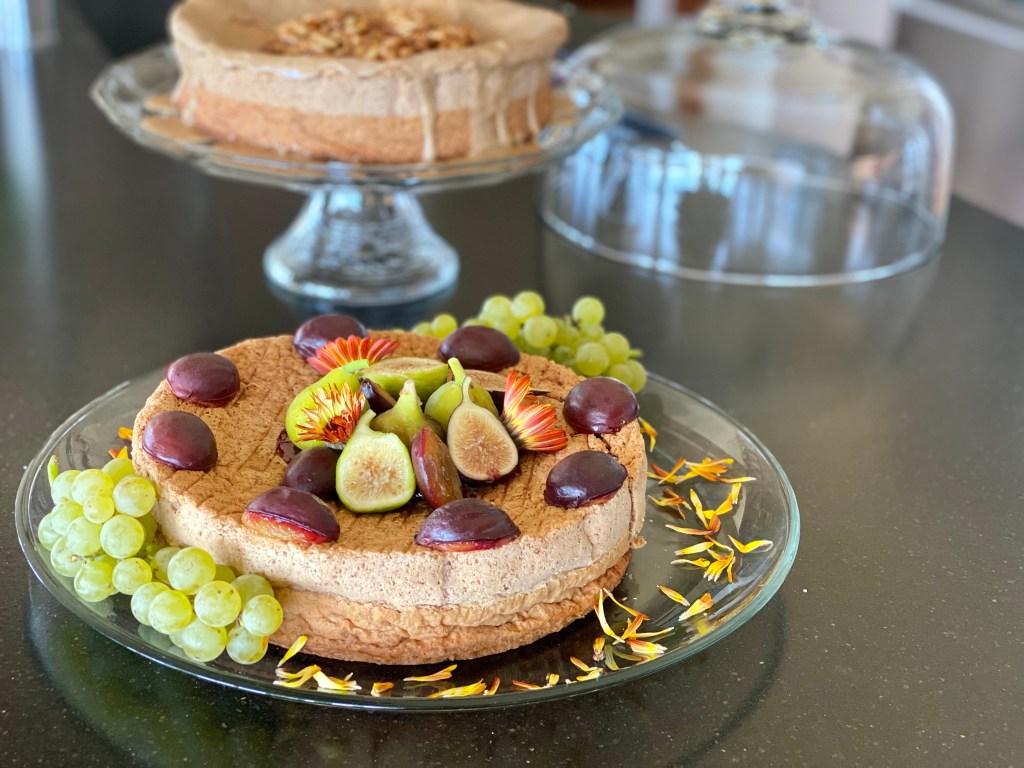
Dessert
Nutty Chocolate Port SundaeFlourless Walnut Cake, plain, coffee, or spice versions
It might be because of my old pastry chef days of making and rolling a dozen pastry crusts every Monday, but making pies feels pretty tedious amidst all of the other pre-holiday meal components. If you have non-pie eaters or gluten free eaters, these two recipes will save the day.
Flourless Walnut Cake (use GF flour to dust your pan) is so lovely, and so simple. Ground walnuts, some eggs, and sugar are all you need. And better yet, you can opt for the coffee flavored version, or the spice cake version. This flexible recipe gives you these flavor choices, or make it plain and serve it with the ice cream of your choice. So good, so pretty, and so simple.
If you want to keep it really simple, how about a rich and very adult wintry Nutty Chocolate Port Ice Cream Sundae? This takes 10 minutes, and yet is as elegant and rich as any other dessert ever. And with this choice, you won't spend one minute baking. (The candied orange slices that make this so wonderful are available at most Trader Joe's stores.)
However you do your holiday, do it in a way that's authentic to you! Pure traditionalist or thoroughly modern; formal or casual; fancy or simple are all valid. It's easy to get caught up in the perfect Instagramable holiday, but it is only as wonderful as you feel!
Have you joined the 101-Mile Kitchen community? If not, we'd love to have you. You can take care of that right here, and when you do I'll send you my free Top Five Cool-Weather Cooking Guide downloadable as a thank you!
This post contains affiliate links, including but not limited to Amazon. As an Amazon Associate I earn from qualifying purchases.When you use these links to buy something I may earn a commission at no cost to you. Product affiliation helps me to keep this site ad-free while providing you with the content you enjoy. I only promote items that I use, like, and trust, or would invest in myself.
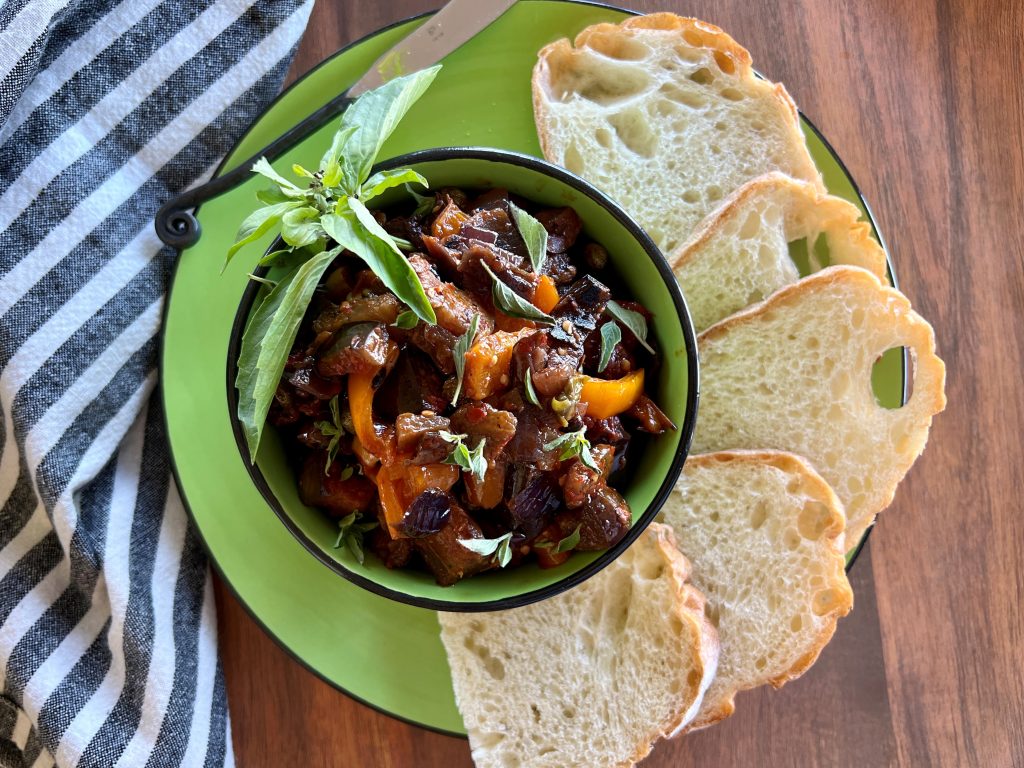
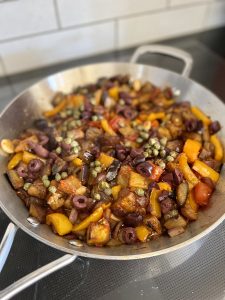
Oregon-style smoky caponata is my attempt to replicate a most memorable caponata I once had at the historic James Beard awarded Nick's Italian Café in McMinville, Oregon. Nick's caponata (a sort of Sicilian version of ratatouille) is made in a wood-fired oven that imparts a lovely smoky note not typical to caponata. I think of it every year at this time, when tomatoes, eggplants, and peppers are at their seasonal peak. This year I decided to make it at home, even without a wood burning oven of my own.
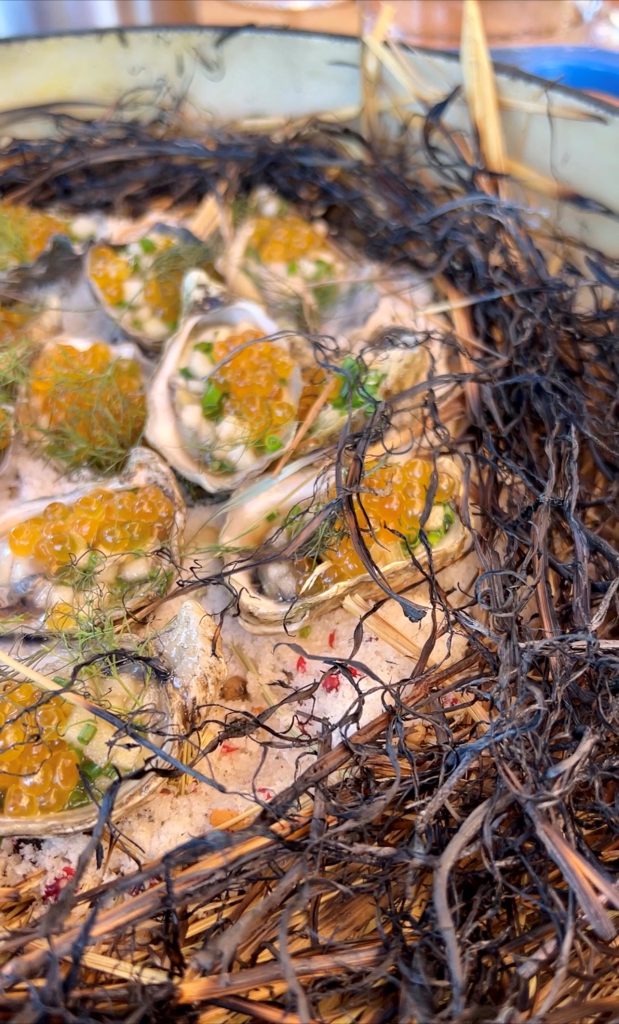
Pan-smoked oysters at King Estate
The idea of how to pull this off, however, came from another Oregon restaurant. We recently ate at King Estate Winery Restaurant, where a fresh oyster dish came in a covered Dutch oven in which hay from their farm encircled the oysters, was lit, and then quickly covered before being whisked tableside. We erupted in happy sighs of awe when the lid was removed, the smoke puffed out, and the gently smoked raw oysters were revealed. The aroma was incredible and the food inside was a stunning surprise.
I thought-- Hey! I mean, hay! I'm an Oregon hay farmer! I've got tons of that stuff. What could I smoke? How about a caponata like Nick's?
How to Use Oregon-Style Smoky Caponata
Caponata makes a flavorful summer bounty bruschetta. Why not pile it into a bowl, surrounded by the toast for an interactive dish people can build themselves? It's also a great all-in-one pizza topping. Or, use it as a relish on a cheese and charcuterie platter. To change up any leftovers, blitz it into a smooth paste for a dip for flatbread, a sandwich spread, or pizza sauce base.
My most favorite way to use caponata might be in pasta. Caponata with nearly any pasta, with a scoop of pasta water and more olive oil for a silky sauce? Yes! Add a generous spoonful of ricotta, a flurry of pine nuts, and some basil on top and you've got a wonderful weeknight dinner.
Making the Caponata
This little caponata recipe is entirely worth the multiple steps. If you skip the optional hay smoking step you'll still end up with a caponata that will be a little more complex than usual by using the grill.
Caponata is usually made by roasting the eggplant in the oven, then adding it to the other ingredients on the stovetop to complete the cooking. I've found that roasting all the vegetables together in a grill basket (this high-quality stainless steel one is on sale right now) on the grill saves turning on the oven and eliminates a step. When making it in the winter months or if you don't have a grill, this step can be done in the oven with all the cubed vegetables on a baking sheet at one time . The oven method will not have the smoky quality, but will be traditional and delicious.
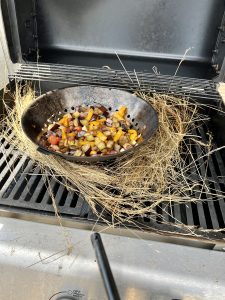
Just getting started on the grill.
The vegetables are cooked and hay-smoked (directions below) on the grill, then we finish the dish in a large skillet on the stovetop. This is where we lightly and quickly stew the vegetables with capers, olives, a little sugar and vinegar for the typical sweet/sour finish, olive oil, and herbs. This final part takes about 15 minutes.
Serve the caponata at room temperature or lightly chilled. It is even better the day after it's made and the flavors have integrated, making it perfect for do-ahead meals and entertaining.
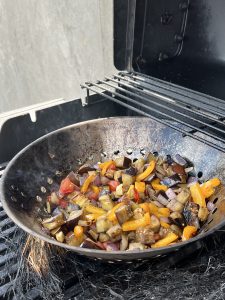
Getting ready to light the hay.After the hay has burnt off, and the grill lid opens.Back in the house to add the remaining ingredients.
How to Smoke Foods With Hay
Hay smoking provides a light, gentle smoked quality to any vegetable, potato, chicken or fish dish cooked on the grill. To hay smoke caponata on the hot grill, carefully take a handful of cut hay and arrange it around the grill pan. Acting very quickly, use a long-necked lighter to touch the hay in two or three places and immediately shut the lid of the grill. You'll see a light smoke coming from under the lid and seams of the grill. After three or four minutes, carefully open the grill to make sure the flame is out. Now, a light kiss of hay smoke aroma and flavor has fallen on the vegetables.
Remember to avoid overcooking! Do this step after the food is not quite at the doneness you desire. It will continue to cook in the enclosed hot grill for three of four additional minutes.
Share Your Success!
When you make this recipe, please show it off to our 101-Mile Kitchen community! Let us know in the comments, or on Facebook or Instagram, @101milekitchen. Speaking of that, have you joined the community? If not, we'd love to have you. You can take care of that right here, and when you do I'll send you a free Taste of Oregon appetizers recipe downloadable as a thank you!
This post contains affiliate links. When you use these links to buy something I may earn a commission at no cost to you. Product affiliation helps me to keep this site ad-free while providing you with the content you enjoy. I only promote items that I use, like, and trust, or would invest in myself.
Oregon-Style Smoky Caponata
Course: Appetizer, Main Dish
Cuisine: Italian, Pacific Northwest
Season: Bounty (August - October)
Dietary: Dairy-Free, Gluten-Free, Vegan
Prep Time: 15 minutesminutes
Cook Time: 40 minutesminutes
Total Time: 55 minutesminutes
Servings: 8
Author: Pam Spettel
A kiss of hay smoke, easily done in a grill, brings this classic Italian summer vegetable dish next level. Use you caponata on bruschetta for an appetizer or light meal, as a pizza topping, or as a relish for a charcuterie plate.
1 largered, orange, or yellow bell pepper, seeded, large diced
½largepurple onion, large diced
4medium tomatoes, ripe, large diced
8clovesgarlic, peeled and roughly chopped into large pieces
6tablespoonsextra virgin olive oil, divided
2tablespoonstomato paste mixed with 3 tablespoons water
1tablespoonsugar
3tablespoonssherry vinegar, or white wine or red wine vinegar
4tablespoonscapers
¼-⅓cupblack oil-cured olives, green Castelvetrano, or Kalamata olives, pitted and roughly chopped
salt and ground black pepper to taste
¼cupmixed fresh oregano and basil, roughly chopped
Instructions
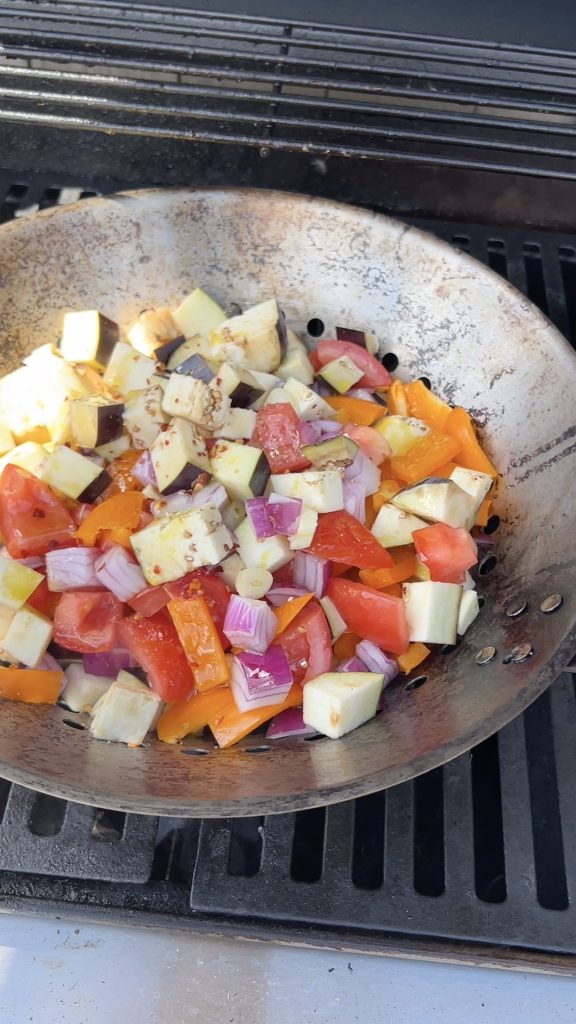
Preheat all elements of a gas grill to high heat (400°-450°) or light a charcoal grill for a hot fire. Wash and chop the eggplant, pepper, onion, tomatoes, and garlic. Place the prepared vegetables in a grill basket. (Alternately, you could put the vegetables in a large cast iron skillet, or on multiple sheets of foil with the edges crumpled in to create a sided container.)
Put the grill basket onto a plate, and sprinkle the vegetables generously with salt and black pepper (at least one teaspoon of salt to enliven the vegetables is my recommendation.) Drizzle the vegetables with 3 tablespoons of the olive oil, and stir. (The plate will contain any olive oil drips as you transport the grill basket to the grill and back.)
Once the grill is up to heat, place the grill basket onto the grates and close the lid. Check the vegetables every five-seven minutes and stir to help them cook evenly and to keep them from sticking and burning. Adjust your temperature or move your coals as needed to maintain a high but not scorching heat. Cook until the vegetables are beginning to soften but retain their shape, and the eggplant is turning from opaque creamy white to translucent gray-beige but the centers still have a little of their white showing through. Depending on your grill and its heat, this step will take from 15 to 25 minutes.
Do the optional hay smoking technique, described below. Remove the grill basket back to the plate, and bring it indoors to complete the dish. (Or, if you have a burner feature on your grill use it. Lucky you!)
On your cooktop, heat the remaining 3 tablespoons olive oil in a large stainless steel or cast iron skillet to medium heat. Add the vegetables from the grill basket. Stir in the remaining ingredients except the herbs. Cook, stirring frequently, until the vegetables are fork-soft but not mushy, and are coated in the light sauce that has formed. This step will take about 15 minutes.
Allow the caponata to cool a bit before stirring in the herbs. Reserve a few pinches of the herbs for garnish, and serve. Store leftovers in a tightly closed container in the fridge for up to 5 days.
Optional Hay Smoking
Turn off the gas grill, or if using a charcoal grill, scoot the coals to one side away from the grill pan. Find a medium-sized handful of clean, dry hay, and arrange it around the outer edges of the grill basket. Work carefully around the hot grill and grill grates to avoid injury. Use a long-necked lighter to lightly touch the hay in two or three places, and quickly cover the grill. You will notice a light smoke coming from under the lid and seams of the grill. When is dissipates to light wisps, remove the grill lid and proceed.Only try this in an enclosed grill to avoid setting a grass fire.
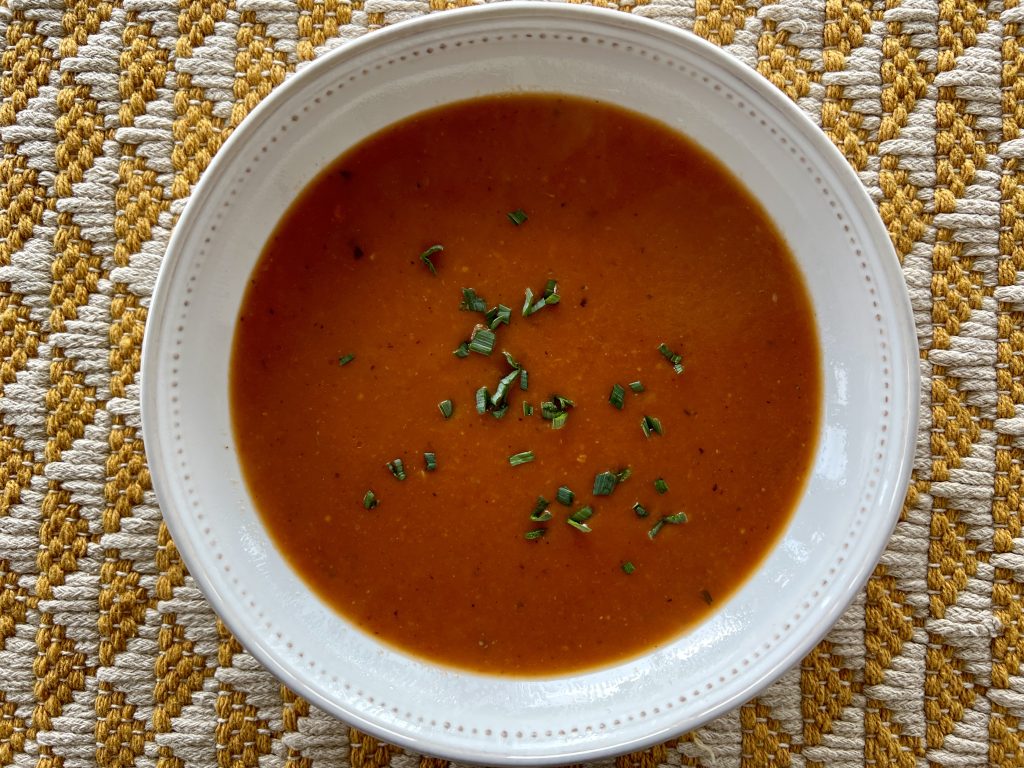
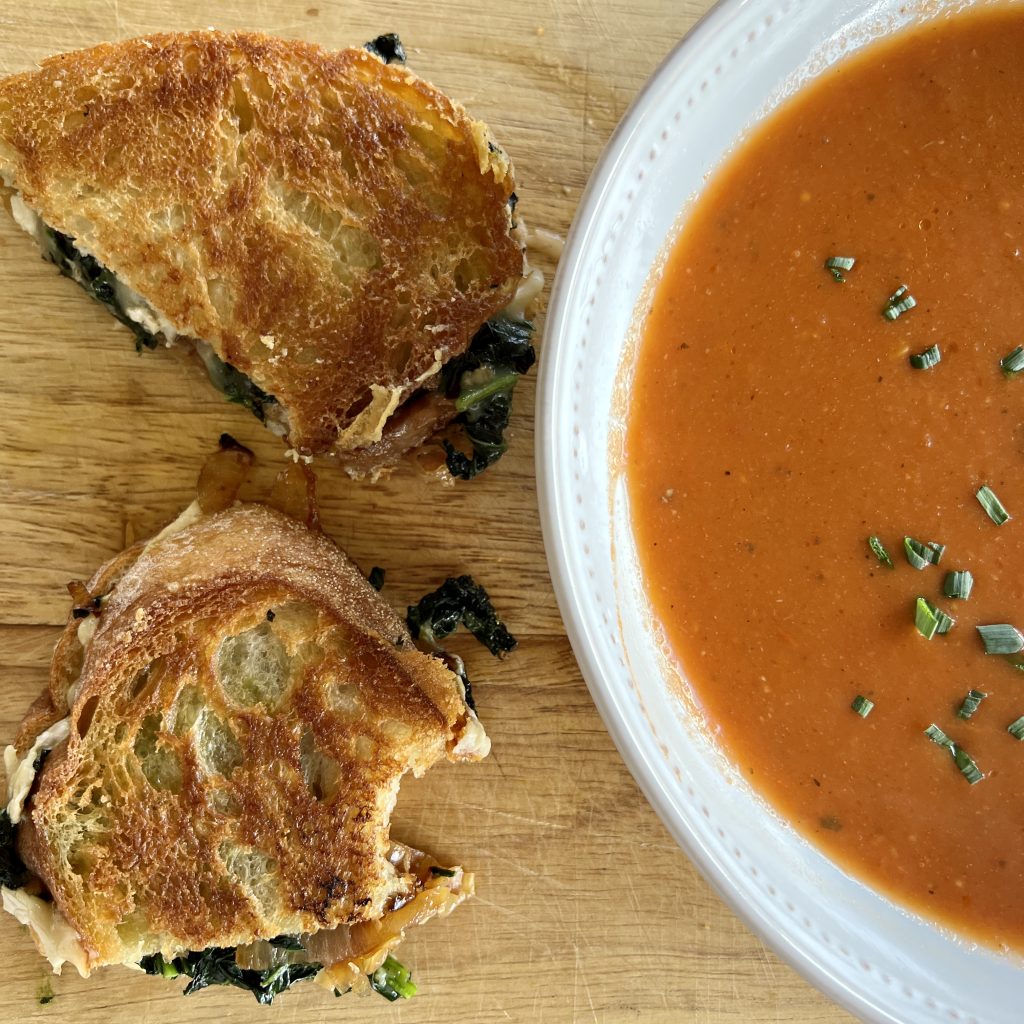
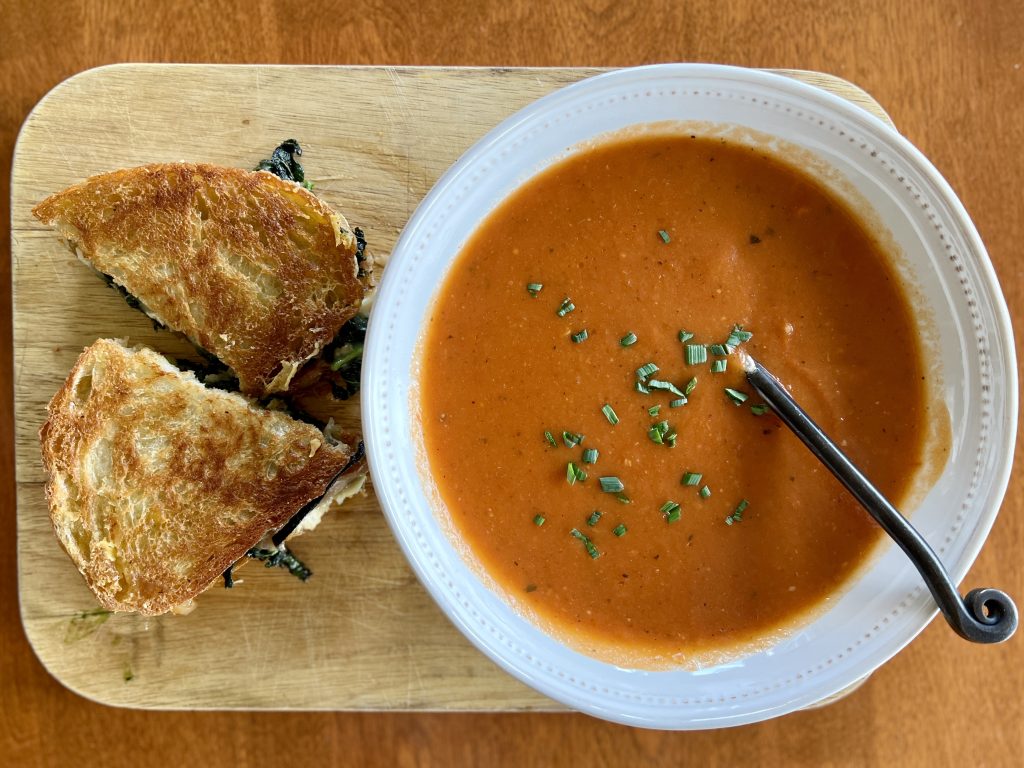
Yesterday I shared with you The World's Best Grilled Cheese Sandwich, made with garlicky greens, caramelized onion, and brie. It's only fitting that you have The World's Best Tomato Soup recipe to go with it. The two are a match made in heaven.
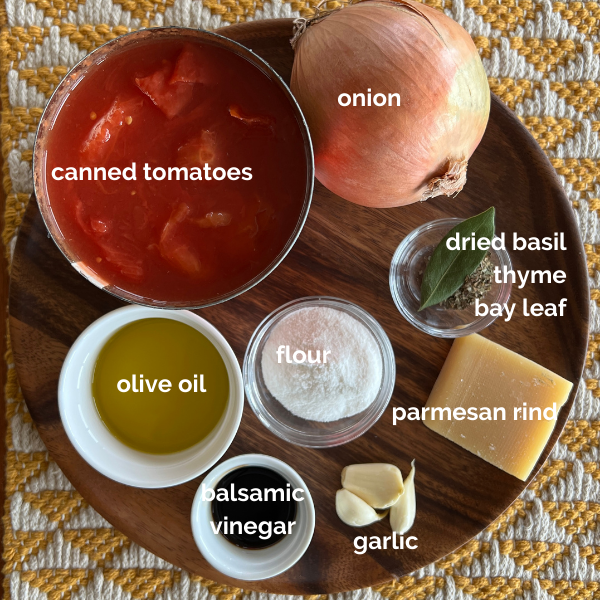
A Word About Canned Tomatoes
I've driven Interstate Five through California's agricultural regions many times. Enough times to see truckloads of produce pulling off the highway into the many canneries there. May I tell you that not all canned tomatoes are of the same quality? I've observed truckload after truckload of hard pink balls in the truck-trailers. It's not hard to know how they will perform in flavor and texture next to their red, ripe cousins. My practical observation is that you truly get what you pay for in canned tomatoes. Unless you use a lot of canned tomatoes, the price differential is relatively small. It might not make that much difference in a stew with lots of other flavors, but here's my rule of thumb: If the word tomato is in the title of the food I'm making, like tomato sauce, for example or the world's best tomato soup, I spend the extra dollar.
Making the World's Best Tomato Soup
First, lets talk equipment. This is a time when an immersion blender is more than handy. Yes, you can blend the soup in batches in either a food processor or blender. However, a stick blender will get the job done and reduce the amount of cleanup you'll have. I've not met a cook yet who would argue with that!
Because it's still late winter I used dried herbs and a bay leaf, which also gets blended into the soup, but in the growing season, trade those herbs out for fresh basil, fresh thyme, or any of the tender, leafy herbs that suit you.
Two other touches make the soup extra special. I save parmesan rinds for times like this. Just throw one in during the short simmering period for an extra flavor boost. The rind will soften and become somewhat gooey looking, but holds together just fine and can easily be fished out prior to blending. If you don't have a parm rind on hand that's just fine. The soup is still lovely so don't let that stop you from making it. The second bit of magic comes with a hearty drizzle of balsamic vinegar as a finishing touch.
The olive oil in here gives it a creamy texture and appearance, but if you love a splash of milk or cream in your tomato soup, by all means use it.
If you like this recipe, please leave it a star rating by clicking on the green stars below the title in the recipe card below. If you like the 101-Mile Kitchen project, I'd be honored if you subscribed to the newsletter!
The World's Best Tomato Soup
Course: Appetizer, Main Dish, Quick + Easy, Soup + Stew
Cuisine: American
Season: All Season
Dietary: Gluten-Free
Preparation: Fast + Easy, One Pot/One Pan
Prep Time: 15 minutesminutes
Cook Time: 30 minutesminutes
Total Time: 45 minutesminutes
Servings: 4
A few special touches make this recipe the only one you need for The World's Best Tomato Soup!
Heat the olive oil in a large saucepan over medium heat. Add the diced onion and sauté until the onion has softened and is starting to become translucent. Add the garlic, thyme, basil and bay leaf and sauté another 2-3 minutes. Add the flour and sauté, stirring for another 2-3 minutes.
Add the tomatoes and their juices, the water, optional parmesan rind, salt, and pepper and bring to a simmer. Cover, and simmer for 30 minutes, stirring occasionally.
Remove the parmesan rind and blend the soup using an immersion blender, food processor, or blender. If using a food processor or blender, blend in batches. Blend until the soup is fairly smooth, but still has a slight amount of tomato texture. Remove from the heat and stir in the balsamic vinegar. Serve piping hot.
I often make soup and some kind of grilled sandwich or panini for supper in the cool weather months, and this week's sandwich was a true hit. Garlicky greens and caramelized onion grilled cheese made with creamy brie is a rather fancy sandwich. I'm going so far to say this is the world's best grilled cheese to date.
Inspiration for Special Grilled Cheese
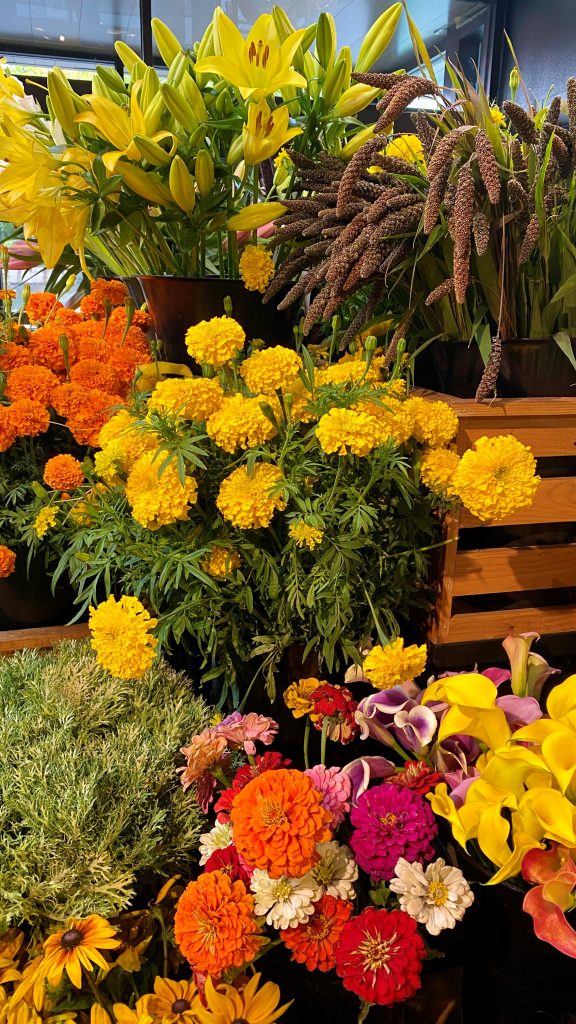
In my town there is one special spot that adds so much to my experience of living here. Provisions Market Hall is a beautiful place full of gastronomical goodness and so much more. Inside is a gorgeous florist, a wine shop, a beautiful kitchen and gift shop, a specialty foods grocery complete with lovely cheeses and charcuterie, freshly baked breads and pastries, wood oven baked pizzas with bubbly crusts, a coffee shop, and delicious lunch items. Provisions is a place of visual wonder, yes, but also offers practical support to the entire spectrum of us who cook and offer hospitality at home. When you visit Eugene, you just must visit Provisions.
Flowers greet you at the door of Provisions Market Hall
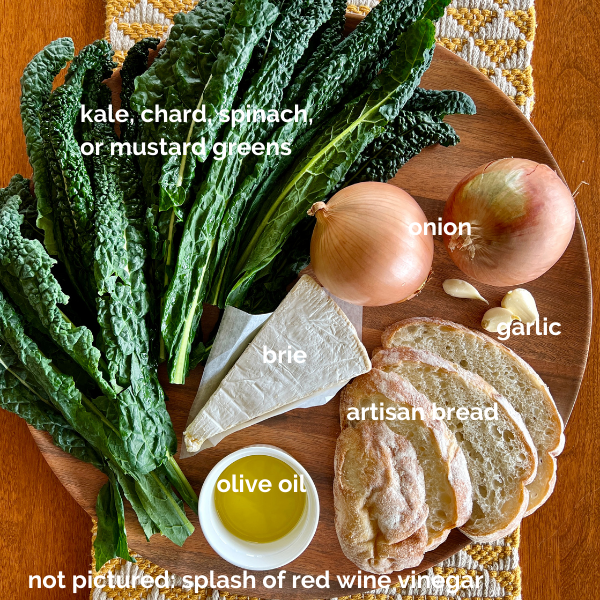
I met a friend for lunch there last week ordered their chard and brie grilled sandwich special. It was so delicious I couldn't wait to try making it at home. I used kale because that's what I had on hand. Chard, kale, or even spicy mustard greens would each be gladly received in this glorious sandwich.
If you're a fan of the classic tomato soup and grilled cheese combination, this is the sandwich you'll want going forward. The slightly bitter greens, sweet earthy caramelized onion, and bloomy brie are the perfect foil to tomato soup. Tomorrow I'll share my recipe for the best tomato soup so you'll have the matched set.
Making the Garlicky Greens and Caramelized Onion Grilled Cheese
There is nothing tricky here. Caramelize a few onions, cook some greens, and layer them on top of brie. Using a really good bread will also make a difference, so try for that, too.
Other Soups to Serve with Garlicky Greens and Caramelized Onion Grilled Cheese
1bunchchard, kale, or mustard greensribs removed, chopped into about 1" pieces
3cloves garlicminced
salt + pepper to taste
1½teaspoonsred wine vinegar
sliced pain de mie or artisan bread, 2 per person
5-6ouncesbrie, sliced ¼" thick
Instructions
In a large skillet heat 2 Tbsp. olive oil over medium high heat. Place the sliced onions in the skillet, sprinkle on several pinches of salt, and allow them to sit undisturbed for several minutes. When the bottom is beginning to brown, turn them, and once again allow them to brown undisturbed for several minutes. Continue this for about 15 minutes until the onions are soft and golden brown throughout.
While the onions are caramelizing, in another large skillet heat another 2 Tbsp. olive oil over medium high heat. Place the chopped greens in the skillet, and sprinkle with a few pinches of salt and pepper. Add the minced garlic. Sauté, stirring occasionally, until the greens have cooked down about 1/3, or are beginning to soften, about 5-6 minutes. Stir in the vinegar.
Lay the bread out on a work surface, and lay slices of brie on one side. Divide the sautéed greens among the sandwiches over the brie, then divide the caramelized onions over the brie. Cover each sandwich with its remaining bread slice.
Wipe out the skillet that the greens were cooked in with a paper towel, and heat the remaining Tbsp. olive oil in it over medium heat. Place the sandwiches in the skillet and cook each side until golden brown and crispy. Cut sandwiches in half and serve with tomato soup or simple salad or fruit.
Notes
Left over cooked greens and caramelized onions store well for 3-4 days in the refrigerator.
This recipe is designed for a very special group of people who started out as neighbors and became dear friends. Ever since we moved to the 101-Mile Kitchen we gather frequently to relax, shoot the breeze, eat and drink. This recipe is a thank you to these amazing souls who have kept my heart from drooping during the last 20 months of living in an upside down world, and to the universe for putting us in each other's paths.
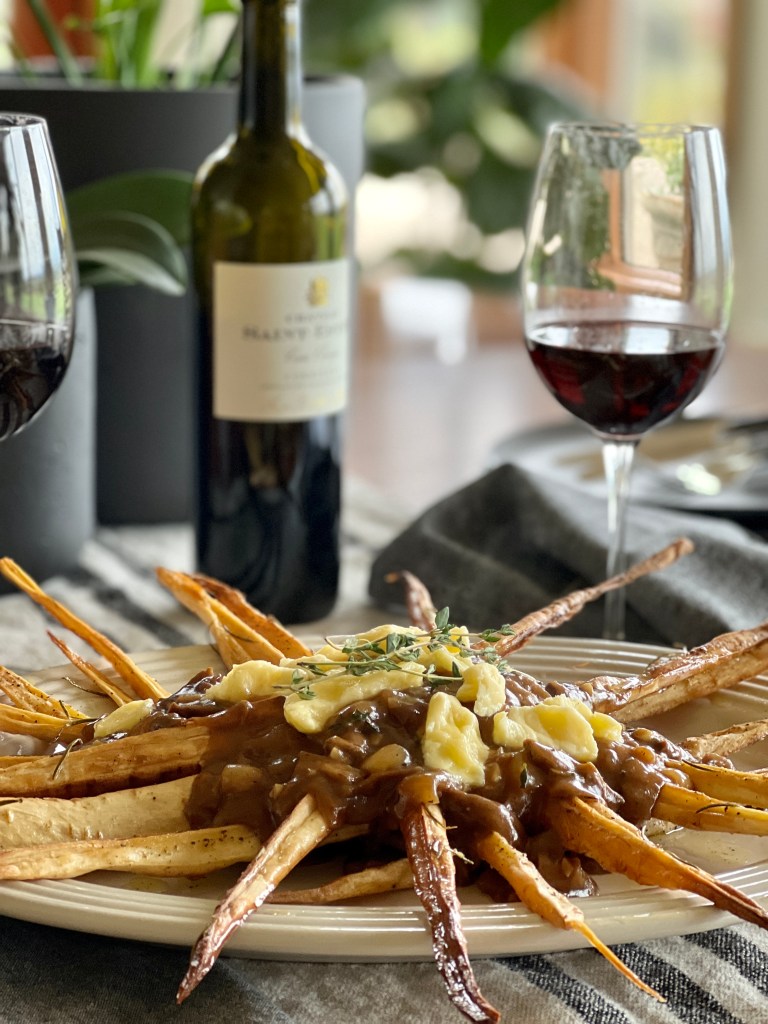
Besides being funny, smart, and caring, our neighbors all enjoy cooking great food and drinking nice wine. (There might be a splash of bourbon here and there, too.) Sometimes we have a full-on meal, but most often we meet over easy noshes, charcuterie, spreads and dips, and casual dishes. I can't wait to make this poutine for them.
What is the Best Pairing?
While it makes a terrific main course at its heart poutine is bar food and doesn't need a precious pairing. I'd suggest a Southern Rhone style blend. This time I served the poutine with a very inexpensive ($13) 2017 Château Saint-Estève Cuvée Classique Corbières Rouge-- a nice old world 60% Grenache- 40% Syrah blend. It is lively, with whispers of herbs and deep fruit that compliment the umami and herbal flavors in the gravy.
Of course most ales and beers are also delightful with poutine.
Making the Poutine + Gravy
Parsnip Poutine + Rich Mushroom Gravy is another of those one-hour wonders. It takes maybe ten minutes to prep the ingredients, 16 minutes in the oven to get the parsnips on their tender and crunchy way while the mushrooms rehydrate, and another 15 or 20 minutes to make the gravy while the parsnips are finishing off. A foil-lined sheet pan, a large pan, a knife, and a bowl are the only tools used so clean-up is speedy.
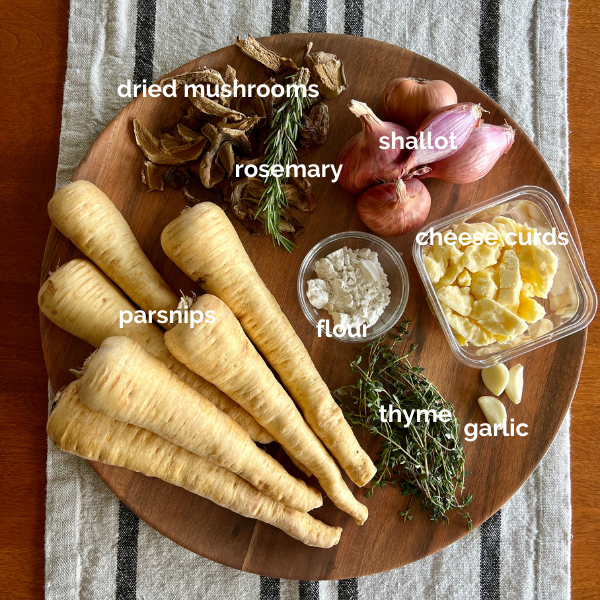
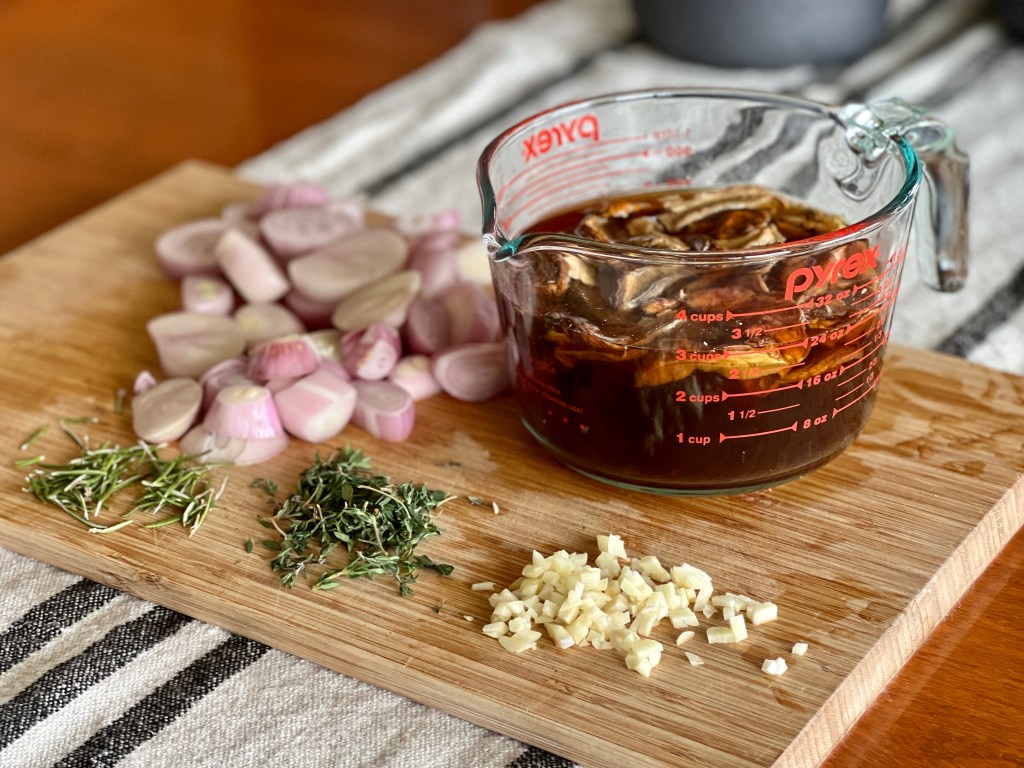
Parsnips and shallots grow just about anywhere, so they should fit in to most people's imaginary 101-mile sourcing radius. You can find dried Porcini mushrooms at many groceries and online. My favorite source is Pistol River Mushroom Farm in Southern Oregon. Dried mushrooms seem expensive until you realize that one ounce of dried mushrooms is equal to 8 ounces of fresh. The dark color of the soaking liquid becomes the intensely flavored broth for the gravy-- something a fresh mushroom just can't do.
As an aside, tuck this mushroom gravy recipe away to use in many other ways. I can't wait to ladle it onto a split and fluffed baked potato one cold winter's day.
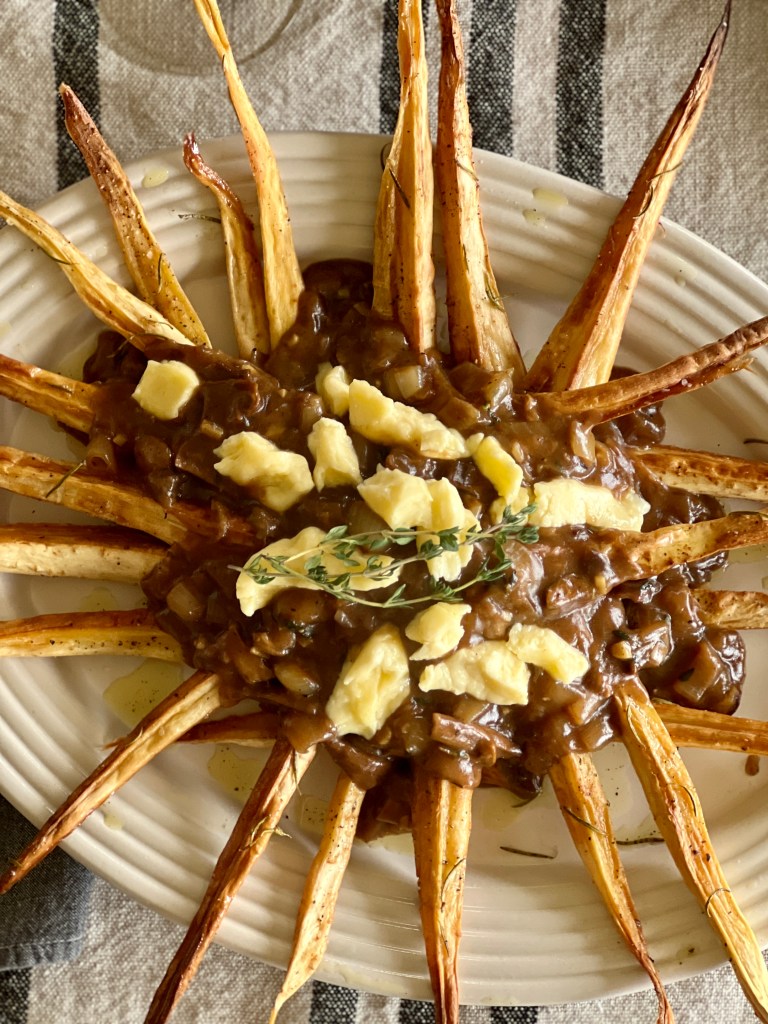
The parsnips roast, the mushrooms soak and the shallots, garlic, and herbs are prepped; caramelizing the shallots; the mushrooms and their soaking water go into the gravy; everything is plated and topped with cheese curds.
You'd never know there was no meat in this rich silky poutine gravy, and the crunchy, chewy roasted parsnips take it to new but familiar places. A fantastic main or "bar food" course for vegans and omnivores alike.
1 oz.dried porcini mushrooms, or other dried cooking mushroom
12oz.shallot, approximately 4 large peeled and sliced ½" thick
3clovesgarlic, minced
2tablespoonsfresh thyme leaves, plus more for garnish
2½tablespoonsGF One-for-One flour, rice flour, or all-purpose flour
salt and pepper
¼lb.cheese curds, or goat cheese
Instructions
For the Parsnips
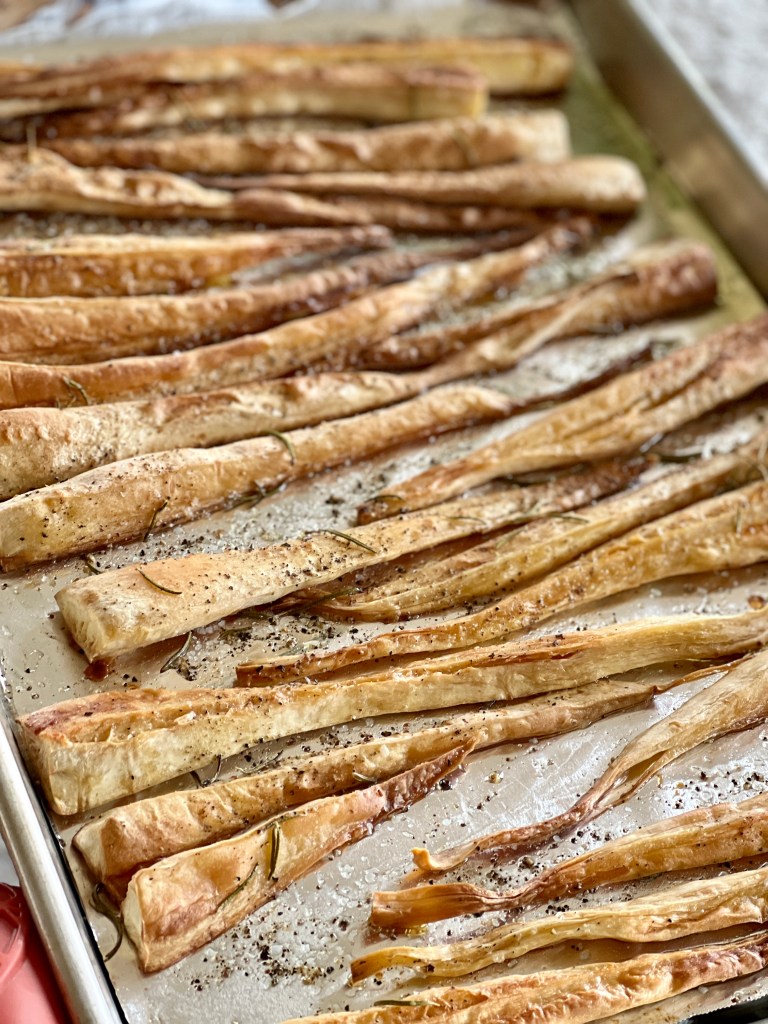
Preheat the oven to 400° convection and line a baking sheet with foil.
Trim and peel the parsnips. Quarter them lengthwise, and if they are especially thick, cut them again into eighths. Lay them out on the foil lined baking sheet, and drizzle them generously with olive oil. Toss them with your hands to evenly cover them in the olive oil, and spread them out flat at much as possible. Sprinkle them lightly with salt and black pepper. Bake for 16 minutes, and them flip them over. Reduce the oven heat to 350°. Sprinkle again with salt and pepper, and drizzle olive oil on any parts that look parched. Sprinkle the rosemary leaves over the parsnips and return to the oven for another 16-20 minutes. Check them often for doneness-- the thick tops will be browned and tender, the thin ends will be well browned and somewhat crispy.
For the Mushroom Shallot Gravy
As soon as the parsnips are in the oven, place the dried porcini in a 4-cup measuring cup or bowl, and cover with hot tap water to the 3-cup mark. Set aside.
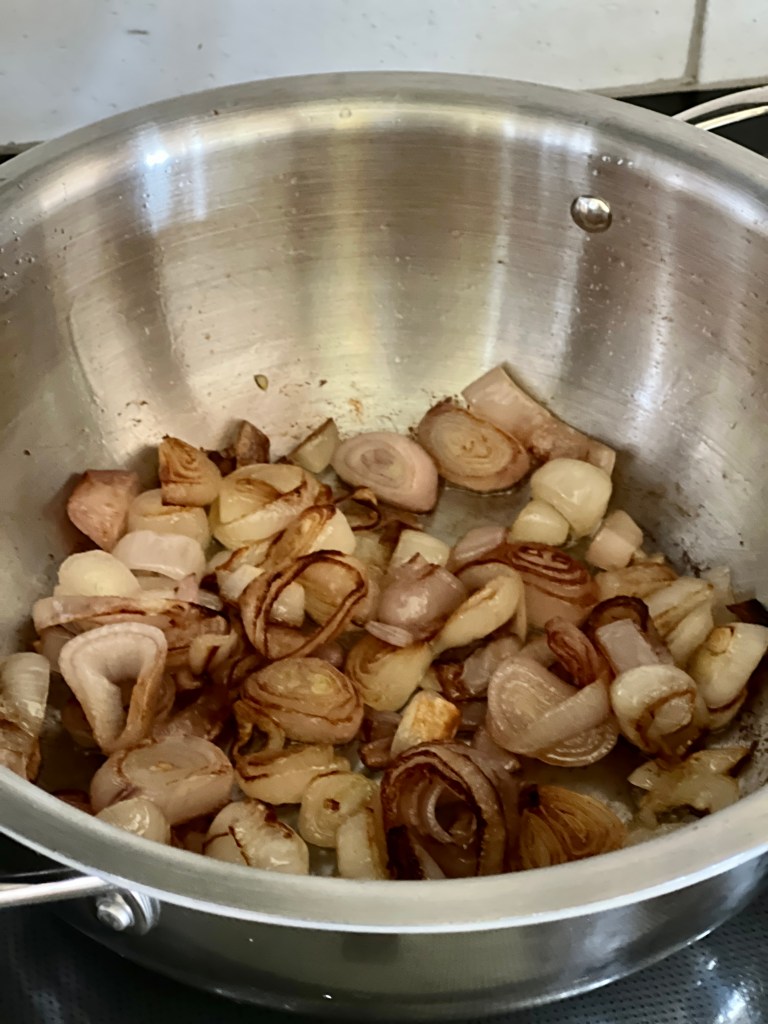
Heat enough olive oil over medium-high heat to generously cover the bottom of a sauteuse or large pan. Slide in the sliced shallots and leave without turning until the bottoms are browned. Stir, flipping them over, and again allow them to brown. After the first ten minutes add the minced garlic, thyme, and a 4-finger pinch of salt. Continue the browning process until the shallots are completely tender but not mushy, and have a good amount of browned caramelization throughout.
Stir in the flour, and continuously stir until the flour is well incorporated and beginning to stick to the pan. Stir for about three minutes.
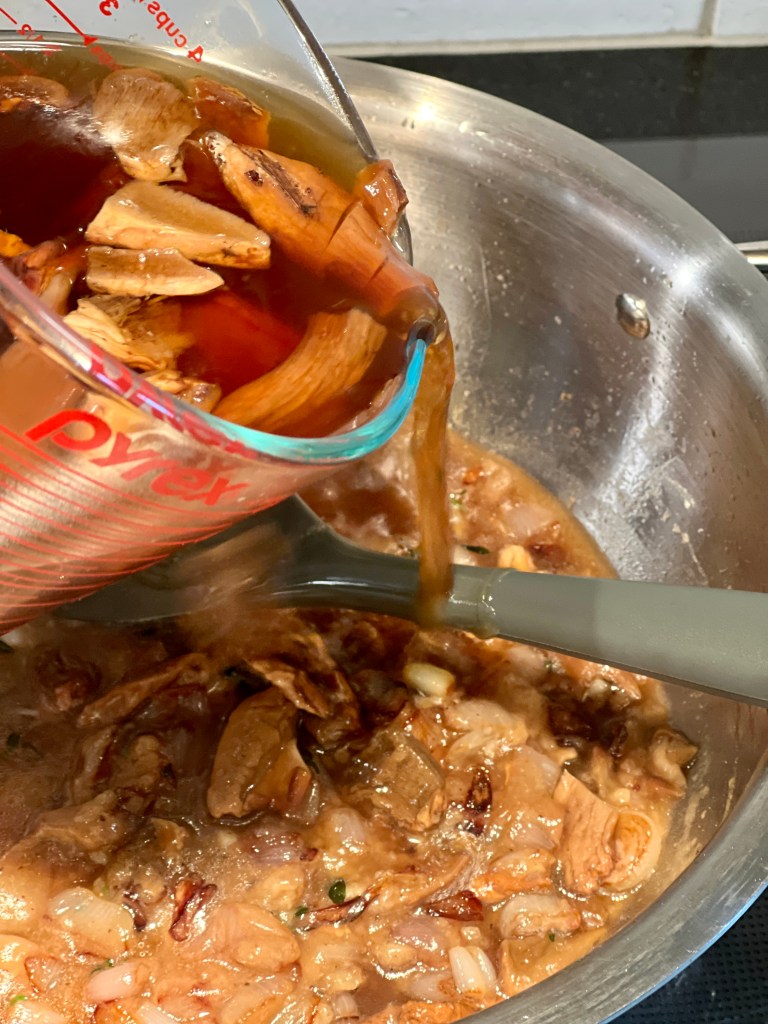
Gradually ladle in the soaked mushrooms and their dark brown soaking liquid, stirring between ladlefuls, until it it incorporated. You will see the gravy begin to thicken immediately-- stir throughout this process to avoid any lumps.
Stirring frequently, bring the gravy to a boil, and add some more salt. There should be about one teaspoon total in the gravy, or to taste. Add a very generous amount of black pepper to season. Allow the gravy to bubble and thicken for about 6 minutes.
Bring it All Together
Arrange the roasted parsnips on a large warmed platter in a spiky spoke-like fashion. Ladle the hot gravy in the center. Arrange the cheese curds over the gravy, and top with a bunch of thyme for garnish. Serve while piping hot.
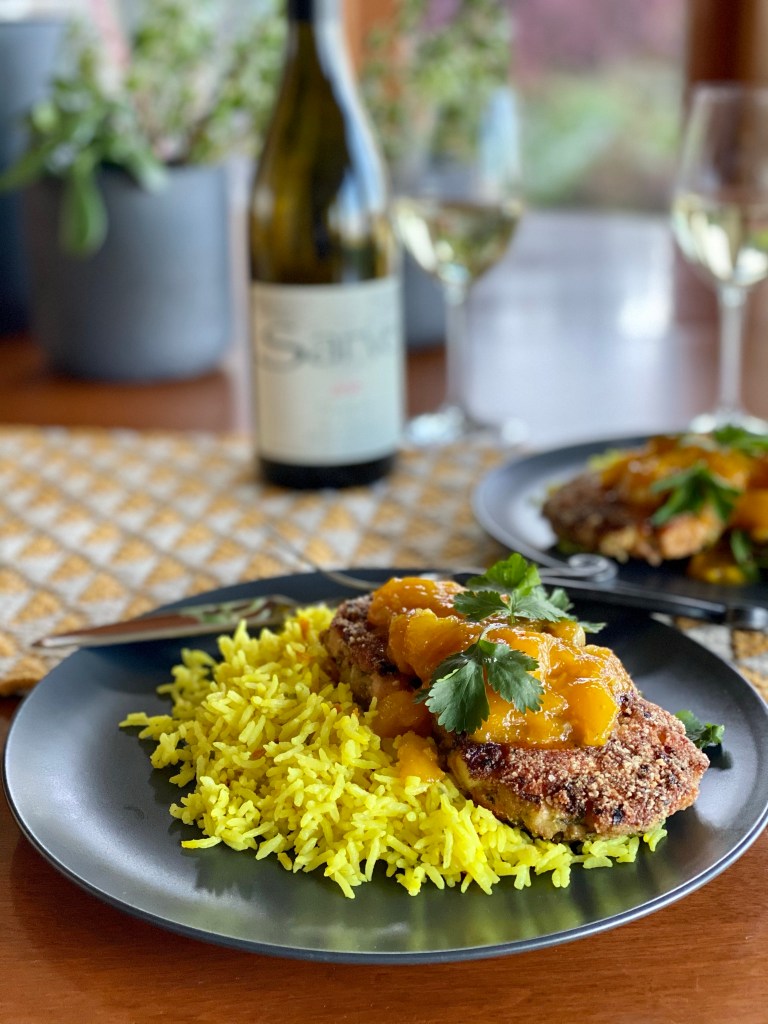
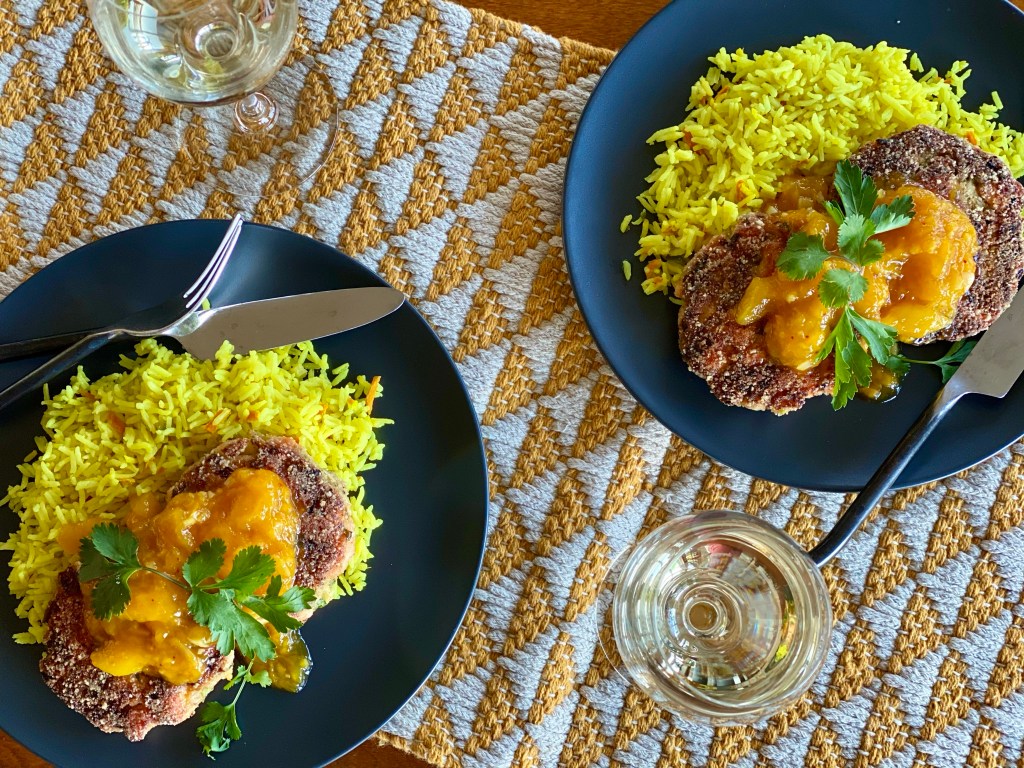
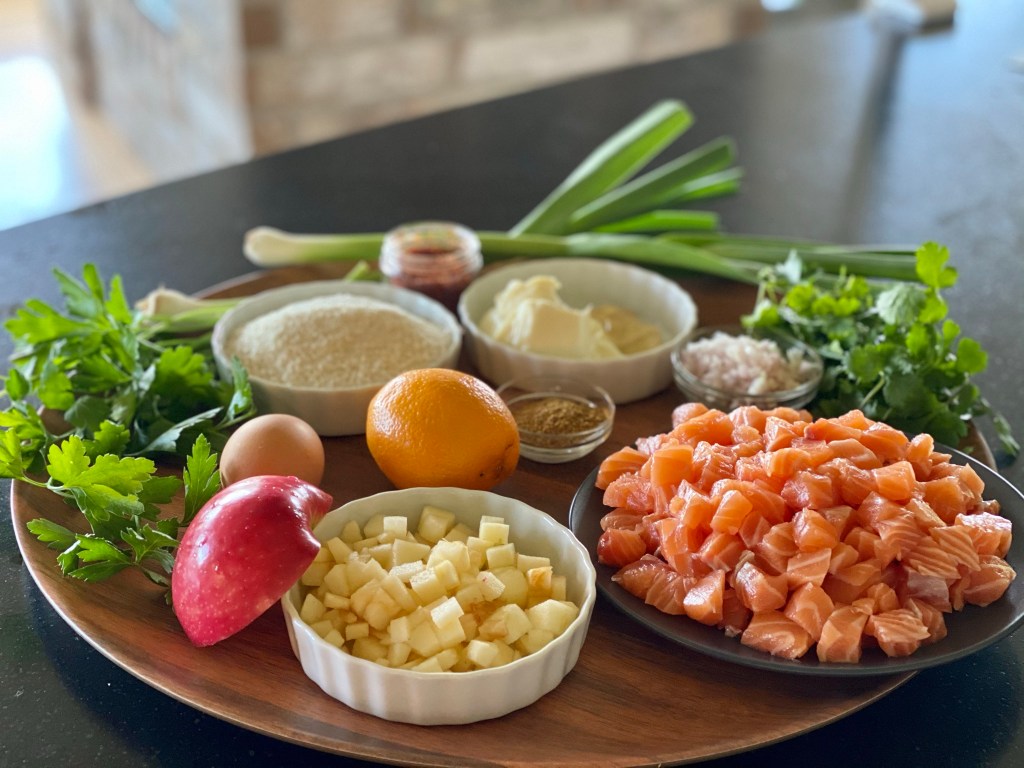
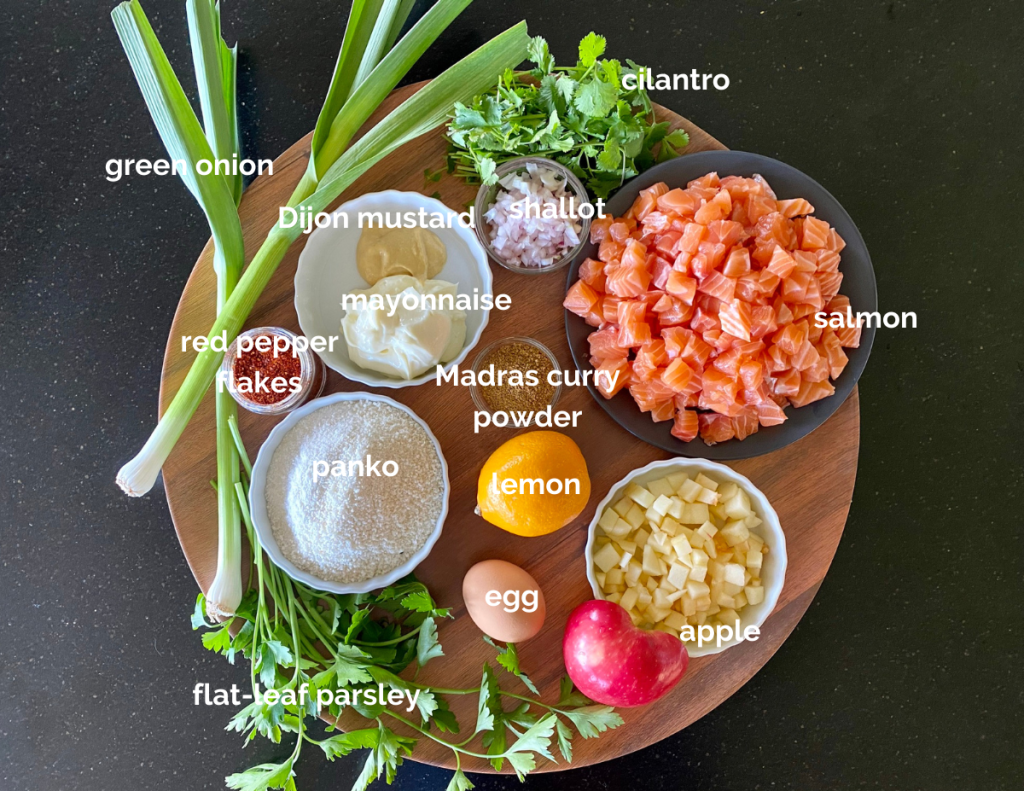
I consider Curried Salmon Cakes with Mango Chutney and Coconut Rice my springtime signature dish. Do you have a show-stopping dish in your cooking bag of tricks?
You'll know the recipe. People lean forward over their plates to inhale its aroma and turn their focus to their fork or spoon. A hush falls over the table. An eater's brow becomes furrowed in concentrated curiosity, quiet little sighs or hums bubble up as a delicate soundtrack to the moment. Time becomes momentarily suspended.
All of a sudden, that focused calm breaks into cheery chatter and conviviality brighter than before. Life goes on with this one subtle experience tucked into it. And this is when you know.
Credit for this curried salmon cake recipe goes to our friend Larry Deck. He once served it as a late-night New Year's Eve dinner and I was transfixed. The brightness of the homemade chutney and light curry notes in the salmon cakes was a sunny counterpoint to that dark winter night.
It highly likely that I let out a long, deep hhhmmmmmmmm that night.
This recipe was also a super-fun contest winner for me. See more about that here. (And thank you again, King Estate, for the lovely experience!)
Wine Pairing for Curried Salmon Cakes + Mango Chutney
Curried Salmon Cakes, Mango Chutney, and Coconut Rice is a heavenly match with any of King Estate's Pinot Gris. I am especially fond of their Domaine Pinot Gris with its pear, tangerine and Meyer lemon peel aromas and flavors, clean minerality, and silky texture. My husband and I featured the Domaine Pinot Gris at our wedding day brunch.
Just like today's recipe trio, this wine is full of happy memories.
The salmon cakes, chutney, and rice make an all-season dish, but I most often make it in late spring when the market is flush with fresh ripe mangoes and Copper River salmon are making their first run. The gingery coconut rice got added over the years and creates a truly perfect flavor and texture triad.
Good to note is that the mango chutney is fantastic with roasted pork and on a cheese platter, and the chartreuse-colored rice will make its way into your rotation apart from the salmon cake and chutney elements.
Any type of salmon you can access is just right for this dish. You're really in luck if your fish market sells salmon trimmings by the bag at a discount, which are perfect since a filet gets chopped anyway. With all of the flavorful ingredients added, the subtleties among salmon varieties can be lost. Go with what you've got.
There is nothing technically challenging about producing this meal. I suggest, however, that you plan it on a long afternoon devoted to zenning out in your kitchen, or when you have a pal available to help with the chopping. All three meal components need quite a bit of chopping!
What is your show-stopping signature dish? If you yet don't yet have one, what would you like it to be?
Other Signature Dish-Worthy Recipes You'll Love
Roasted Chicken + Autumn Bread Salad (adaptable to all seasons): Get recipe here. Mediterranean Chicken + Artichokes: Get recipe here. Sweet + Spicy Salmon Bowls: Get recipe here.
An all-season Pacific Northwest/Southern Indian fusion full of tropical flavors. The ingredient list looks long, but this is an easy make-ahead dish that wows family and guests alike. Make your cakes small for a great appetizer version! This recipe pairs perfectly with Oregon Pinot Gris and other dry white wines.
1cuppanko or gluten-free panko crumbs, divided(½ cup for the salmon mixture, the rest to coat the uncooked cakes)
½ - 1tsp.salt to taste
¼cupcanola or olive oil, for cooking
Coconut Rice
1¼cupsBasmati rice
1 13.5 oz. canlight coconut milk
1-2tsp.fresh gingerroot, peeled and minced (optional)
1-2tsp.fresh turmeric, peeled and minced (optional) ORFind this at an Indian or Asian grocer, and at places like Whole Foods in your area.
½tsp.ground turmeric (the dried spice)If fresh turmeric isn't available where you live.
1smallserrano chili, seeded and minced (optional)
Instructions
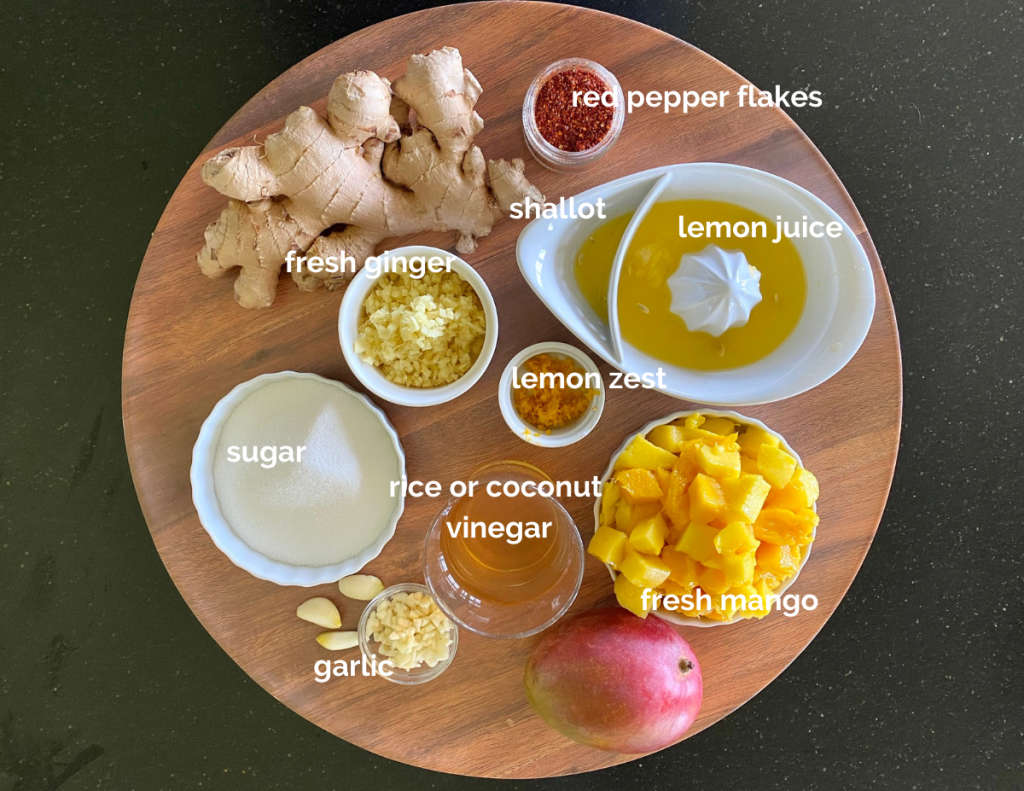
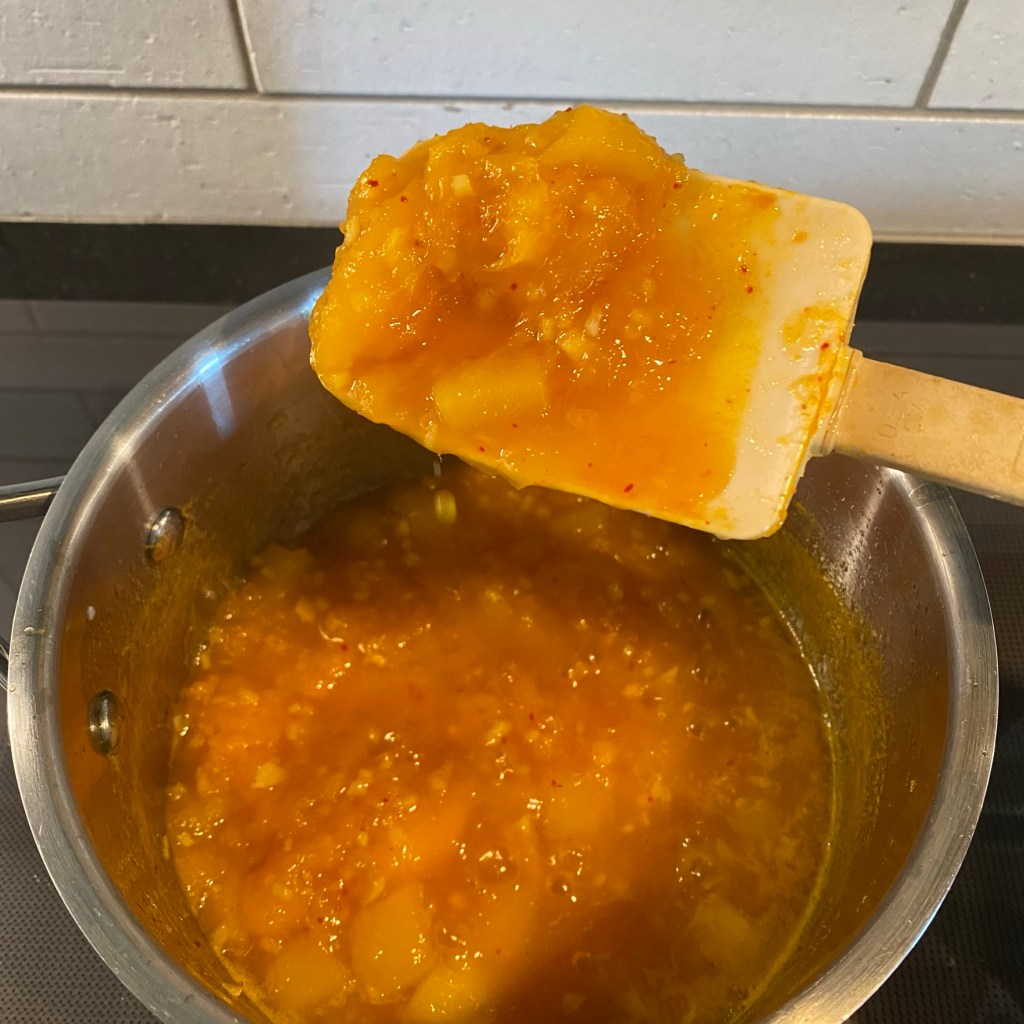
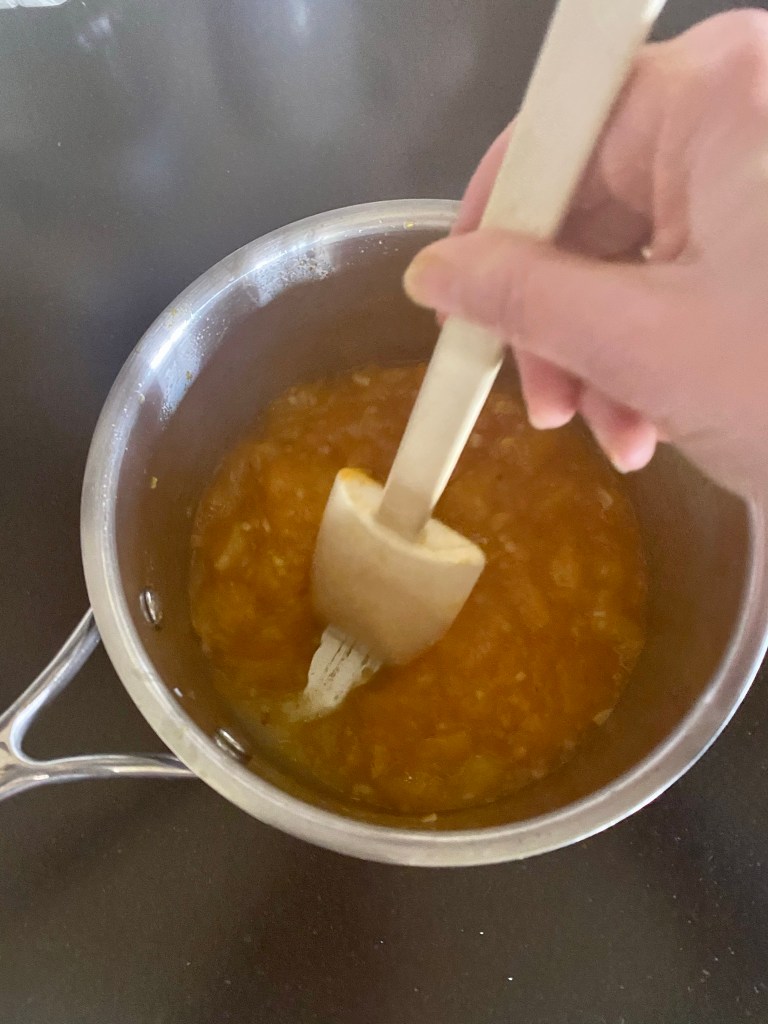
Start with the Mango Chutney
Bring all ingredients to a boil in a non-aluminum saucepan over medium heat. The aroma will be vinegary-pungent at first, then will turn sweet and gingery. Turn the heat down and simmer until the liquid condenses and becomes thick and syrupy, stirring frequently, approximately 30-40 minutes.
The chutney thickens as it cools, and keeps in the refrigerator for 2-3 weeks. Makes 2½ cups.
Now the Curried Salmon Cakes
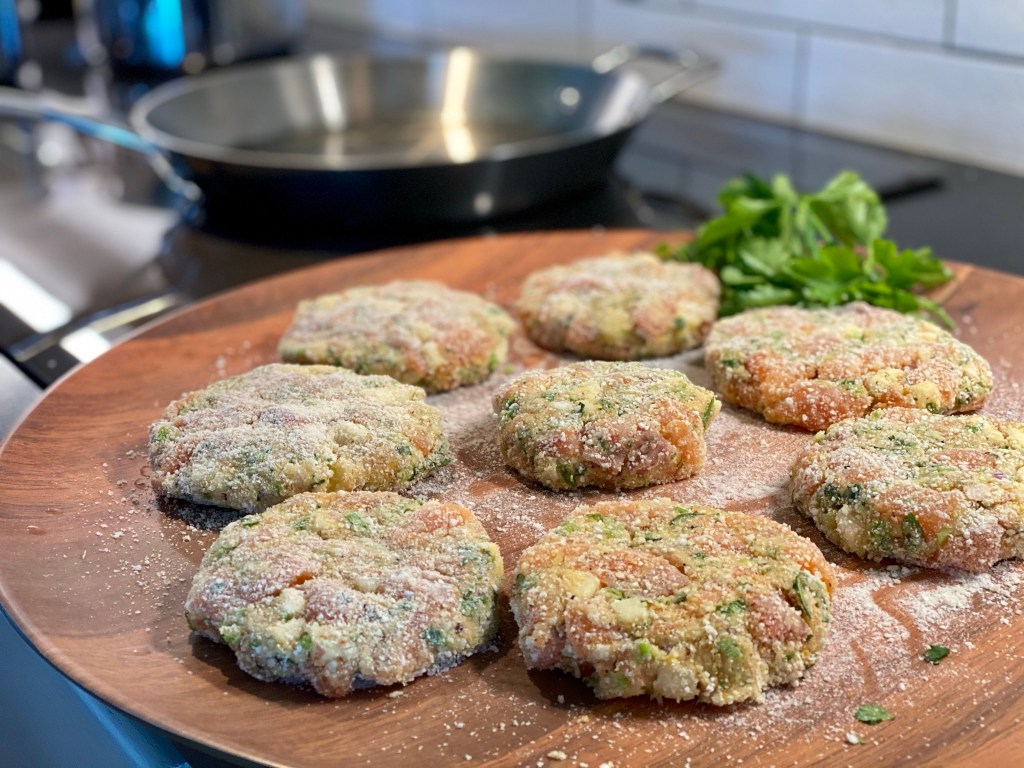
Gently combine all ingredients EXCEPT ½ cup of the panko. Allow mixture to rest five minutes. (While you're waiting, now is a good time to start the rice!)
Place the remaining ½ cup panko onto a plate or shallow dish. Scoop up ½ cup of the salmon mixture and form into 3" cakes. Carefully coat each cake in panko crumbs. Allow the cakes to rest another five minutes. (The resting steps help the panko absorb to hold the cakes together/stick to the cakes and make them much easier to handle.)
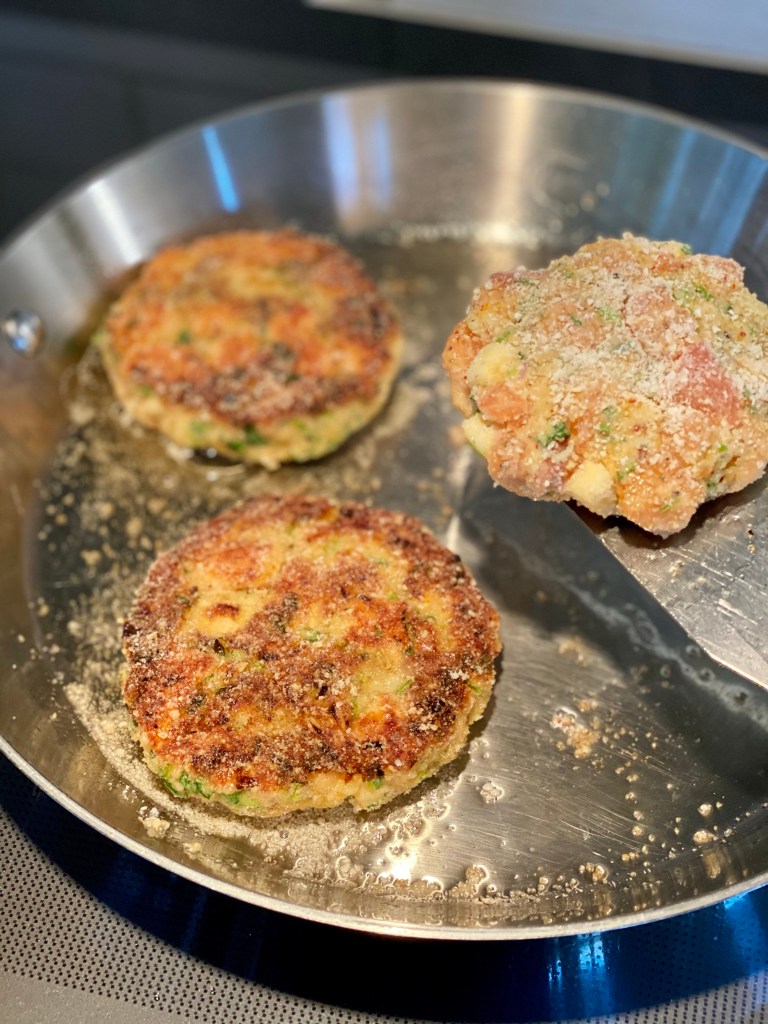
Heat oil in skillet over medium-high heat until just starting to shimmer. Place salmon cakes, a few at a time to avoid crowding, in the skillet and cook without moving until golden brown, about 3 minutes. Carefully flip cakes and cook without moving until the second side is golden brown, about another 3 minutes. (You should have eight cakes, or enough to serve four people.)
Make the Coconut Rice
Over the sink, rinse the rice in a fine-mesh strainer with cold water, stirring the rice with your fingers until the water runs clear. Put the rice in a medium saucepan.
Add the coconut milk, ginger, turmeric (fresh or dried), and serrano* to the saucepan (if using.) Bring to a full boil over high heat. cover, reduce heat and simmer for 20 minutes. Keep the lid on, and set the rice aside.
To Serve
Lay down a bed of rice in the center of each plate. Place two cakes on the rice. Top with generous spoonsful of warm mango chutney, and garnish with cilantro, if desired.
Notes
The salmon cakes and mango chutney are perfect with Oregon Pinot Gris and other dry white wines, and sparkling whites. All components can be made ahead-- perfect for entertaining. Rewarm the salmon cakes in a hot oven for a few minutes. Warm the rice and the chutney in lidded saucepans over medium-low heat. This, of course, works well for any leftovers, too.Experiment using halibut or other white fish in place of the salmon.*I suggest a pretty wide range of quantity for the ginger, turmeric, and serrano for the rice, as well as an option for dried ground turmeric if you can't find fresh. This rice is stellar with all of these added, but you have the freedom to choose to omit, increase, or reduce the quantity to suit your taste. We like it with its full-flavor, all-in, maxxed out goodness. The rice can be made with full-fat coconut milk, but it will of course have a heavier, oilier feel. If full-fat is what you have, please use it, but to try it once with light coconut milk.
Artichokes are another of the short-season wonders, and we try to eat as many as we can while they are available. This terrific artichoke recipe from Allison Roman's book Nothing Fancy is super easy, and makes the most succulent, juicy, and rich-tasting artichokes ever. It's nice to have a new addition to the 'choke repertoire.
After making this a dozen times or more, I want to encourage you to free yourself from exact measurements, and think instead about ratios. Start with as many artichokes as you plan to serve. I encourage you to make extra while you're at it as they are fantastic cold or warmed up as leftovers.
Making the Wine-Roasted Artichoke Recipe
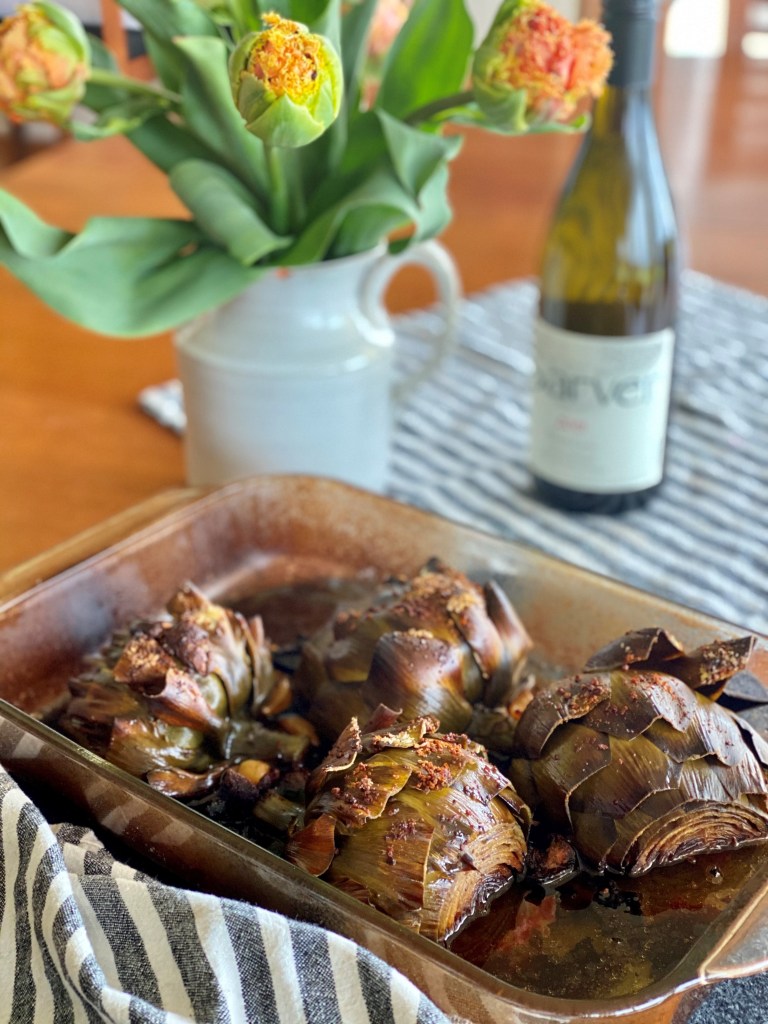
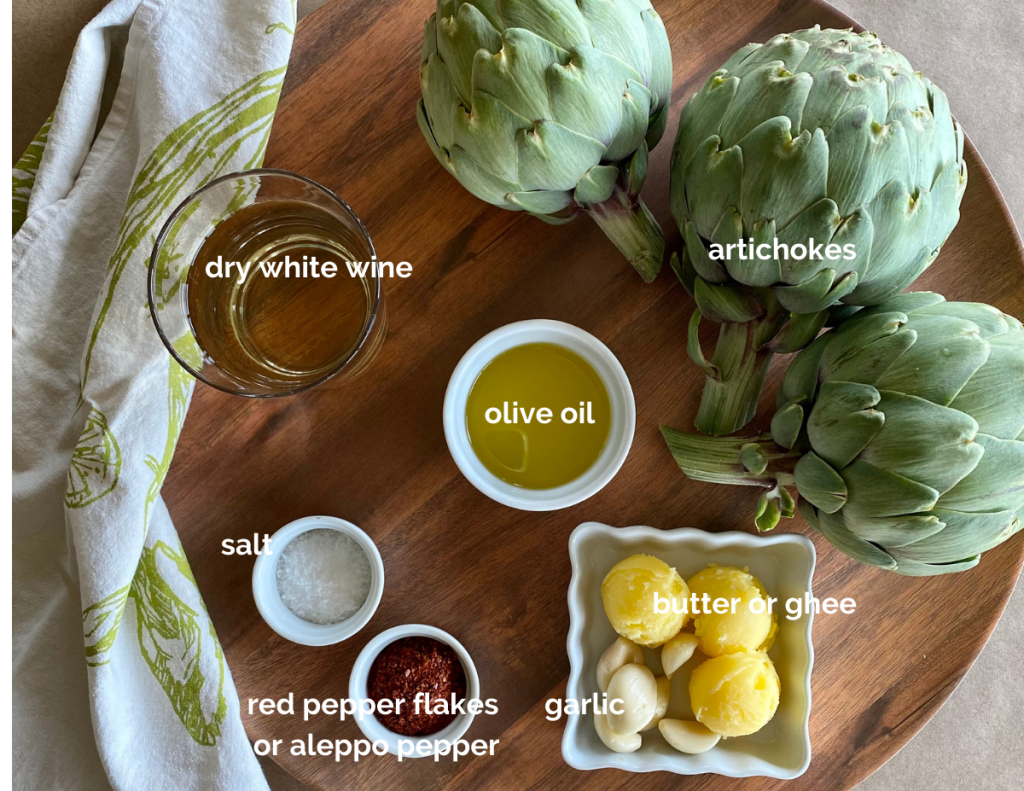
First, think big as far as your baking dish goes. It's surprising how much space the halved artichokes need for their flat surfaces to touch the pan. From there, just think in terms of having about 1/4-inch of wine in the bottom of the pan around the artichokes, to which you'll add another 1/4-inch of water. (I use Sarver Winery Pinot Gris for this-- my favorite from our neighboring winery!) You'll generously drizzle the artichokes with olive oil, and plop in maybe a half-tablespoon or more of butter for each artichoke half in the dish. Crush as many garlic cloves as you like-- we go big on garlic at this house, so perhaps 2 cloves for every artichoke half, and sprinkle the tops of them amply with kosher salt and red pepper flakes, or my favorite Aleppo pepper.
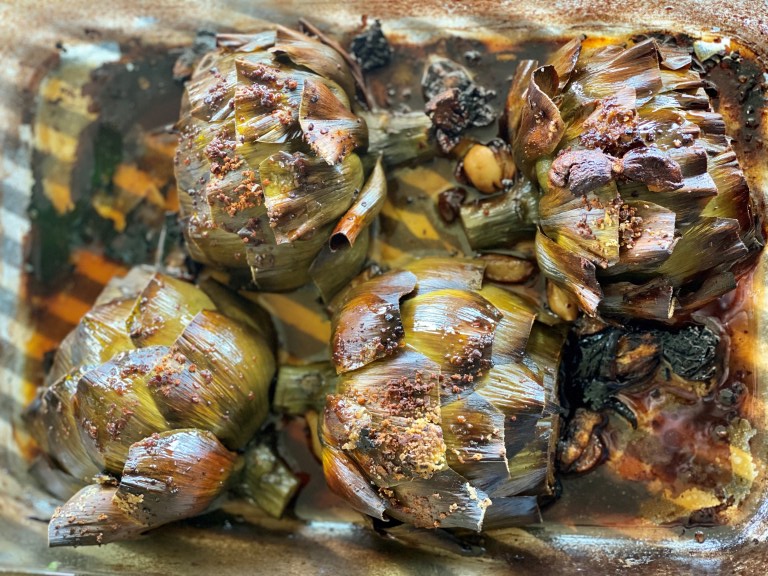
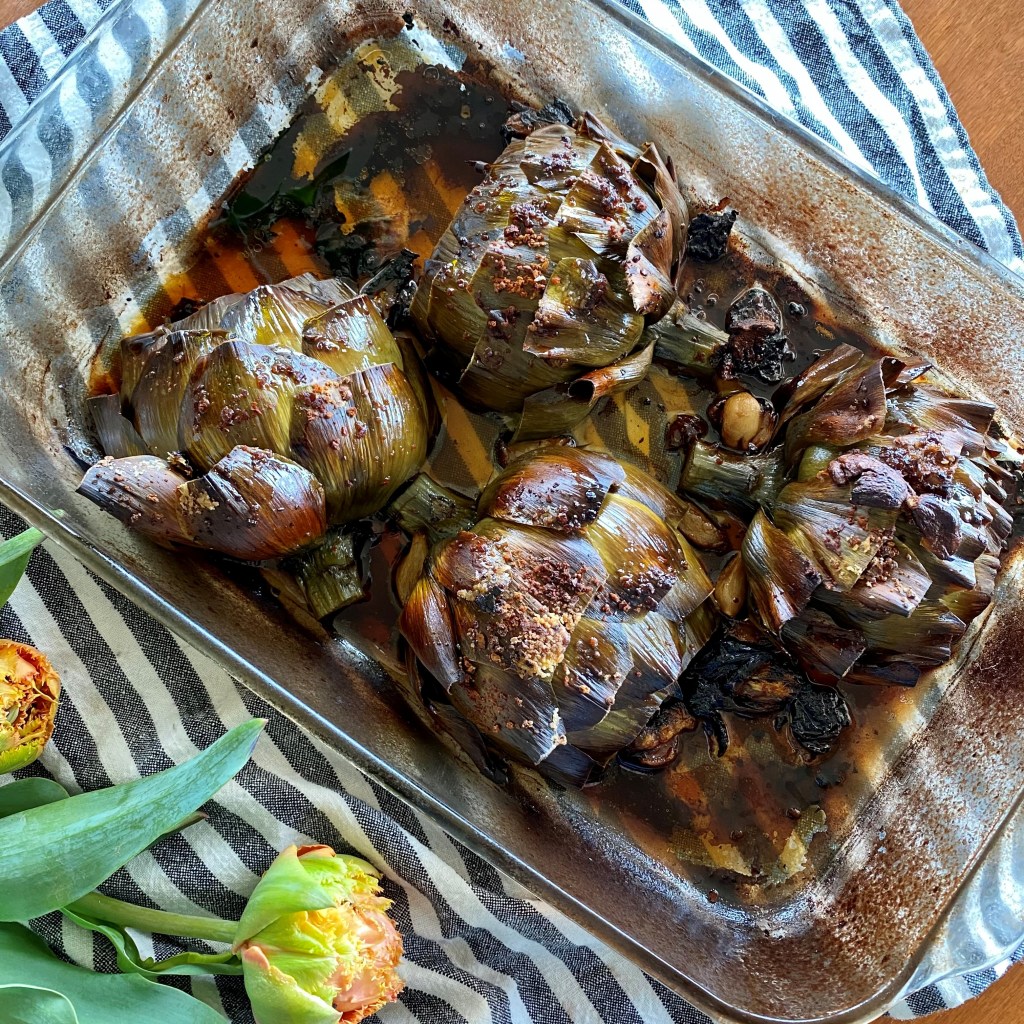
Aside from prepping the artichokes, the hands-on time is just a couple of minutes. Cover it in foil, bake in a 425 degree oven for 45-55 minutes, depending on the size of your artichokes. Remove the foil from the pan, and assess if it needs a little more water-- you don't want the pan to run dry but do want a reduced glaze to form. Then continue to roast them for another 15 minutes until they turn a deep mahogany, and the cooking liquid reduces into a garlicy little sauce you'll want to dip bread into.
This is the Artichoke Recipe Choice for Part Givers
If you're hosting a gathering, this dish is for you! It can be made ahead, either the day of or the day before, and warmed back up at the last minute. The artichokes are equally charming served room temperature for warm-day entertaining. While the artichokes pair perfectly with most white wine varieties, they really shine served with the same Sarver Winery Pinot Gris they are cooked in.
Have you noticed what happens when a crowd of people eat with their fingers? It's a magical way to drop barriers and bring people together. Put a bowl on the table for guests to toss their tooth-scraped outer leaves into.
What shall I serve with Wine-Roasted Artichokes?
This dish makes a lovely first course, if you like stretching the table adventure out for hours like we do. It's also a perfect accompaniment to fish, chicken, or pork tenderloin. It is equally good as part of a vegetarian meal, served with a nutty rice pilaf or lemony pasta.
Guess what?
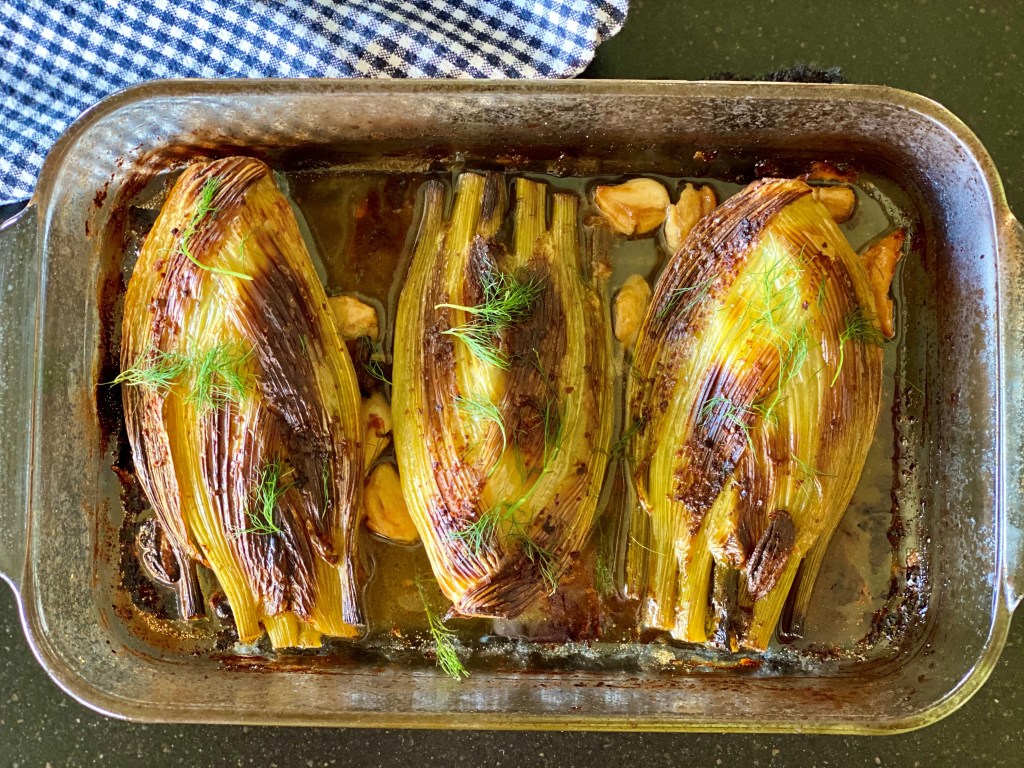
Wine-roasted fennel
This exact technique works to sweeten and juice-up fennel. Give it a try!
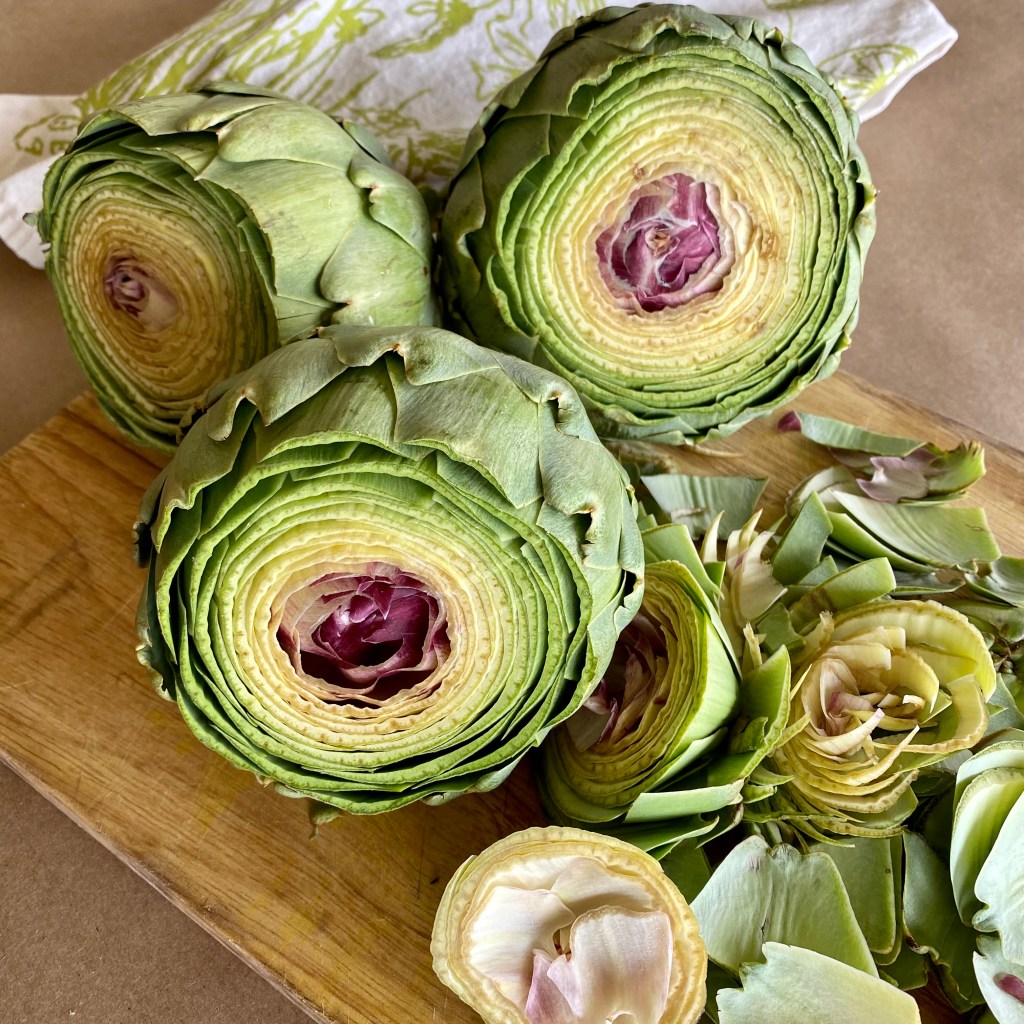
Trim the edible artichoke stem of any woody parts, leaving as much of it as you can. Snap off the bottom one or two layers of tough outer leaves. Use kitchen shears to trim the thorny ends of the remaining leaves, if any. With a serrated or chef's knife, cut about 1 ½" from the crown of the artichoke, exposing the yellowish and rosy interior.
Cut the artichokes in half lengthwise. Using a spoon, dig out the fuzzy choke of each half, removing all fuzzy bits. Some of the purple-tipped center leaves will come out, too. Place the cut side down into a large baking dish (don't underestimate the size of dish you'll need-- the cut artichokes take up a lot of space!)
Pour the wine, water, and olive oil over the artichokes. Add the butter, cut or pinched into pieces, and smashed garlic. Generously sprinkle each half with kosher salt, red pepper flakes or Aleppo pepper, and black pepper. Cover tightly with foil and roast until the artichokes are fork-tender, about 45 minutes, depending on their size.
Remove the foil and continue to roast another 15 minutes or so until the liquid is mostly evaporated and the tops are a mahogany brown. Take care that the liquid doesn't entirely evaporate-- add a little water if needed.
To serve, scrape up the garlicky oil at the bottom of the baking dish to spoon on top of the artichokes.
Notes
Make it Your Own:Use the same exact process for whole fennel bulbs. Very tasty! Perhaps experiment with other vegetables such as carrots, parsnips, and turnips, altering the roasting time depending on their tenderness. Dairy-free option: substitute olive oil for the butter.
Just when the "Third Places" urban panning concept became the norm the whole world broke. The fantastic little coffee shops, bars, restaurants, and public squares where people meet to exchange ideas, have a good time, and solidify relationships shut down. All the people packed up their backpacks and man bags and retreated home to their first places.
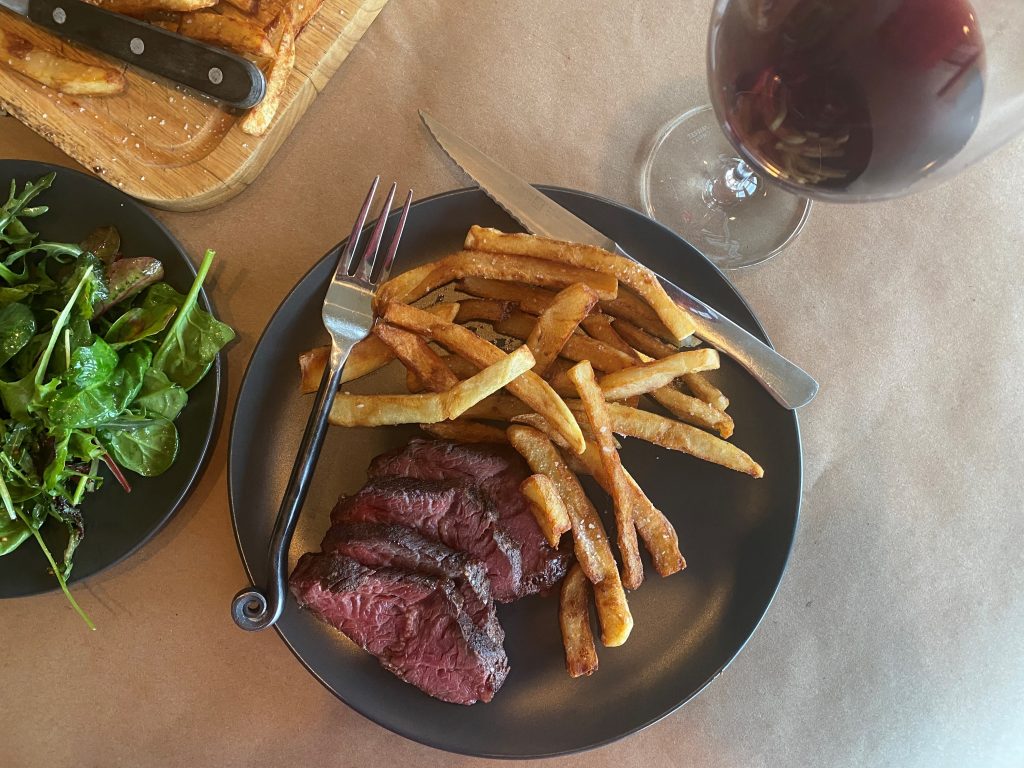
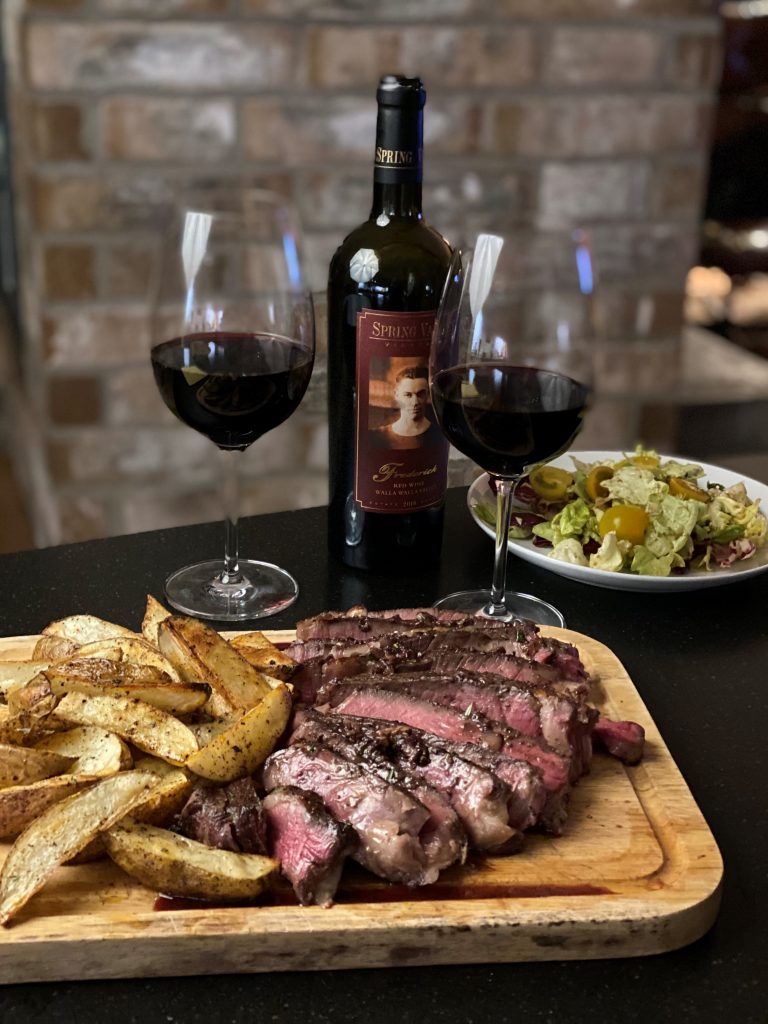
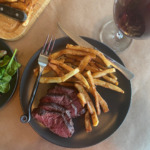
Hanger steak with homemade hand-cut frite-- Perfection!
That was a year ago.
At first it was nice, right? Soft clothes, relaxed grooming habits and timelines, no commutes, more time with the family, pets, and houseplants was all right. With exception of the virtual school part that many of you have endured, there wasn't much to complain about in those first months, especially for us introverts.
Sous vide ribeye with mediocre frozen French fries.
Don't get me wrong-- my home is very, very nice. But as they say, familiarity breeds contempt. After 12 months of being trapped in it, there's a growing sense of malaise with my first space. So, I say to myself, what am I going to do about it? Whining isn't helping, sister, so get off your tuckus and figure this one out. It is novelty you're missing, I tell myself. If I look around, I might find some variety right here at home without spending any of the dimes that are lost under my sofa cushions.
Sous vide ribeye with just OK hand-cut oven-baked fries.
Here are five no and low-cost ways to inject novelty into our home spaces right now.
Go through your cupboards and pantry and find all the fancy foodstuff you've been hoarding. That jar of homemade fig jam the neighbor gave you, the cute jar of honey with the chunk of honeycomb in it, and the fancy package of crackers? What are you waiting for? Get a nice cheese and give yourself an special little appetizer experience this weekend. That expensive box of Maldon salt hidden on the back of the shelf? Pour some into a pinch bowl and keep it out to fancify your finished dishes. Now is the time to drink the good wine and use the truffle oil, even if it's just on mac and cheese or frozen French fries.
Do the same thing with bath products you've squirreled away. Glitz up your day-to-day routine by digging out these bougie things you've been saving. If a worldwide pandemic isn't a special occasion, I don't know what is. Smell nice. Use a new soap or soak and call it a fake-ation spa experience.
Switch up your bedding. Rustle through your linen closet for stashed sheets, comforters, blankets, and bedspreads and exchange them for your day-to-day ones. What is old is new again. Go crazy mixing patterns and colors. Making things different is what this is all about. For that matter, why not sleep in the guest room for a week, just to shake up the routine? Almost anything divergent is helpful about now. It's only a temporary commitment meant to lift your spirits and see things anew.
Do the spiff-and-swap throughout your space. Channel your inner Leanne Ford and snip some branches from your yard and put them on your table in the biggest jar you can find. If you've got your grandma's china or an unused set of dishes or top-shelf glassware, use them now. Would it make your space more alive to paint those shelves bright blue like you've always wanted? Channel your inner Rayman Boozer and do it. I recently swapped the art pieces around in our house, an easy ennui-busting solution with the cheer-rising effect I'd hoped for.
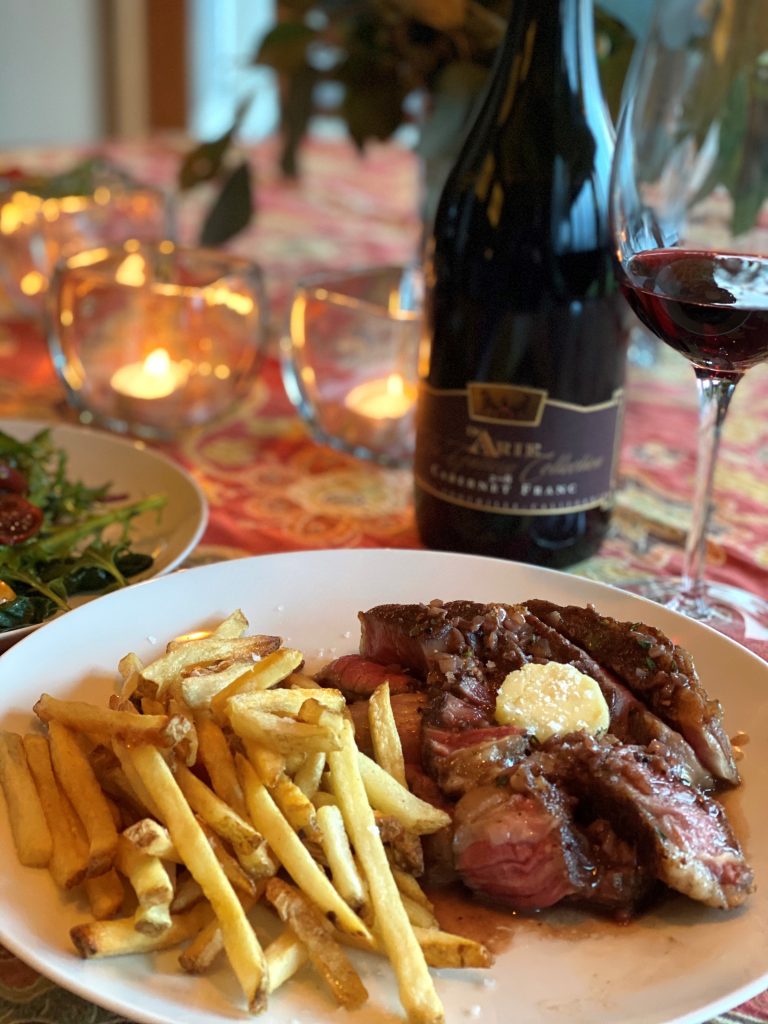
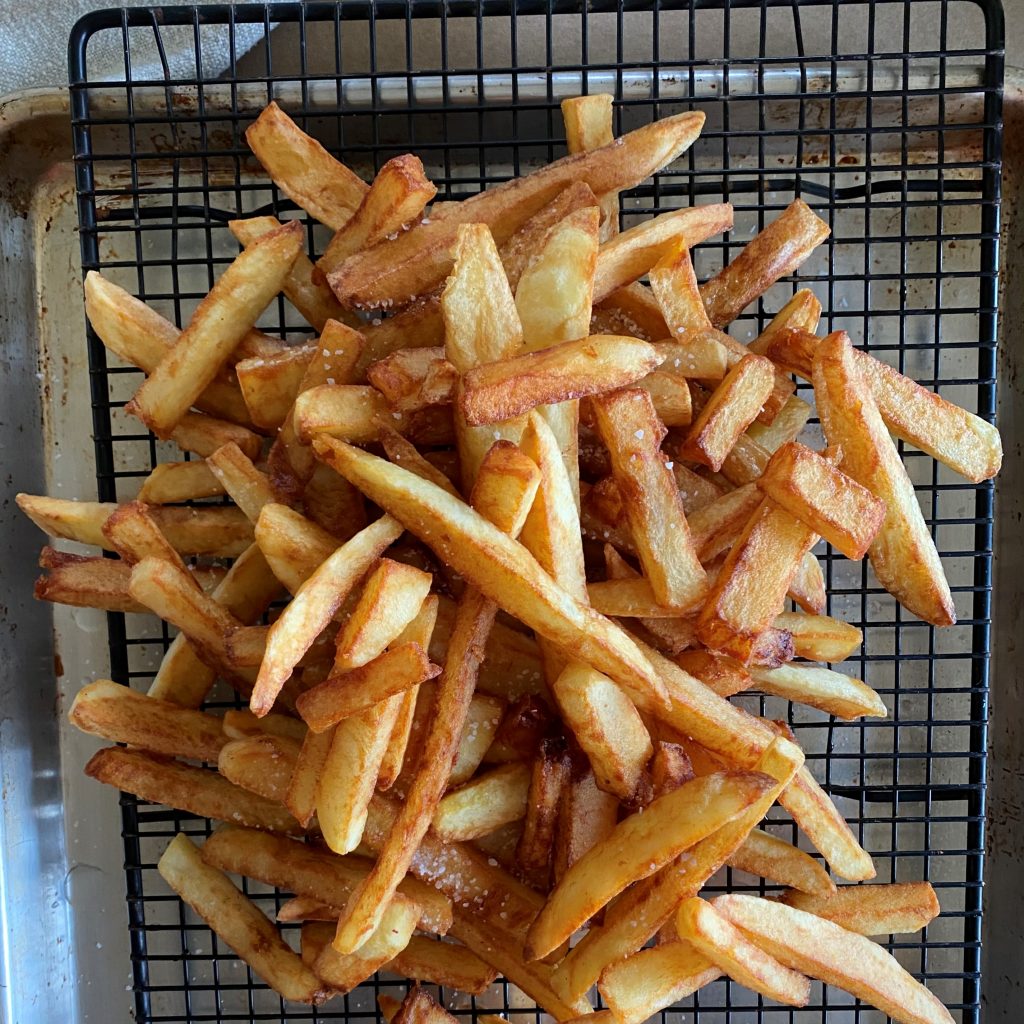
Now that you've lifted your first space from the doldrums, what is the one aspirational thing you'd like to incorporate into your cooking cred, something that challenges your skills? Clear the deck this weekend, make a shopping list, and get ready to blow your own mind. How about adding the perfect European café steak-frites to your repertoire? Learn to sous vide a steak-- Lana at Lana Under Pressure is a great teacher. I do not typically make fried foods at home, so I also challenged myself to make perfect hand-cut French fries to replace the baked ones I usually do, and I can't wait to do this for friends once we become vaccine-worthy. It was fun, and gave me a new skill.
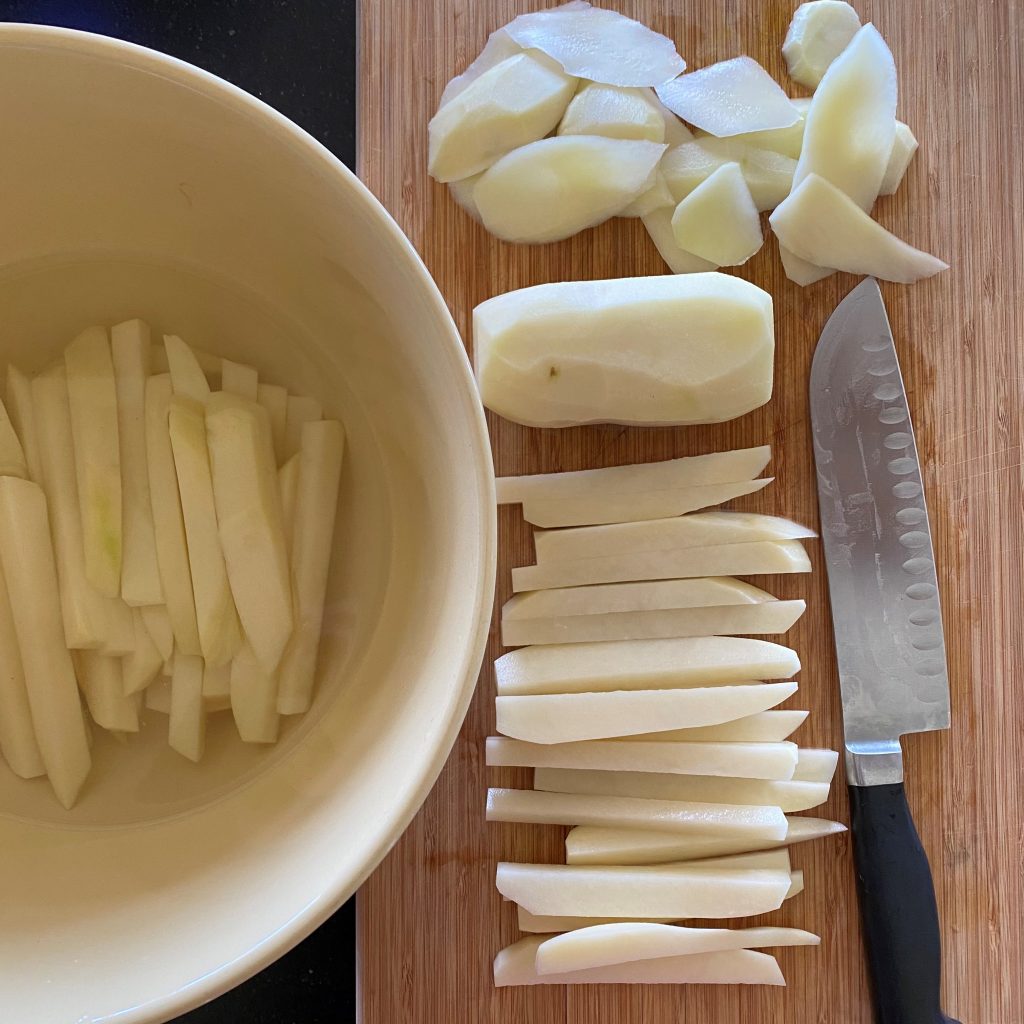
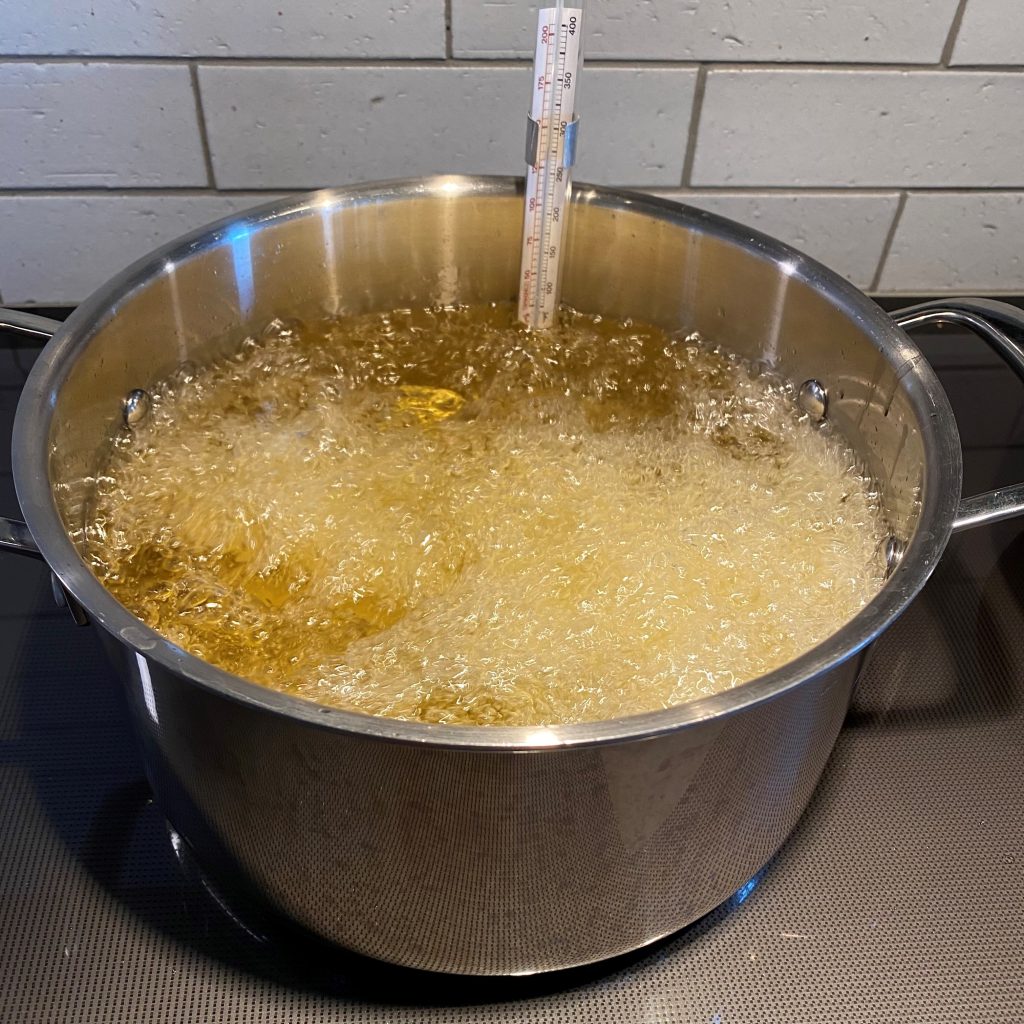
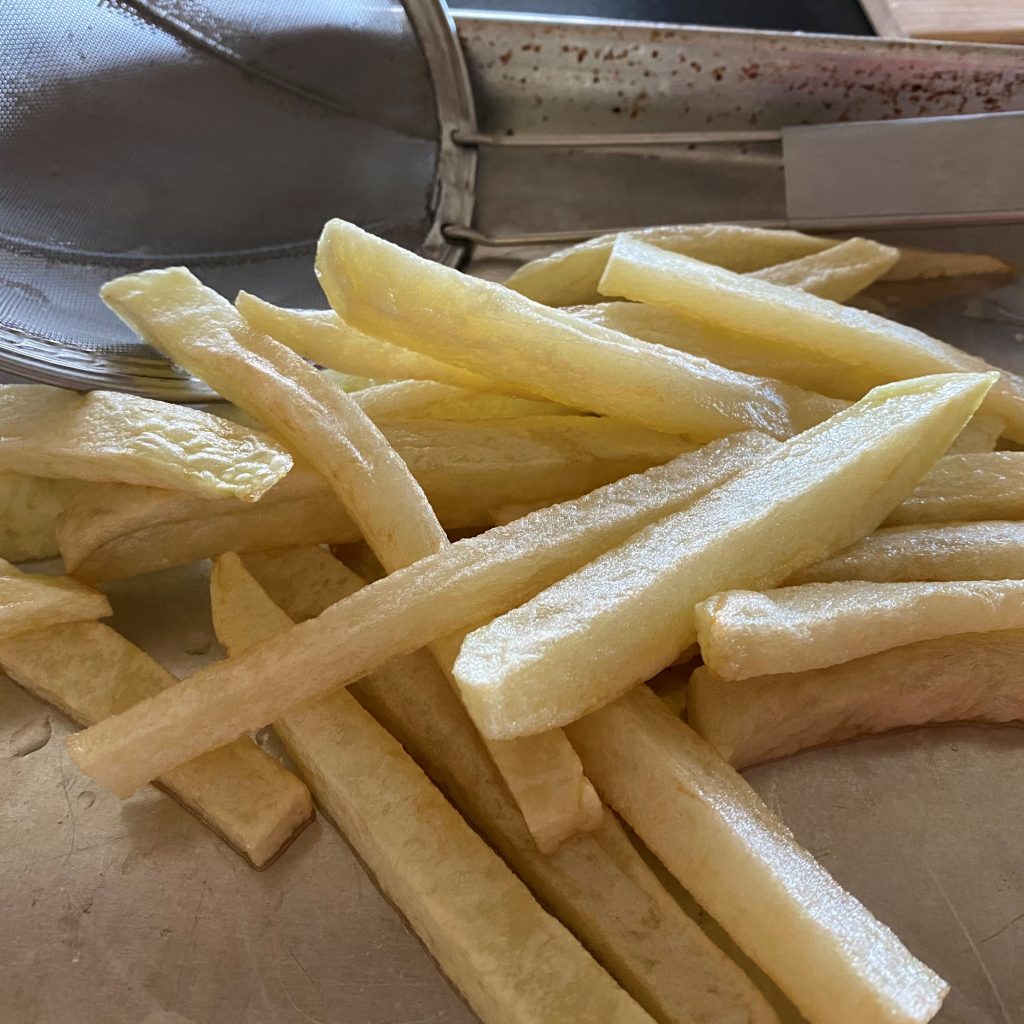
1. Slicing and soaking; 2. Drying; 3. After the first fry cycle; 4. The finishing frying cycle; 5. Viola! Perfection!
Scrub and peel the potatoes. To cut them into perfect French fries, square them up by trimming of the top, bottom and four sides of the potato to start with a block. Then, slice the potatoes into approximate 1/3 inch (less than 1/2 centimeter) slabs, and then cut the slabs into approximate 1/3 inch strips.
Place the cut potatoes into a large bowl of cold water. Leave for 15 minutes. This removes excess starch from the potatoes that would cause them to stick together when cooked, and helps them be extra crispy.
While the potatoes are soaking, pour the oil into a deep pot, at least 5 inches deep. Begin to heat the oil on medium heat.
After 15 minutes, drain and thoroughly rinse the potatoes. Lay them out in a single layer on a clean kitchen towel. Dab them dry with another clean towel to remove all water from all sides of the cut potatoes.
Raise the heat under the pot to medium high. Bring the canola or peanut oil to 270°F (130°C) when measured with an instant-read thermometer.
First fry: Working in batches, place the dried cut potatoes into the hot oil. You may use a fry basket or mesh strainer to lower them into the oil, and to remove them from the oil. Blanch them for 8 minutes. They will look pale and flabby. That's OK! Lay them out on a baking sheet to cool, separating them with tongs.
Second fry: Raise the oil to 350°F (180°C.) Mind your temperature. When the oil is at temperature (use your instant-read thermometer again) place some of the blanched potatoes into the hot oil, being sure not to overcrowd them. You'll be doing this step in batches unless you're only cooking a few potatoes. Cook the potatoes until they are a nice medium-golden color, or to your liking.
Remove the potatoes with a strainer (or fry basket if you're using one) and put them into a large bowl.
Toss with a generous amount of your favorite salt, and serve while hot with excellent ketchup.
Notes
Make It Your Own:Add pepper, red chili flakes or paprika, garlic powder, or minced rosemary to the salt, or any combination of them to suit your tastes.Sprinkle with truffle oil. If you do this, be sure to stand over it and inhale the beautiful scent that will waft up when the oil hits the hot French fries. Tip:Mind your temperature along the way. If you're using a heavy pot as you should be, the temperature will want to climb and drop. You'll likely need to continuously keep an eye and make adjustments throughout the process. This is a hands-on, eyes-on process. To stay focused, don't attempt to multi-task!
Follow Me
Welcome!
You’re in the right place! I’m Pam Spettel, home cooking expert and guide, and I’m here to show you how to break up with cooking and hospitality anxiety, learn how to use recipes as guides rather than strict rules, and let your cooking intuition and confidence soar.
Superpower: Dreaming up recipes that work, serving them to my friends and family, and writing little stories about how cooking them well is the same as loving well.
Inspiration: Ingredients! The fresh, colorful, fragrant, local, seasonal ingredients found in the Pacific Northwest are my creative medium.
Heroes: Local food and wine producers– the people who keep me, my family, and our community nourished and happy.
We use cookies on our website to give you the most relevant experience by remembering your preferences and repeat visits. By clicking “Accept”, you consent to the use of ALL the cookies.
This website uses cookies to improve your experience while you navigate through the website. Out of these, the cookies that are categorized as necessary are stored on your browser as they are essential for the working of basic functionalities of the website. We also use third-party cookies that help us analyze and understand how you use this website. These cookies will be stored in your browser only with your consent. You also have the option to opt-out of these cookies. But opting out of some of these cookies may affect your browsing experience.
Necessary cookies are absolutely essential for the website to function properly. These cookies ensure basic functionalities and security features of the website, anonymously.
Cookie
Duration
Description
cookielawinfo-checkbox-analytics
11 months
This cookie is set by GDPR Cookie Consent plugin. The cookie is used to store the user consent for the cookies in the category "Analytics".
cookielawinfo-checkbox-functional
11 months
The cookie is set by GDPR cookie consent to record the user consent for the cookies in the category "Functional".
cookielawinfo-checkbox-necessary
11 months
This cookie is set by GDPR Cookie Consent plugin. The cookies is used to store the user consent for the cookies in the category "Necessary".
cookielawinfo-checkbox-others
11 months
This cookie is set by GDPR Cookie Consent plugin. The cookie is used to store the user consent for the cookies in the category "Other.
cookielawinfo-checkbox-performance
11 months
This cookie is set by GDPR Cookie Consent plugin. The cookie is used to store the user consent for the cookies in the category "Performance".
viewed_cookie_policy
11 months
The cookie is set by the GDPR Cookie Consent plugin and is used to store whether or not user has consented to the use of cookies. It does not store any personal data.
Functional cookies help to perform certain functionalities like sharing the content of the website on social media platforms, collect feedbacks, and other third-party features.
Performance cookies are used to understand and analyze the key performance indexes of the website which helps in delivering a better user experience for the visitors.
Analytical cookies are used to understand how visitors interact with the website. These cookies help provide information on metrics the number of visitors, bounce rate, traffic source, etc.
Advertisement cookies are used to provide visitors with relevant ads and marketing campaigns. These cookies track visitors across websites and collect information to provide customized ads.