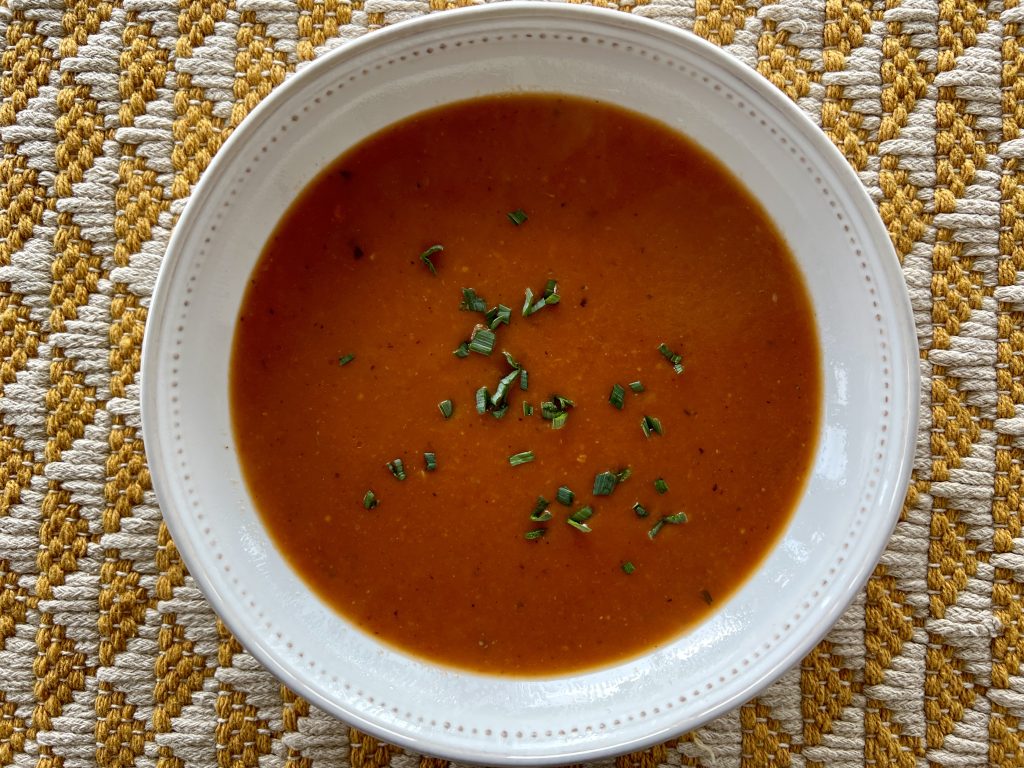
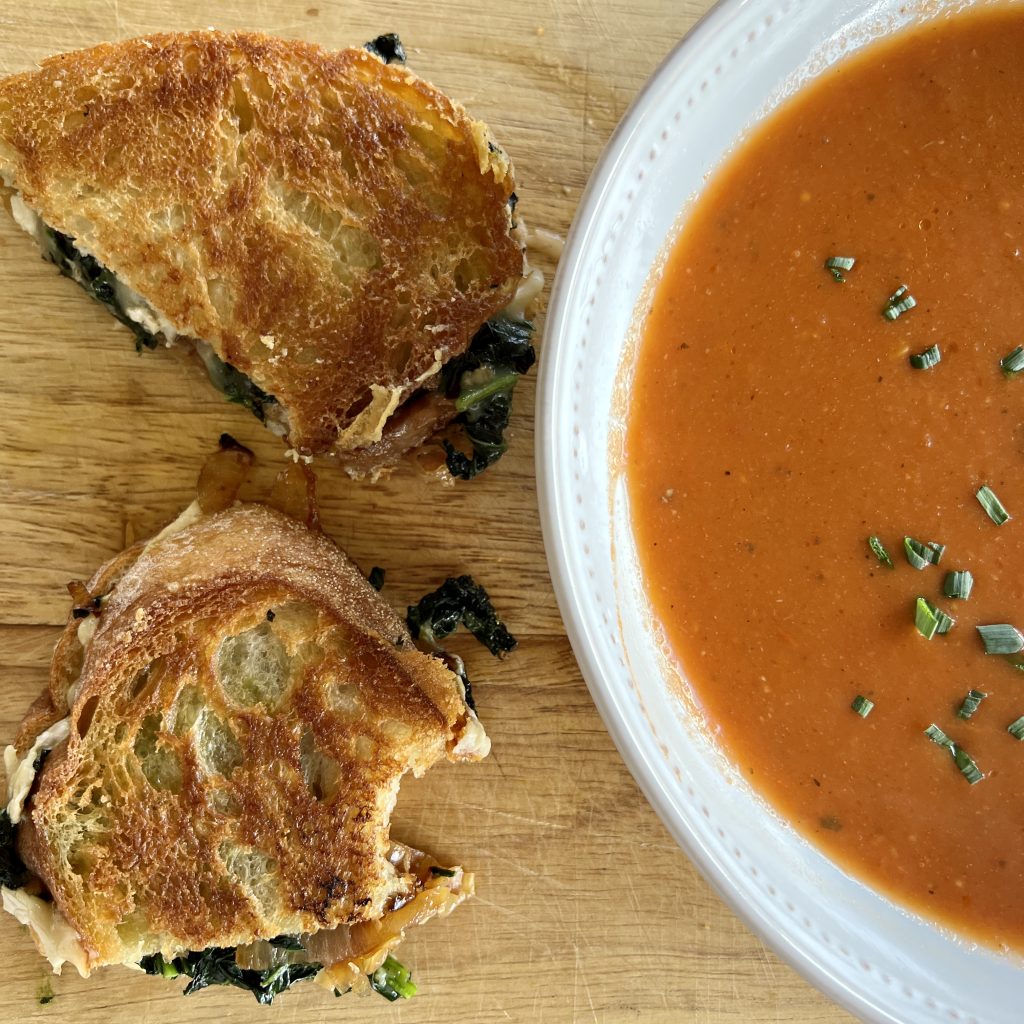
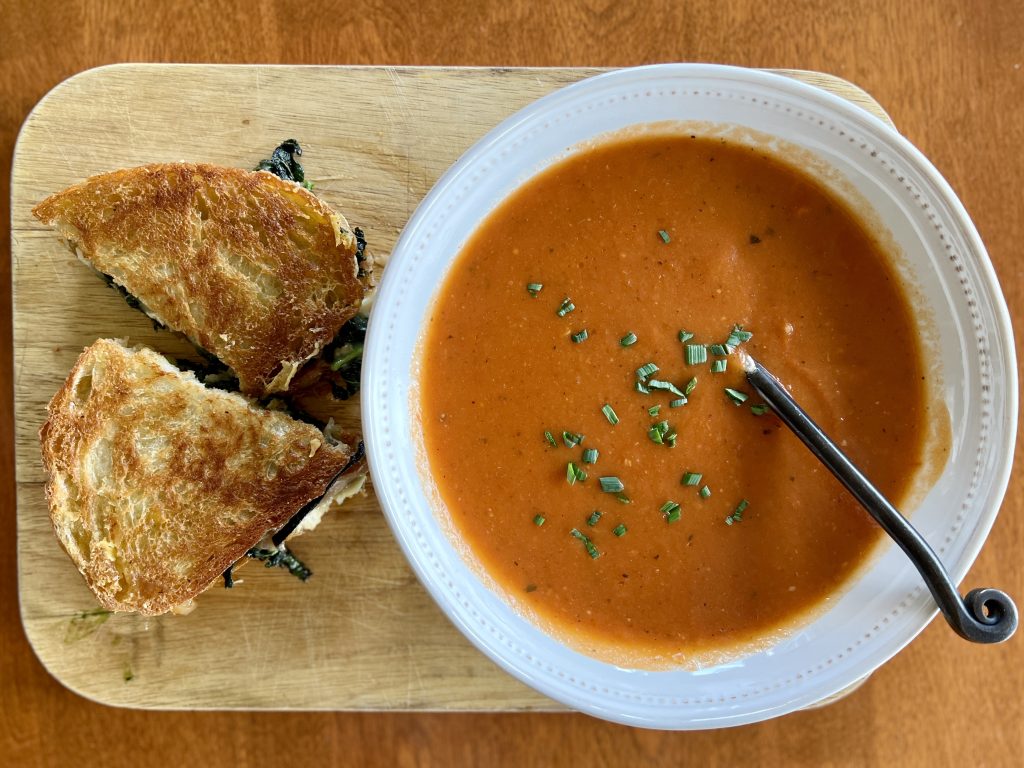
Yesterday I shared with you The World's Best Grilled Cheese Sandwich, made with garlicky greens, caramelized onion, and brie. It's only fitting that you have The World's Best Tomato Soup recipe to go with it. The two are a match made in heaven.
A Word About Canned Tomatoes
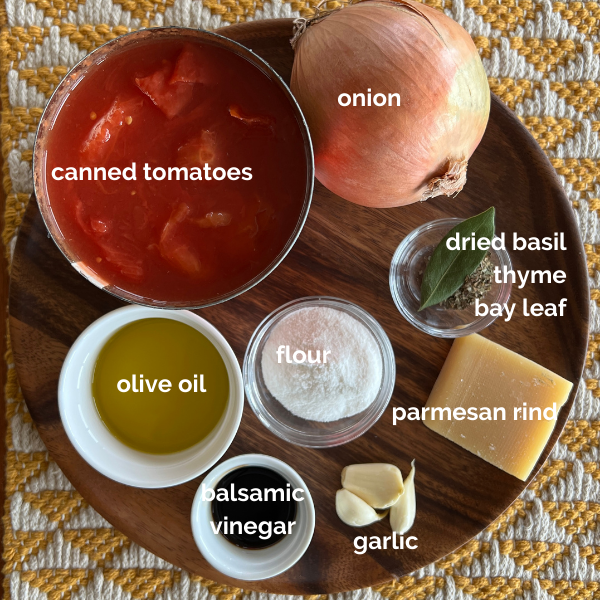
I've driven Interstate Five through California's agricultural regions many times. Enough times to see truckloads of produce pulling off the highway into the many canneries there. May I tell you that not all canned tomatoes are of the same quality? I've observed truckload after truckload of hard pink balls in the truck-trailers. It's not hard to know how they will perform in flavor and texture next to their red, ripe cousins. My practical observation is that you truly get what you pay for in canned tomatoes. Unless you use a lot of canned tomatoes, the price differential is relatively small. It might not make that much difference in a stew with lots of other flavors, but here's my rule of thumb: If the word tomato is in the title of the food I'm making, like tomato sauce, for example or the world's best tomato soup, I spend the extra dollar.
Making the World's Best Tomato Soup
First, lets talk equipment. This is a time when an immersion blender is more than handy. Yes, you can blend the soup in batches in either a food processor or blender. However, a stick blender will get the job done and reduce the amount of cleanup you'll have. I've not met a cook yet who would argue with that!
Because it's still late winter I used dried herbs and a bay leaf, which also gets blended into the soup, but in the growing season, trade those herbs out for fresh basil, fresh thyme, or any of the tender, leafy herbs that suit you.
Two other touches make the soup extra special. I save parmesan rinds for times like this. Just throw one in during the short simmering period for an extra flavor boost. The rind will soften and become somewhat gooey looking, but holds together just fine and can easily be fished out prior to blending. If you don't have a parm rind on hand that's just fine. The soup is still lovely so don't let that stop you from making it. The second bit of magic comes with a hearty drizzle of balsamic vinegar as a finishing touch.
The olive oil in here gives it a creamy texture and appearance, but if you love a splash of milk or cream in your tomato soup, by all means use it.
If you like this recipe, please leave it a star rating by clicking on the green stars below the title in the recipe card below. If you like the 101-Mile Kitchen project, I'd be honored if you subscribed to the newsletter!
The World's Best Tomato Soup
Course: Appetizer, Main Dish, Quick + Easy, Soup + Stew
Cuisine: American
Season: All Season
Dietary: Gluten-Free
Preparation: Fast + Easy, One Pot/One Pan
Prep Time: 15 minutesminutes
Cook Time: 30 minutesminutes
Total Time: 45 minutesminutes
Servings: 4
A few special touches make this recipe the only one you need for The World's Best Tomato Soup!
Heat the olive oil in a large saucepan over medium heat. Add the diced onion and sauté until the onion has softened and is starting to become translucent. Add the garlic, thyme, basil and bay leaf and sauté another 2-3 minutes. Add the flour and sauté, stirring for another 2-3 minutes.
Add the tomatoes and their juices, the water, optional parmesan rind, salt, and pepper and bring to a simmer. Cover, and simmer for 30 minutes, stirring occasionally.
Remove the parmesan rind and blend the soup using an immersion blender, food processor, or blender. If using a food processor or blender, blend in batches. Blend until the soup is fairly smooth, but still has a slight amount of tomato texture. Remove from the heat and stir in the balsamic vinegar. Serve piping hot.
I often make soup and some kind of grilled sandwich or panini for supper in the cool weather months, and this week's sandwich was a true hit. Garlicky greens and caramelized onion grilled cheese made with creamy brie is a rather fancy sandwich. I'm going so far to say this is the world's best grilled cheese to date.
Inspiration for Special Grilled Cheese
In my town there is one special spot that adds so much to my experience of living here. Provisions Market Hall is a beautiful place full of gastronomical goodness and so much more. Inside is a gorgeous florist, a wine shop, a beautiful kitchen and gift shop, a specialty foods grocery complete with lovely cheeses and charcuterie, freshly baked breads and pastries, wood oven baked pizzas with bubbly crusts, a coffee shop, and delicious lunch items. Provisions is a place of visual wonder, yes, but also offers practical support to the entire spectrum of us who cook and offer hospitality at home. When you visit Eugene, you just must visit Provisions.
Flowers greet you at the door of Provisions Market Hall
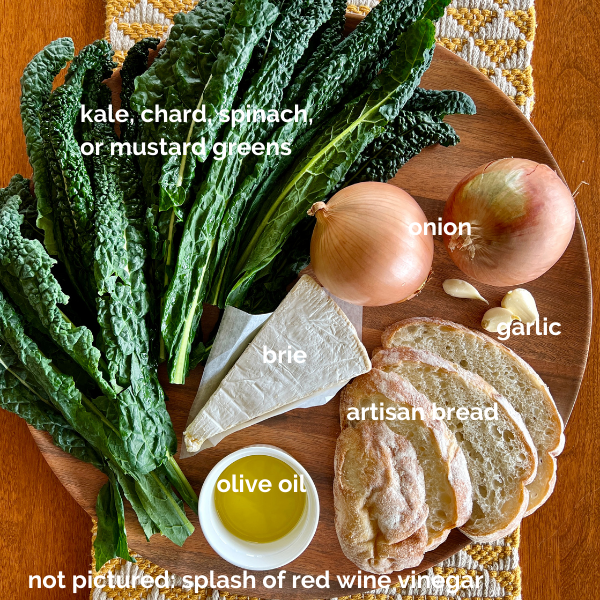
I met a friend for lunch there last week ordered their chard and brie grilled sandwich special. It was so delicious I couldn't wait to try making it at home. I used kale because that's what I had on hand. Chard, kale, or even spicy mustard greens would each be gladly received in this glorious sandwich.
If you're a fan of the classic tomato soup and grilled cheese combination, this is the sandwich you'll want going forward. The slightly bitter greens, sweet earthy caramelized onion, and bloomy brie are the perfect foil to tomato soup. Tomorrow I'll share my recipe for the best tomato soup so you'll have the matched set.
Making the Garlicky Greens and Caramelized Onion Grilled Cheese
There is nothing tricky here. Caramelize a few onions, cook some greens, and layer them on top of brie. Using a really good bread will also make a difference, so try for that, too.
Other Soups to Serve with Garlicky Greens and Caramelized Onion Grilled Cheese
1bunchchard, kale, or mustard greensribs removed, chopped into about 1" pieces
3cloves garlicminced
salt + pepper to taste
1½teaspoonsred wine vinegar
sliced pain de mie or artisan bread, 2 per person
5-6ouncesbrie, sliced ¼" thick
Instructions
In a large skillet heat 2 Tbsp. olive oil over medium high heat. Place the sliced onions in the skillet, sprinkle on several pinches of salt, and allow them to sit undisturbed for several minutes. When the bottom is beginning to brown, turn them, and once again allow them to brown undisturbed for several minutes. Continue this for about 15 minutes until the onions are soft and golden brown throughout.
While the onions are caramelizing, in another large skillet heat another 2 Tbsp. olive oil over medium high heat. Place the chopped greens in the skillet, and sprinkle with a few pinches of salt and pepper. Add the minced garlic. Sauté, stirring occasionally, until the greens have cooked down about 1/3, or are beginning to soften, about 5-6 minutes. Stir in the vinegar.
Lay the bread out on a work surface, and lay slices of brie on one side. Divide the sautéed greens among the sandwiches over the brie, then divide the caramelized onions over the brie. Cover each sandwich with its remaining bread slice.
Wipe out the skillet that the greens were cooked in with a paper towel, and heat the remaining Tbsp. olive oil in it over medium heat. Place the sandwiches in the skillet and cook each side until golden brown and crispy. Cut sandwiches in half and serve with tomato soup or simple salad or fruit.
Notes
Left over cooked greens and caramelized onions store well for 3-4 days in the refrigerator.
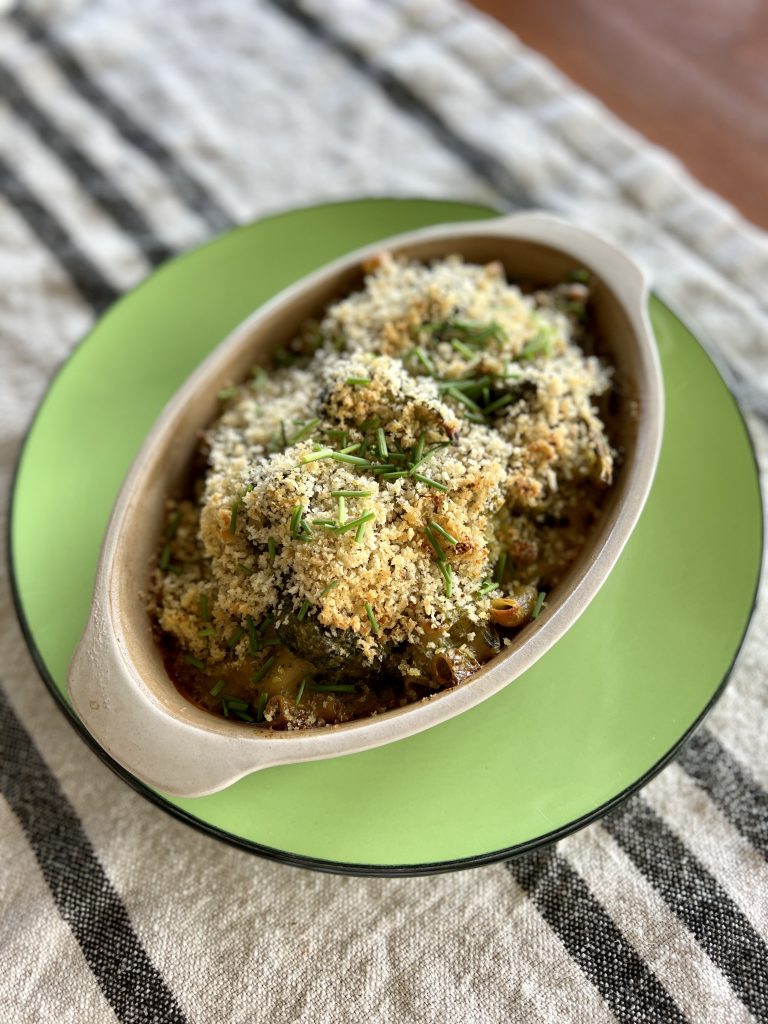
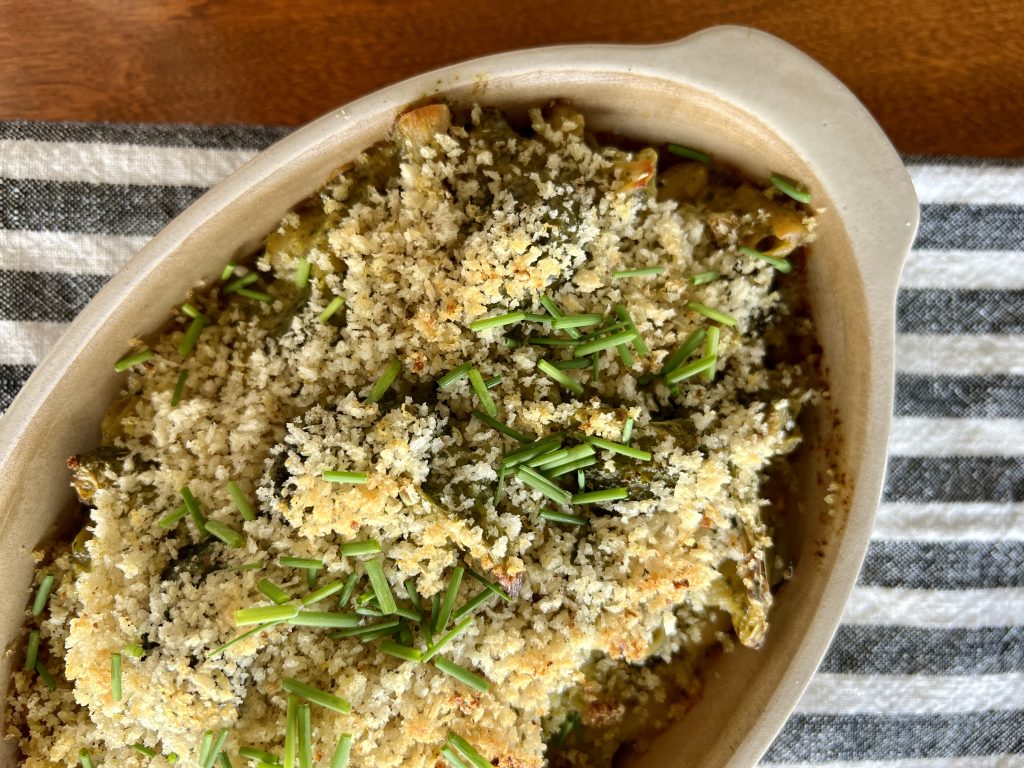
Adulting has been especially challenging this week, and comfort food has been as important as ever. Green Goddess Macaroni and Cheese has that magical combination of being carb-y, cheesy-gooey, and packed full of good-for-you stuff that ensures that if this is all you eat for a week, you'll at least be getting your vegetables.
This recipe amps up the adult factor with the addition of Dijon mustard and a few anchovies to the cheesy base. These additions offer an exciting depth of flavor snuggled up with the same cozy familiarity you expect from good ol' macaroni and cheese.
How Can I Help?
When the going gets tough for friends and family we ask, "How can I help?" Often the response is something like, "Well, there's nothing anyone can really do except send your love/ good energy/ healing thoughts/ prayers." I'm a big fan of asking the universe to surround my beloveds in need, but when I hear that there's nothing I can physically do to help it is frustrating to not DO something.
This week the shoe is on the other foot. I have been on the other side of those words how can I help? and have learned their hidden power.
Even when there is nothing practical others can do to help, the willingness of a friend to accept a small chunk of my burden has a remarkable effect. Every person who asks this forms a network of support and love that lessens my emotional weight. Every one of the beautiful souls who steps forward to ask how can I help? becomes an invisible army around us-- my family and me.
So never be discouraged if there's "nothing you can do". Your presence, your calls, your prayers and good juju are so important. So impactful. So encouraging. Such a display of kindness. Love personified, even.
And, if you can, show up with a dish like this one so your loved one is sure to eat their vegetables all wrapped up in the comfort of good ol' macaroni and cheese.
What Wine Should I Pair with Green Goddess Macaroni and Cheese?
Anchovies and Dijon mustard make this recipe incredibly wine-friendly, not that plain mac and cheese needs a lot of help with that! And this week there definitely has been wine! We found the 2020 Conde Valdemar Blanco Rioja from Valdemar Estates Winery in Walla Walla, Washington to be a better than perfect pairing. It is light, clean, and refreshing-- in other words, a wonderful foil to the rich cheese dish. This is truly a joyful wine.
Making Green Goddess Macaroni and Cheese
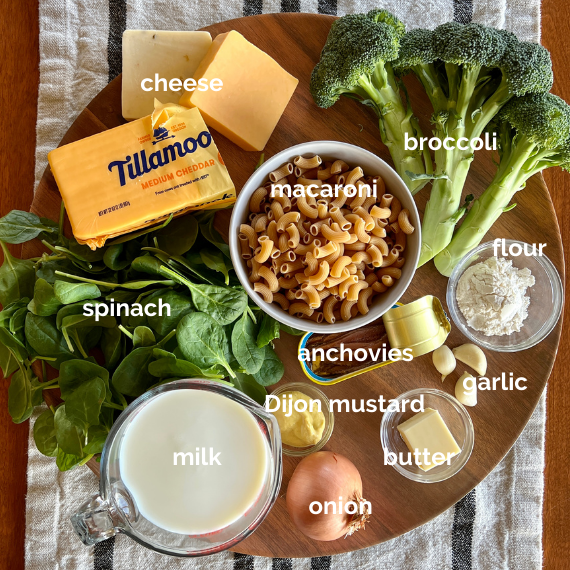
I used to always make mac and cheese with this ratio: One pound pasta/ 4 tablespoons flour/ 4 tablespoons butter/ 4 cups milk/ 4 cups (one pound) shredded cheese. This ratio feeds a tribe.
Since most of us here are feeding one, two, three or four people on a daily basis I've revised my formula: One-half pound pasta/ 2 tablespoons butter/ 2 tablespoons flour/ 2 cups milk/ 2 cups (1/2 pound) shredded cheese. In our household, that makes enough for a very handy two meals apiece. If you are feeding a bigger household, guests, or a gathering, just double the recipe as it is written.
Yes, there are little anchovy fishies tucked into this dish. Umami, friend! Do give them a try. Adding the raw broccoli florets to the mixture right before baking keeps them a wee bit crunchy and not lost in the creamy pasta. The crispy topping adds a wonderful textural note, too. You may be tempted to forgo that part, but it is a low-effort-high-reward addition.
You'll also note that I used our local favorite Tillamook Creamery Cheddar and Monterey Jack cheeses in this dish. If you don't have a local cheesemaker near you, these are worth seeking out.
Other Comfort Foods for When the Going Gets Rough. . .
. . . for you, or for those you love: Carrot Risotto with Green Garlic Sauce: Recipe Here. Easy Winter White Vegetable Soup and Infinite Variations: Recipe Here.
Green Goddess Macaroni + Cheese
Course: Main Dish, Quick + Easy, Side Dish
Cuisine: American
Season: All Season
Prep Time: 20 minutesminutes
Cook Time: 30 minutesminutes
Total Time: 50 minutesminutes
Servings: 4
Familiar comfort food, with a green goddess veggie twist.
8oz.macaroni other small pastaregular or gluten free
2Tbsp.butter
½onion, finely diced
2 clovesgarlic, minced
4oil-packed anchovies, drained and mined (optional)
1large stemsbroccoli, stem peeled and diced, florets broken apart
2Tbsp.all-purpose or rice flouruse rice four of GF 1- to- 1 flour for GF
1tsp.salt
1/2tsp.finely ground black pepper
2cupsmilk
1Tbsp.Dijon mustard
6oz.fresh spinach
8oz. grated cheddar, Monterey jack, or pepper jack cheese (2 cups)or a mix of any of these to equal 2 cups
Crispy Garlic Lemon Topping
½cuppankoregular or gluten free
1Tbsp.olive oil
zest of one lemon
1clovegarlic, grated into bowl
Instructions
Make the Topping
Combine all ingredients in a small bowl, and stir thoroughly. Set aside.
Make the Mac and Cheese
Preheat the oven to 350°. Put a pot of salted water on to boil for the macaroni. Cook the macaroni according to package directions.
In a large saucepan or Dutch oven, melt the butter. Add the diced onion, garlic, anchovies, and diced broccoli stems. (Reserve the broccoli florets for later.) Sauté over medium-high heat until the vegetables are tender, about five minutes.
Stir in the flour and salt and pepper. Add the milk and Dijon mustard, and continue stirring as the mixture thickens and begins to bubble, about 5-6 minutes.
Stir the spinach into the milk mixture until it is wilted. Use a blender (working in batches) or a immersion blender right in the pot to blend the vegetables into the milk mixture, turning it green. Stir in the cheese until it it completely melted. Stir in the broccoli florets. Pour the ingredients into a 9" x 13" baking dish.
Spread the crispy topping over the macaroni mixture. Bake until hot and bubbly, and the edges begin to brown. Allow to set 5 minutes before serving.
Notes
Don't let the anchovies scare you. They add a depth of flavor (nothing fishy) and elevate this dish to a wonderful adult comfort food!
For every aspirational, time-consuming, detail-laden recipe in a cook's repertoire, she needs ten like this one in her bag of tricks. These 20-minute, one bowl Quickie Olive Oil Drop Biscuits have elevated so many meals in my lifetime. They are a perfect last-minute additional to all the soups and stews of the season. The biscuits also compliment any main-dish salad, and are a great way to stretch a meal when guests pop in (like back in the BC days.) Really, they are perfect wherever a dinner roll or biscuit would fit.
A fun trick is to make the biscuits small, dropped from a dinner spoon instead of a soup spoon, and serve them as an appetizer or snack with a glass of wine, an American version of gougères.
What is to love about these golden mounds of goodness?
Olive Oil Drop Biscuits are a bit crispy on the outside, tender + fluffy on the inside.
Selling point number one-- quickie olive oil drop biscuits are made in lightening speed. As in, begin preheating your oven now, and your biscuits will be mixed and formed before the oven is up to heat. There are only four primary ingredients to gather and measure here. Using olive oil eliminates the step of cutting in butter. Without the need to roll out and cut the dough like a typical biscuit you save that time, and a lot of cleanup by keeping everything contained in one bowl and not spread all over the counter.
Next, you'll fall head-over-heels for them because they are highly customizable. Olive oil drop biscuits without any of the optional add-ins are deliciously simple, and they become even more remarkable with the addition of some cheese, fresh or dried herbs, or better yet, both cheese and herbs. Any cheese that can be crumbled with your fingers or grated works here, and I often use a combination of cheeses just to use up the left-over nubbins.
Lastly, I love this recipe for olive oil droppers because it makes a relatively small batch. Did you know that in 2020, 53% of American households has one or two members? Most of us can't use a dozen biscuits. This fact is something I'm taking note of more and more when developing recipes, and you should see a change in the recipe sizes on these pages.
Serve your quickie olive oil biscuits alongside these recipes:
Any of the variations of Winter White Vegetable Soup: Get recipe here. Healing Chickpea Orzo Bowl in Ginger Broth: Get recipe here. Roasted Mushroom, Grain, + Spinach Salad. Get recipe here. Roasted Peppers, White Beans, Feta + Simple Herb Sauce, made sheet-pan-style instead of grilled. Get recipe here.
So few ingredients for so much quick and easy goodness!
Quickie Olive Oil Biscuits
Course: Appetizer, Bread + Rolls, Quick + Easy
Season: All Season
Dietary: Egg-Free, Nut-Free, Vegan
Preparation: Baking, Fast + Easy
Prep Time: 8 minutesminutes
Cook Time: 12 minutesminutes
Total Time: 20 minutesminutes
Servings: 8biscuits
These lightning fast, crispy on the outside, tender on the inside drop biscuits are the perfect "little something" to round out a meal. Delicious plain, or with the cheese and herb add-ins. You'll have them mixed up before your oven preheats!
6 tablespoonsextra virgin olive oil (equal to ⅓ cup + 1 tablespoon)
Optional Add-Ins
⅓cupcrumbly or grated cheeseParmesan, cheddar, gruyere, blue, fontina, gouda, etc.
fresh or dried herbs of your choicethyme, chives, rosemary, Italian seasoning, oregano, basil, cumin, etc.
Instructions
Preheat oven to 425°. Line a baking sheet with parchment of a silicone baking mat. In a medium mixing bowl whisk together the dry ingredients. If you are using any cheese or herbs, stir them into the dry ingredients.
Pour the milk and olive oil over the dry ingredients at the same time, and quickly and gently stir until the dry ingredients are incorporated. This will leave a somewhat shaggy dough. Don't overmix.
Drop the biscuits by spoonful onto the parchment or mat. Sprinkle the tops with a little more cheese, if you'd like. Bake for 10-12 minutes until the biscuits are golden brown and the tops bounce back up when lightly pressed. Cool on a rack, and serve.
Notes
These speedy drop biscuits are best eaten right out of the oven. If you have any leftover, rewarm them for a few minutes on an oven or toaster for best texture. Leftovers are also good for breakfast, toasted with butter and jam.
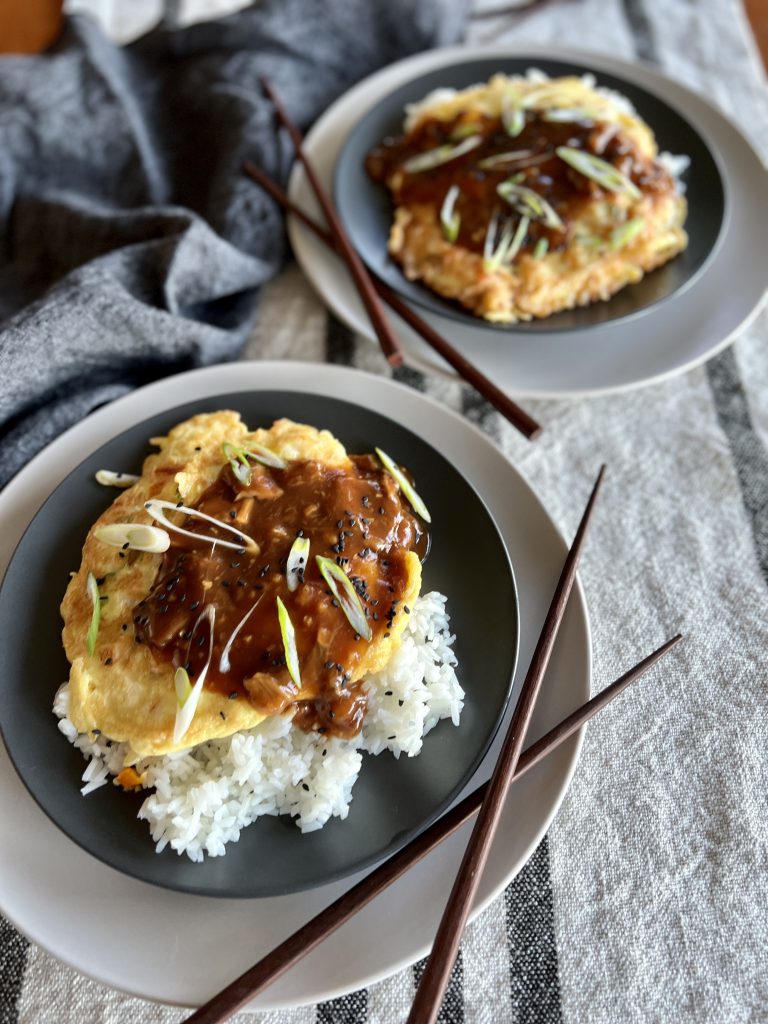
I had forgotten how much I adored egg foo young. The recipe, "Eggs, Edamame, Bean Sprouts" in Nigel Slater's 2020 book, Greenfeast: Autumn, Winter opened my aroma memory floodgates. I was taken back to very special meals in Chinese restaurants as a child.
That sent me searching the phenomenal "Omnivore's Cookbook," with its hundreds of classic and modern Chinese dishes by Maggie Zhu. Her traditional egg foo young versions include the brown sauce I remember. Approachable recipes and interesting family history fill her beautiful blog.
This recipe is a mash-up of tradition and change. Omnivore's Kitchen for tradition. Greenfeast for the addition of edamame. My own addition of making the brown sauce mushroomy.
Making Egg Foo Young at Home
Maggie Zhu's trick for getting the omelette, as she calls it, thick and puffy is to use a fair amount of vegetable oil in the pan. Her recipes say to use between 2 and 8 tablespoons of vegetable oil. Less oil will give you a flatter, less puffy, less traditionally Chinese omelette, she says, and she is right. I found that 6 Tablespoons in my 8" skillet is perfect for that tall, puffy egg foo young that I remember having in Chinese restaurants. The extra oil helps the Chinese omelette become well-browned, with the slightest crusty crispness that is more traditional.
If mushrooms aren't your thing like they are mine, omit them. Instead of the water, substitute dark vegetable or chicken stock. Here's my recipe for a rich brown roasted vegetable stock.
The edamame is optional, or peas or finely chopped broccoli can be a substitute. Egg foo Young doesn't require animal protein, so leave that out if you'd like. Once you get the hang of it, you'll see that egg foo young is more of a method than a prescription. It can be filled with any number of things, just like a French-style omelette.
The resulting egg foo young is amazingly easy, restaurant take-out fast, and powerfully delicious. I hope you like it.
Egg Foo Young
Course: Breakfast + Brunch, Main Dish, Quick + Easy
Cuisine: Chinese
Season: All Season
Dietary: Dairy-Free, Gluten-Free, Vegetarian
Preparation: Fast + Easy
30 minutesminutes
Total Time: 30 minutesminutes
Servings: 46" egg patties
A Chinese take-out favorite made in a flash at home. Fill your egg foo young with any number of fillings to suit your mood or what you have on hand.
⅓cupedamame, peas, or finely chopped broccoli, optional
3green onions, two finely chopped and one thinly sliced on the diagonal
1cupcooked shrimp, chicken, or ham, finely chopped, optional
salt and black or white pepper to taste
6Tablespoonsvegetable oil*
Instructions
Cook the Sauce
In a small saucepan, use your fingers to break the dried mushrooms into small, irregular pieces and cover them with 1¼ cups hot water. Set aside for 15 minutes. Whisk all the remaining sauce ingredients into the saucepan with the mushrooms and cook over medium heat, whisking occasionally, until the sauce simmers and thickens, about 5-6 minutes. Keep warm.
Cook the Egg Pancakes
In a medium mixing bowl, beat the eggs with a fork until well combined. Add the bell pepper, bean sprouts, chopped green onions, and shrimp, chicken or ham, if using. Season with salt and pepper.
Heat the oil* in a small skillet over medium to medium high heat. Scoop about ½ cup of the egg mixture into the skillet. Fry until golden brown, about 4 minutes per side. Repeat with the remaining egg mixture. This should make about four 6" patties.
Serve with steamed short-grained rice, spooning the mushroom sauce over the top. Garnish with sliced green onion.
Notes
This recipe is adapted from Maggie Zhu at Omnivore's Kitchen. I thank her for her delicious blog and the step-by-step guidance in learning to cook Chinese dishes. *Maggie's recipe for egg foo young says to use between 2 and 8 tablespoons of vegetable oil. Less oil will give you a flatter, less puffy traditional omelette, she says, and she is right. I found that 6 Tablespoons in my 8" kitchen is perfect for that tall, puffy egg that I remember having in Chinese restaurants.
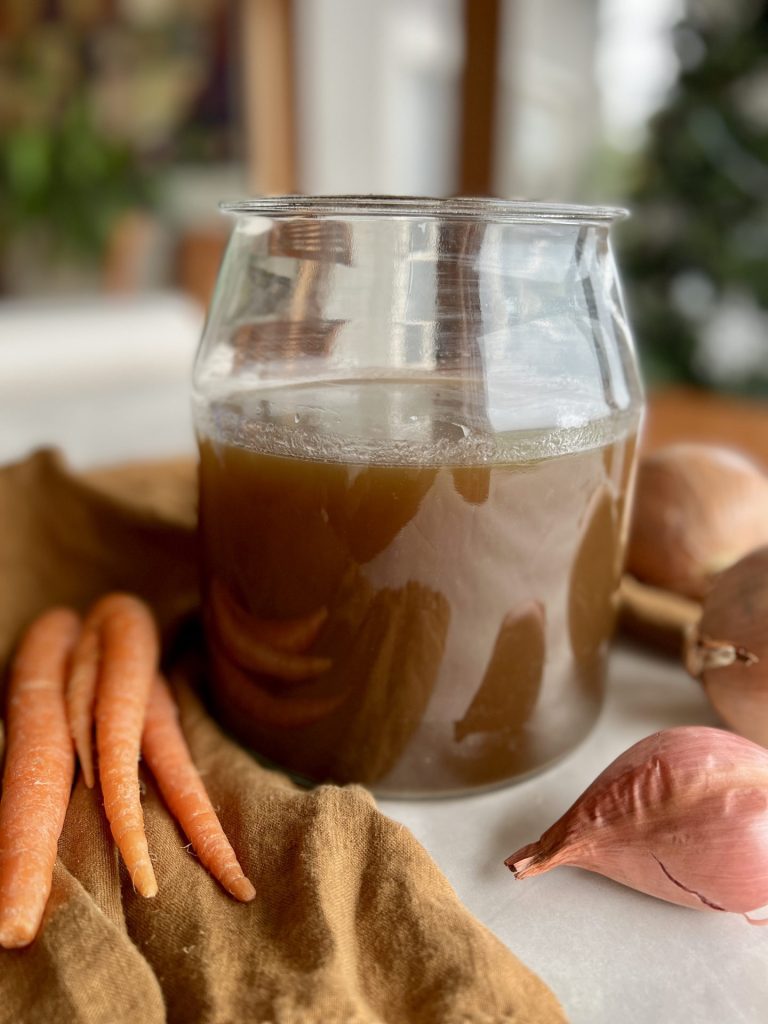
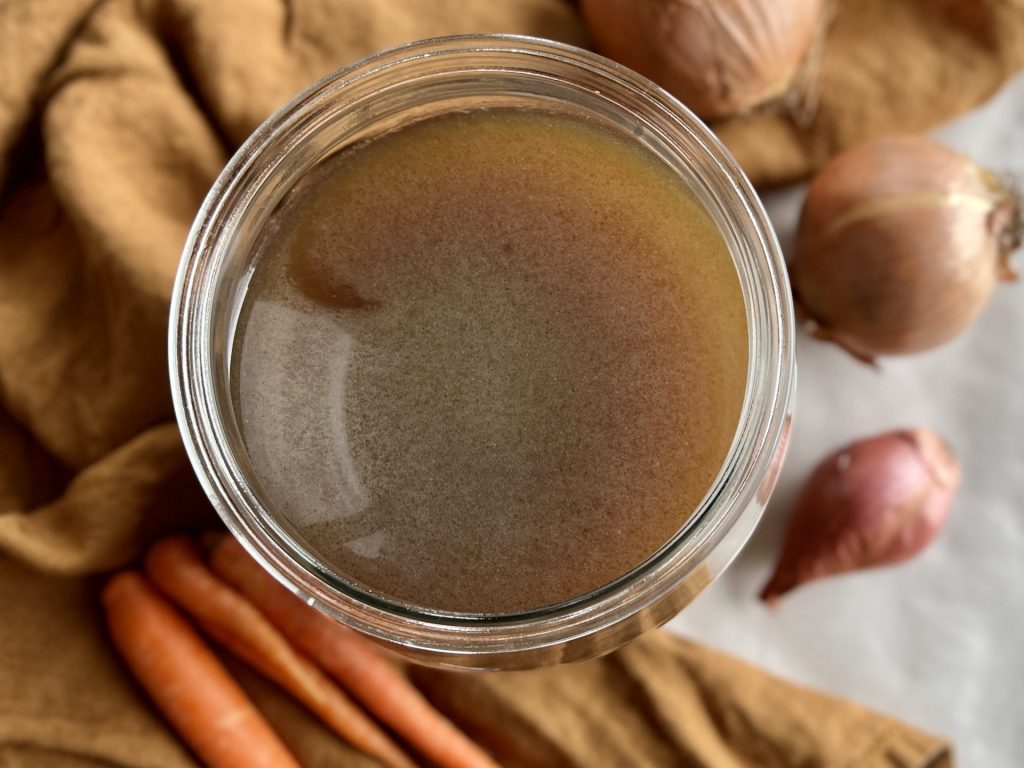
One of the graces of home cooking is that there are no paying customers demanding a dish to be exactly the same visit after visit. Each time you make roasted vegetable stock you use any variety of vegetables, bones, meats, herbs, and spices you happen to have. Each time the stock will have a subtly unique flavor. This may not work well in a restaurant, but is terrific at home.
This post is dedicated to my 1970's junior high school home economics teacher, Mrs. Waetje, who taught that reducing waste is a tenet of home economics-- a wise use of family finances. It is a great feeling to rummage through the fridge for vegetables that may otherwise go to waste and turn them into liquid gold. Thank you, Mrs. Waetje, and if you are still out there, I was paying attention despite my wiggles and perpetual chatter.
Wake up Your Cooking with Aromatic and Delectable Stock
Your roasted vegetable stock will add layers and layers of flavor to the soups and stews you make-- that's a given. Use your liquid gold to make risotto, to cook rice and grains like barley, farro, and buckwheat groats. Use it as a medium in which to simmer your dried beans, and as a base for meaty braises. A ladleful added to just about any ragu or stew will deepen its flavor. And one of my favorite things is to cradle a hot mug of broth first thing in the morning as a gentle winter wake up tonic.
The Difference Between Unroasted and Roasted Vegetable Stock
Roasting the vegetables before the simmer produces a deep, richly flavored stock perfect for supporting heartier cool-weather ingredients and recipes. Save the light golden unroasted vegetable stocks for spring and summer cooking. To make a typical light golden broth, simply do not roast the vegetables first, and omit the mushrooms. Follow the remaining directions as they are written.
So, potayto, potahto. Make some, enjoy it, and call it whatever you want. To me, spring and summer cooking seems to lend itself to light broths, autumn and winter to rich, brown stocks. The cooking community seems to agree that the terms are interchangeable. Whatever rolls out of my mouth is the term I'll use!
Vegetable Stock Do's and Don'ts
The very thrifty among us (like Mrs. Waetje, I'm sure) keep a zip-bag in the freezer and stuff clean, vegetable scraps into it. When it's full it is time to make stock.
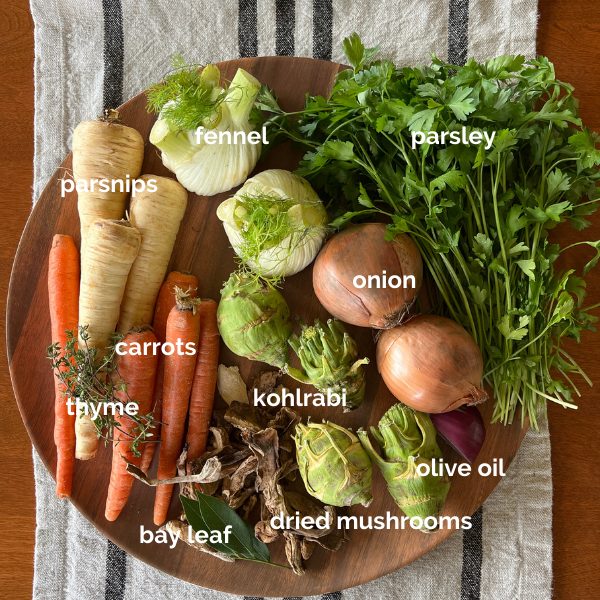
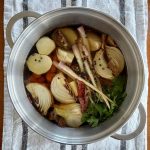
Classic mirepoix-- onion, carrot, and celery are standard issue in stock making. (You will note the absence of celery in the mis en place photo below. I didn't have any, and it is not noticeably missed in the resulting stock.) See the notes section of the recipe for a more comprehensive list of vegetables and optional ingredients that can contribute to great stock.
Most vegetables make a good stock, with a few exceptions; Brussels sprouts, broccoli, cauliflower, asparagus, and artichokes can be overpowering or add off-putting flavor notes, so avoid them for this purpose. Beets, especially red ones, will likely make your stock an odd and unappealing color, so think twice about throwing those into the pot. Potatoes are fine, but I don't use them to keep the stock a little more clear than cloudy, a personal preference.
Mushrooms are lovely in a roasted vegetable stock. Dried mushrooms, even better! Just one ounce of dried mushrooms (don't roast them-- just add them to the pot with the water) intensify the rich flavor and add a deeper color to the stock. They are not required, but do add something nice and grounding.
Limp, wilted, scuffed, and past-their-prime vegetables are all fair game. Just be sure to peel or cut off any parts that have blackened or have signs of mold to keep your broth clean and fresh tasting.
Not pictured in the mis en place photo for this batch of roasted vegetable stock are late additions of icicle turnips, a knob of fresh ginger, two arbol chiles, and the left-over rind of a Meyer lemon.
Use Your Roasted Vegetable Stock in These Recipes
To cook the grain in Roasted Mushroom, Grain, and Spinach Salad. Get the Recipe. In place of the water in Pumpkin Black Bean Soup. Get the recipe.
Last Words
If you like this recipe, please give it rating by clicking into the green stars, and if you have questions about the recipe or other culinary dilemmas, please email me at pam@101milekitchen.com. Your success is important to me. Thank you to each and every one of you who subscribes to 101-Mile Kitchen newsletters. You are appreciated more than you'll ever know!
Roasted Vegetable Stock
Course: Soup + Stew
Season: Mist (November - March)
Dietary: Dairy-Free, Gluten-Free, Vegan
Preparation: Roasting
Total Time: 2 hourshours15 minutesminutes
Servings: 2quarts
Deep, richly flavored roasted vegetable stock provides perfect support to hearty cool-weather ingredients and recipes.
1teaspoonkosher salt, plus more for adjusting at the end
1teaspoonwhole black or mixed peppercorns
1 bunchparsley, flat leaf or curly, stems trimmed
assorted fresh herbs of your choice, about one bunch total, OR dried herbs of your choice, up to 2 teaspoons
1ouncedried mushrooms, any variety, optional
1-2bay leaf
other optional ingredients of your choice. See notes.
2½quartswater
Instructions
Preheat oven to 350°, or 325° convection. Line a 13" x 18" baking sheet with foil.
Wash the vegetables and trim away any spoiled parts. Cut the vegetables into evenly sized chunks and place them on the foil-lined baking sheet. Sprinkle lightly with salt and a good drizzle of olive oil, up to 3 Tablespoonsful. Mix gently together with your hands. Place the sheet into the oven and roast for about 40 minutes, or until the onions and other vegetables are beginning to take on some roasted color and are quite fragrant, stirring halfway through.
Place the roasted vegetables and any browned stuck-on parts and oil that remain into an 8 quart stockpot. Add the salt, peppercorns, fresh or dried herbs, dried mushrooms, if using, bay leaves, and water. Bring the pot to a rapid boil, and immediately reduce heat to maintain a simmer. Cover, and cooking for 1-2 hours, stirring often. Remove the lid for the last half of cooking.
Taste the stock and adjust seasoning by adding more salt if necessary. Allow the stock to cook slightly until safe to handle.
Strain the stock first through a colander to remove the larger bits, then strain again through a very fine mesh strainer to remove the tiny bits that make it cloudy. Store in the refrigerator for up to 5 days, or freeze for up to three months.
Notes
Vegetable selection:Classic mirepoix-- onion, carrot, and celery are standard issue. Most vegetables make a good stock. Do use the leaves, peels, skins, and stalks of leeks, garlic, peppers, parsnips, turnips, squashes, fennel, kohlrabi, tomatoes. Corn and corn cobs and celery root, are good additions, too. Think twice about using Brussels sprouts, broccoli, cauliflower, asparagus, and artichokes which can add overpowering off-putting flavor notes. Potatoes are fine, but omitting them will keep the stock from becoming too cloudy.Mushrooms are lovely in a roasted vegetable stock. Dried mushrooms are even better! Just one ounce of dried mushrooms (don't roast them-- just add them to the pot with the water) intensify the rich flavor and deep color to the stock. They are not required, but do add something nice.Optional additions:Rinds (not the juicy flesh) of citrus, especially lemon and orange.Nubs of fresh ginger and/or turmeric.Dried chilis of any variety. I find a couple small arbols add a very subtle warmth. The larger dried chilis will make a marked flavor difference and would be fantastic as a tortilla soup base, for example. Varied fresh herbs. Nearly all herb will make a nice flavor contribution, but do be careful with some of the more overpowering herbs such as rosemary and oregano. A little can go a long way.Dried herbs are much more condensed in flavor than fresh, so a little goes a long way here, too. But do use them!Juniper berries are wonderful in a stock. Add up to 1 teaspoonful, gently crushed to release even more of their wintry flavor.
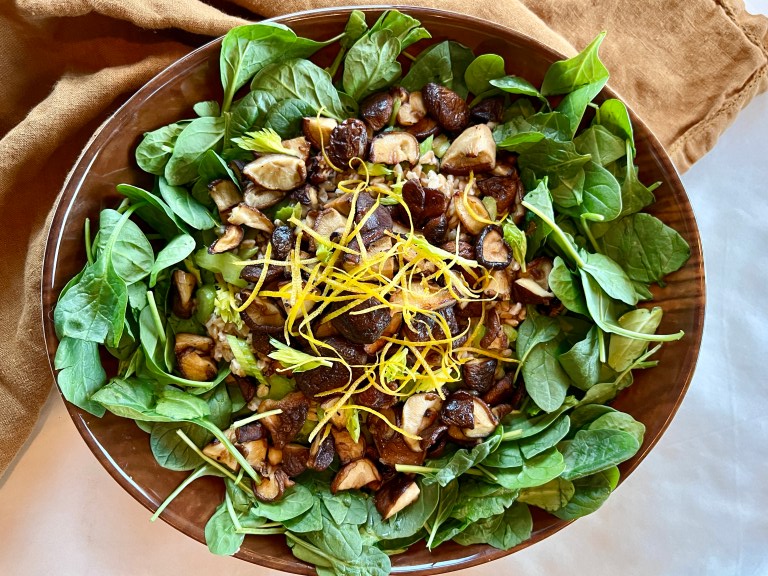
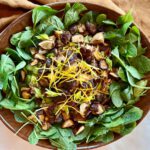
Feasts, cookie platters, cocktail parties, and office holiday goodies, oh my! As fun as it is, it doesn't take long to feel the overwhelm of holiday system overload, just when the mood of the day calls for merry and bright. As a remedy to seasonal splurges, include a salad of roasted mushrooms, warm grains, and baby spinach into your menu this week.
Making the Roasted Mushroom, Grain and Spinach Salad
This quick little main-course salad starts with four easy-to-come by ingredients and a light but flavorful lemon vinaigrette. The vinaigrette is made even better by using Meyer lemons, just coming into peak season.
Here I go on about celery again. Celery adds an essential textural crunch to this dish, and a bit of delicious freshness that you will welcome to your winter plate. I view this as this as a subtle necessity.
In the extraordinary Pacific Northwest food playground we have easy access to an array of cultivated and wild mushrooms. One trial of this recipe I used a shiitake-only approach. Another trial used a melange of chestnut, oyster, shiitake, and crimini mushrooms. I loved it both ways. If you can only access white buttons or brown criminis, please use them! Your dish will be as delicious as ever.
You have a lot of running room when it comes to the grain you use in your roasted mushroom salad. I used Purple Valley Barley, an organic product from my local Lonesome Whistle Farm. Lonesome Whistle also carries wheat berries, emmer (a farro) and oat groats that would be perfect. If you are new to this type of thing and eat gluten, I suggest starting with pearled barley, or just jump right in and try one of the above grains. If you eat gluten-free, give buckwheat groats or brown rice a try.
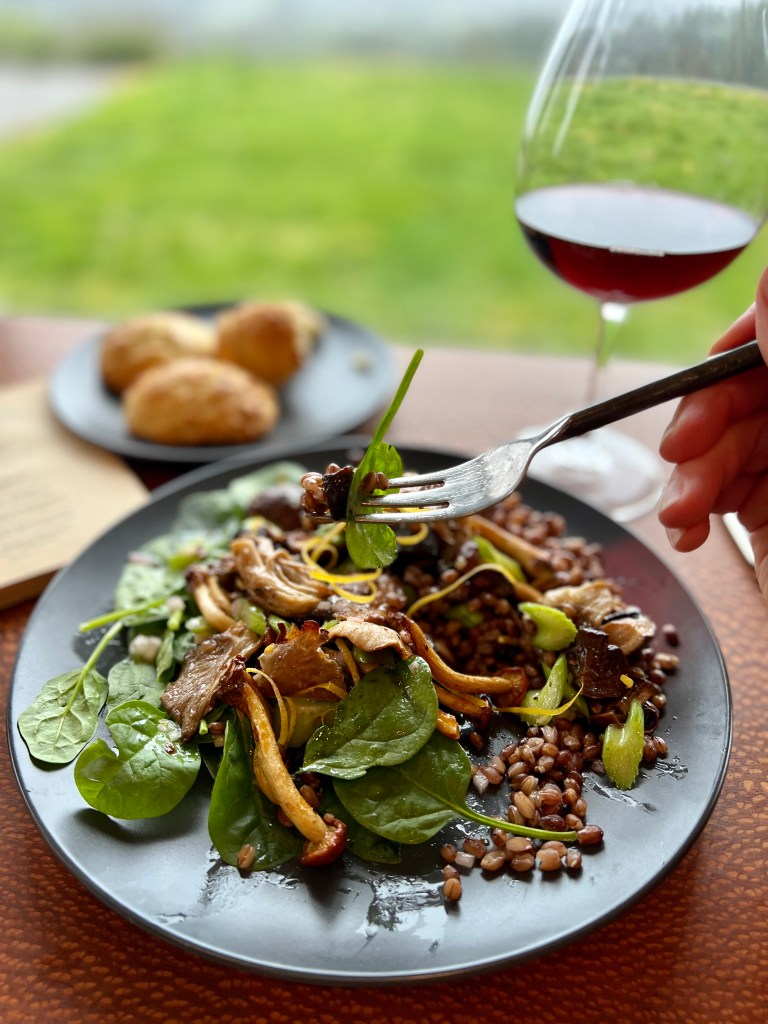
What Wine Should I Serve with Roasted Mushroom, Grain, and Spinach Salad?
I started off suggesting a mushroom, warm grain, and spinach salad as a detoxifying healthy choice, so maybe through the holidays consider a tonic of pomegranate juice and sparkling water? Or not! I highly suggest the Artisanal Wine Cellars 2015 Dukes Family Vineyard Pinot Noir. Tom and Patty Feller, and their daughter, Mia, are a family operation dedicated to handcrafted expressive wines. The grapes in this bottle were grown by Pat and Jackie Dukes of Dukes Family Vineyard. We view the Artisanal's Pinot Noirs to be beautiful wines at incredible values.
Roasted mushrooms, warm chewy grain, and fresh spinach dressed in the best ever lemon vinaigrette. This fantastic fast and easy layered salad is hearty enough for satisfying cool weather meals, light enough to counterbalance seasonal feasts and spurges.
1½lb.mushrooms of your choice, singularly or in combinationcrimini, shiitake, chestnut, chanterelle, hedgehog, button, etc.
5stalkscelery, and leaves if your head has them
1cupwhole grain of your choice, prepared according to package directions and kept warm*barley; emmer, spelt, or einkorn farro; wheat berries; oat or buckwheat groats; brown, black, purple, red, or wild rice, etc.
8-10oz.fresh baby spinach
lemon vinaigrette, recipe below
zest of 2 lemons, in strips
Best Ever Lemon Vinaigrette
½cuplemon juice, Meyer lemon preferred, zested firstabout 2 large lemons
2clovesgarlic, pressed or very finely minced
1shallot, finely minced
tsp.maple syrup
salt and pepper to taste
Instructions
Preheat the oven to 400° convection. Line a baking sheet with foil and spray it with oil or non-stick spray.
Begin cooking your chosen grain according to package directions. (For example, quick-cooking par cooked farro from Trader Joes takes 10 minutes to cook; unhulled barley takes up to 40 minutes.) Once it is cooked, keep it warm while the other steps come together.
Prepare the Best Ever Lemon Vinaigrette, recipe below.
Wipe mushrooms clean and trim them if necessary. If you are using shiitakes, remove the stems. Leave the small ones whole, cut the medium-sized ones in half, and the largest ones into quarters for similarly sized pieces that will roast at the same rate. Place them in a heap on the prepared baking sheet. Spoon about ¼ of the lemon vinaigrette over the mushrooms. Use your hands to toss the mushrooms in the vinaigrette, coating each piece lightly and evenly. Spread the mushroom pieces out on the pan, and place in the oven. Roast for 12 minutes, remove from the oven and stir. Spread them out again and roast them for another 10 minutes or so until they are deeply colored and their juices have almost evaporated. Don't leave them much longer than this or they will lose their tenderness.
While the mushrooms are roasting, thinly slice the celery and set aside. When the grains are cooked and drained, stir in ¼ of the vinaigrette and continue to keep gently warm. Place the spinach on the platter or individual plates.
When the mushrooms are done roasting, add the sliced celery and give it a good toss. Spoon the dressed grains in the center of the plate, and top with the mushroom/celery mixture. Drizzle a little more of the vinaigrette over the layered salad.** Garnish with strips of lemon zest, which are not only eye-catching, but add a delicious flavor note. Serve while warm.
Make the Best Ever Lemon Vinaigrette
Combine all ingredients on a pint-sized jar with a tight fitting lid. Shake until the salt and maple syrup are dissolved. Shake before each use.
Notes
*I've made this recipe using organic locally-grown barley, with buckwheat groats, and with a package of "10-Minute Farro" sometimes found at Trader Joes. Follow the package directions for any grain you use for both serving size and cooking times. **You will have a little of the vinaigrette left over. Don't be sad about this-- use it on your next kale or lettuce salad, on top of baked or broiled fish, or to dress a pan of roasted vegetables. When Meyer lemons are in season, be sure to use them. The typical Eureka or Lisbon lemons are wonderful, too, but Meyers offer a step up in flavor.I recently found that the water that remains when cooking whole-grain barley is delicious as a sipper. Cook the barley "pasta-style" floating freely in a pot of water, and reserve the water. It's as tasty as any stock, and can be used as a soup base or warming cup. This recipe is easily halved and easily doubled. If you double it, use two sheet pans to roast the larger amount of mushrooms.
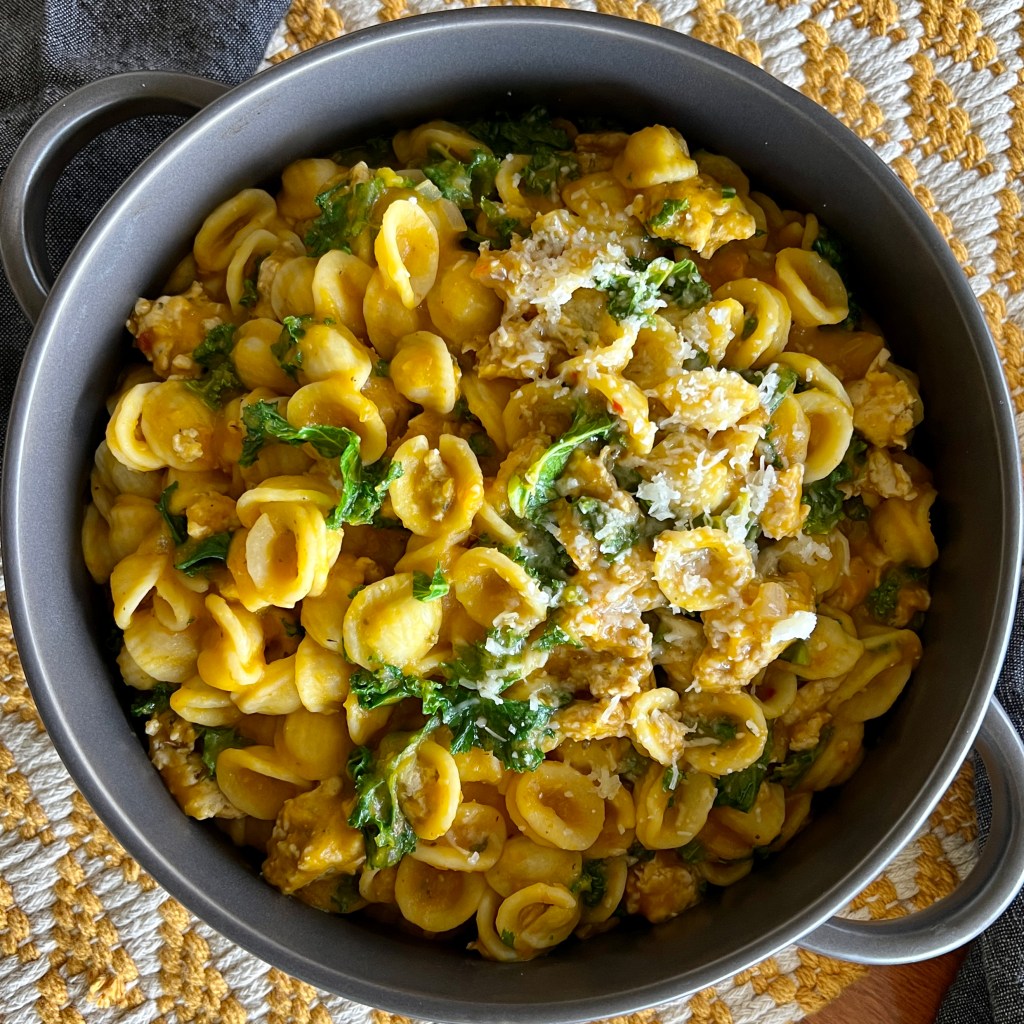
Are you ready for a true confession?
I rarely cook from a recipe. The first time I made this Pumpkin + Homemade Chicken Sausage Pasta there was no script. I tell you this so you understand my process of getting a recipe from my brain to your screen-- one that I know will work for you at home and that you can trust. A recipe that will hopefully make it onto your table.
How an Idea Becomes a Recipe
A new recipe concept starts with thinking and dreaming about the flavors, colors, scents, and textures of ingredients. This work happens when I'm asleep and when I'm awake-- all the time! All that I have learned in over 50 years of cooking and eating informs how a new recipe idea comes together.
Step One
Intuition led the way when I first made this marigold Pumpkin + Homemade Chicken Sausage Pasta, like with most things I cook. I found it warm and comforting. It was delicious enough to share, and didn't take a fortnight to make, and so on to trial number two.
Step Two
The second run is where I pay keen attention to quantities, timing, and cooking nuances you might want to know that will ensure success. Paper and pen are right next to me noting details as I work it through. At this stage I ask myself some hard questions: Is this really the kind of recipe you might want. Does this recipe create a solution for you? Will it delight you and your family and guests? Is it a thing you might really make at home? How can I instill confidence and cheerlead you through the steps?
Pumpkin + Homemade Chicken Sausage Orecchiette
Step Three
When I agreed with my initial idea that you might really like this recipe, I moved on to a third Pumpkin + Chicken Sausage Pasta trial. Once again I prepare the recipe again from my notes, writing down any new thoughts or learnings that come. This is the step where I photograph the process using natural light and no filters-- no spin or tricks. Then off I go to write up the recipe in standard format for you.
Lastly and most importantly, I invite your feedback. If a recipe step is unclear, if there is something that you loved or that didn't go right, or if you have an idea that you tried that made it even better, I'm all ears! Please email me at pam@101milekitchen.com. I warmly welcome your comments on the post, too. Every time you leave a star rating on the recipe you help others find it through the Google maze. I value that, as well. In short, you are at the center of my work.
Making the Pumpkin + Homemade Chicken Sausage Pasta
Please don't let the idea of making sausage intimidate you. It is as fast and easy as adding a few herbs and spices to some purchased ground meat. Try it with ground pork or turkey if you prefer. I just happen to like the lightness of the chicken with this ample portion of pasta. Casings or fancy techniques are not called upon. This particular spice blend was borrowed from a recipe I wrote about years ago.
The sausage recipe is versatile. Roll it into meatballs. Brown it and use it on pizza, salad or in other pastas. Form it into patties to snuggle into a bun or next to your breakfast eggs.
Pumpkin puree is easy to do at home. Click here for link to a Facebook Live video of me explaining the easy process of making pumpkin puree from scratch. Laugh along with me at my very first and awkward Facebook Live tutorial! However, feel free to use canned pumpkin puree if that works best for you. The recipe uses two cans of solid-pack pumpkin puree (just one if you want to cut the recipe in half.) Recipes that aren't scaled to use an entire can of something that will otherwise go to waste are simply annoying.
Wine Pairing with Pumpkin + Chicken Sausage Pasta
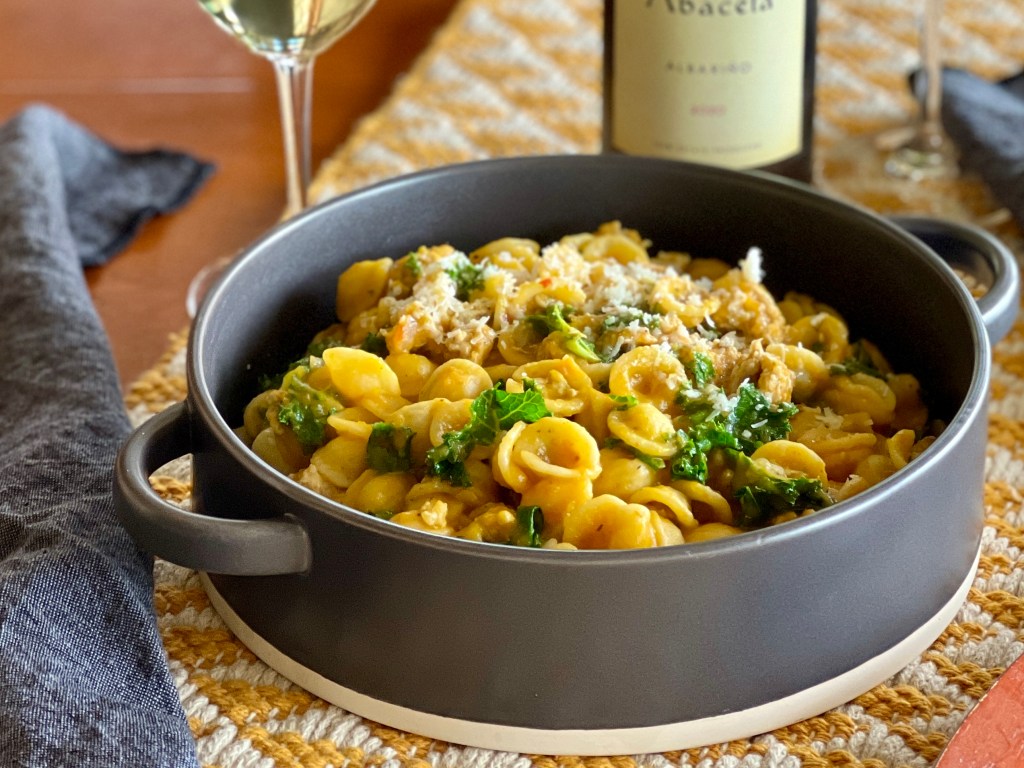
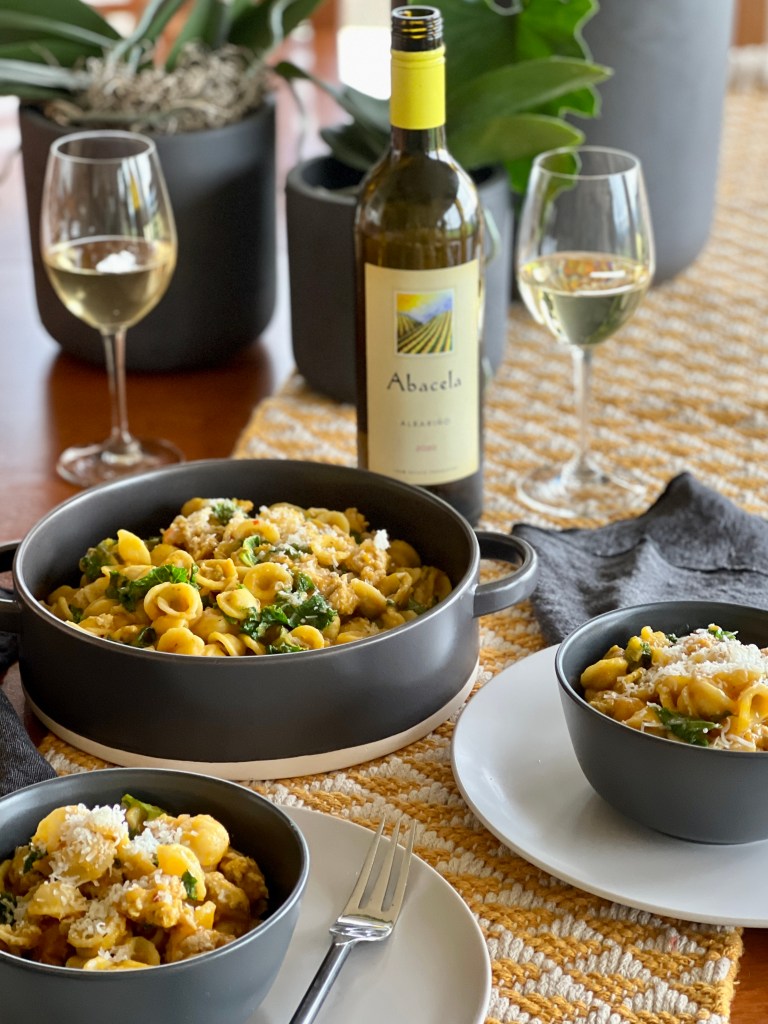
When you are looking for a wine-friendly autumn dish, Pumpkin + Homemade Chicken Sausage is it. A light Italian or Rhone red would be lovely, or any number of dry white wines. Award-winning Abacela Albarino 2020 from Oregon's Umpqua Valley is just lovely with the dish. You'll find this light and dry Albarino with no residual sugar and just 13% alcohol, to be a beautifully complimentary weight for this lighter pasta. Fresh fruit and floral aromas and a nice acidity bring the experience into graceful balance.
1lb.orecchiette or other small pastause gluten free pasta if you choose
2Tbsp.olive oil
1largeshallot, minced
3cupspumpkin puree (two 15 oz. cans)
½cupdry white wine
1bunchcurly or lacinato kale, large ribs removed, chopped into 1" pieces
salt + pepper to taste
Instructions
Make the Sausage
Crumble the ground chicken into a mixing bowl. In a small bowl, mix remaining herbs and spices. Sprinkly the herbs and spices over the ground chicken and drizzle with the olive oil. Rinse your hands in cold water and gently knead the spices into the ground chicken until thoroughly combined. Set aside.
Make the Pasta and Sauce
Put a large pot of generously salted water on to boil for the pasta. While the water comes to a boil, in a wide pan brown the sausage mixture in olive oil-- enough to cover the bottom of the pan. Stir frequently, breaking up the sausage into bite-sized bits. This should take 6-8 minutes. Remove cooked sausage and juices to a plate and set aside.
In the same wide pan heat another swirl of olive oil. Saute the minced shallot in the olive oil until tender and translucent, about 3 minutes. Add the pumpkin, white wine, and salt to taste. Stir together and heat until gently bubbling.
When the water is boiling, add the pasta and cook according to package directions. This may happen before or after the pumpkin mixture has come together.
When the pasta is cooked al dente (it will finish cooking in the sauce, so don't overcook it!) reserve 2 cups of the pasta cooking water and drain the pasta. (Don't forget this step, as it helps make a beautiful silky sauce!) Drain the pasta and return it to its cooking pot.
Add the chopped kale and cooked sausage and its juices back into the pan with the pumpkin mixture and stir in one cup of the pasta water. Scrape the sausage/pumpkin mixture into the cooked pasta and stir. Add enough more of the reserved pasta water to create a smooth, silky sauce that evenly coats the pasta. The pasta will continue to absorb the liquid, so be generous. Adjust salt and pepper. Serve in a large serving dish or in individual pasta bowls.
Notes
It is conceivable to garnish this dish with grated Parmesan or Romano cheese, however my cheese-loving husband says this is the "cheesiest pasta with no cheese" he's ever eaten! Omitting it makes the dish dairy-free. If you'd prefer, you can use store-bought hot Italian chicken sausage, but this is such an easy and delicious sausage recipe I do hope you'll give it a try.
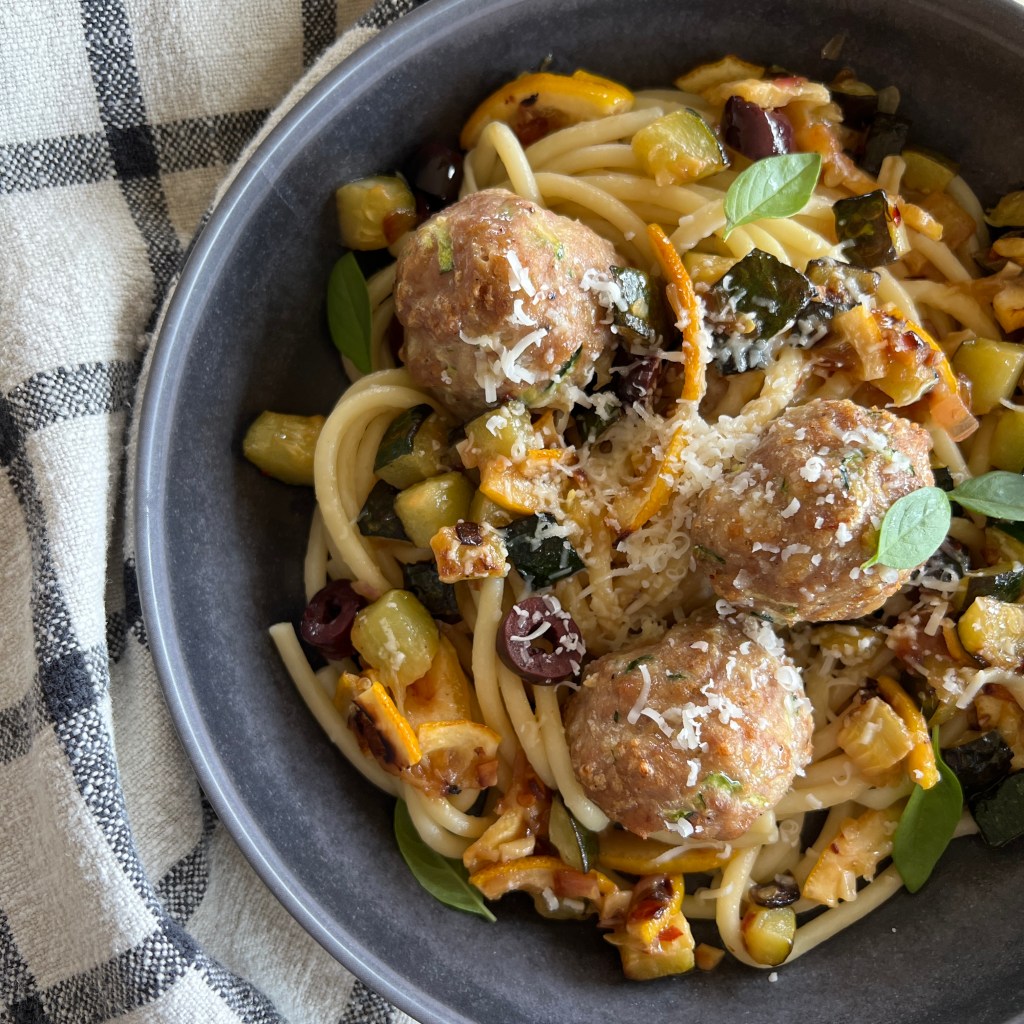
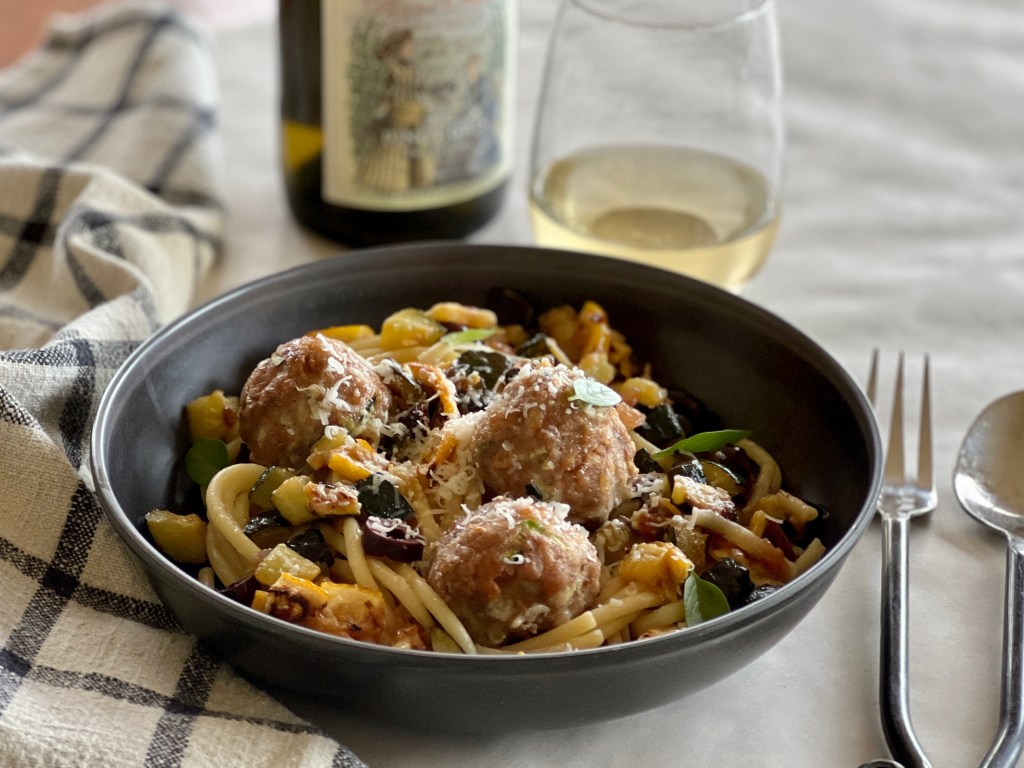
Turkey Meatball + Roasted Lemon Zucchini Pasta is one of the tastiest recipes you can have in your weeknight toolbox. Pop these juicy meatballs into the oven and they'll be done in twenty minutes-- as long as it takes to get the rest of the dinner together. This fun and exciting weeknight meal is ready in under an hour, but is definitely company-worthy.
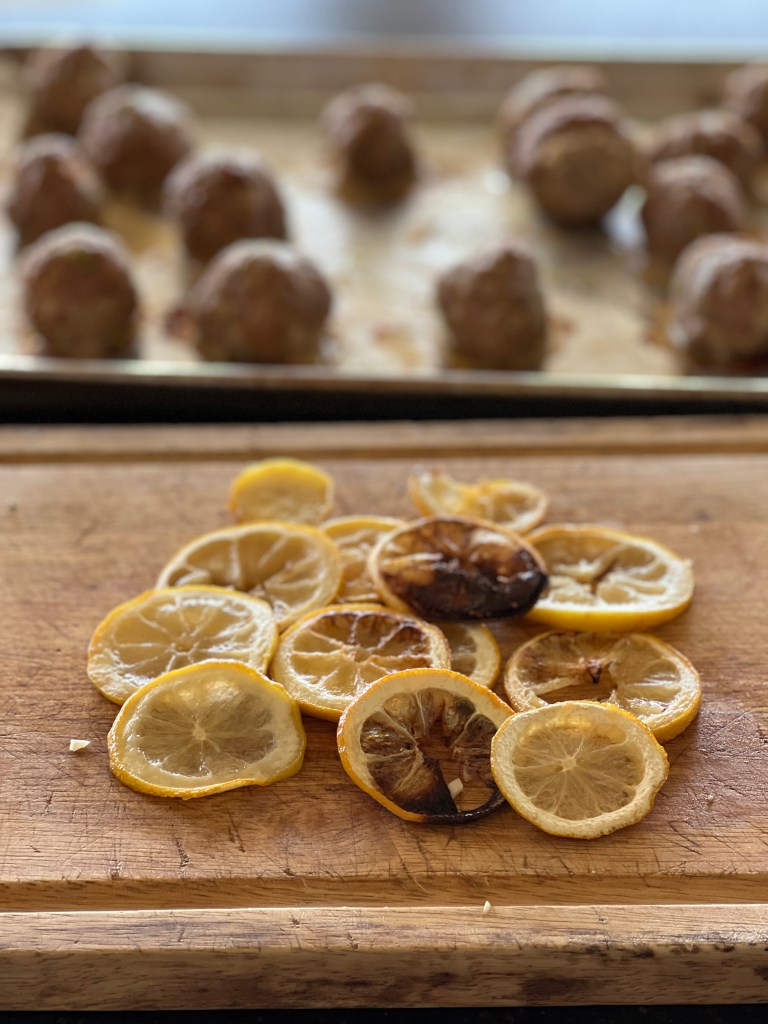
Lemon slices roast alongside the meatballs, then are chopped and added to the sauce with briny chopped olives to give this simple dish huge flavor for the amount of effort it takes.
Our household is not yet ready to make the shift to an entirely plant-based diet, but we make incremental steps in that direction. This turkey meatball and roasted lemon pasta is chock full of zucchini. The turkey meatballs hold a lot of zucchini which lightens the meatballs. Reduce and replace the volume of turkey with even more zucchini if that's where your dietary choices are taking you. In the future I'll be experimenting with replacing the turkey with mashed beans for a completely meatless "meatball."
Making the Turkey Meatball + Roasted Lemon Zucchini Pasta
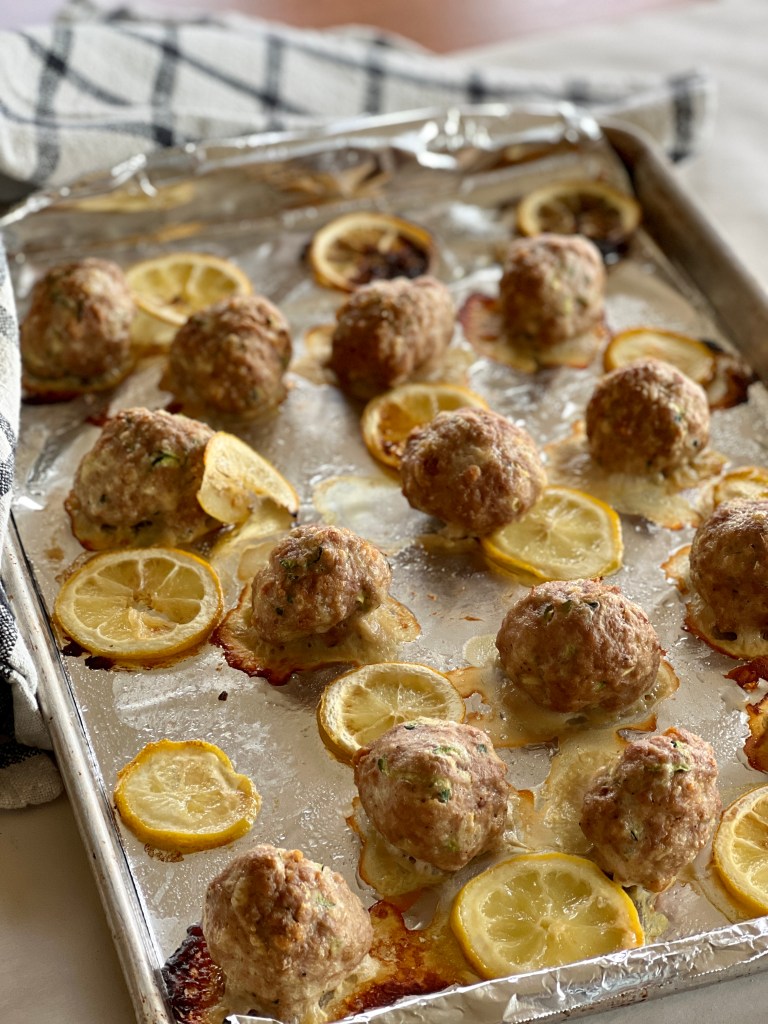
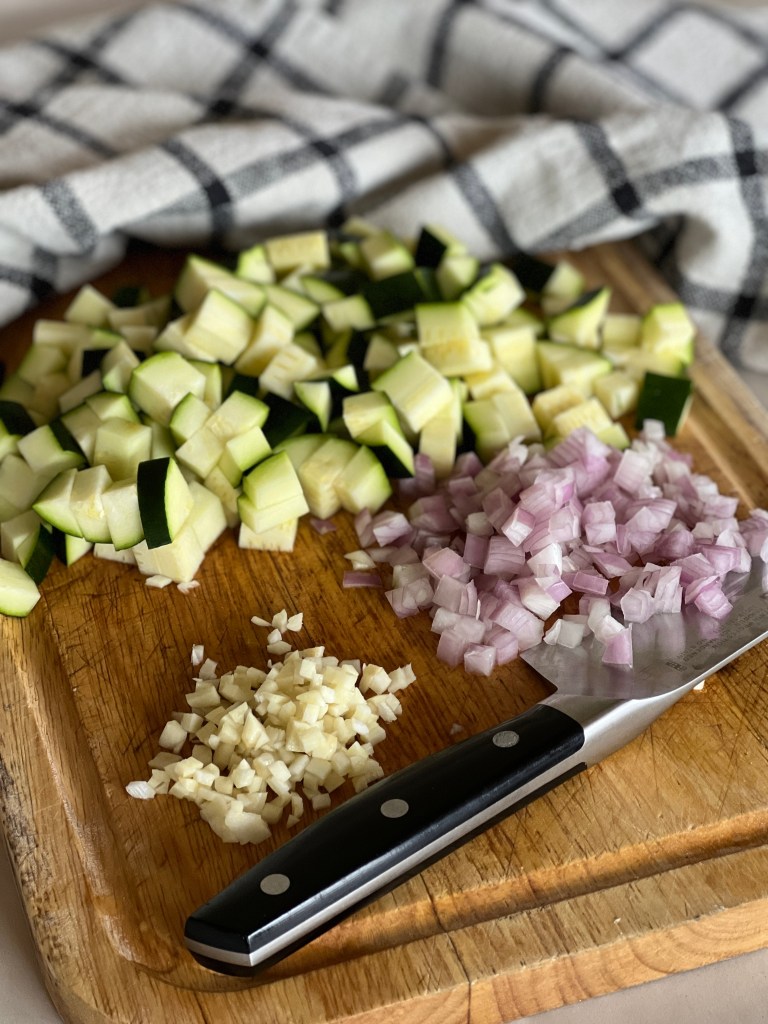
Meatballs and sliced lemon roast together; Roasted lemon will go into the sauce; Prepping the vegetables for the sauce; Quickly saute the sauce while the meatballs roast and the pasta cooks; Toss the cooked pasta into the sauce with some of its cooking water.
First, form the meatballs and lay them out on a sheet pan with the sliced lemon which will go into the sauce after it roasts. The meatballs and lemon roast together while a pot of water boils for the pasta and a simple robust mediterranean sauce sautes. Then toss together the pasta and sauce with some of the pasta cooking water. Then top it off with the meatballs, and viola-- dinner is served.
A few common ingredients are all it takes for this easy weeknight pasta.
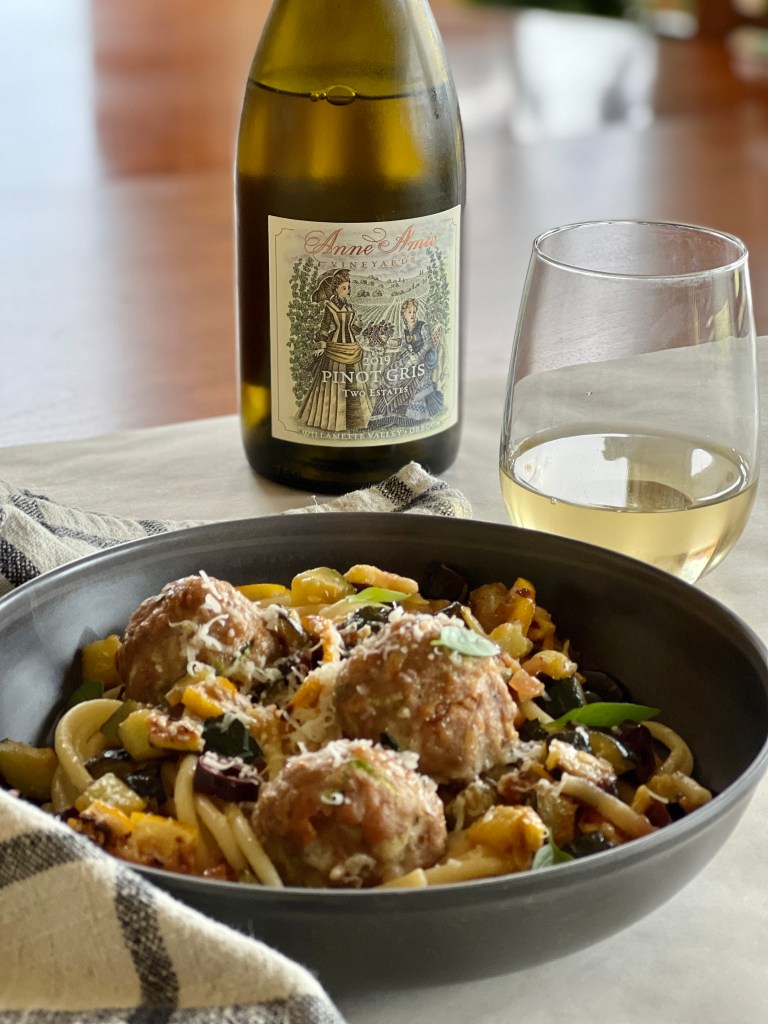
What Wine Shall I Serve?
Turkey meatballs and roasted lemon zucchini pasta is perfect with Anne Amie 2019 Pinot Gris.
The mediterranean flavors in the sauce-- garlic, condensed roasted lemon, and Kalamata olives-- were perfect with the Willamette Valley wine producer Anne Amie2019 Pinot Gris. 15% of the Pinot Gris barrels in this vintage were fermented in neutral barrels and aged on the lees, giving it a soft, round mouthfeel not often found in a Pinot Gris. This very enjoyable wine is found within our 101-mile sourcing radius!
In general, a dry white wine with some citrus and minerality will be a perfect match. Experiment and have fun finding those that you most enjoy.
Turkey Meatball + Roasted Lemon Zucchini Pasta
Course: Main Dish
Cuisine: Italian, Mediterranean
Total Time: 55 minutesminutes
Servings: 4
Tucking a little zucchini into the meatballs lightens this hearty, comforting pasta dish that is loaded with delicious bright flavor. Less than an hour from start to finish makes it easy enough for a weeknight, but it's fancy enough for company.
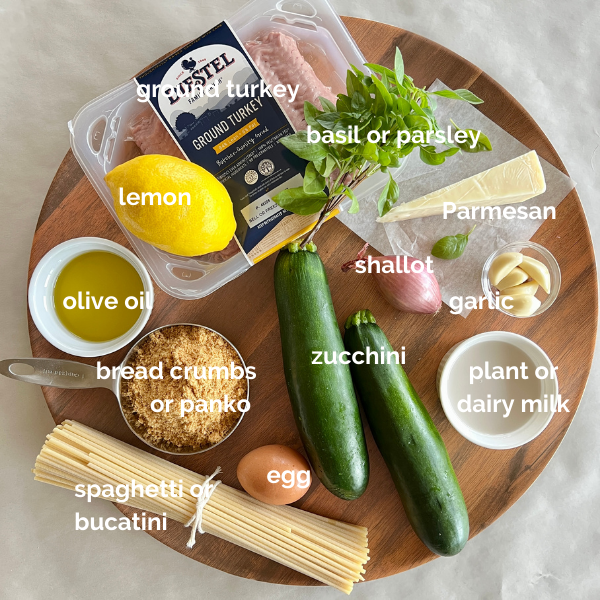
1 cuppanko or purchased bread crumbsboth are available in gluten-free options
¾cupmilk, dairy or plant
1large egg
1 ½cupsgrated zucchinisqueezed of moisture in a clean kitchen towel
1poundground turkey94% lean will be juicier than 99% lean
1 ¼cupfinely grated parmesan cheesereserve ¼ cup for serving. For dairy-free, replace this with 1-2 Tablespoons nutritional yeast.
2clovesgarlic, pressed
1teaspoonsalt
1teaspoononion powder, optional
1largeor two smaller lemons, sliced 1/2›" thin
For the Pasta and Roasted Lemon Sauce
¾poundspaghetti or bucatinior gluten free pasta
extra virgin olive oil
3-4cupszucchini, diced in about 1/4" pieces
1shallot, finely diced
4 cloves garlic, finely minced
1teaspoonsalt
½teaspoonred pepper flake
1/2cupKalamata olives or other black olives, roughly chopped
roasted lemon slices, above, chopped into small piecesthe lemon slices will roast at the same time at the meatballs, so they are included in the above ingredient list
Chopped flat-leaf parsley or basil for garnish
Instructions
Make the Meatballs
Line a sheet pan with foil and spray it with oil spray. Preheat the oven to 375°.
In a large mixing bowl stir together the panko and milk and let rest for 5 minutes while the crumbs absorb the milk. Add the squeezed grated zucchini, turkey, 1 cup parmesan, garlic salt, and onion powder, if using. Mix everything together with you hands until thoroughly combined.
Use an ice cream or cookie scoop to form the meatballs, rinsing your hands in cold water to smooth the balls and place them on the sheet pan. (This makes 12-14 meatballs, depending on the size of your scoop.) Place lemon slices around the meatballs on the foil-lined sheet. Bake the meatballs for about 20 minutes, or until they are lightly browned and the lemon slices have softened. Some of them may have browned edges.
When the lemon slices are cool enough to handle, stack them up on a cutting board and cut them into quarters. Set aside for the sauce.
Make the Pasta and Roasted Lemon Zucchini Sauce
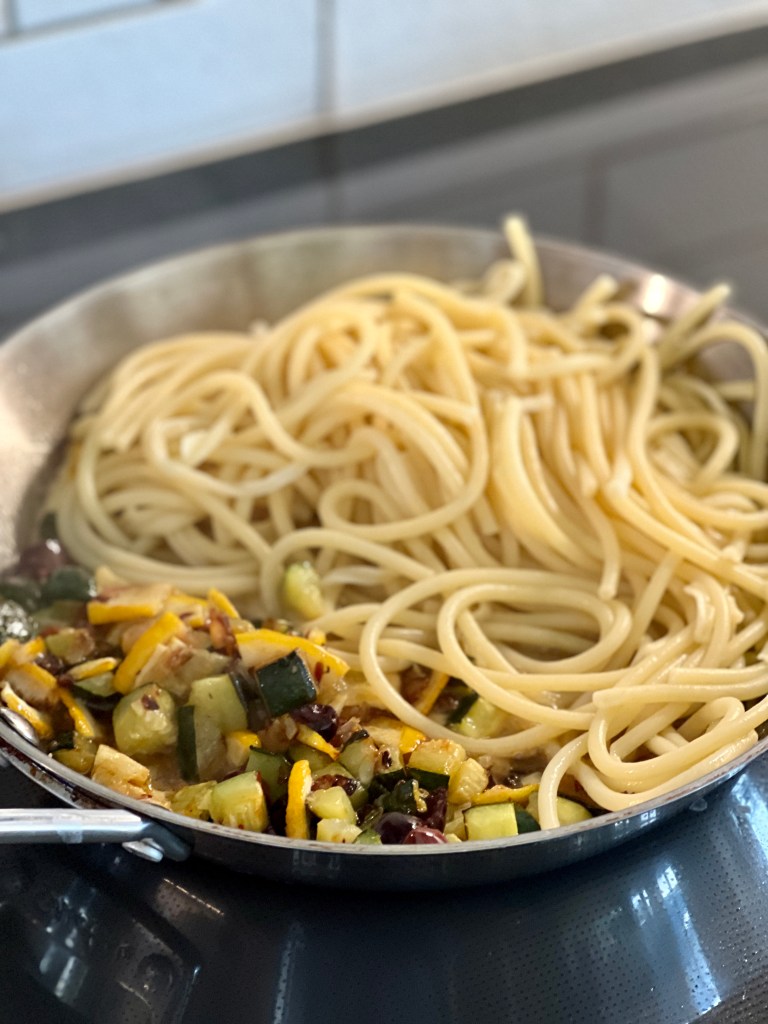
While the meatballs are in the oven, bring a pot of water to boil and cook the pasta according to package instructions. Reserve one cup of pasta water.
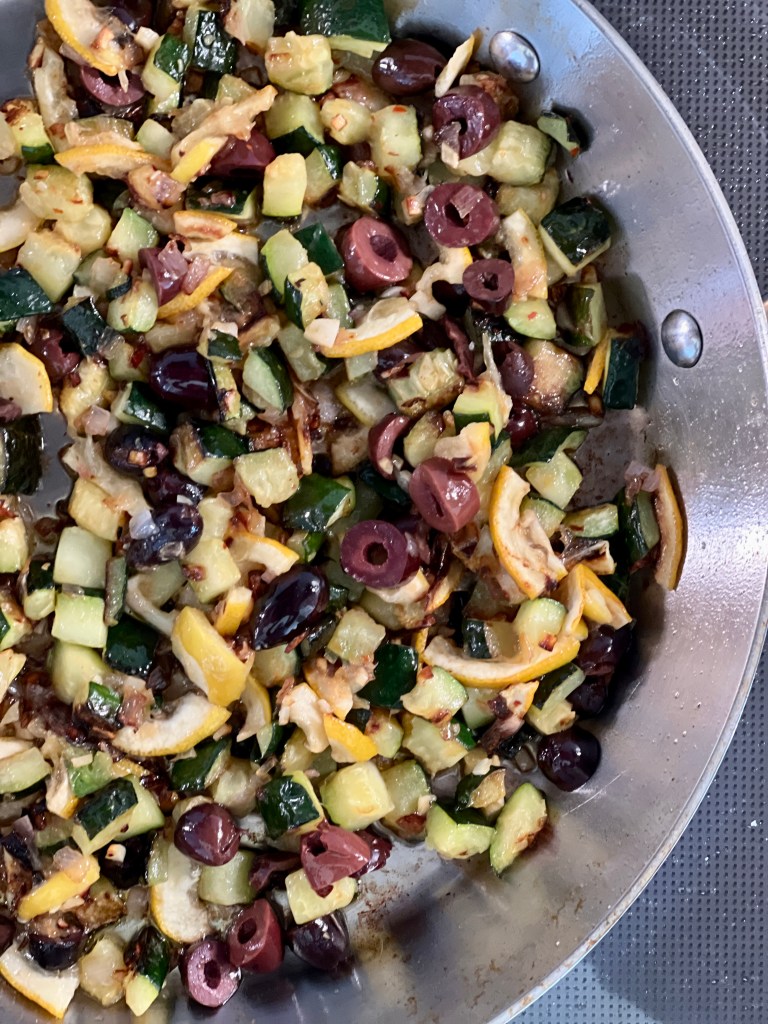
While the water is boiling, place enough olive oil to amply cover the bottom of your largest skillet over medium-high heat. It may seem like a lot, but the oil will become your pasta sauce so be generous. When the oil is hot add the zucchini, shaking the pan to settle the zucchini in to the pan. Leave it to brown without stirring for 2 - 3 minutes. Stir the zucchini around and shake the pan again, and add the shallot, garlic, salt, and red pepper flake on top. Adjust the temperature if needed to allow the browning to continue without burning, stirring every 2 minutes or so until all the vegetables are lightly caramelized and cooked through, about 8 minutes total.
With the heat still on the skillet, add the Kalamata olives and reserved roasted lemon to the zucchini mixture. Use tongs to lift the al dente pasta into the skillet with the sauce. Add ½ cup of the pasta water and use tongs to mix the sauce and pasta together. As the water absorbs you may want to add the rest of the water, tossing the pasta and sauce together as it becomes silky and coats the pasta.
Serve the pasta and sauce on plates or bowls, and nestle in the meatballs on top. Garnish with the remaining parmesan and parsley or basil. Drizzle with additional olive oil if desired.
Notes
For a dairy-free version, omit the parmesan from the meatball mixture and add 1 Tablespoon nutritional yeast. You may also sprinkle some nutritional yeast as a garnish to the finished dish. For a gluten-free version, use gluten-free bread crumbs or panko, and GF pasta.For a vegan option, omit meatballs and just roast the sliced lemon alone.Double the meatball portion of the recipe-- The meatballs freeze well and can be added to any pasta and sauce, or make great meatball sandwiches.
Other Cool-Weather Pasta Recipes and Zucchini Recipes
Bread turns golden as it soaks up the pumpkin-based custard.
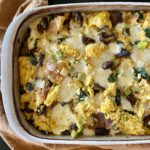
Pumpkin can't seem to get away from the use of sugar and cinnamon-y pumpkin pie spices that relegate it to the sweets table. This Savory Pumpkin Bread Pudding-- with things like onions and herbs-- opens a whole new world of pumpkin possibilities.
Here, the dusky earthiness of pumpkin is the perfect match to lots of herbs, mushrooms, and two cheeses in the recipe. Think of it like a cheesy stuffing baked outside the bird, or like a strata.
Savory Pumpkin Bread Pudding Brings People Together
The people who gather at my table represent a wide range of dietary needs and preferences and, if you live in America in 2021, this is likely the case for you, too. This bread pudding is easily modified to meet the challenges of nourishing a dietarily diverse crowd. And the challenges of the cook organizing meals for them!
Having dishes on the table that respect everyone's needs can be a challenge that you likely know all too well. Above all, it is important to me that there be food that all my beloveds can share. I want no one to feel left out when the oohs and ahhs start happening!
This Savory Pumpkin Bread Pudding serves as a hearty main course for non-meat-eaters, and a tasty side dish for meat-eaters. Tailor it to your crowd by trading plant milk for dairy milk, and non-dairy cheese for the Parmesan and Fontina. Gluten-free bread is an easy swap that everyone will enjoy. However, egg substitutes have not been tested in this recipe.
Making the Savory Pumpkin Bread Pudding
Firstly, start with an artisan-style bread with lots of bubbles and holes in the crumb that create cozy spaces for the eggy pumpkin custard to rest. Day-old bread is even better, because it will soak up the custard best and bake up with a more firm sliceable texture.
After that, making pumpkin puree from scratch is really easy in an Instant Pot. Try making a batch or two to freeze and have on hand for all your pumpkin cooking and baking. The convenience of canned pumpkin is great, but there is a quality trade-off.
Things you'll need to make a Savory Pumpkin Bread Pudding of your own.
The make-ahead nature of Savory Pumpkin Bread Pudding makes it a great addition to your Thanksgiving table, or any time. Assemble the bread pudding the day before you need it, then baked it off on serving day. I hope you enjoy having pumpin in this savory way!
8ouncesfontina cheese, diced into about 1/4" cubesfor dairy-free version, omit or replace with a firm dairy-free melting cheese
salt and pepper to taste
Instructions
Oil a deep 9" x 13" baking dish or casserole. Preheat the oven to 350°.
Wash and dice the onion, celery, mushrooms, kale, and herbs. Dice the fontina and finely grate the Parmesan. Set aside.
Make a custard by first whisking the pumpkin puree and eggs together, then slowing whisking in the milk to combine. Add in about ¾ cup of the Parmesan, the nutmeg, 1 teaspoon salt, and freshly ground black pepper to taste. Set aside.
In a large skillet set over medium-high heat, add half the olive oil or butter. Add the onions and celery and sauted, stirring frequently, until the onions become translucent and soft without browning, about 5-7 minutes. While the onions are softening, in your largest mixing bowl, use your fingers to tear the bread into bite-sized chunks. Remove the crust only if it is especially thick and tough, otherwise include it. Lightly salt the bread and toss it.
When the onions and celery are tender, add them to the bread. Heat the rest of the olive oil or butter in the skillet and sauted the mushrooms until they have released some of their moisture and are beginning to brown, about 5-7 minutes. Add in the garlic, kale and ½ teaspoon or so of salt and a generous amount of pepper and sauted another 2-3 minutes until the kale has softened a little and the mushrooms are well-browned. Add them to the bread and onion mixture in the large bowl. Add the diced fontina if using, and give the ingredients in the bowl a good toss.
Pour the reserved pumpkin custard mixture over the bread and vegetables and gently stir with a rubber spatula, scraping down the sides and bringing the ingredients up from the bottom to evenly coat them with the custard mixture. Tip it out into the prepared baking pan.
Cover the dish tightly with foil. Bake for 45 minutes, remove the dish from the oven and remove the foil. Sprinkle the remaining Parmesan over the top, and bake for another 15 minutes until the cheese is browned and bubbling. Remove from the oven and allow to set for 10 minutes before serving. The pieces cut nicely into squares like lasagne, or can be spooned out with a large spoon.
Notes
Make It Your Own:Add chunks of squash or pumpkin, use mustard greens or chard instead of the kale, try different cheeses and herbs. Follow your heart and use what you have!
Follow Me
Welcome!
You’re in the right place! I’m Pam Spettel, home cooking expert and guide, and I’m here to show you how to break up with cooking and hospitality anxiety, learn how to use recipes as guides rather than strict rules, and let your cooking intuition and confidence soar.
Superpower: Dreaming up recipes that work, serving them to my friends and family, and writing little stories about how cooking them well is the same as loving well.
Inspiration: Ingredients! The fresh, colorful, fragrant, local, seasonal ingredients found in the Pacific Northwest are my creative medium.
Heroes: Local food and wine producers– the people who keep me, my family, and our community nourished and happy.
We use cookies on our website to give you the most relevant experience by remembering your preferences and repeat visits. By clicking “Accept”, you consent to the use of ALL the cookies.
This website uses cookies to improve your experience while you navigate through the website. Out of these, the cookies that are categorized as necessary are stored on your browser as they are essential for the working of basic functionalities of the website. We also use third-party cookies that help us analyze and understand how you use this website. These cookies will be stored in your browser only with your consent. You also have the option to opt-out of these cookies. But opting out of some of these cookies may affect your browsing experience.
Necessary cookies are absolutely essential for the website to function properly. These cookies ensure basic functionalities and security features of the website, anonymously.
Cookie
Duration
Description
cookielawinfo-checkbox-analytics
11 months
This cookie is set by GDPR Cookie Consent plugin. The cookie is used to store the user consent for the cookies in the category "Analytics".
cookielawinfo-checkbox-functional
11 months
The cookie is set by GDPR cookie consent to record the user consent for the cookies in the category "Functional".
cookielawinfo-checkbox-necessary
11 months
This cookie is set by GDPR Cookie Consent plugin. The cookies is used to store the user consent for the cookies in the category "Necessary".
cookielawinfo-checkbox-others
11 months
This cookie is set by GDPR Cookie Consent plugin. The cookie is used to store the user consent for the cookies in the category "Other.
cookielawinfo-checkbox-performance
11 months
This cookie is set by GDPR Cookie Consent plugin. The cookie is used to store the user consent for the cookies in the category "Performance".
viewed_cookie_policy
11 months
The cookie is set by the GDPR Cookie Consent plugin and is used to store whether or not user has consented to the use of cookies. It does not store any personal data.
Functional cookies help to perform certain functionalities like sharing the content of the website on social media platforms, collect feedbacks, and other third-party features.
Performance cookies are used to understand and analyze the key performance indexes of the website which helps in delivering a better user experience for the visitors.
Analytical cookies are used to understand how visitors interact with the website. These cookies help provide information on metrics the number of visitors, bounce rate, traffic source, etc.
Advertisement cookies are used to provide visitors with relevant ads and marketing campaigns. These cookies track visitors across websites and collect information to provide customized ads.