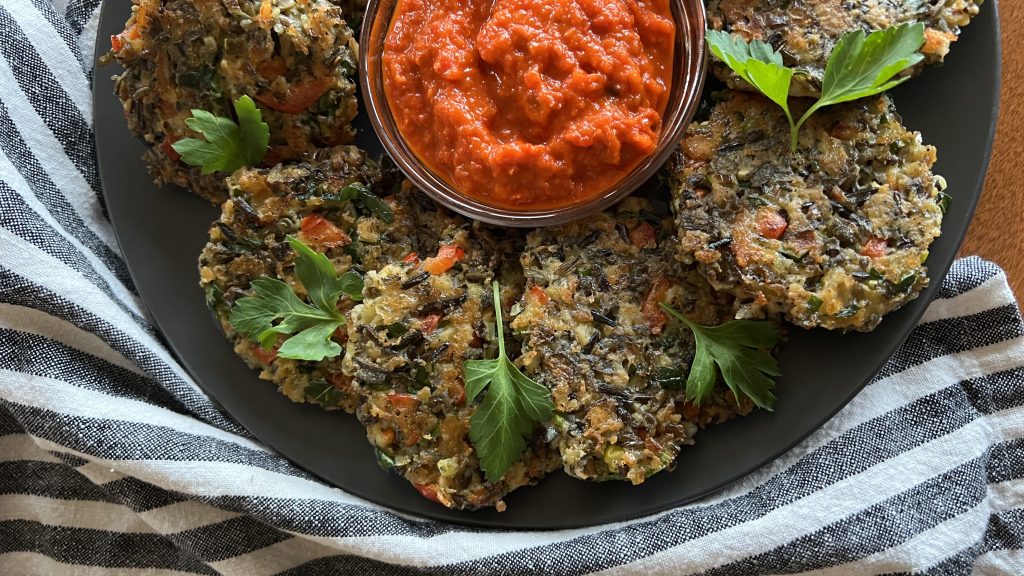
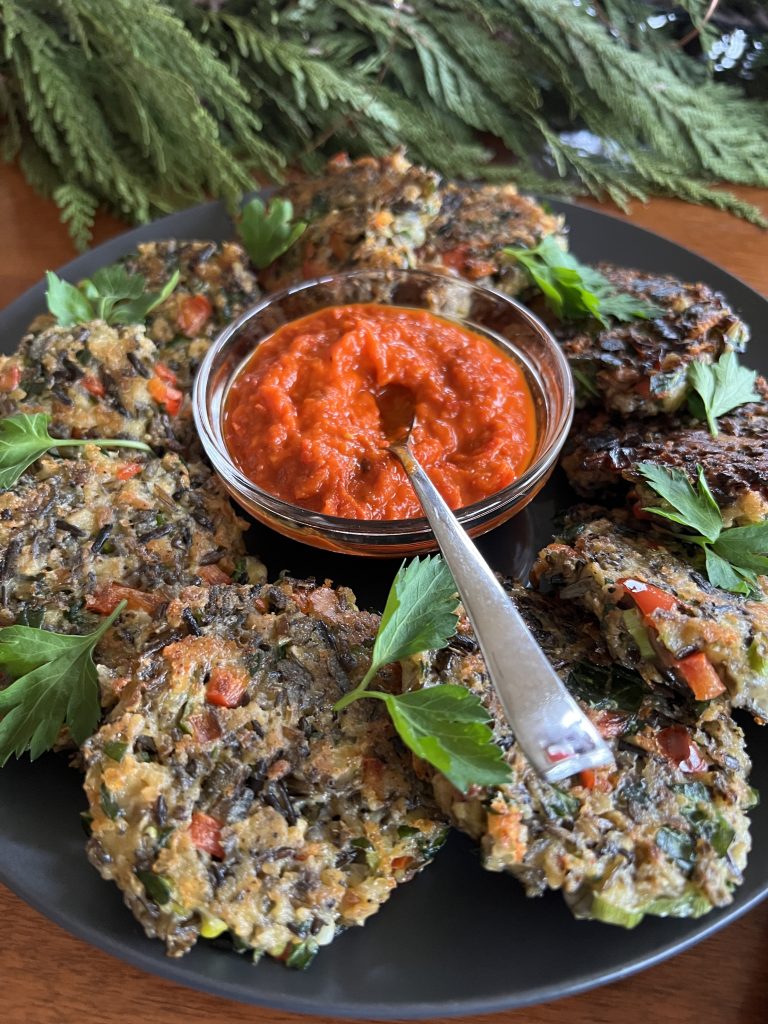
I've been dreaming of developing a recipe for Wild Rice Fritters and Red Pepper Dip for months, and it finally took shape in this last puff of space of the year.
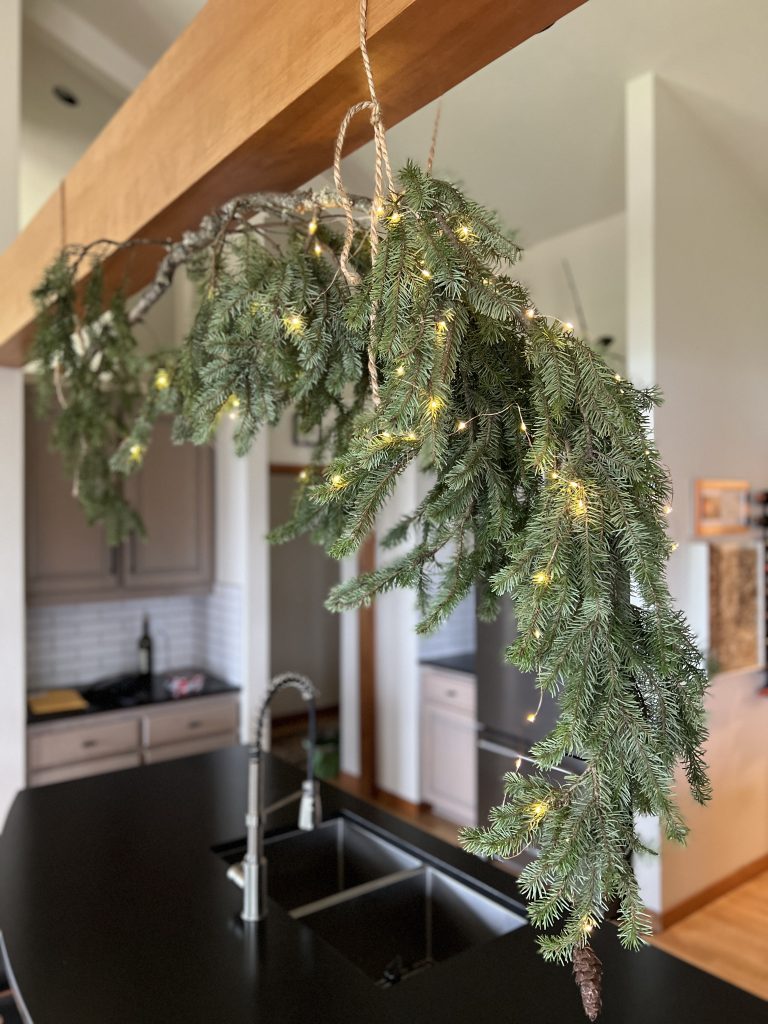
I love this span of time. The old year is essentially over. The new year is drawing its own deep breath readying for its debut. In this liminal vacuum, dreaming and realigning with nature happen without much effort. I begin celebrating the quieter side of winter.
Christmas is over and we’re supposed to be hauling trees out of the house, but I couldn’t resist hanging this windfall fir branch from my kitchen rafters, and lighting it up to extend my celebration of winter.
Wild Rice Fritters, Perfect for the Season
The 101-Mile Kitchen spirit emphasizes eating seasonally, but along with that comes living seasonally. Like a bear in its wintery den, my digestion slows this time of year. Eating smaller meals that feature storage ingredients like dried beans and wild rice, squashes, and root vegetables makes the best sense when I'm listening to my body.
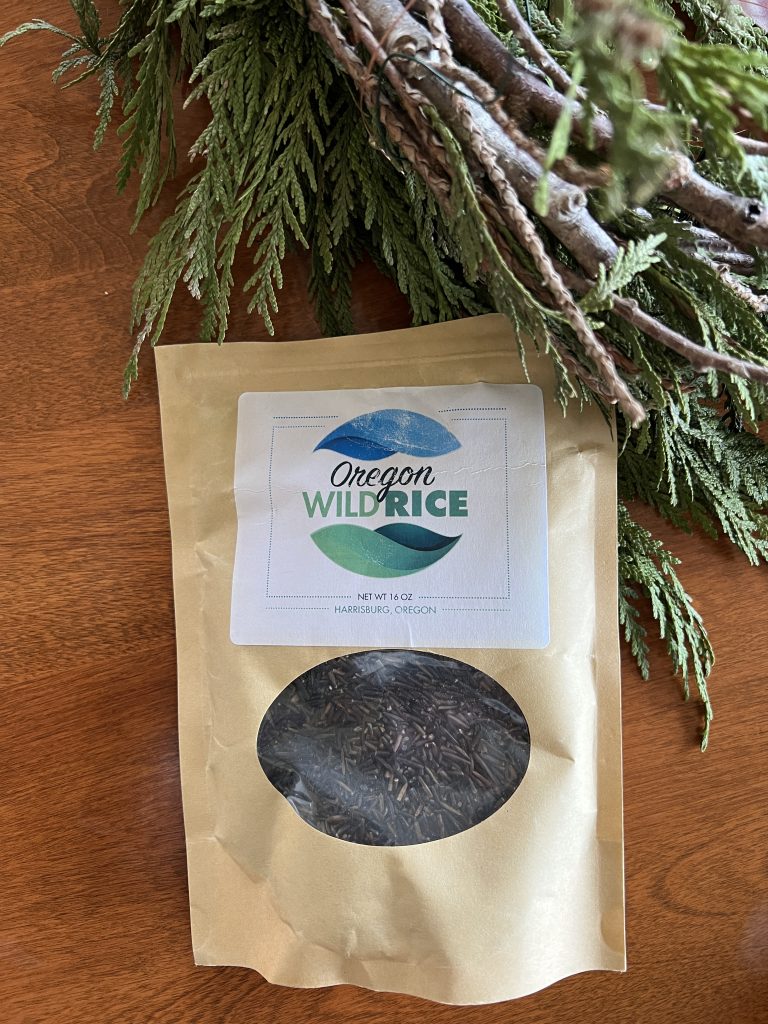
Wild rice fritters make a satisfying small meal or appetizer, or a great side dish to a larger winter meal. I use Oregon's very own Oregon Wild Rice, about 20 miles as the crow flies from our 101-Mile Kitchen hillside. The Langdon family stopped draining their fields of the autumn rains to convert their former grass-seed operation to wild rice in 2016, bringing their farmer practices in better line with nature. We've become the beneficiaries by enjoying their flavorful wild rice more often.
Versatile and Simple Red Pepper Dip
When it comes to injecting bright color to our meals this time of year, this red pepper dip really delivers. The beautiful bright red-orange dip is also delightful along with roasted Brussels sprouts halves, as sandwich spread, (do try it on grilled cheese sandwiches), and as a pizza sauce.
Other Light But Satisfying Wintery Meals You Might Like:
1cupwild rice, raw(You will have about one cup of rice left over for another use.)
3 largeeggs
3green onions, thinly sliced
½red or yellow bell pepper
1oz.spinach leaves, thinly sliced and then chopped (about 1 cup)
2cloves garlic, minced or pressed
1tablespooncapers, minced
4 oz.fontina, gruyere, or cheddar cheese, grated
1teaspoonsea salt
1/2teaspoonfreshly ground black pepper
1cupplain cracker crumbs, finely crushed
1tablespoonbutter
1 tablespoon olive oil, plus 1 teaspoon for rice
For the Red Pepper Dip
12 oz.jarroasted red peppers
1tablespoonolive oil
1 clovegarlic, smashed
½teaspoonsalt
2teaspoonsbalsamic vinegar or blackstrap vinegar
Instructions
Make the Fritters
Place the rice in a small saucepan and rinse with cold water. Carefully drain and add one teaspoon olive oil and 2½ cups water. Stir. Bring to a boil, then cover and drop the temperature to low. Cook until the rice is tender and the grains are beginning to unfurl. Drain through a fine mesh strainer and allow to cool while you carry on.
In a large mixing bowl, whisk the eggs. Add the green onions, red or yellow bell pepper, spinach, garlic, capers, cheese, salt and pepper, and stir.
Add two cups of the cooled wild rice and the cracker crumbs. Stir together thoroughly.
Heat a large stainless steel or cast iron skillet over medium high heat. Heat the butter and olive oil to the pan until bubbly. Using a ¼ cup scoop or measuring cup for consistent size, form patties with your hands, and drop them into the hot skillet. Press down on them gently to flatten them in the skillet. Cook for about 4-5 minutes per side until well-browned and crispy, adjusting temperature as necessary to keep them from burning. You will do this in two batches. Remove cooked fritters to a paper-towel-lined cutting board or plate.
Place the cooked fritters on a serving plate along with a small bowl of Trader Joe's Roasted Red Pepper Spread for dipping. Enjoy these hot or room temperature. Freeze leftovers for up to two weeks. Rewarm in a 350° oven.
Make the Red Pepper Dip
Drain the roasted red peppers well, and lay them out on a double layer of paper towels, or more sustainably, on a double layer of cotton dish cloth. Press the peppers firmly to release as much moisture as possible. Dry them off.
Add all ingredients except the peppers to a food processor and process until the garlic is finely minced. Add the peppers, and process until the peppers are not quite smooth and the dip is homogenous. Store in a recycled jar with tight-fitting lid for up to five days. Serve at room temperature.
Notes
The beautiful bright red dip is also delightful with roasted Brussels sprouts halves, as a spread on ham, turkey, roast beef, or stacked vegetable sandwiches, grilled cheese sandwiches, and as a pizza sauce.
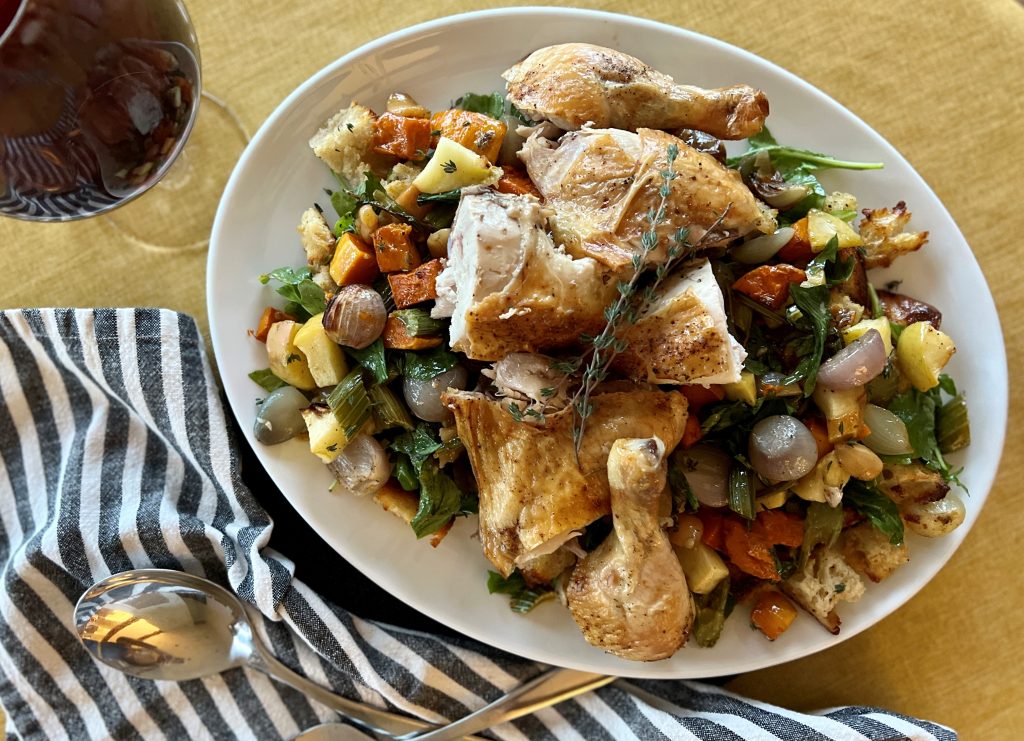
Here's a recipe I'm quite proud of: Roasted Chicken + Autumn Bread Salad. A quickly-roasted chicken delivers its juices to butternut squash, whole sweet shallots, and tart apples roasting beside it on a sheet pan. Peppery arugula in a light dressing mix with vinegar-soaked golden raisins and crispy-chewy toasted bread chunks make a lovely autumn panzanella-style salad that make a bed for the chicken and deeply flavored vegetables. It's all you need on one platter. I can't think of a better Saturday night or Sunday afternoon cool-weather dinner.
This roasted chicken and autumn bread salad borrows inspiration from the late Judy Rodgers, generous traditionalist and exemplary restaurateur. And golly, is it good.
The Inspiration for Roasted Chicken + Autumn Bread Salad
First let me tell you about the chicken Ms. Rodgers made famous at the Zuni Cafe in San Francisco. At Zuni, whole, small chickens are roasted in a wood-fired brick oven. The juicy, crackly-skinned chicken is served with a warm bread salad. At Zuni, chunks of hand-torn toasted bread, scallions, garlic, bitter greens, dried currants, and pine nuts are tossed in a light vinaigrette. When you experience this dish, it becomes the gold standard for all roasted chicken. And the craveable bread salad is just as good.
Until now, my go-to method of roasting chicken has been the Zuni Cafe way. Ms. Rodger's way. I pat the chicken dry and give it a dry rub of salt and pepper. Then, I loosely wrap it and put in the fridge for two days before roasting. The chicken skin dries in the refrigerated air, setting it up for crispness. Then on roasting day I set into a hot skillet and rush into a very hot oven. A series of flips mid-roast, and viola! The most crispy-skinned and juicy chicken ever. Put this roasted chicken together with a seasonal bread salad-- oh my!
Sometimes I haven't planned this out well, or don't have the time or energy for these steps but still would love a roasted chicken. Hmmm. What could I do about that?
Ditching the two-day dry brine period and shortening the overall cooking time with our unique preparation method is a great advantage for the home cook. And it still turns out a chicken that is almost as wonderful as the Zuni style.
How Can I Roast a Chicken Without Drying Out the White Meat?
It's easy to end up with dry white meat when roasting a chicken, and yet so easy to prevent it! By separating the breast and wing section from the leg and thigh section, we give the legs and thighs a 15-minute head start in the oven, sparing the white meat from overcooking. I call this a major kitchen coup!
The best tool for working with a whole chicken is kitchen shears. Get yourself a good pair. Poor quality shears need to be replaced frequently, so make this investment up front when you can. This is the pair I recommend for its value. You can spend more, but these are very good and will last.
With this method we use our kitchen shears to easily separate the breast and wing section from the rest of the bird. We start by separating the breast from the legs in two quick "vee" cuts. Then we flip the breast section upwards like a page in a legal pad. From there, it's very simple to separate the front from the back of the bird at the shoulders.
Preparing the chicken for the oven.
Match Your Roasted Chicken and Bread Salad to the Season
Roasted winter squash, celery, apple, golden raisins, tons of shallot, and arugula make this a fall-into-winter salad. In the spring and summer, swap those things out for fresh peas or sauteed zucchini, blistered cherry tomatoes, lots of fresh herbs, scallions, and torn mustard greens for a lighter taste. Use what is in season, and the rest remains the same. No matter what time of year, be sure to use garlic confit if you can. It's is always in season!
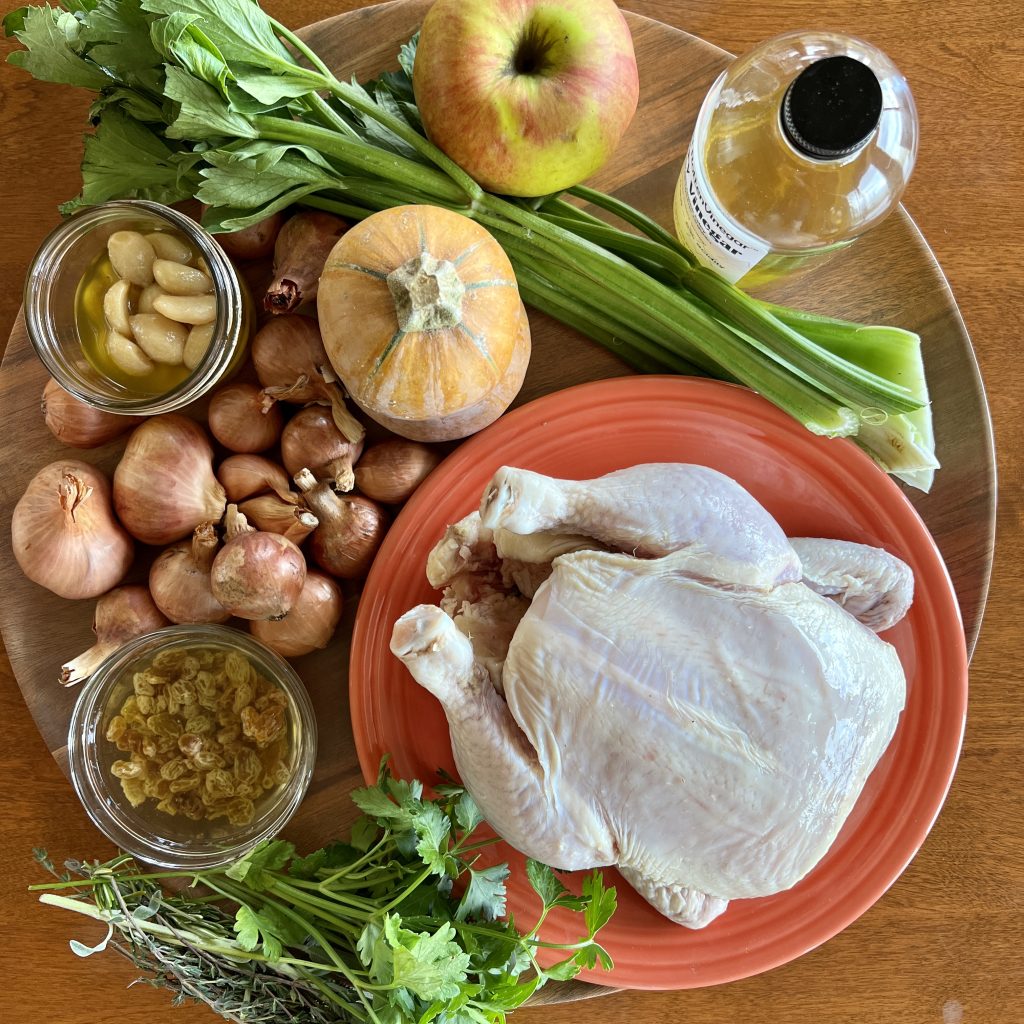
Ingredients. Not pictured, bread and arugula.
Have you joined the 101-Mile Kitchen community? If not, we'd love to have you. You can take care of that right here, and when you do I'll send you my Top Five Tips and Recipes for Cool-Weather Cooking downloadable as a thank you!
This post contains affiliate links. When you use these links to buy something I may earn a commission at no cost to you. Product affiliation helps me to keep this site ad-free while providing you with the content you enjoy. I only promote items that I use, like, and trust, or would invest in myself.
Preheat the oven to 425°. Place one oven rack in the upper third of the oven, and one in the lower third. Wipe the chicken dry. Using kitchen shears, and the chicken breast-side up and legs pointed to you, cut along the bottom edges of the breast upwards toward the wing on each side, following the natural "vee" shape. Fold the breast upward (like flipping a page of a legal pad). Press down to flatten the chicken. Use the shears to separate the breast/wing section from the backbone and neck.
Sprinkle both bird sections liberally with salt and pepper. Place the leg/thigh section on the baking sheet and put several sprigs of thyme, a sprig of sage, and a sprig of rosemary under it. Place the baking sheet on the lower oven rack for 15 minutes.
Prep the vegetables and apple while the legs/thighs are roasting. Place them in a bowl, salt and pepper to taste, and add the garlic confit (or olive oil and garlic cloves) and toss well to coat the vegetables in oil and set it aside.
After the first 15 minute roast, place the chicken breast/wing section on the baking sheet with herbs underneath and roast for another 15 minutes. While this is happening, place the golden raisins in a small dish and cover them with the vinegar. Set aside.
After the second 15 minute roast, place the prepared vegetable mixture all around the chicken on the baking sheet, distributing them evenly. Place the baking sheet back in the oven for another 15 minutes.
During this 15 minute roast, tear the bread into uneven bite-sized chunks onto a small baking sheet. Sprinkle with salt and pepper, and drizzle with olive oil. Toss the bread pieces well. Place the bread pieces in the oven on the upper rack for 6-8 minutes. Remove from the oven and toss, then if necessary, return to the oven for another few minutes. You are looking for a mix of crunch and tender bits, some browning and crispy bits, and some that will be softer. This step is very dependent on your own oven, so please watch carefully to avoid burning!
When the chicken reaches 160° at the thickest part of the thigh and breast, it is done. Remove from the oven to rest before cutting it into serving pieces.
In a large bowl (I use the same bowl that the vegetables were in) place the toasted bread chunks, arugula, another swirl of olive oil, and the golden raisins and their vinegar. Toss well and spread the bread salad on a platter. Spoon the roasted vegetables and all the pan juices onto the bread salad.
Use the kitchen shears to separate the chicken into 2 legs, two thighs, two wings, and two breasts. Use a heavy knife to cut the breast pieces in half, resulting in 4 chicken breast pieces. Arrange the ckien over the vegetables and serve.
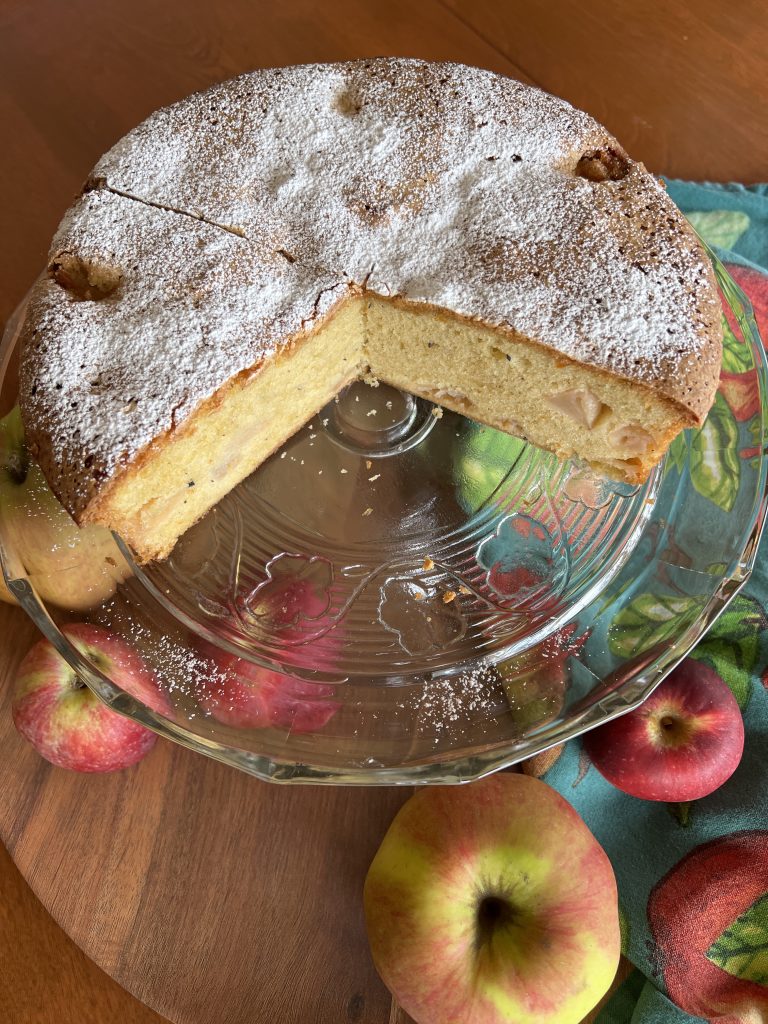
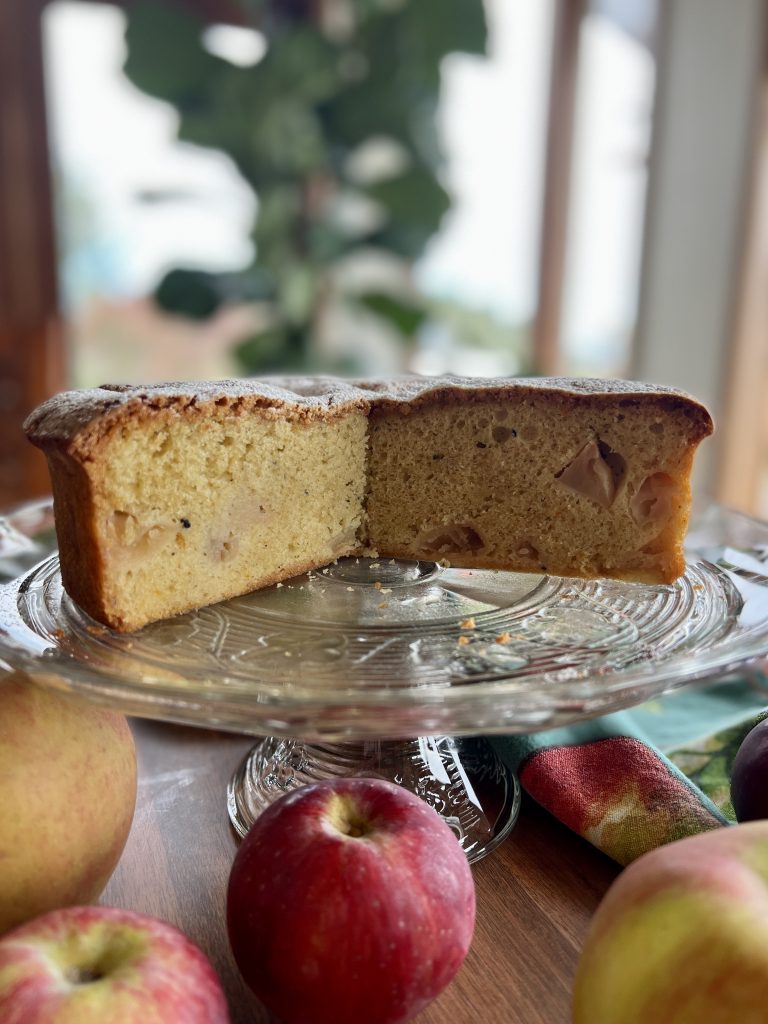
This Apple Olive Oil Cake, of all the rustic cakes I swoon over, is my very most favorite. It can be called rustic merely because it is not adorned in buttercream, an accessory that would only complicate its simplicity. Fragrant olive oil in the batter marries beautifully with orange zest, cracked cardamom seed, and pure vanilla. I am delighted the lack of cinnamon normally found in apple desserts. Am I the only one who tires of overwhelming the pure taste of apple with cinnamon?
What Varieties of Apples are Best for This Cake?
Tom Murray, my friend and orchardist who specializes in apples at his SLO Farm (seasonal, local, organic), suggested that I try his Liberty variety. He said that its sharp flavor would balance the sweet cake, and he was right. Other varieties that are tart and hold up to baking are Pink Lady, Jonathan, Mutsu, and good old Granny Smith. Any of these will be perfect in this apple cake.
Tom sells his apples at the Lane County Farmers Market in Eugene, Oregon. Please look for him there, and try all of his lovely apple varieties.
Extra apples in the batter make it extra moist and extra delicious.
About This Apple Olive Oil Cake
This recipe originated with Rachel Coyle, published by Food & Wine Magazine. I've made it so many times that I've added some of my own riffs. I've found that the batter can easily old 50% more apples than in the original recipe. So in goes 1½ pounds, weighed before peeling and coring, for more appley goodness.
Cakes made with olive oil have become popular for good reason. The texture becomes more like a sponge cake, very moist and tender, but with structure. If you've yet to try the taste phenomenon of the olive oil/sugar combo, you are in for a real treat. A fruity olive oil is great for this, of course. Stonehouse Olive Oil's house blend, my house olive oil, works wonderfully in this recipe. I buy it in 9-liter quantities a few times a year.
Choosing a Pan for this Cake
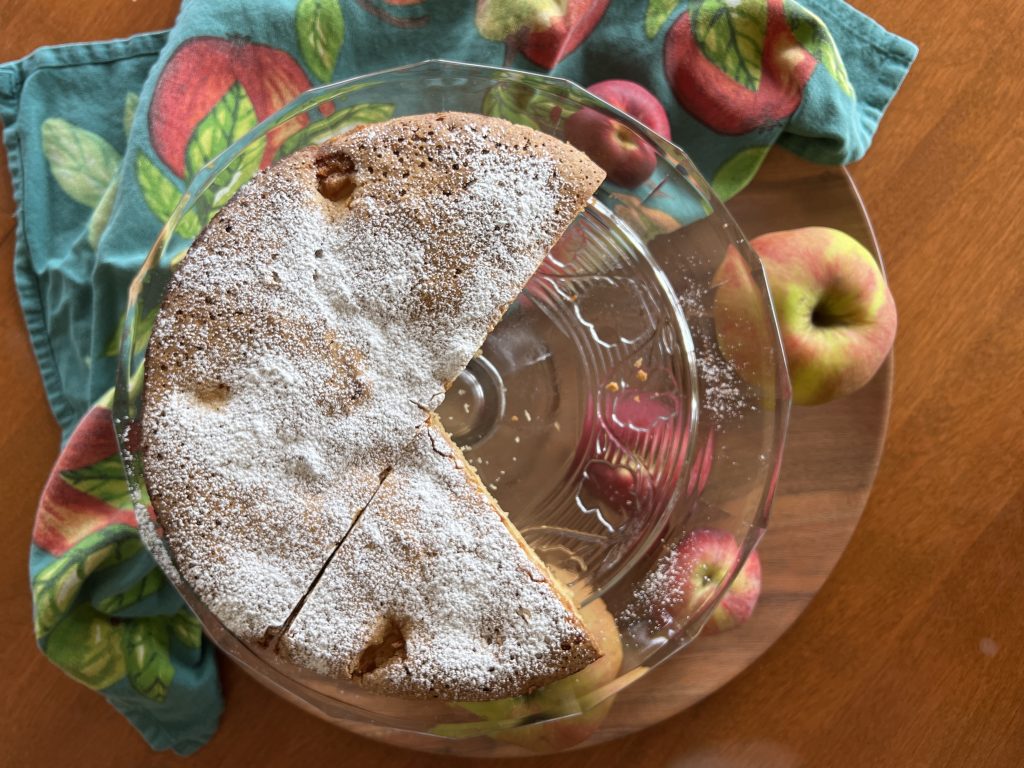
Rachel Coyle's original recipe says to use a 14-cup Bundt-style pan, and I've learned there are more great pan options for the apple olive-oil cake. A 9" springform pan creates a gorgeously tall round cake; a tube pan makes an even taller cake with a hole in the center that I really like; and I often divvy up the batter between three 6" round cake pans that serve six people each. This is perfect for our smaller household, as the cakes freeze perfectly. So handy! Please note that as of this publication date, Sur La Table is offering a 20% off sale on each of these pans, and on all of their bakeware! Just in time for holiday baking. Sur La Table only sells high-quality products that I always trust.
This post contains affiliate links. When you use these links to buy something I may earn a commission at no cost to you. Product affiliation helps me to keep this site ad-free while providing you with the content you enjoy. I only promote items that I use, like, and trust, or would invest in myself.
Have you joined the 101-Mile Kitchen community? If not, we'd love to have you. You can take care of that right here, and when you do I'll send you my Top Five Tips and Recipes for Cool-Weather Cooking downloadable as a thank you!
Author: Adapted from Rachel Coyle of Food & Wine Magazine
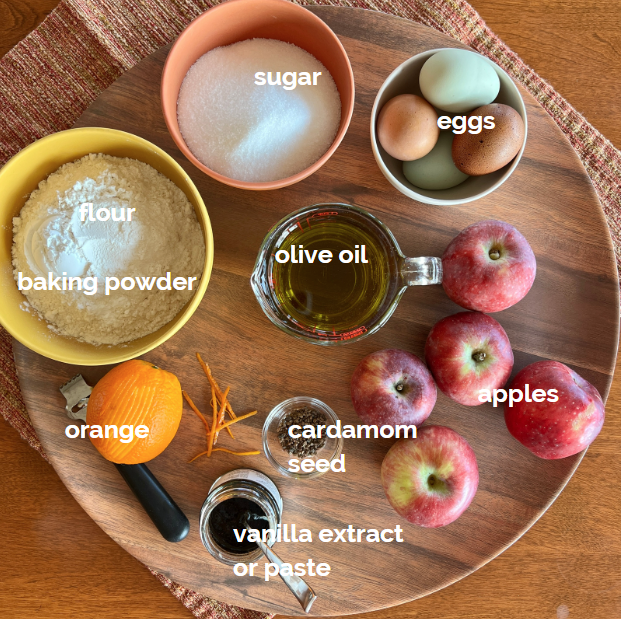
This apple olive oil cake is moist and light, studded with chunks of apple, and fragrant with cardamom, orange, vanilla, and, of course, the olive oil itself. This recipe will have you tossing all others aside, forever and ever. It's that special.
2teaspoons cardamom seeds, crushed in a mortal and pestleor 1 teaspoon ground cardamom
1tablespoon orange zest
2teaspoons pure vanilla extract
1cupextra-virgin olive oil
2⅓cupsall purpose flour, plus more for dusting the pan
1tablespoonbaking powder
1½poundstart firm apples, peeled and diced into ⅓" piecesGranny Smith, Jonagold, Liberty, Pink Lady, Mutsu are all very good for this
2tablespoonspowdered sugar
Instructions
Preheat oven to 350°. Generously grease and flour a 9" springform pan, a 14-cup Bundt-style pan or tube pan, or three 6" round cake pans**. Crush cardamom seeds in a mortar and pestle until finely crushed, if using, and set aside.
Place the granulated sugar, eggs, egg yolks, and salt in the bowl of a heavy-duty stand mixer fitted with the whisk attachment. Beat on medium speed until the mixture is light and fluffy, about 2-3 minutes. Whisk in the cardamom, orange zest, and vanilla, scraping down the sides of the bowl as needed.
With mixer running on medium speed, gradually add olive oil in a slow, steady stream, slowly pour as necessary to ensure oil is fully incorporated. If the oil is pooling, simple stop the flow and continue whipping until it is incorporated, and then continue adding the rest. At this stage, you will have an emulsion that is a bit fluffy, but somewhat thin.
Remove the mixing bowl from the stand. Using a course-mesh strainer or a sifter, sift the flour and baking powder over the egg mixture. Use a rubber spatula to fold the flour mixture in until almost completely incorporated. Add the apples, and fold just until combined. Gently pour the batter into the prepared pan.
Bake in the preheated oven until golden brown and a long wooden pick inserted in the center comes out clean, about 1 hour, turning the pan in the oven about halfway through. Allow the cake to sit 10-15 minutes, then the invert it onto a wire cooking rack. Cool completely, about 2 hours, then sift the powdered sugar over the top. Serve with vanilla ice cream, in a puddle of Creme Anglaise, or whipped cream.
Notes
** Bear in mind that the smaller the pan, the shorter the cooking time. If you decide to use the 6" cake pans, start checking for doneness at the 25-minute point.
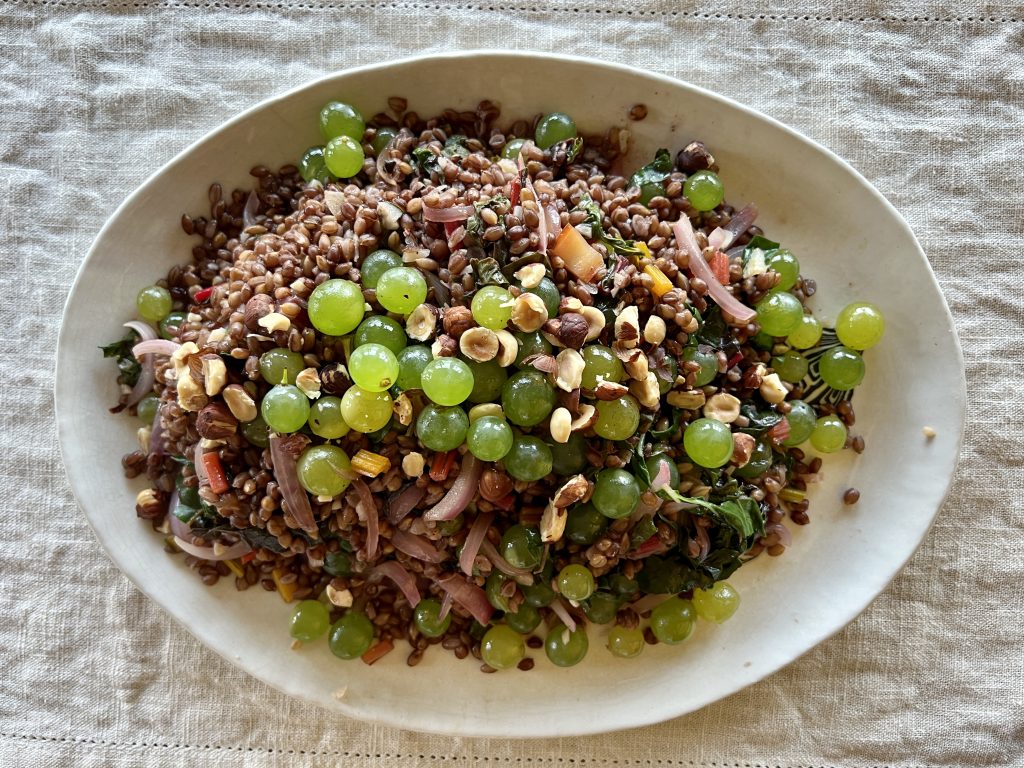
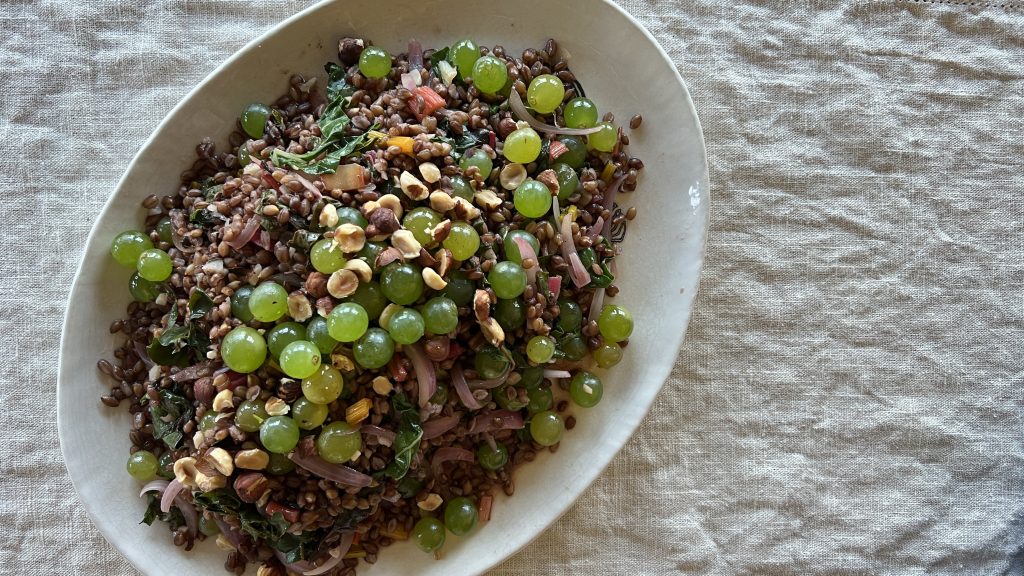
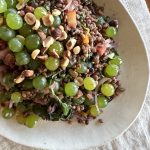
Today I'm teaching my community how to make this wonderful warm autumn grains, grapes, and greens pilaf. Our phenomenal Lane County Farmers Market has hosted a series of cooking demonstrations generously funded by the Upper Willamette Soil and Water Conservation District. Some fabulous local chefs have been smashing it up with their demos all summer long. And today, it's me, a professional home cook sharing with the crowd. I'm extremely honored to be among this group of people, making our local foods more accessible to our community, and adding value to those shopping at our market.
About This Grains, Grapes and Greens Pilaf
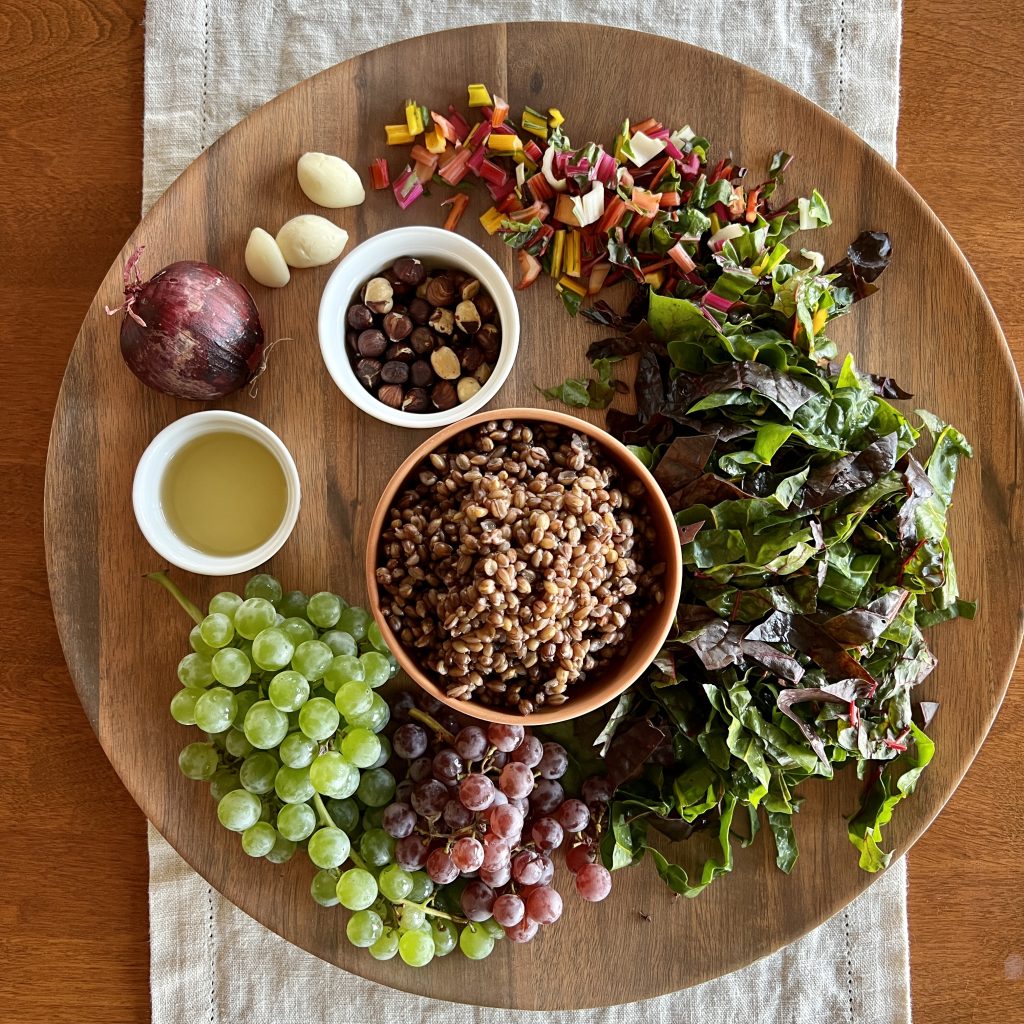
With the exception of olive oil, salt, and pepper, every single ingredient in this dish was purchased at the farmers market. My intent in developing today's recipe was to stuff it full of local ingredients, spotlighting ingredients that abound at the market today and the growers and producers who bring them to us. This very moment. This exact week of this exact season. I wanted my dish to taste like Oregon at this very moment. There is a good chance that many of these ingredients will give you that "terroir", or sense of place, if you live in the northern hemisphere. If you live down under, file this away for your autumn cooking next April.
Grains, Grapes, and Greens is a Seasonally Flexible Recipe
This recipe rendition captures autumn, with grapes coming ripe and wintery greens, still tender and young, just now coming to market. Grains are enduring-- we enjoy them throughout the year. Here are some change-ups you might make with this idea, no matter the season:
Replace the grapes with apples, firm pears, or segmented citrus. In the summer, blueberries, pitted cherries, and diced stone fruit will work wonderfully.
Rotate through barley, wheat berries, farro, freekeh, and the array of colorful rices-- black, brown, red, and purple. They all work perfectly as the base for this type of warm salad or pilaf.
What nuts grow in your area? We're famous for our hazelnuts here in Oregon. As a matter of fact, we grow 99% of the U.S. hazelnut crop. Use whatever nut you have or love. Almonds, pecans, and walnuts are equally good here. Even pine nuts, really a seed, not a nut, would be wonderful.
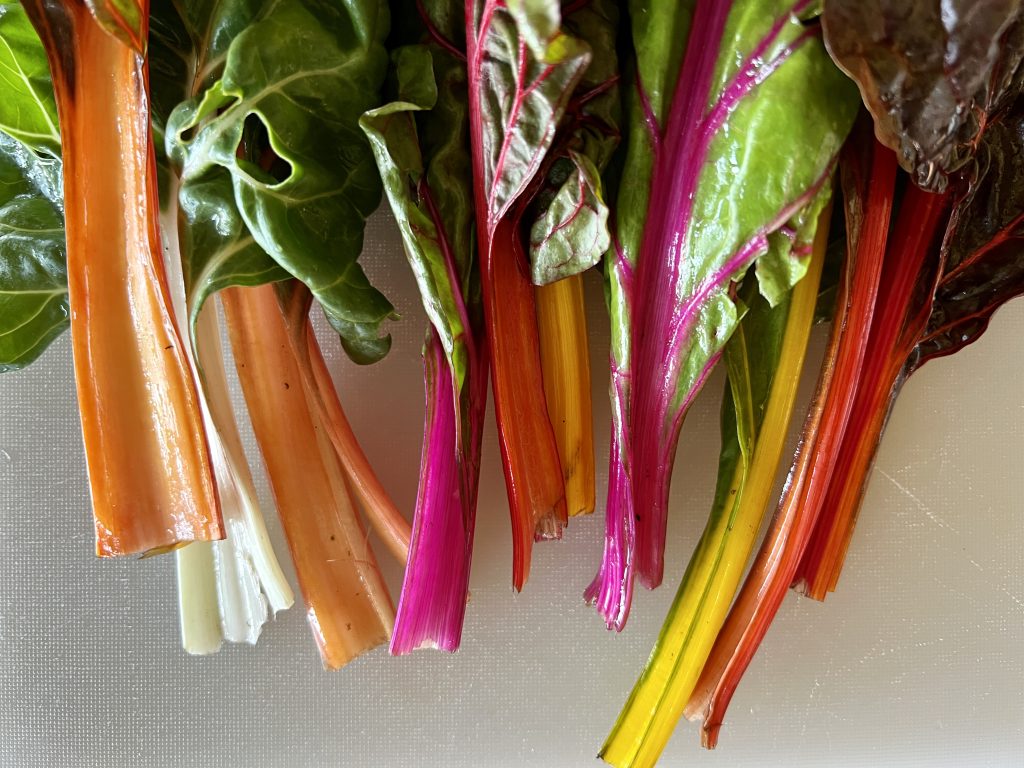
Whatever hearty, sauté-able green you can put your hands on would be fantastic. Kales, chards, collards, mustards, dandelions, nettles, and arugulas are the first ones that come to mind. Swap at your whim, or whatever is available. Today I'm using rainbow chard-- look at its vibrant colors!
Rainbow chard adds some dazzling color to the pilaf.
Have you joined the 101-Mile Kitchen community? If not, we'd love to have you. You can take care of that right here, and when you do I'll send you my Top Five Tips and Recipes for Cool-Weather Cooking downloadable as a thank you!
Warm grains like barley, farro, or brown rice, gently sauteed greens, and juicy just harvested grapes and a quick in-the-skillet vinaigrette make this dazzling Pacific Northwest-centric pilaf sparkle. Or, use it as a warm salad. Either way, healthy never tasted so good.
Cook the grains pasta style: Rinse the grains and place them in a medium saucepan and fill the pan with at least 6 cups of water. Add a healthy pinch of salt and stir. Bring to a boil, stir again, and adjust the heat to a slowly bubbling simmer. Cook for 45 - 60 minutes or until the barley is plump and tender. Drain well.
While the barley is simmering, wash the greens and remove the stems. Slice the stems into ½" pieces. stack the leaves on top of each other, and roll the stack into a long cigar shape. Slice through the roll first lengthwise, and then into 1" pieces.
In a large skillet, warm the olive oil over medium heat. Add the shallot and garlic and saute for 1-2 minutes. Add the cut greens to the pan and saute, stirring every minute or two, until the greens have become tender and soft. Salt and pepper the greens to taste (about 1 teaspoon salt, 1/3 teaspoon pepper).
Stir in the warm grains and the vinegar. Taste and adjust the seasoning if you'd like. Remove the pan from the heat. Stir in about half the grapes.
Place the warm pilaf in serving bowl or platter. Top with the remaining grapes and the crushed hazelnuts. Serve warm or at room temperature.
Notes
+ Jane Touzalin of The Washington Post says it best."Hulled barley, considered a whole grain, has had just the indigestible outer husk removed. It’s darker in color and has a little bit of a sheen. Pearled barley, also called pearl barley, is not a whole grain and isn’t as nutritious. It has lost its outer husk and its bran layer, and it has been polished. It has a lighter, more matte appearance."They can be used interchangeably. However, hulled barley is a more nutritious whole grain and also holds its shape better is soups and stews. Hulled barley takes up to an hour to cook, whereas the pearled kind cooks in about 30-45 minutes.
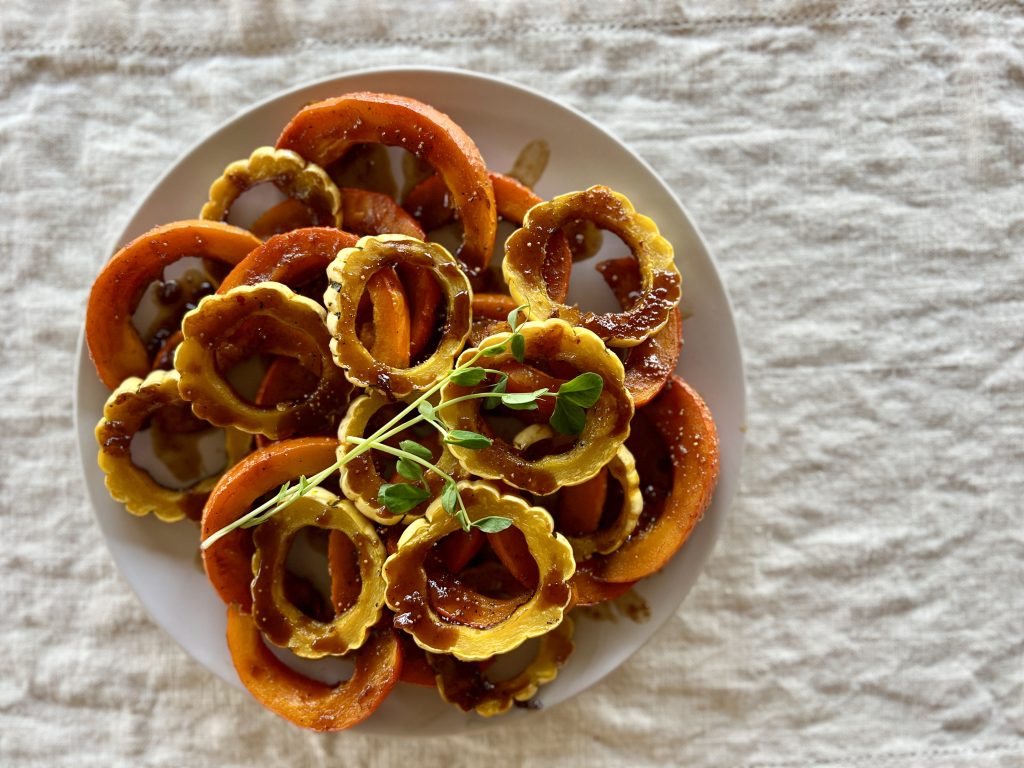
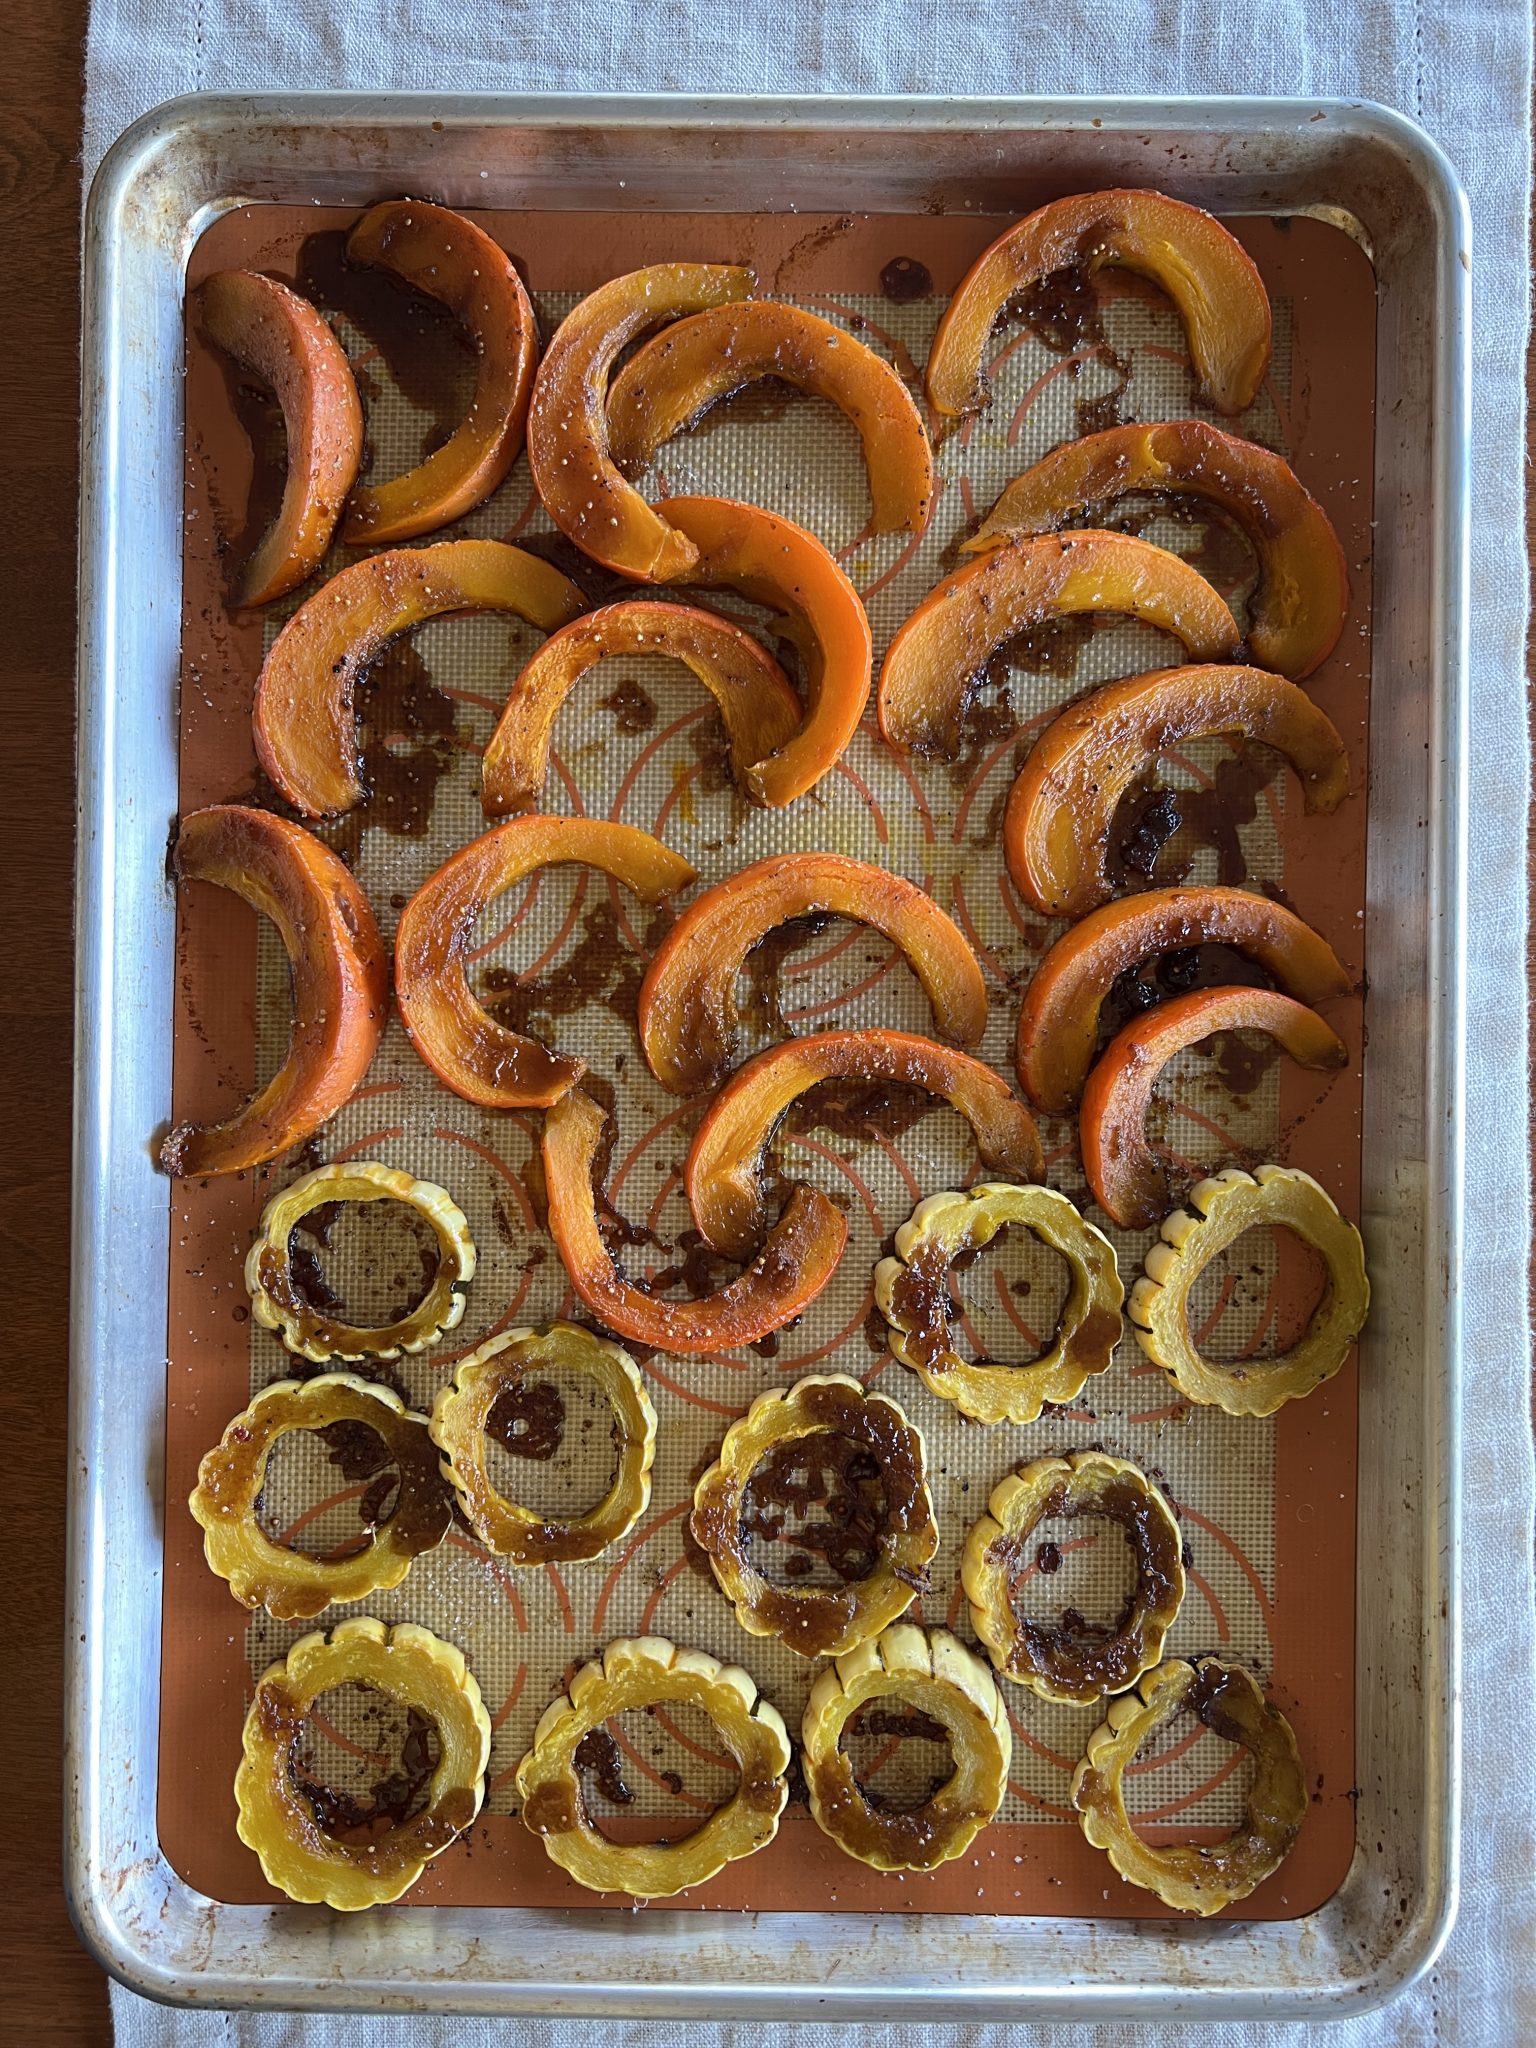
Is it possible to be glum in the presence of orange things, like this autumn sunset-hued roasted fig-glazed winter squash? As autumn comes knocking, this three-ingredient wonder is a cheery and scrumptious welcome to the cool-weather cooking season.
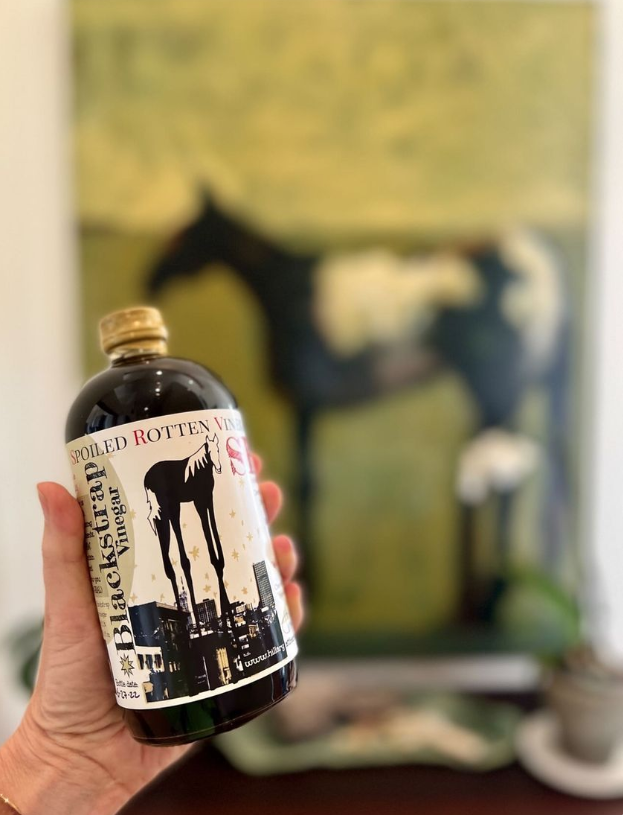
Like an oven being lit, my imaginative cooking fires are lit by trying new ingredients. This little recipe started when I was recently introduced to blackstrap vinegar. At our farmers market, I met Klee and Cherie Wiles-Pearson of Spoiled Rotten Vinegar who make, among other vinegar, the award-winning blackstrap vinegar used in this dish. They appropriately call it "One American's retort to Italy's aged Balsamic." Blackstrap molasses makes it full-bodied, rich, and sweet, and it works in most applications where one would normally reach for Balsamic. One sip of this living food and I am forever hooked.
Klee ferments and bottles Spoiled Rotten Vinegar's distinctive vinegars. Cherie designs the beautiful, information-filled labels that highlight the work of local artists. The charming Spoiled Rotten Vinegar bottles are not made to be hidden behind cupboard doors.
Ways to Use Your Fig-Glazed Squash
Besides straight-up out of the oven, here are other some ways to put this fig-glazed winter squash to work from now until spring.
Lay the roasted rings over a bed of cooked barley, farro, wild rice, quinoa, etc. that has been mixed with olive-oil-cooked onion and perhaps chopped parsley. Drizzle the whole thing with the glaze.
For a salad, put the roasted squash on a bed of slivered kale that has been tossed in a spoonful of the glaze and sprinkle on chopped toasted hazelnuts.
Tuck halved or quartered figs in and around the squash for a lovely fall touch.
Utilize the heat of your oven and make fig-glazed squash alongside a roasted chicken, turkey breast, pork loin, or pork tenderloin. They are delicious together, and energy efficient this way!
Try the glazed squash in a rice bowl, along with some browned tofu or leftover protein.
Tips for Preparing Winter Squashes
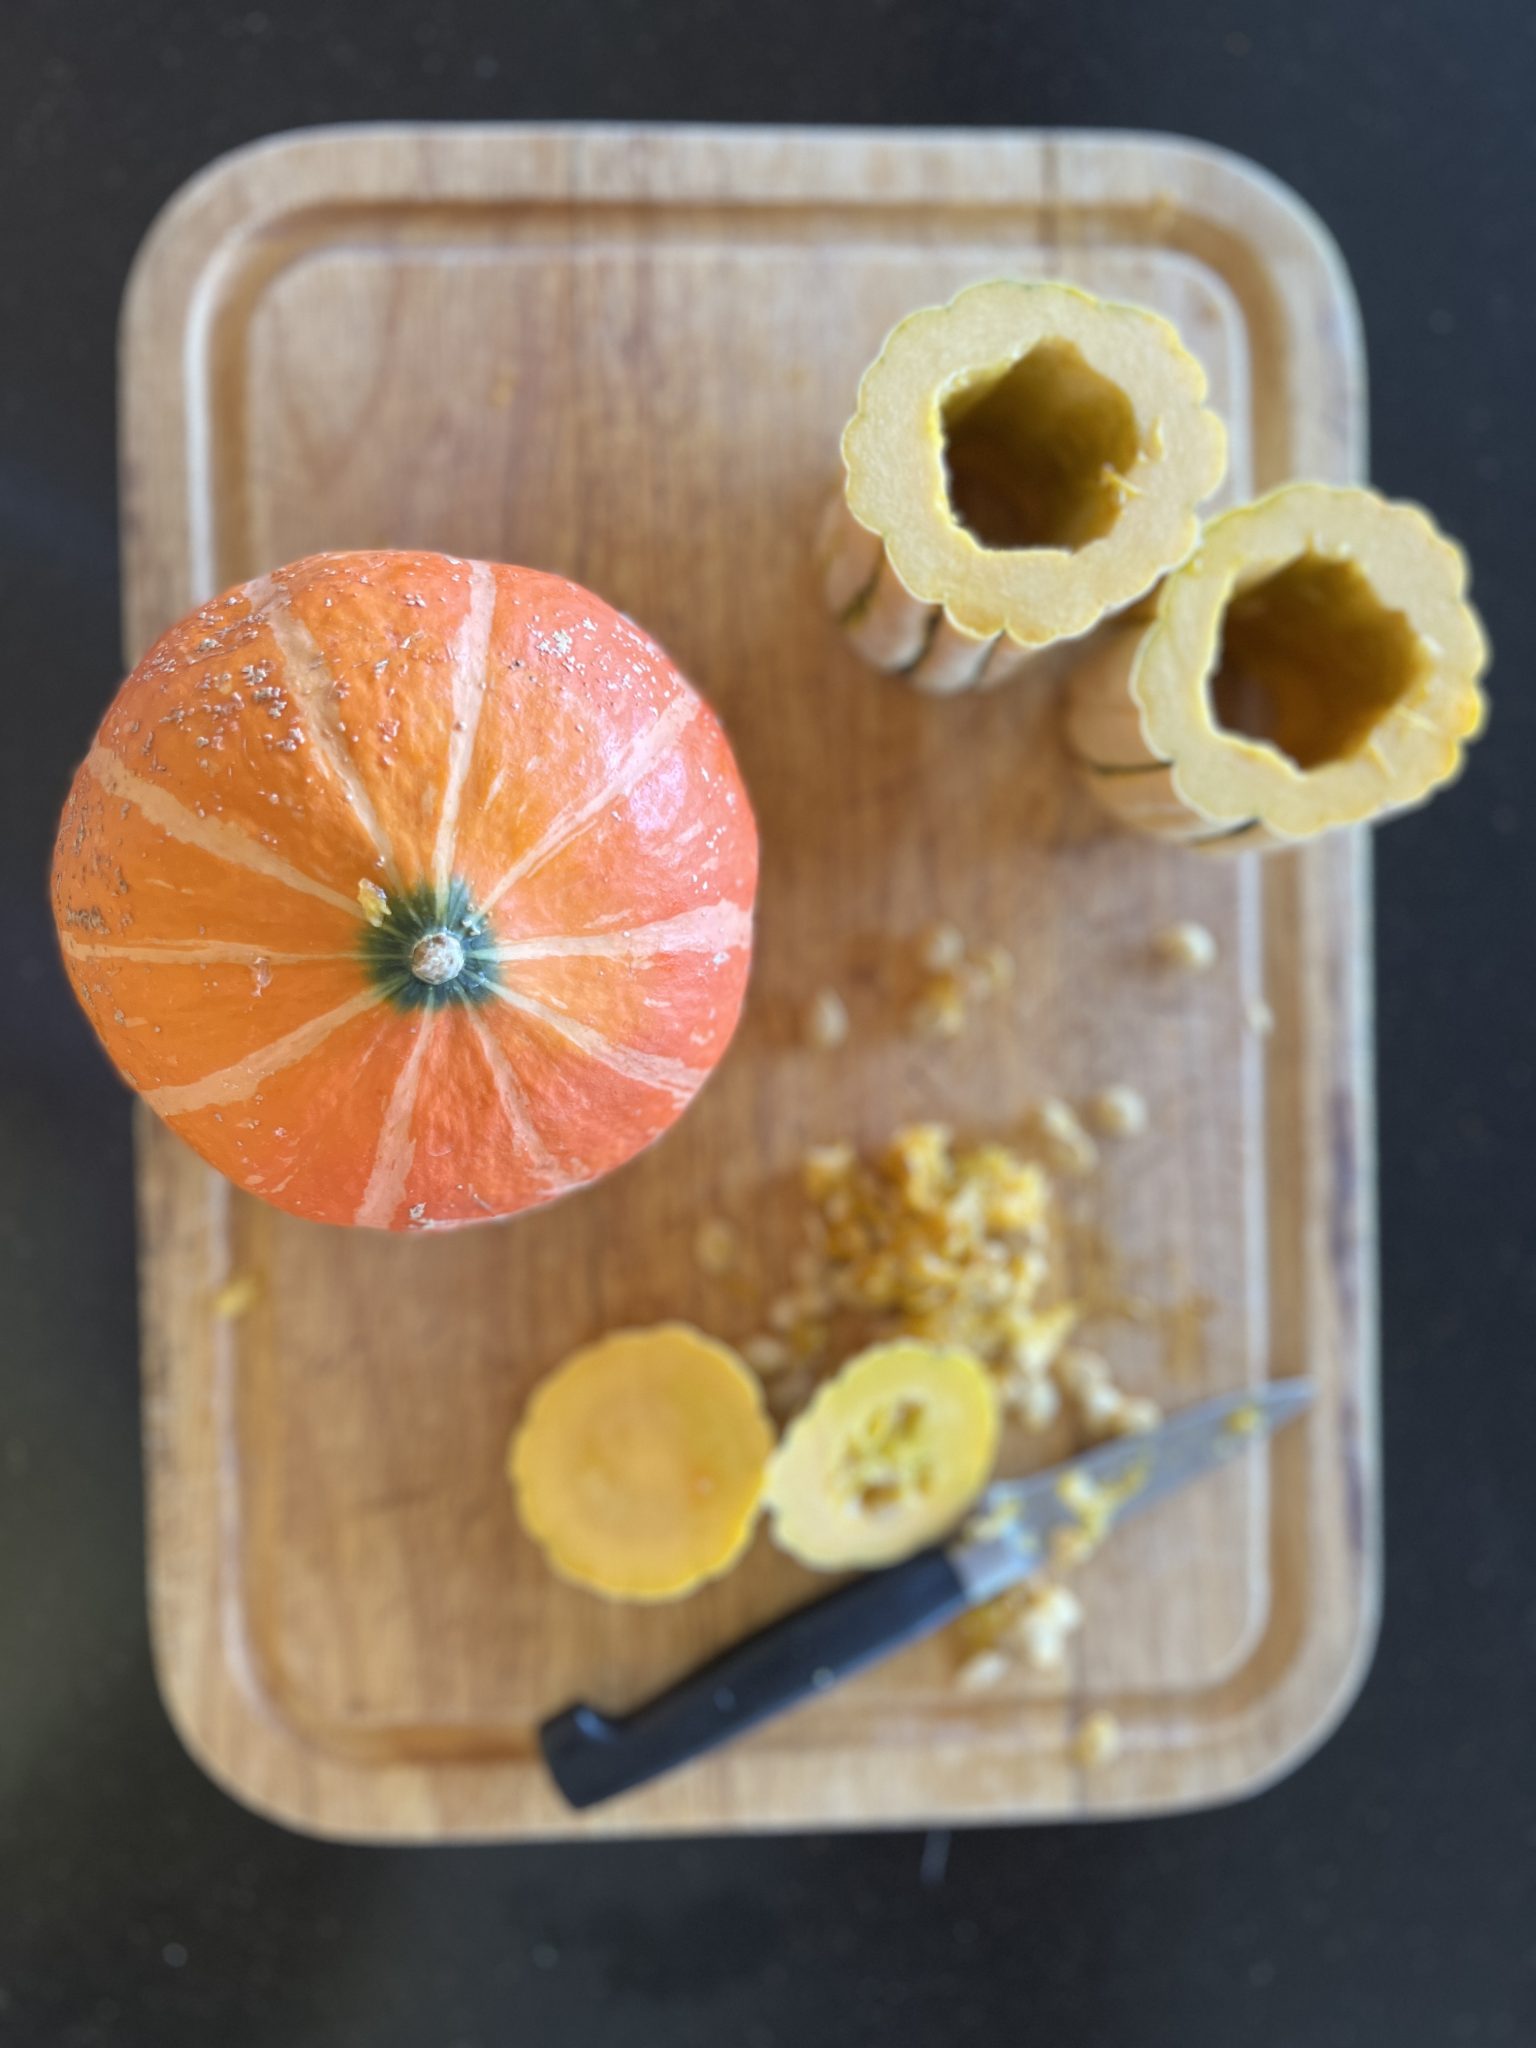
What variety of winter squash wouldn't be lovely in this recipe? I am wildly fond of the Red Kuri variety, not only because of its red-orange luminosity, but also because it cooks to a silky texture without falling apart. Kabocha squash is similar. And don't forget Delicata, which offers a yellow contrast and is a great little squash, too. Except for butternut, none of the varieties listed in the recipe below require peeling. Their skins soften equally to the flesh when roasted.
Scrub winter squash and then microwave it for 2 minutes or so on high power before cutting into it. This allows the knife to slide through the squash more easily. I think it makes scooping the seeds out a little easier, too.
Making the Fig-Glazed Winter Squash
Above all, don't give up on this recipe if you can't find blackstrap vinegar. Dark Balsamic is a worthy substitute.
Where are fig jams, spreads, or butters found? Many grocery stores that have a gourmet-style cheese section carry fig jam, spread, or butter. Ask there. Trader Joe's fig butter is good and is generally the most affordable. I keep a jar or two of it around for cheese boards and cheesy paninis. You may also find it in the jams and jellies section of your grocery. This is the fig spread I'm using at the moment, and it is excellent.
The density of the glaze is dependant on the particular fig jam, spread, or butter you use. If your glaze is so thick that it doesn't drizzle off your mixing spoon, thin it with a tablespoon or so of water. You want it just loose enough to drizzle in a thin ribbon. If you happen to thin it too much, just reduce the fig/vinegar mixture back down in a small saucepan over medium heat for a few minutes.
Save any glaze leftovers and use it in a salad dressing. With a little olive oil added, it is terrific on a leafy salad with apples, chopped dried figs, and some toasted nuts.
Store leftover fig-glazed squash tightly covered in the fridge. Then rewarm it gently in a microwave oven or a toaster oven.
This post contains affiliate links, including but not limited to Amazon. As an Amazon Associate I earn from qualifying purchases. When you use these links to buy something I may earn a commission at no cost to you. Product affiliation helps me to keep this site ad-free while providing you with the content you enjoy. I only promote items that I use, like, and trust, or would invest in myself.
2poundswinter squash, one variety, or a colorful mixred kuri, delicata, acorn, butternut, kabocha, Hubbard, etc. (this was one medium delicata and one small red kuri)
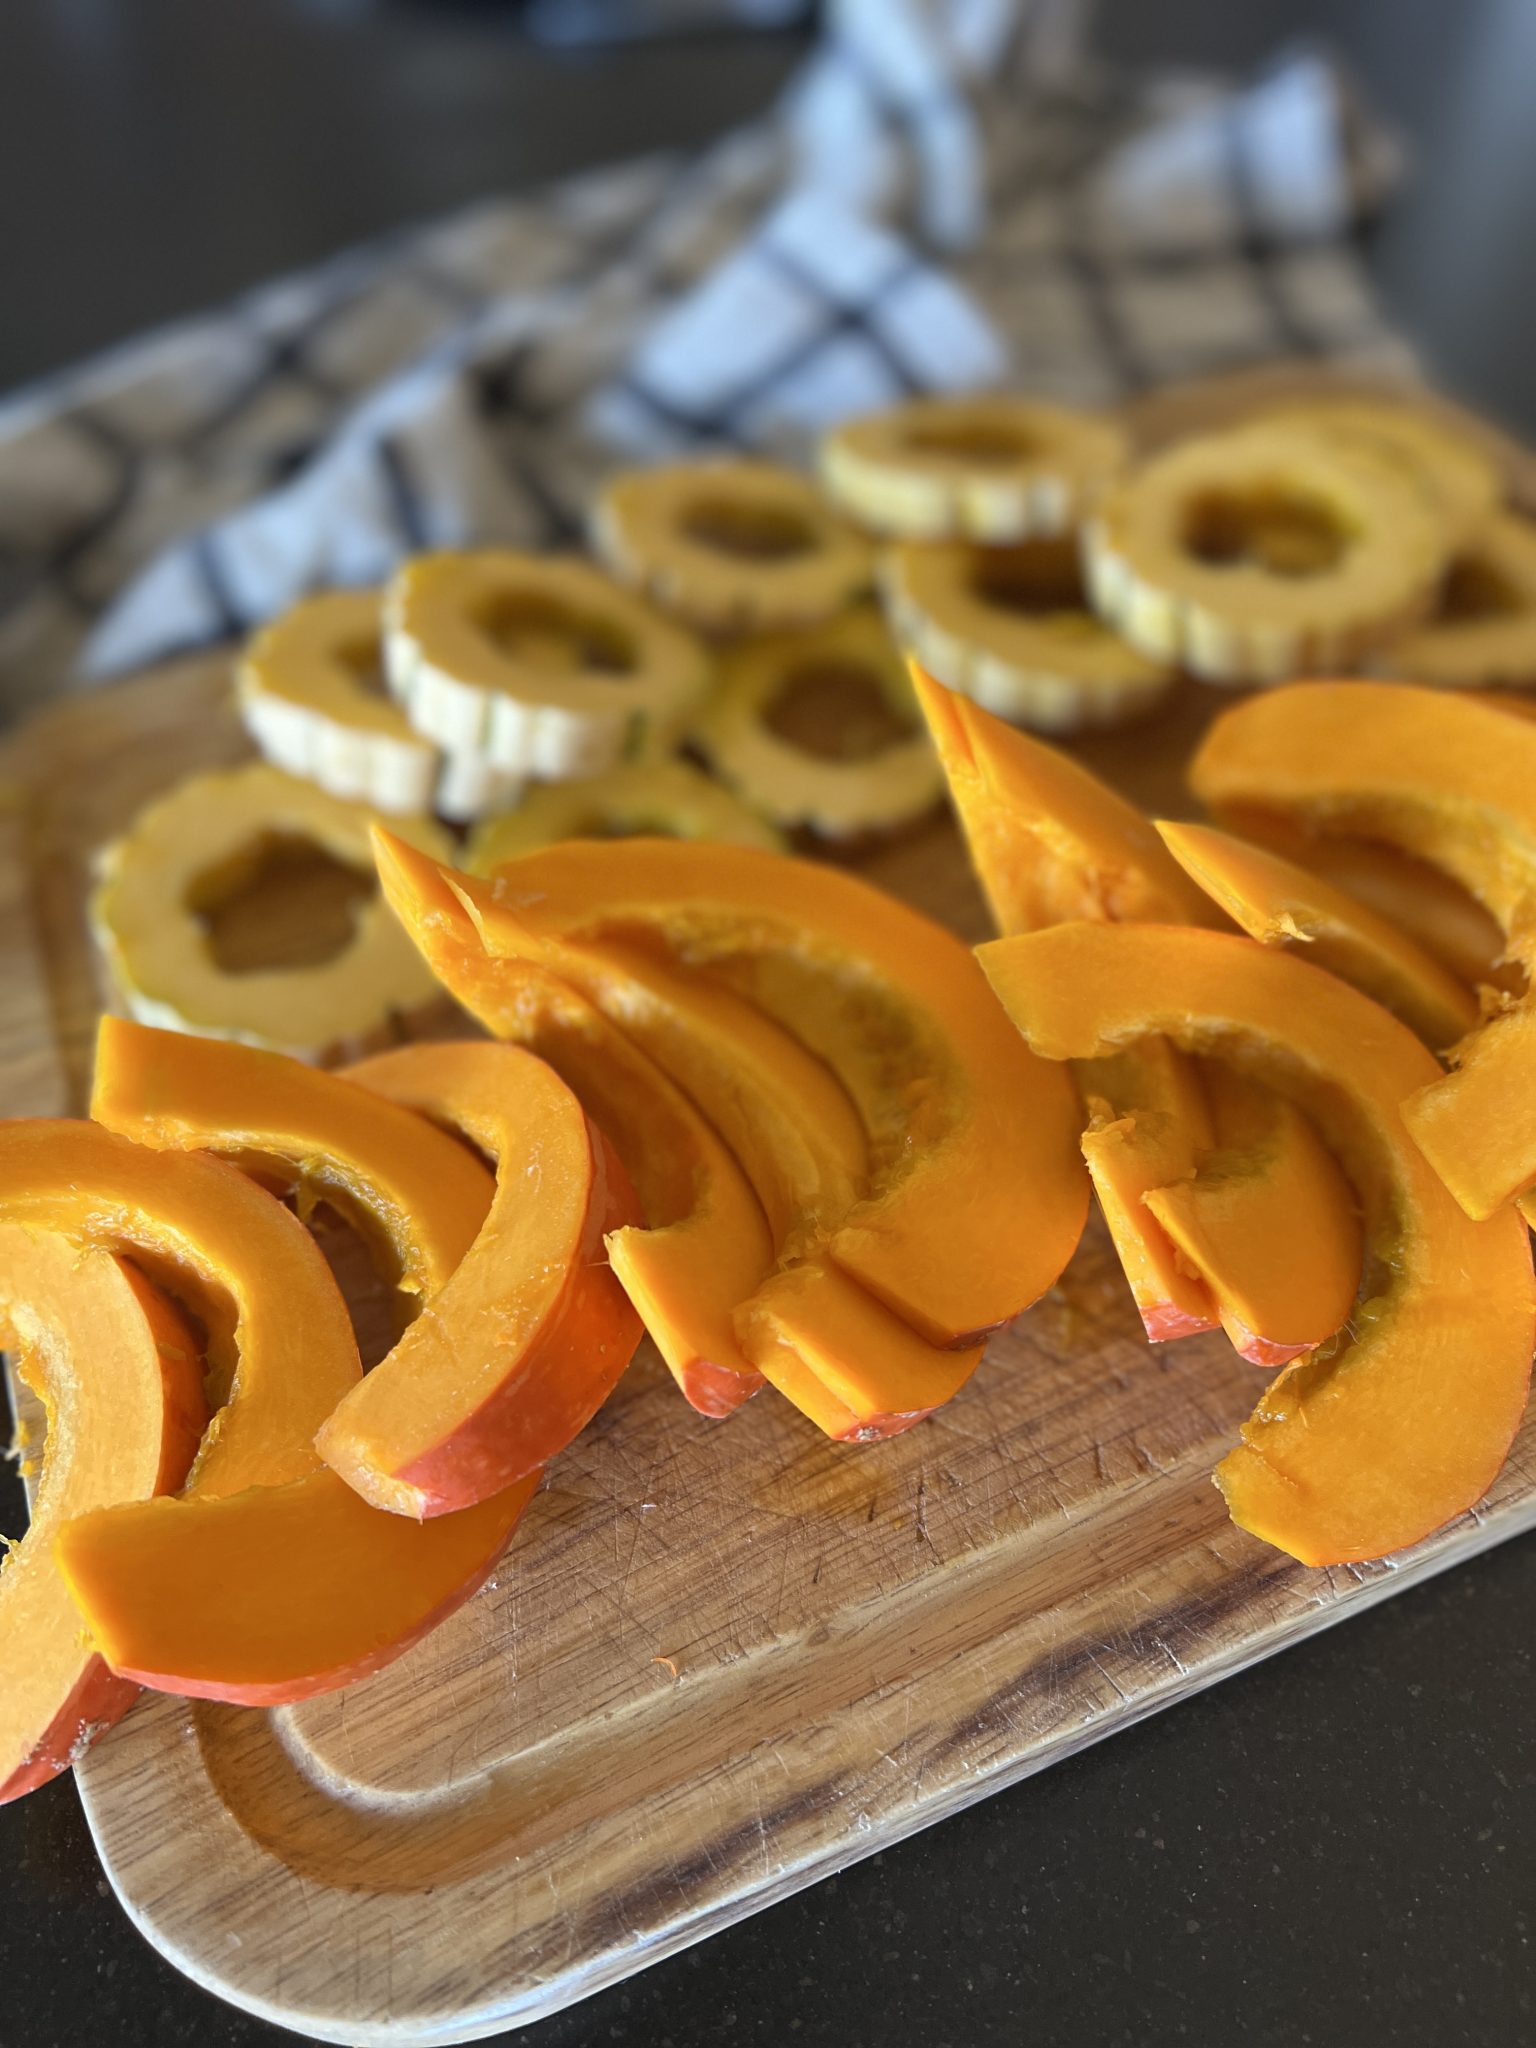
Preheat the oven to 400° convection roast. Scrub the squash, cut them in half, and remove the seeds. Slice the squash into ½" slices. In the case of Butternut squash, slice the sold neck pieces in half. Lay the squash slices on a silicone mat-lined or parchment-lined baking sheet. Drizzle about 1 tablespoon olive oil over the squash, and lightly sprinkle with salt and pepper. Roast for 10 minutes.
While the squash is beginning to roast, mix the fig jam, blackstrap or balsamic vinegar, salt and pepper in a small bowl. Add up to 1 tablespoon of water to the mix to make it thin enough to drip from the spoon.
After the squash has roasted for ten minutes, bring it out of the oven and flip each piece over. Drizzle the slices with about half of the fig glaze mixture. Reduce the oven temperature to 375°, and roast for another 10-12 minutes, until the squash is browned in spots, fork-tender and somewhat translucent in color, and the glaze has thickened. Watch this closely toward the end so the glaze doesn't burn.
Arrange the squash rings and/or slices on a serving platter. Drizzle a few more spoonsful of the reserved glaze over the top, and serve. A green garnish (like parsley or microgreens) makes the colors really pop! Leftovers store nicely in a covered container in the refrigerator.
I'm beginning to think that dishes like Grilled Peach + Ricotta Salad are proof that a key purpose of summer is to oust cooking burnout. All we have to do is stand back and let the extravagant array of juicy, colorful ingredients do what they do with nominal human interference. Since the garden and farm stand bounty pretty much does all the work for us, all we have to do is relax, and maybe chop a thing or two.
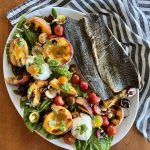
The flavors in this salad are wonderfully harmonious. First, grill-kissed peaches, lightly caramelized and warmed through, lean savory rather than peach-pie sweet. Then there are tart cherries, tangy tomatoes, and creamy ricotta. Add in savory herbs, and a sweet and unctuous dressing. All this combines to light up all five flavor receptors in your mouth. Dollops of our Summer Basil Sauce add yet one more way to use this essential sauce. And then, there's the color explosion that delights your eyes and soul as each bite is lifted on your fork. Our grilled peach + ricotta salad as dinner simply matches the exuberance and joy of the season.
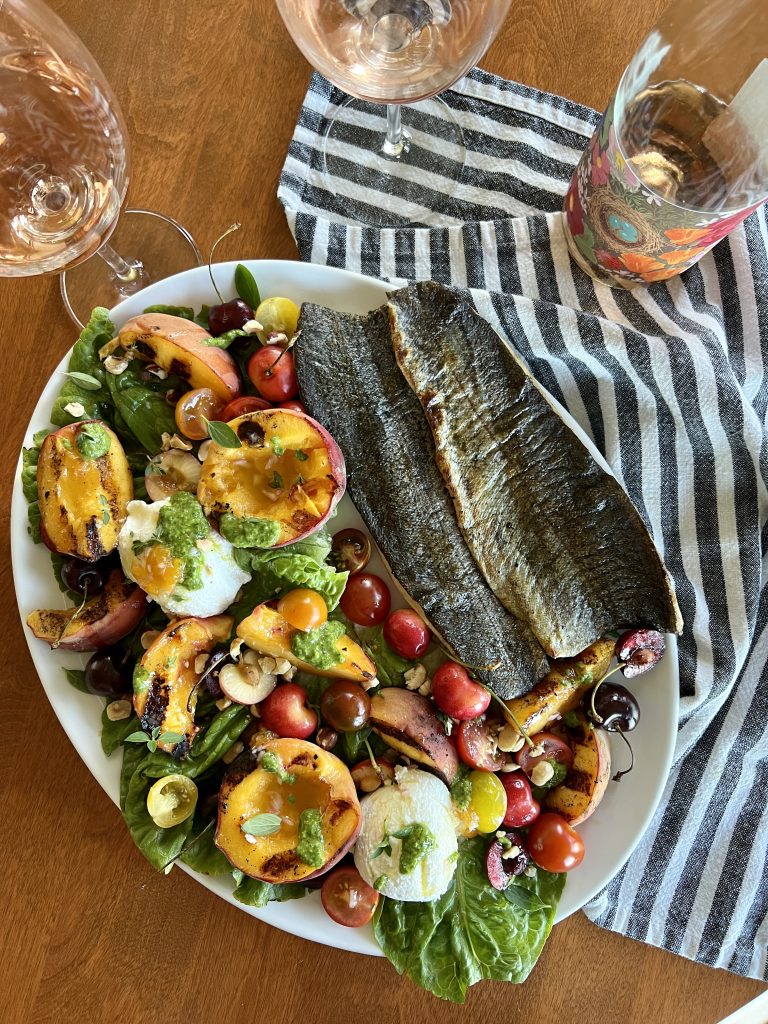
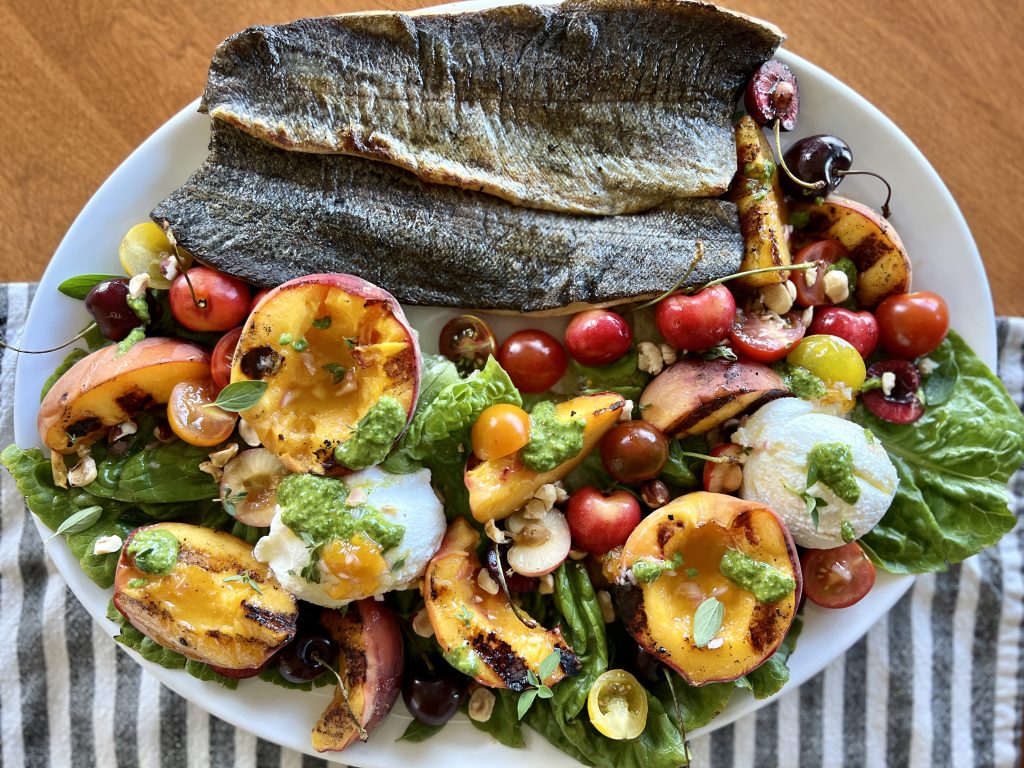
Vibrant, luscious grilled peach + ricotta salad served here with grilled trout filets.
What Wine to Serve with Grilled Peach + Ricotta Salad?
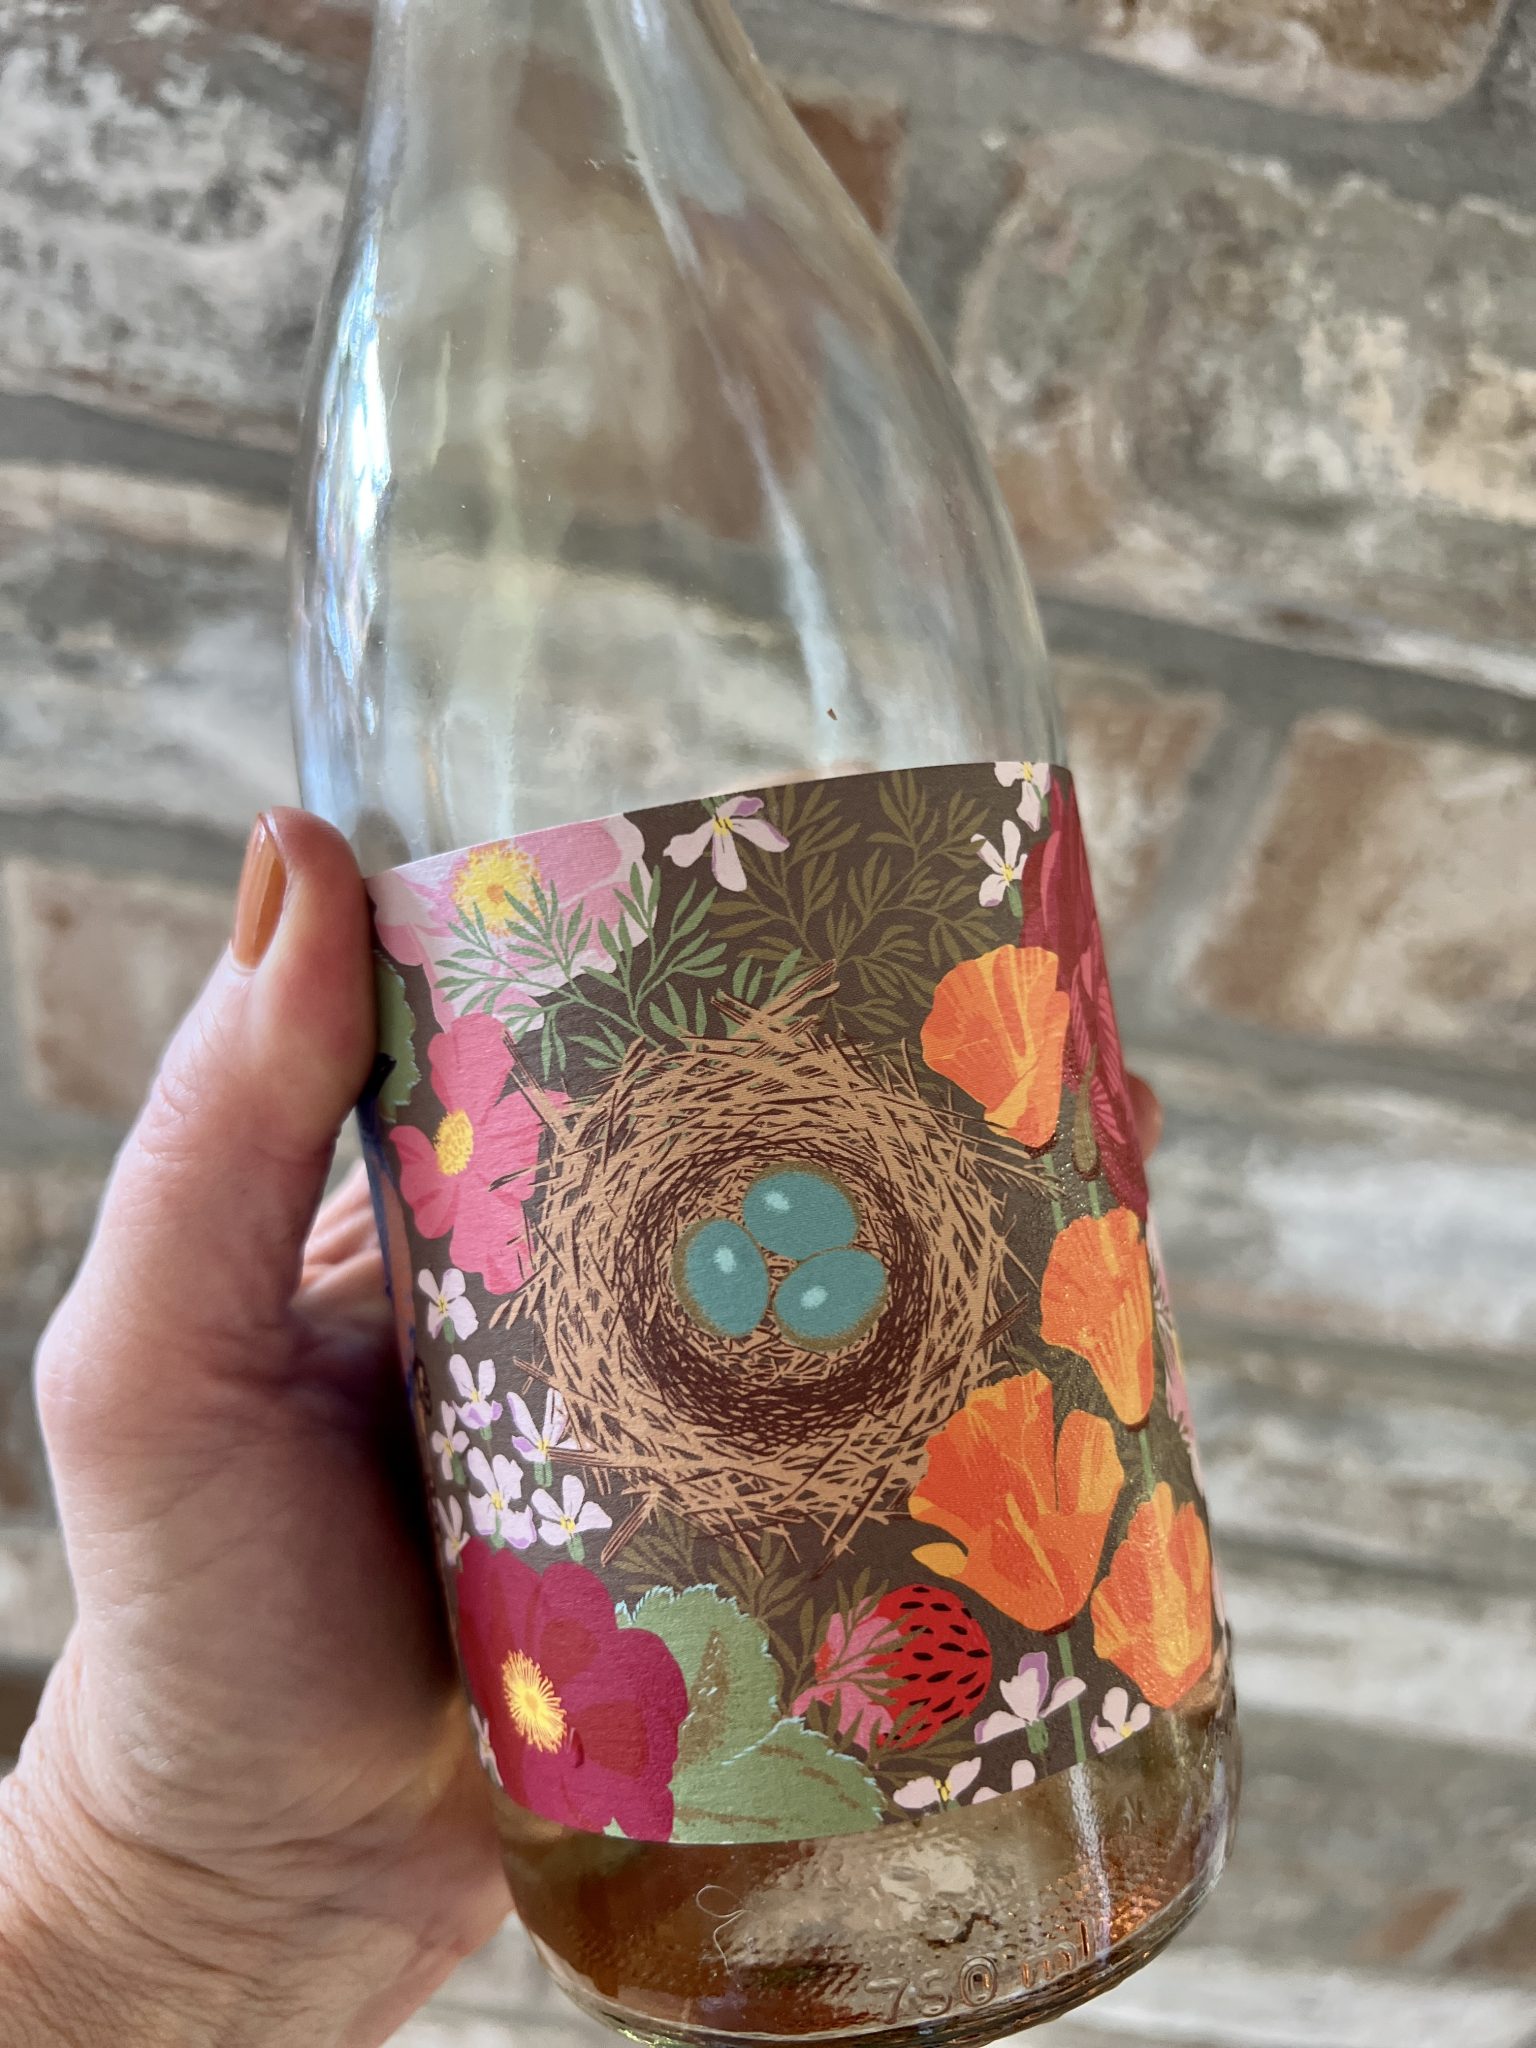
Anne Amie Vineyards, in Oregon's Yamhill-Carlton wine area, offers a 2021 Rosé of Pinot Noir you shouldn't miss. (This wine is no longer available directly through Anne Amie's website.) It is a dry (not sweet) medium bodied wine with soft fruit and herb flavors, a slight minerality, and balanced acidity that nicely supports the grilled peach salad. And the sweet label will make you smile in the same way the pretty salad does. Be sure to save it and use it as a vase for summer blooms once you've finish the delicious wine!
I hope you'll try this easy-going summer recipe. When you do, please share with our 101-Mile Kitchen community! Tell us in the comments, or on Facebook or Instagram, @101milekitchen. Have you joined the community? If not, we'd love to have you. You can take care of that right here, and when you do I'll send you a free Taste of Oregon appetizers recipe downloadable as a thank you!
Warm, juicy, grilled peaches, cherries, tomatoes, creamy whole milk ricotta, and lots of herbs. Elegant summer eating with so little effort because the ingredients do all the work for you!
2-3tablespoonsfresh thyme, oregano, and/or mint leavesuse one or a mix, depending on what you have on hand
For the Dressing
2½tablespoonswhite balsamic vinegar
1smallshallot, finely minced
1tablespoonapricot, peach, or cherry jam
1teaspoonfresh thyme, finely minced
¾teaspoon salt
fresh ground pepper to taste
Instructions
For the Dressing
Place all ingredients in a small lidded recycled jam jar. Screw the lid on tightly and shake until the salt is dissolved. Set aside.
For the Salad
Light a small section of your grill to high heat. When the grates are very hot, spray them with cooking spray. Place the peaches on the hot grate, cut side down. Leave for 2-3 minutes or until grill marks appear, then turn. Allow the peaches to grill another 3 minutes until they are very warm throughout and are nicely marked by the grill. (If you don't have a grill, use a stovetop grill pan of cast iron skillet for this step.)
Mound the washed and dried lettuce leaves onto a platter or individual serving plates and lightly toss with about one tablespoon of the dressing. Arrange the leaves as a base onto the platter. Arrange the grilled peaches on the lettuce. Use an ice cream scoop to make two mounds of ricotta on the platter. Arrange the cherries and tomatoes over the top. Drizzle the remaining dressing over the peaches, ricotta, and the whole salad. Sprinkle with the crushed hazelnuts and herb leaves. Place small dollops of the Summer Basil Sauce around all the elements of the salad. Serve!
Notes
This salad is great on its own, or as a side to simply grilled proteins.
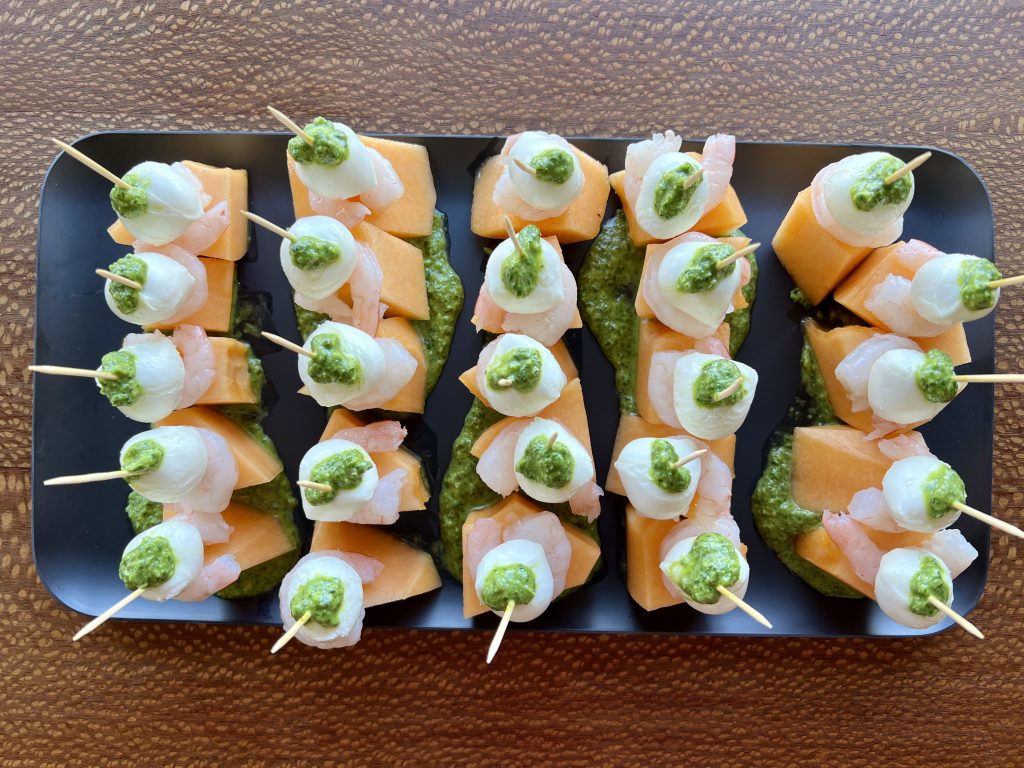
Skewers of cantaloupe, shrimp, and fresh mozzarella pearls sit on a puddle of summery basil sauce, with a dollop on top.
Summer Basil Sauce has me stunned by its magical simplicity, and I'll be making it at least one a week until basil season ends. Five everyday ingredients and a one-minute whirl in a food processor (this is the one I've used and loved for decades) produces a versatile sauce that will make you want to dance into the summer moonlight.
The recipe for basil sauce began in the mind of David Lebovitz, the famous American-in-Paris cookbook author. The Perfect Scoop is my favorite of his books, loaded with recipes for the very best ice creams, sorbets, and sherbets. But I digress-- we were talking about basil.
You know what I really love about summer basil sauce? It is the fastest, easiest way to improve so many seasonal foods with hardly any work. More time for summer fun and yummier eating? I'm in. If you grow basil in your garden, I feel you giving me a big kiss for sharing this way of putting it to great use.
This is NOT pesto!
What Makes this Sauce Different Than Pesto?
This spot-of-glory sauce is less specific and more versatile than pesto. Its compatibility with the wide slate of summer ingredients lets other flavors shine through in such a friendly way. It is 100 percent swoon-worthy. I view this as a kitchen essential-- one of those things every cook should know how to make.
It is slightly thinner, silkier, and gets its piquancy from a spot of Dijon mustard rather than Parmesan and pine nuts. There are two differences between my version and David's. I add slightly more Dijon for a subtle complexity bump. The mustard remains undetectable as an ingredient but adds a little certain something. And, because basil is often sold by weight instead of giving you a measurement by the cup I offer it by weight. Approximately one very large farmers market bunch or big Trader Joe's clamshell worth. And, wow, is it ever a bright green! My favorite color.
David Lebovitz calls it Basil Vinaigrette which I think undersells its super powers as an all-around sauce. Yes, it has a tablespoon or two of vinegar as an ingredient, but it serves as much more than a dressing for salads or marinade for meats.
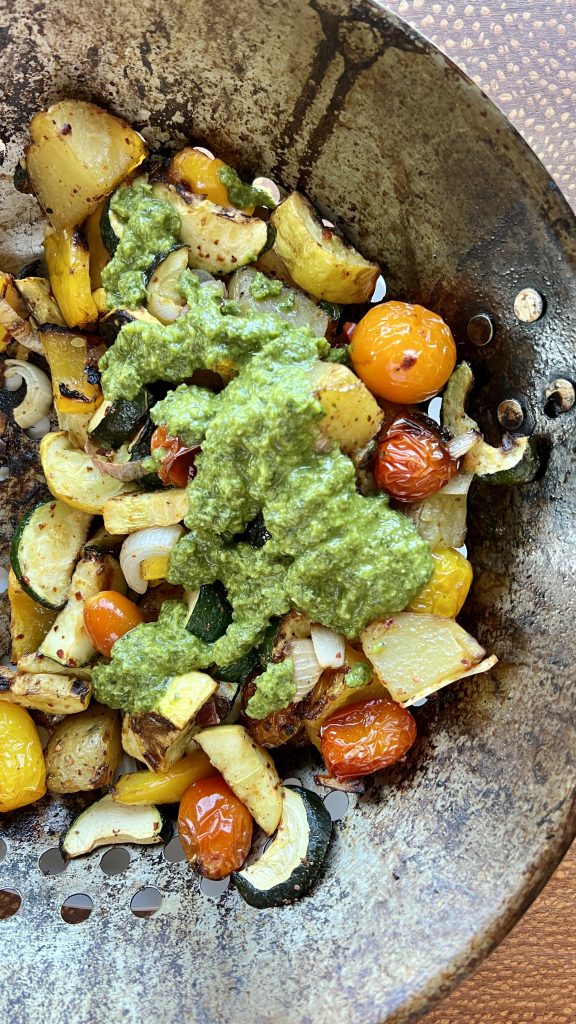
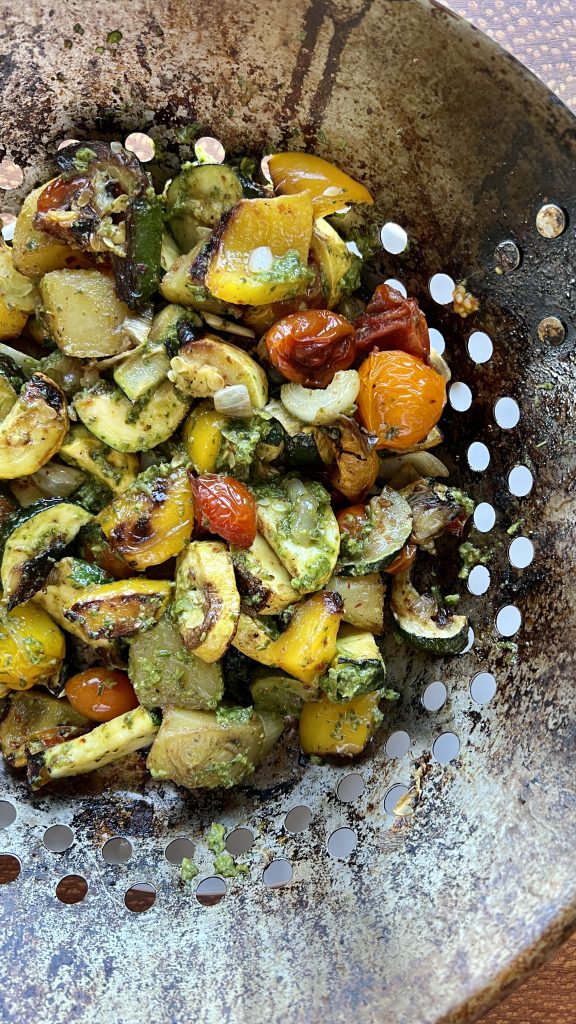
Grilled veggies with basil sauce, pre-stir.Post-stir.
Let Basil Sauce Jazz Up Your Summer
Since discovering this sauce a few weeks ago, I've used it like this:
on grilled fish
on grilled and thinly sliced steak, much like a chimichurri sauce
as a schmear on toast, topped with slices of avocado
as a sauce for cantaloupe/shrimp/fresh mozzarella appetizers (yumm-o, and great served with a glass of Viognier. This one from the Virginia is over the moon!)
as the sauce to a delicious 10-minute shrimp pasta, recipe available to the 101-Mile Kitchen Community in our next newsletter.
on grilled summer vegetables
on pan-fried breakfast potatoes
as a dip for grilled garlic bread
drizzled on sliced ripe tomatoes
I've got it queued up to use in bean salads, stirred into scrambled eggs, drizzled over a caprese salad, as a glaze for grilled chicken thighs, splashed onto any pizza before or after baking (especially a Margarita-style one,) and perhaps a spoonful added to a typical classic vinaigrette for leafy salads.
Share Your Success!
How will you use this amazing green goodness? I invite you to join me in using this to amp up our easy-going summer eating all season long. When you find yourself using this simple basil sauce in ways of your inventing, please share with our 101-Mile Kitchen community! Tell us in the comments, or on Facebook or Instagram, @101milekitchen. Have you joined the community? If not, we'd love to have you. You can take care of that right here.
This post contains affiliate links. If you use these links to buy something I may earn a commission at no cost to you. Product affiliation allows me to keep this site ad-free while providing you with the content you enjoy. I only promote items that I use, like, and trust, or would invest in myself.
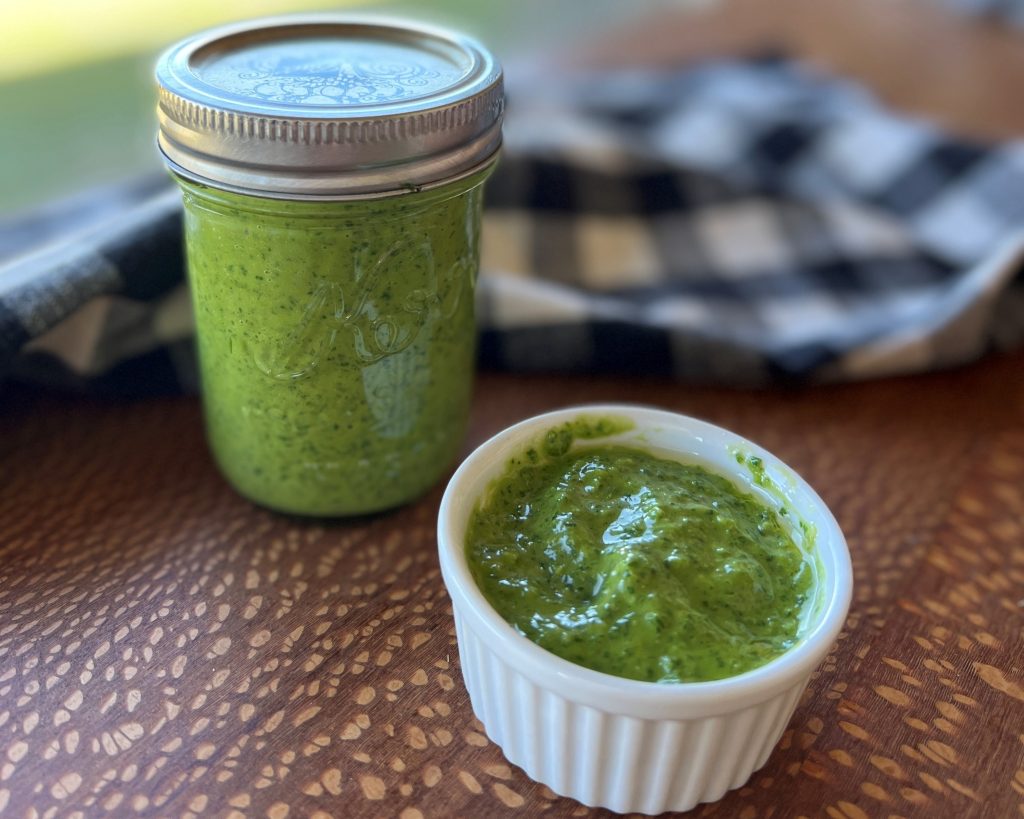
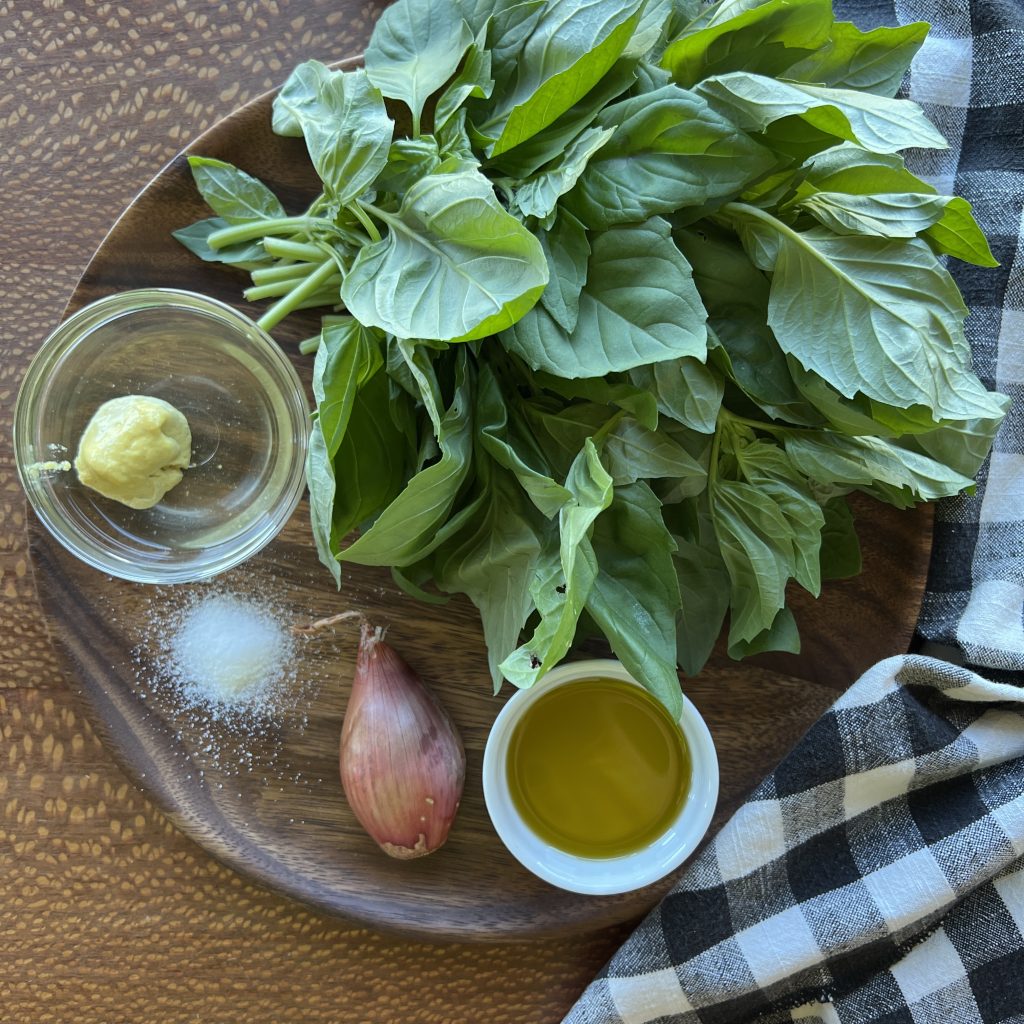
Basil, white wine vinegar and Dijon mustard, salt, shallot, and olive oil. That's all it takes!
4ouncesroughly chopped fresh basil leaves and thin stems, woody stems removed, one very large farmer's market bunch worth, or one Trader Joe's clamshell package
Instructions
Add all ingredients except the basil to the food processor and whirl for a few seconds. Add the basil, and whirl for 45 seconds to 1 minute, scraping down the sides once or twice, until the vinaigrette is smooth. If the sauce is too thick for your liking, add a little more water or olive oil to thin it out.
Store in a jar with a tight-fitting lid in the refrigerator for up to a week. The sauce is best served at room temperature.
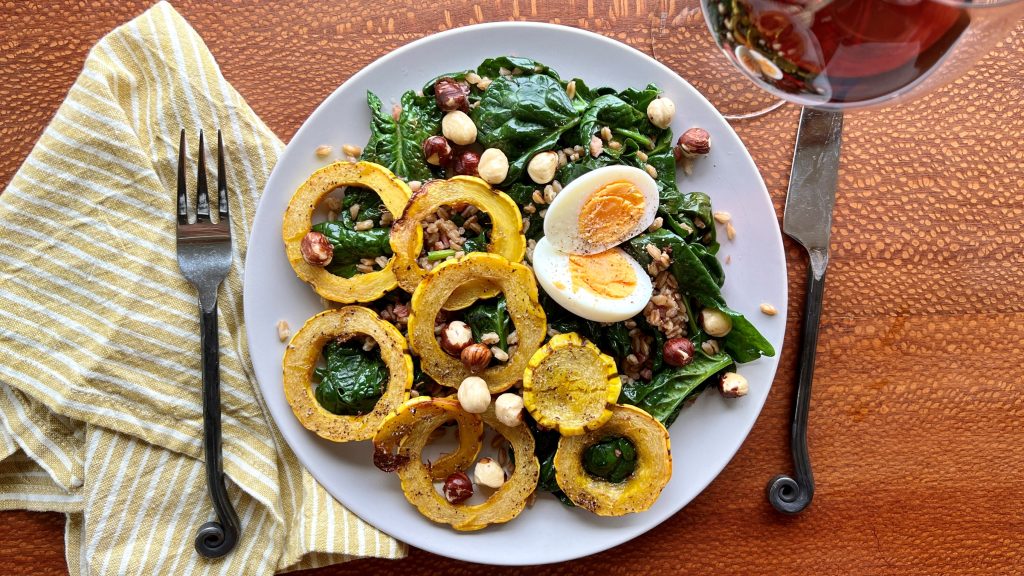
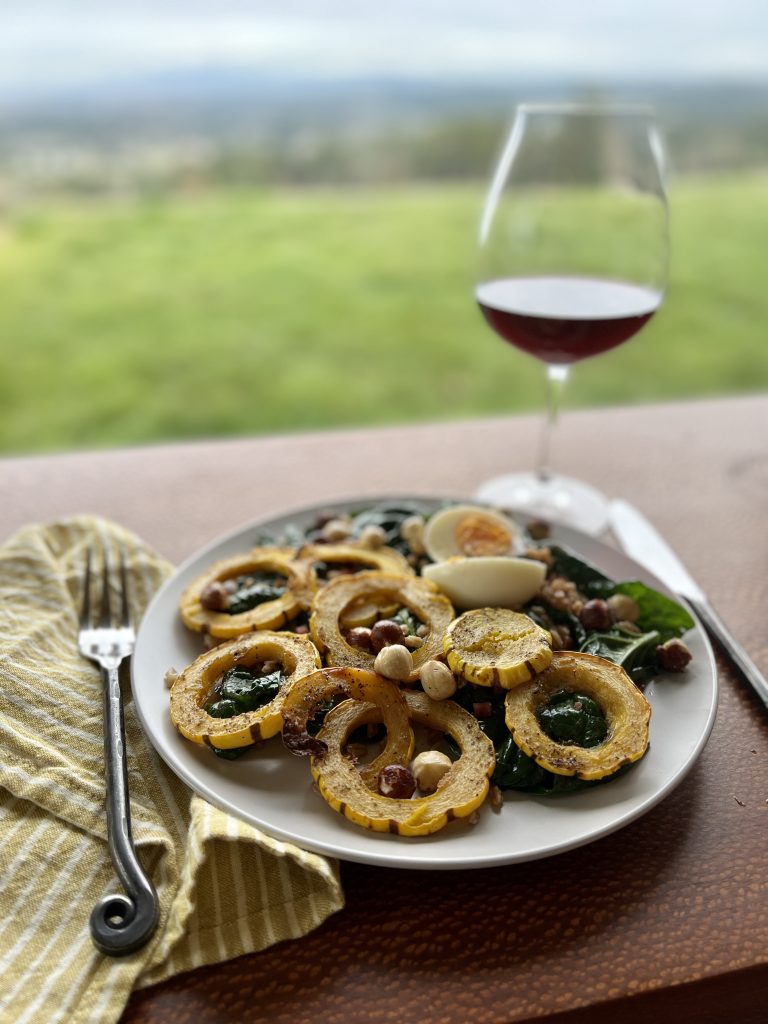
Every now and then I cook for just myself, something like this warm spinach salad with pancetta vinaigrette, warm barley, toasted hazelnuts, an egg, with beautiful golden crowns of Delicata squash. It takes me back to my single days when I first learned to eat alone. For 47 years of my life there was family at my dinner table, and suddenly eating alone was such a hard thing. I had finally learned to enjoy it by the time this one particularly extraordinary guy came along.
Meet Scott
What can I tell you about my this man, who became my husband? First, Scott is a never-ending source of puns that always make me laugh. He is really sweet with his mother, daughters, sons, grandchildren, my whole family, friends, grocery checkers, wait staff, dogs and cats, well, everyone. He always takes the generous view of (nearly) all people.
Going places with him is always a fun adventure.
We once hiked what seemed like 400-foot high sand dunes to visit the Oregon coastline. The wind was howling, it was raining, and my hikers were filled with sand. It had not been my favorite afternoon, and we still had to climb back over the dunes to get to our car. I was over it. He pulled out his phone, pretended to dial, and held the phone to his ear.
"Hello?" he said with a serous façade. "My wife is ready to have the helicopter pick her up and return her to the chateau. Twenty minutes? Great, thank you." Scott always knows how to make me laugh, and how to gently move my legs-- and my attitude-- in the right direction.
My sweetheart.Rustling up some supplies.Sometimes Scott dresses funny.Who could resist this charm?Such a good face.
Still Learning About Him, Still in Awe
I could go on about how smart and good looking he is, too. But here's what you really need to know. At this moment one of Scott's most dearly beloveds is in long-term hospital care. She lives far away, and when he couldn't be at her side in the first days of her medical situation he was nearly beside himself. He has now spent a few weeks at her bedside helping her heal, with more time away from home to come. He has full-heartedly embraced the task of caregiving in the most beautiful way, with strength, humor, devotion, and hope.
So, this won't be the last time I make spinach salad with pancetta vinaigrette for one. I'll be doing more dining alone off and on for a time, while this amazing person I call my husband is away doing God's work of loving so well.
My table-for-one view.
About this Spinach Salad Recipe + Pancetta Dressing
This pretty shoulder-season main-dish salad uses hearty curly spinach, the last of the winter Delicata squash in my vegetable basket, and some warm cooked barley, naturally gluten-free buckwheat groats, or farro. Warm salads are so satisfying during the spring and autumn season changes. This one is every bit as yummy to eat as it is lovely to look at.
Portland's James Beard award winning Joshua McFadden's book, Six Seasons; A New Way with Vegetables provides the inspiration for the pancetta vinaigrette. I divert from his recipe in a few places-- I use the olive oil and rendered pancetta to lightly wilt hearty spinach right in the pan. Sherry vinegar is my choice for this dish instead of red wine vinegar that Chef McFadden uses, and I add it just as the spinach is finished wilting in the pan. And, since I'm cooking for one, I reduce the overall ingredient quantities.
Other Shoulder-Season Main-Dish Salads You May Enjoy
If you like this recipe, please give it a rating by clicking on the green stars on the recipe card below. That will help others find it in their searches, too. If you like this post, please subscribe to receive my newsletter for more recipes, cooking tips, and cooking class information. When you sign up, you'll receive a free downloadable Taste of Oregon tartines recipe booklet.
Warm Spinach Salad + Pancetta Vinaigrette
Course: Main Dish, Salad
Cuisine: Pacific Northwest
Season: Mist (November - March)
Dietary: Dairy-Free, Gluten-Free
Servings: 1
A delicious salad using the last of winter's produce and the first of spring's. Toasty nuts, warm grains, and an egg make it very special, Increase quantities as needed.
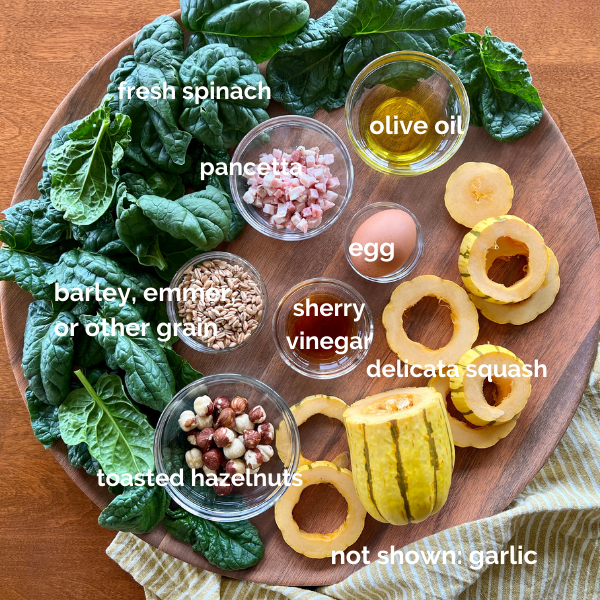
¼cuphulled barley, buckwheat groats, or farro*see notes for cooking times.
½smallDelicata squash, sliced into ½" rings, seeded
2tablespoonsolive oil, divided
1clovegarlic, minced
2handfulscurly leaf spinach. washed and shaken dry(see special instructions if using baby spinach)
2tablespoonsSherry vinegar
¼cuptoasted hazelnuts(place nuts on a small baking sheet in a 350° degree oven 6-8 minutes until fragrant)
1boiled egg, cooked to your liking and peeled
salt and pepper to taste
Instructions
Preheat the oven to 357°. Put the barley, buckwheat groats, or farro* in a small saucepan and add 3 cups of water. Bring to a boil, stir, then reduce heat to a lightly bubbling simmer. Leave the pan uncovered, and cook the grains until plump and tender, stirring occasionally. This will take between 15-60 minutes depending on your grain of choice. Drain, and set aside.
Place the sliced Delicata squash rings on a small baking sheet, drizzle with one tablespoon olive oil, and sprinkle with salt and pepper. Place into the hot oven for 20-25 minutes until fork-tender and beginning to brown in some places, flipping halfway through.
About 5 minutes before the grains are finished cooking, warm one tablespoon olive oil in a large skillet over medium high heat until shimmering. Add the pancetta and garlic. Move the pancetta and garlic around in the skillet with a wooden spool or spatula until it is rendered, crispy, and slightly browned. Reduce the heat to medium and add the spinach. Toss the spinach in the warm pancetta garlic oil until it is just beginning to wilt, about 2-3 minutes. Add the warm cooked grain and sherry vinegar to the spinach, and toss until well coated in the vinaigrette.
Place the spinach and grains on a serving plate. Arrange the Delicata slices on top, sprinkle with hazelnuts, and place the egg on top. Serve.
Notes
Grain cooking times:Barley: Pearled-- 20-30 minutes Hulled- 45-60 minutesBuckwheat groats- 15-25 minutesFarro: 20-50 minutes depending on if grains are pearled or hulled
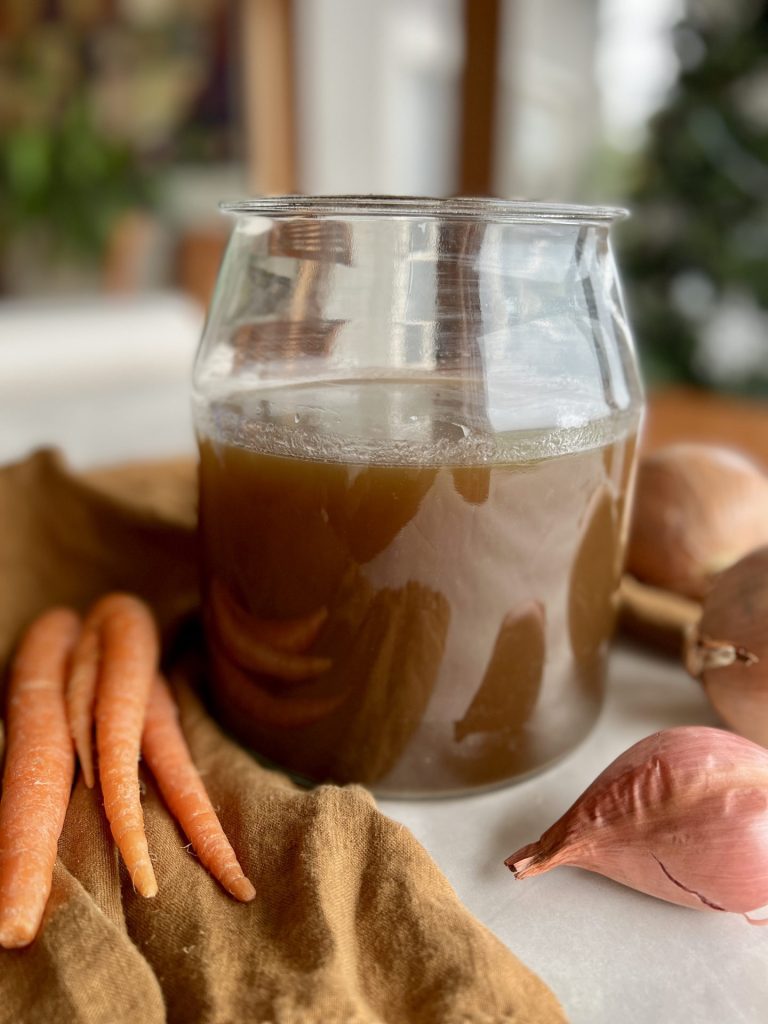
One of the graces of home cooking is that there are no paying customers demanding a dish to be exactly the same visit after visit. Each time you make roasted vegetable stock you use any variety of vegetables, bones, meats, herbs, and spices you happen to have. Each time the stock will have a subtly unique flavor. This may not work well in a restaurant, but is terrific at home.
This post is dedicated to my 1970's junior high school home economics teacher, Mrs. Waetje, who taught that reducing waste is a tenet of home economics-- a wise use of family finances. It is a great feeling to rummage through the fridge for vegetables that may otherwise go to waste and turn them into liquid gold. Thank you, Mrs. Waetje, and if you are still out there, I was paying attention despite my wiggles and perpetual chatter.
Wake up Your Cooking with Aromatic and Delectable Stock
Your roasted vegetable stock will add layers and layers of flavor to the soups and stews you make-- that's a given. Use your liquid gold to make risotto, to cook rice and grains like barley, farro, and buckwheat groats. Use it as a medium in which to simmer your dried beans, and as a base for meaty braises. A ladleful added to just about any ragu or stew will deepen its flavor. And one of my favorite things is to cradle a hot mug of broth first thing in the morning as a gentle winter wake up tonic.
The Difference Between Unroasted and Roasted Vegetable Stock
Roasting the vegetables before the simmer produces a deep, richly flavored stock perfect for supporting heartier cool-weather ingredients and recipes. Save the light golden unroasted vegetable stocks for spring and summer cooking. To make a typical light golden broth, simply do not roast the vegetables first, and omit the mushrooms. Follow the remaining directions as they are written.
So, potayto, potahto. Make some, enjoy it, and call it whatever you want. To me, spring and summer cooking seems to lend itself to light broths, autumn and winter to rich, brown stocks. The cooking community seems to agree that the terms are interchangeable. Whatever rolls out of my mouth is the term I'll use!
Vegetable Stock Do's and Don'ts
The very thrifty among us (like Mrs. Waetje, I'm sure) keep a zip-bag in the freezer and stuff clean, vegetable scraps into it. When it's full it is time to make stock.
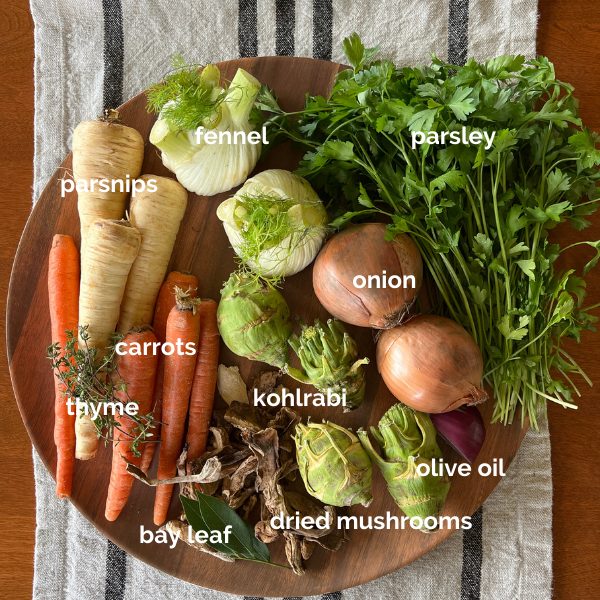
Classic mirepoix-- onion, carrot, and celery are standard issue in stock making. (You will note the absence of celery in the mis en place photo below. I didn't have any, and it is not noticeably missed in the resulting stock.) See the notes section of the recipe for a more comprehensive list of vegetables and optional ingredients that can contribute to great stock.
Most vegetables make a good stock, with a few exceptions; Brussels sprouts, broccoli, cauliflower, asparagus, and artichokes can be overpowering or add off-putting flavor notes, so avoid them for this purpose. Beets, especially red ones, will likely make your stock an odd and unappealing color, so think twice about throwing those into the pot. Potatoes are fine, but I don't use them to keep the stock a little more clear than cloudy, a personal preference.
Mushrooms are lovely in a roasted vegetable stock. Dried mushrooms, even better! Just one ounce of dried mushrooms (don't roast them-- just add them to the pot with the water) intensify the rich flavor and add a deeper color to the stock. They are not required, but do add something nice and grounding.
Limp, wilted, scuffed, and past-their-prime vegetables are all fair game. Just be sure to peel or cut off any parts that have blackened or have signs of mold to keep your broth clean and fresh tasting.
Not pictured in the mis en place photo for this batch of roasted vegetable stock are late additions of icicle turnips, a knob of fresh ginger, two arbol chiles, and the left-over rind of a Meyer lemon.
Use Your Roasted Vegetable Stock in These Recipes
To cook the grain in Roasted Mushroom, Grain, and Spinach Salad. Get the Recipe. In place of the water in Pumpkin Black Bean Soup. Get the recipe.
Last Words
If you like this recipe, please give it rating by clicking into the green stars, and if you have questions about the recipe or other culinary dilemmas, please email me at pam@101milekitchen.com. Your success is important to me. Thank you to each and every one of you who subscribes to 101-Mile Kitchen newsletters. You are appreciated more than you'll ever know!
Roasted Vegetable Stock
Course: Soup + Stew
Season: Mist (November - March)
Dietary: Dairy-Free, Gluten-Free, Vegan
Preparation: Roasting
Total Time: 2 hourshours15 minutesminutes
Servings: 2quarts
Deep, richly flavored roasted vegetable stock provides perfect support to hearty cool-weather ingredients and recipes.
1teaspoonkosher salt, plus more for adjusting at the end
1teaspoonwhole black or mixed peppercorns
1 bunchparsley, flat leaf or curly, stems trimmed
assorted fresh herbs of your choice, about one bunch total, OR dried herbs of your choice, up to 2 teaspoons
1ouncedried mushrooms, any variety, optional
1-2bay leaf
other optional ingredients of your choice. See notes.
2½quartswater
Instructions
Preheat oven to 350°, or 325° convection. Line a 13" x 18" baking sheet with foil.
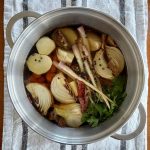
Wash the vegetables and trim away any spoiled parts. Cut the vegetables into evenly sized chunks and place them on the foil-lined baking sheet. Sprinkle lightly with salt and a good drizzle of olive oil, up to 3 Tablespoonsful. Mix gently together with your hands. Place the sheet into the oven and roast for about 40 minutes, or until the onions and other vegetables are beginning to take on some roasted color and are quite fragrant, stirring halfway through.
Place the roasted vegetables and any browned stuck-on parts and oil that remain into an 8 quart stockpot. Add the salt, peppercorns, fresh or dried herbs, dried mushrooms, if using, bay leaves, and water. Bring the pot to a rapid boil, and immediately reduce heat to maintain a simmer. Cover, and cooking for 1-2 hours, stirring often. Remove the lid for the last half of cooking.
Taste the stock and adjust seasoning by adding more salt if necessary. Allow the stock to cook slightly until safe to handle.
Strain the stock first through a colander to remove the larger bits, then strain again through a very fine mesh strainer to remove the tiny bits that make it cloudy. Store in the refrigerator for up to 5 days, or freeze for up to three months.
Notes
Vegetable selection:Classic mirepoix-- onion, carrot, and celery are standard issue. Most vegetables make a good stock. Do use the leaves, peels, skins, and stalks of leeks, garlic, peppers, parsnips, turnips, squashes, fennel, kohlrabi, tomatoes. Corn and corn cobs and celery root, are good additions, too. Think twice about using Brussels sprouts, broccoli, cauliflower, asparagus, and artichokes which can add overpowering off-putting flavor notes. Potatoes are fine, but omitting them will keep the stock from becoming too cloudy.Mushrooms are lovely in a roasted vegetable stock. Dried mushrooms are even better! Just one ounce of dried mushrooms (don't roast them-- just add them to the pot with the water) intensify the rich flavor and deep color to the stock. They are not required, but do add something nice.Optional additions:Rinds (not the juicy flesh) of citrus, especially lemon and orange.Nubs of fresh ginger and/or turmeric.Dried chilis of any variety. I find a couple small arbols add a very subtle warmth. The larger dried chilis will make a marked flavor difference and would be fantastic as a tortilla soup base, for example. Varied fresh herbs. Nearly all herb will make a nice flavor contribution, but do be careful with some of the more overpowering herbs such as rosemary and oregano. A little can go a long way.Dried herbs are much more condensed in flavor than fresh, so a little goes a long way here, too. But do use them!Juniper berries are wonderful in a stock. Add up to 1 teaspoonful, gently crushed to release even more of their wintry flavor.
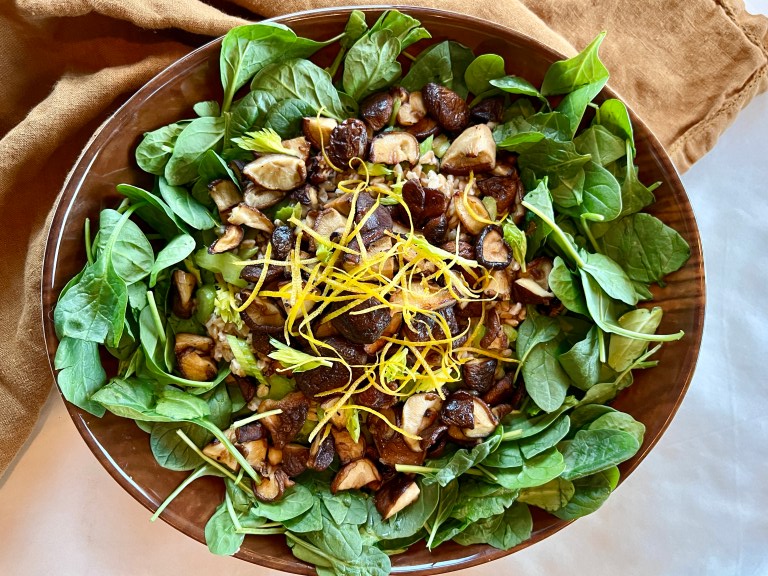
Feasts, cookie platters, cocktail parties, and office holiday goodies, oh my! As fun as it is, it doesn't take long to feel the overwhelm of holiday system overload, just when the mood of the day calls for merry and bright. As a remedy to seasonal splurges, include a salad of roasted mushrooms, warm grains, and baby spinach into your menu this week.
Making the Roasted Mushroom, Grain and Spinach Salad
This quick little main-course salad starts with four easy-to-come by ingredients and a light but flavorful lemon vinaigrette. The vinaigrette is made even better by using Meyer lemons, just coming into peak season.
Here I go on about celery again. Celery adds an essential textural crunch to this dish, and a bit of delicious freshness that you will welcome to your winter plate. I view this as this as a subtle necessity.
In the extraordinary Pacific Northwest food playground we have easy access to an array of cultivated and wild mushrooms. One trial of this recipe I used a shiitake-only approach. Another trial used a melange of chestnut, oyster, shiitake, and crimini mushrooms. I loved it both ways. If you can only access white buttons or brown criminis, please use them! Your dish will be as delicious as ever.
You have a lot of running room when it comes to the grain you use in your roasted mushroom salad. I used Purple Valley Barley, an organic product from my local Lonesome Whistle Farm. Lonesome Whistle also carries wheat berries, emmer (a farro) and oat groats that would be perfect. If you are new to this type of thing and eat gluten, I suggest starting with pearled barley, or just jump right in and try one of the above grains. If you eat gluten-free, give buckwheat groats or brown rice a try.
What Wine Should I Serve with Roasted Mushroom, Grain, and Spinach Salad?
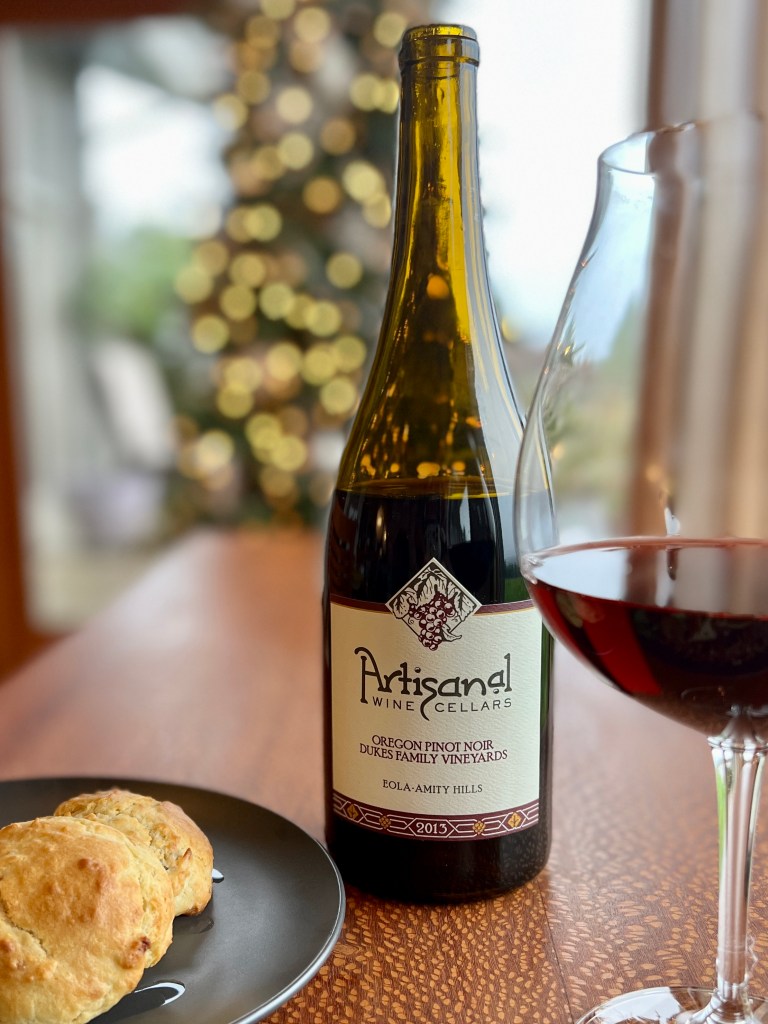
I started off suggesting a mushroom, warm grain, and spinach salad as a detoxifying healthy choice, so maybe through the holidays consider a tonic of pomegranate juice and sparkling water? Or not! I highly suggest the Artisanal Wine Cellars 2015 Dukes Family Vineyard Pinot Noir. Tom and Patty Feller, and their daughter, Mia, are a family operation dedicated to handcrafted expressive wines. The grapes in this bottle were grown by Pat and Jackie Dukes of Dukes Family Vineyard. We view the Artisanal's Pinot Noirs to be beautiful wines at incredible values.
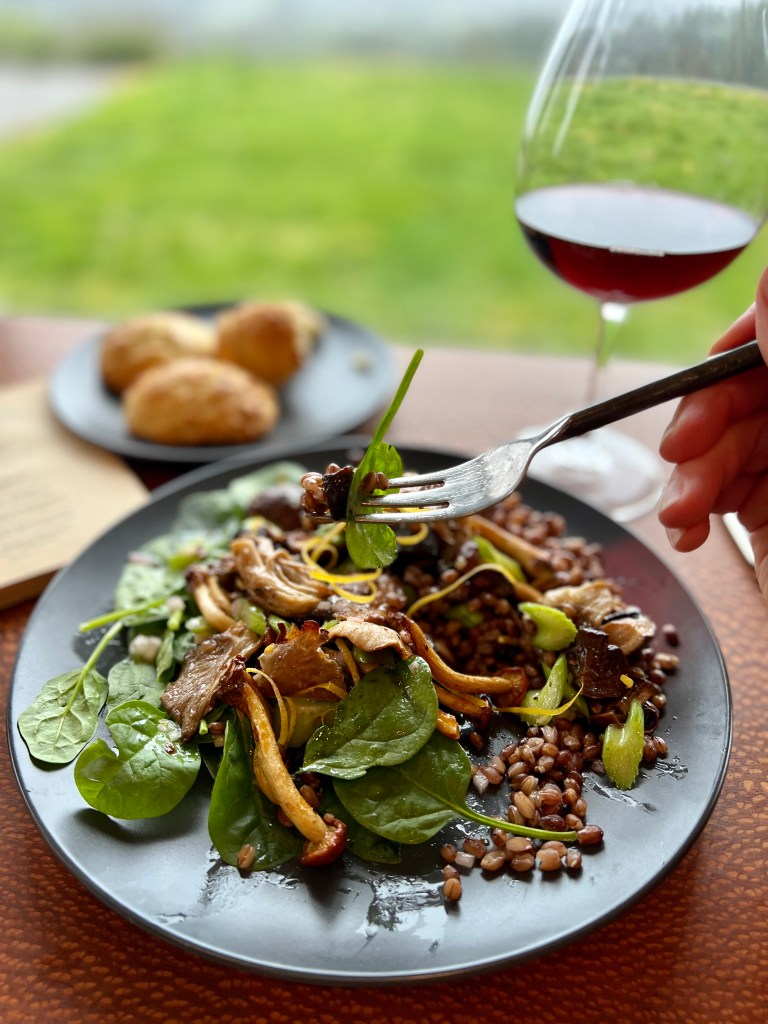
Roasted mushrooms, warm chewy grain, and fresh spinach dressed in the best ever lemon vinaigrette. This fantastic fast and easy layered salad is hearty enough for satisfying cool weather meals, light enough to counterbalance seasonal feasts and spurges.
1½lb.mushrooms of your choice, singularly or in combinationcrimini, shiitake, chestnut, chanterelle, hedgehog, button, etc.
5stalkscelery, and leaves if your head has them
1cupwhole grain of your choice, prepared according to package directions and kept warm*barley; emmer, spelt, or einkorn farro; wheat berries; oat or buckwheat groats; brown, black, purple, red, or wild rice, etc.
8-10oz.fresh baby spinach
lemon vinaigrette, recipe below
zest of 2 lemons, in strips
Best Ever Lemon Vinaigrette
½cuplemon juice, Meyer lemon preferred, zested firstabout 2 large lemons
2clovesgarlic, pressed or very finely minced
1shallot, finely minced
tsp.maple syrup
salt and pepper to taste
Instructions
Preheat the oven to 400° convection. Line a baking sheet with foil and spray it with oil or non-stick spray.
Begin cooking your chosen grain according to package directions. (For example, quick-cooking par cooked farro from Trader Joes takes 10 minutes to cook; unhulled barley takes up to 40 minutes.) Once it is cooked, keep it warm while the other steps come together.
Prepare the Best Ever Lemon Vinaigrette, recipe below.
Wipe mushrooms clean and trim them if necessary. If you are using shiitakes, remove the stems. Leave the small ones whole, cut the medium-sized ones in half, and the largest ones into quarters for similarly sized pieces that will roast at the same rate. Place them in a heap on the prepared baking sheet. Spoon about ¼ of the lemon vinaigrette over the mushrooms. Use your hands to toss the mushrooms in the vinaigrette, coating each piece lightly and evenly. Spread the mushroom pieces out on the pan, and place in the oven. Roast for 12 minutes, remove from the oven and stir. Spread them out again and roast them for another 10 minutes or so until they are deeply colored and their juices have almost evaporated. Don't leave them much longer than this or they will lose their tenderness.
While the mushrooms are roasting, thinly slice the celery and set aside. When the grains are cooked and drained, stir in ¼ of the vinaigrette and continue to keep gently warm. Place the spinach on the platter or individual plates.
When the mushrooms are done roasting, add the sliced celery and give it a good toss. Spoon the dressed grains in the center of the plate, and top with the mushroom/celery mixture. Drizzle a little more of the vinaigrette over the layered salad.** Garnish with strips of lemon zest, which are not only eye-catching, but add a delicious flavor note. Serve while warm.
Make the Best Ever Lemon Vinaigrette
Combine all ingredients on a pint-sized jar with a tight fitting lid. Shake until the salt and maple syrup are dissolved. Shake before each use.
Notes
*I've made this recipe using organic locally-grown barley, with buckwheat groats, and with a package of "10-Minute Farro" sometimes found at Trader Joes. Follow the package directions for any grain you use for both serving size and cooking times. **You will have a little of the vinaigrette left over. Don't be sad about this-- use it on your next kale or lettuce salad, on top of baked or broiled fish, or to dress a pan of roasted vegetables. When Meyer lemons are in season, be sure to use them. The typical Eureka or Lisbon lemons are wonderful, too, but Meyers offer a step up in flavor.I recently found that the water that remains when cooking whole-grain barley is delicious as a sipper. Cook the barley "pasta-style" floating freely in a pot of water, and reserve the water. It's as tasty as any stock, and can be used as a soup base or warming cup. This recipe is easily halved and easily doubled. If you double it, use two sheet pans to roast the larger amount of mushrooms.
Follow Me
Welcome!
You’re in the right place! I’m Pam Spettel, home cooking expert and guide, and I’m here to show you how to break up with cooking and hospitality anxiety, learn how to use recipes as guides rather than strict rules, and let your cooking intuition and confidence soar.
Superpower: Dreaming up recipes that work, serving them to my friends and family, and writing little stories about how cooking them well is the same as loving well.
Inspiration: Ingredients! The fresh, colorful, fragrant, local, seasonal ingredients found in the Pacific Northwest are my creative medium.
Heroes: Local food and wine producers– the people who keep me, my family, and our community nourished and happy.
We use cookies on our website to give you the most relevant experience by remembering your preferences and repeat visits. By clicking “Accept”, you consent to the use of ALL the cookies.
This website uses cookies to improve your experience while you navigate through the website. Out of these, the cookies that are categorized as necessary are stored on your browser as they are essential for the working of basic functionalities of the website. We also use third-party cookies that help us analyze and understand how you use this website. These cookies will be stored in your browser only with your consent. You also have the option to opt-out of these cookies. But opting out of some of these cookies may affect your browsing experience.
Necessary cookies are absolutely essential for the website to function properly. These cookies ensure basic functionalities and security features of the website, anonymously.
Cookie
Duration
Description
cookielawinfo-checkbox-analytics
11 months
This cookie is set by GDPR Cookie Consent plugin. The cookie is used to store the user consent for the cookies in the category "Analytics".
cookielawinfo-checkbox-functional
11 months
The cookie is set by GDPR cookie consent to record the user consent for the cookies in the category "Functional".
cookielawinfo-checkbox-necessary
11 months
This cookie is set by GDPR Cookie Consent plugin. The cookies is used to store the user consent for the cookies in the category "Necessary".
cookielawinfo-checkbox-others
11 months
This cookie is set by GDPR Cookie Consent plugin. The cookie is used to store the user consent for the cookies in the category "Other.
cookielawinfo-checkbox-performance
11 months
This cookie is set by GDPR Cookie Consent plugin. The cookie is used to store the user consent for the cookies in the category "Performance".
viewed_cookie_policy
11 months
The cookie is set by the GDPR Cookie Consent plugin and is used to store whether or not user has consented to the use of cookies. It does not store any personal data.
Functional cookies help to perform certain functionalities like sharing the content of the website on social media platforms, collect feedbacks, and other third-party features.
Performance cookies are used to understand and analyze the key performance indexes of the website which helps in delivering a better user experience for the visitors.
Analytical cookies are used to understand how visitors interact with the website. These cookies help provide information on metrics the number of visitors, bounce rate, traffic source, etc.
Advertisement cookies are used to provide visitors with relevant ads and marketing campaigns. These cookies track visitors across websites and collect information to provide customized ads.